Crochet Cat Granny Square With Cute Embroidered Face
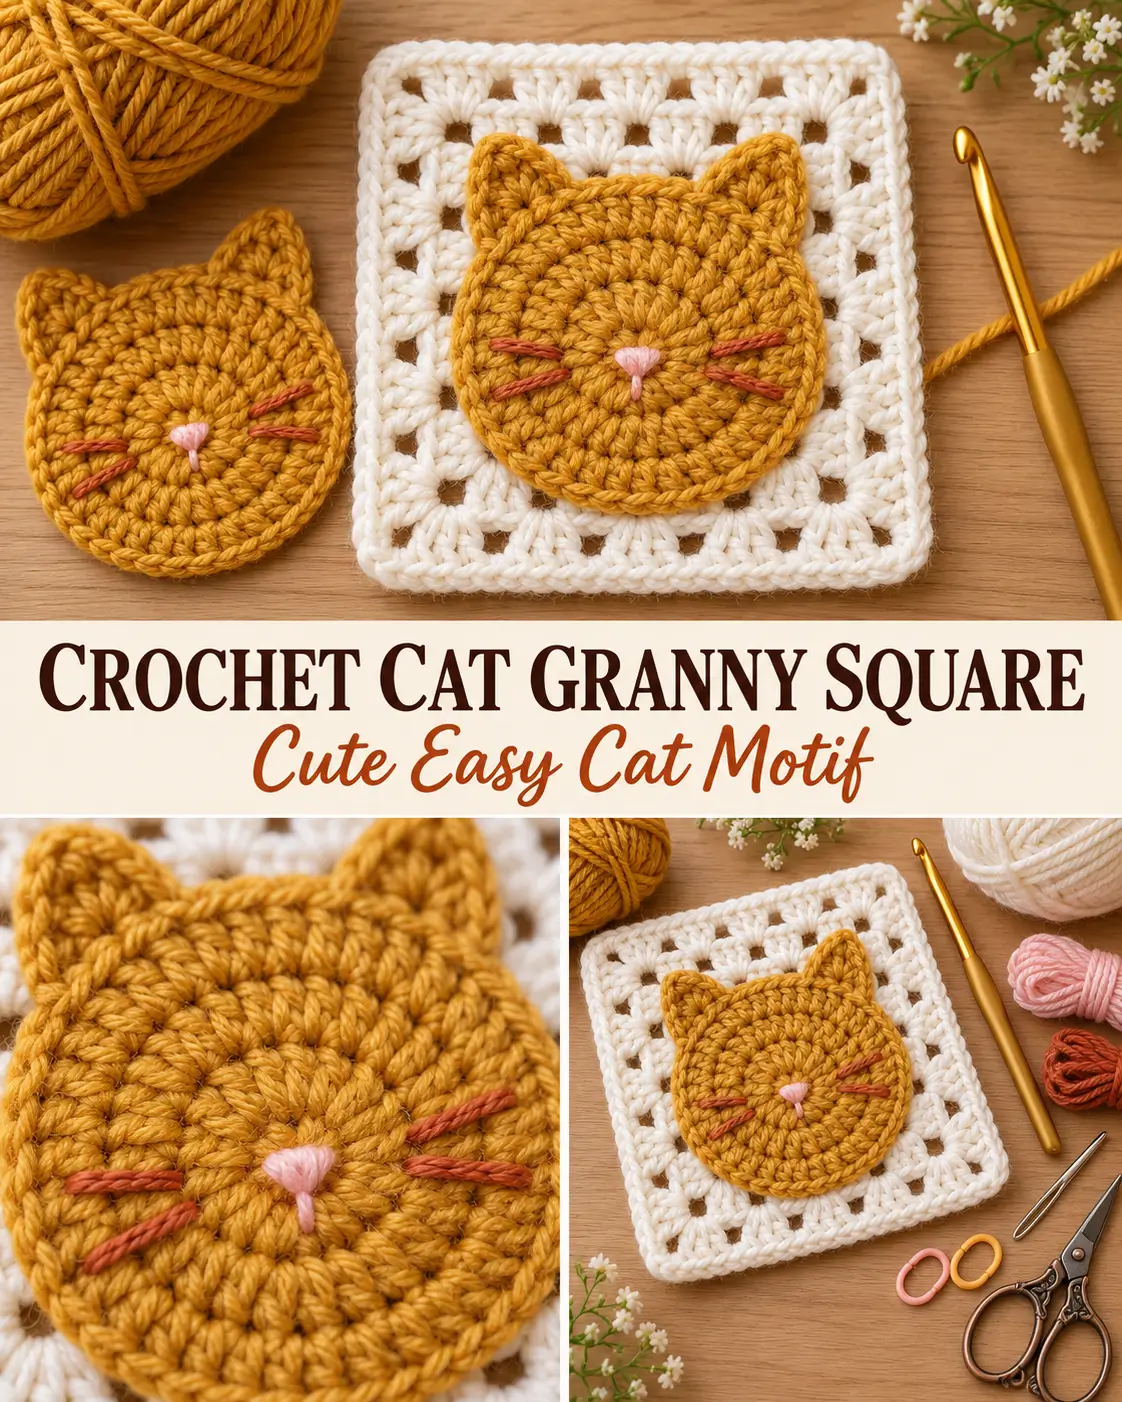
This crochet cat granny square combines a round cat-face appliqué with two pointed ears and a simple solid granny-square background. The finished motif is small, playful, and easy to combine into blankets, cushions, tote bags, cardigans, or other granny-square projects.
The cat is crocheted first as a separate appliqué. The ears are added directly to the top of the head, then the nose and whiskers are embroidered. A simple square is crocheted separately and the finished cat is sewn securely to the center.
Using worsted-weight yarn and a 5 mm hook, the finished square measures approximately:
5–5½ inches / 13–14 cm
The cat appliqué measures approximately:
4 inches / 10 cm wide
Materials
- Medium weight #4 / worsted yarn
- 5 mm crochet hook
- Cat color yarn — mustard, orange, brown, gray, black, cream, or any color you like
- Background yarn — white or contrasting color
- Small amount of pink yarn for the nose
- Small amount of darker yarn for whiskers and optional eyes
- Yarn needle
- Scissors
- Stitch markers, optional
For the look shown here, use:
Cat: golden mustard
Square: clean white
Nose: pale pink
Whiskers: rusty orange
Skill Level
Confident beginner
You should know:
- magic ring
- chain
- slip stitch
- single crochet
- half double crochet
- double crochet
- working several stitches into one stitch
- simple embroidery
- sewing an appliqué onto crochet fabric
Abbreviations
This pattern uses US crochet terminology.
ch — chain
sl st — slip stitch
sc — single crochet
hdc — half double crochet
dc — double crochet
st / sts — stitch / stitches
sp — space
MR — magic ring
PART 1 — CAT HEAD APPLIQUÉ
The head begins as a flat circle.
The ears are added afterward along the upper edge.
Round 1
With the cat-color yarn, make a:
magic ring
Ch:
3
The ch-3 counts as the first dc.
Work:
11 dc into the ring
Pull the ring closed.
Join with a sl st to the top of the beginning ch-3.
You should have:
12 stitches
Round 2
Ch:
3
Work:
1 dc in the same stitch
Then work:
2 dc in every stitch around
Join to the beginning ch-3.
You should have:
24 stitches
The circle should remain flat.
Round 3
Ch:
3
Work:
2 dc in the next stitch
Then repeat:
1 dc in next stitch, 2 dc in next stitch
around.
Join with a sl st.
You should have:
36 stitches
Fasten off only if you want to reposition the yarn before making the ears.
Otherwise, keep the working loop active.
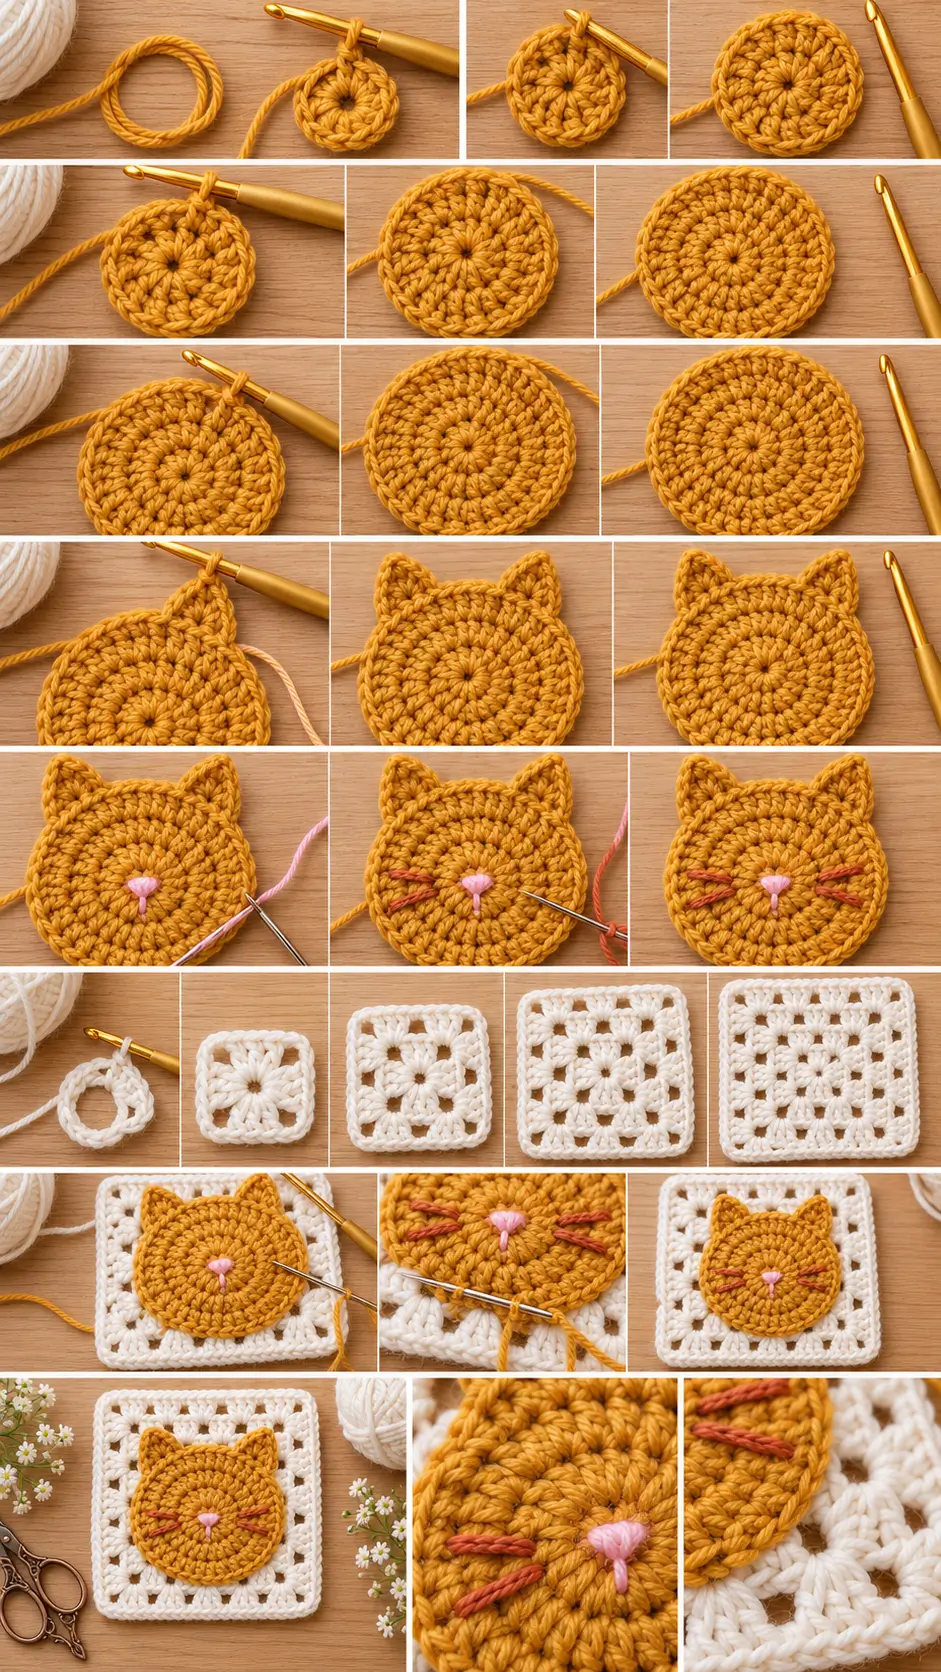
Mark the Top of the Cat Head
Lay the circle flat.
Choose one point as the:
top center
Place a stitch marker there if helpful.
The two ears should sit symmetrically on either side of the top center.
Leave approximately:
5–6 stitches
between the inner edges of the two ears.
LEFT EAR
Join the cat-color yarn approximately:
5 stitches left of the top-center marker
In the selected stitch work:
sc, hdc, 3 dc
In the next stitch work:
3 dc, ch 2, 3 dc
This creates the pointed tip.
In the following stitch work:
3 dc, hdc, sc
Sl st in the next stitch.
The first ear is complete.
RIGHT EAR
Move across the upper part of the head, leaving approximately:
5–6 stitches between the ears
Join yarn in the corresponding stitch on the opposite side.
Work:
sc, hdc, 3 dc
in the first ear stitch.
In the next stitch:
3 dc, ch 2, 3 dc
In the following stitch:
3 dc, hdc, sc
Sl st in the next stitch.
Fasten off.
Shape the Ears
Use your fingers to gently pull each:
ch-2 tip
upward.
The ears should be:
- small
- rounded at the base
- pointed at the tip
- symmetrical
- proportional to the round head
They should not look like large bunny ears.
Optional Cat-Head Edging
For a more finished appliqué, join cat-color yarn at the lower side of the head.
Work loose:
sl sts
around the entire outer edge.
When you reach each ear:
sl st naturally around the outside of the ear stitches.
Do not add stitches at the tips.
Fasten off.
This edging is optional.
PART 2 — EMBROIDER THE FACE
It is easier to embroider the face before sewing the cat onto the square.
Lay the appliqué flat with the ears at the top.
Nose
Using pale pink yarn and a yarn needle, position the nose slightly below the center of the face.
Make approximately:
3–4 small horizontal stitches
in the same area.
Then take one small vertical stitch downward from the middle of the nose.
The finished nose should be tiny.
Do not make a large embroidered patch.
Mouth — Optional
From the bottom center of the nose:
take one short stitch downward.
Then make:
one small diagonal stitch left
and:
one small diagonal stitch right
to create a tiny cat mouth.
Whiskers
Using rusty orange, brown, charcoal, or another contrasting color:
make:
2 whiskers on the left
and:
2 whiskers on the right
Each whisker should be approximately:
¾–1 inch / 2–2.5 cm
long.
Angle the upper whisker slightly upward.
Angle the lower whisker slightly downward.
Keep the whiskers thin and simple.
Eyes — Optional
The reference-style square looks especially cute with a minimal face, so eyes are optional.
For sleeping eyes:
use dark brown or black yarn.
Make one small curved or diagonal stitch on each side above the nose.
For open eyes:
make one tiny vertical stitch on each side.
Avoid large plastic safety eyes if the square will be used for a baby blanket.
PART 3 — WHITE GRANNY-SQUARE BACKGROUND
The background is a simple solid square.
Use the contrasting background color.
For the cream-and-mustard version:
use:
white
Square Round 1
Make a:
magic ring
Ch:
3
This counts as the first dc.
Work into the ring:
2 dc
Ch:
2
Then repeat three more times:
3 dc, ch 2
Join with a sl st to the beginning ch-3.
You should have:
- 4 groups of 3 dc
- 4 corner ch-2 spaces
Pull the magic ring closed.
Square Round 2
Sl st into the first corner ch-2 space.
Ch:
3
Work into the same corner:
2 dc, ch 2, 3 dc
Now work:
3 dc in the space between the next two 3-dc groups
In the next corner work:
3 dc, ch 2, 3 dc
Continue around:
3 dc in side space
then:
3 dc, ch 2, 3 dc in corner
Repeat until all four corners are complete.
Join.
Square Round 3
Sl st into the next corner.
In the corner work:
ch 3, 2 dc, ch 2, 3 dc
Across the side:
work:
3 dc in each space between previous 3-dc groups
At every corner:
3 dc, ch 2, 3 dc
Continue around.
Join.
At this point the square should measure approximately:
5–5½ inches / 13–14 cm
depending on your yarn and tension.
Optional Solid Edge
If you want a firmer frame like the reference image, add one final round.
Ch:
1
Sc in every stitch and chain space around.
At each corner ch-2 space work:
3 sc
Join.
Fasten off.
BLOCK THE SQUARE BEFORE ASSEMBLY
For the neatest result, block the square before attaching the cat.
Lay the square flat.
Straighten:
- four sides
- four corners
- center opening
Lightly dampen.
Pin if necessary.
Allow to dry completely.
Do not stretch it excessively.
PART 4 — POSITION THE CAT
Place the finished cat appliqué on the center of the white square.
The ears should point toward one square edge.
Leave approximately the same amount of white background showing around:
- left side
- right side
- lower edge
The ears may sit slightly closer to the upper edge.
The cat should cover most of the square without hiding the white frame completely.
PART 5 — SEW THE CAT TO THE SQUARE
Thread a yarn needle with the cat-color yarn.
Bring the needle from the back of the square through the outer edge of the cat.
Take small stitches through:
outer cat edge → square fabric → outer cat edge
Continue all the way around the head.
When you reach the ears:
sew around the complete outside edge of each ear.
This keeps the ear points flat against the square.
Do not sew through the center of the face unless necessary.
The appliqué should remain slightly raised and dimensional.
Hide the Ends
Bring all yarn tails to the back.
Weave through several stitches.
Change direction.
Weave through several more stitches.
Trim.
The back should remain reasonably flat if the square will be joined to other motifs.
Finished Square
The completed motif should show:
- one golden cat head
- round cheeks
- two small pointed ears
- small pink nose
- delicate embroidered whiskers
- white crochet square surrounding the cat
- neat square corners
- no bulky seams
Finished measurement:
approximately 5–5½ inches / 13–14 cm
MAKE A CAT GRANNY-SQUARE BLANKET
Once you are comfortable making one square, repeat it in multiple colors.
Try cats in:
- orange
- cream
- gray
- black
- brown
- calico-inspired colors
- dusty pink
- sage
- mustard
Keep the background squares the same color for a coordinated blanket.
For example:
Baby Blanket
Make:
30 squares
Arrange:
5 squares × 6 squares
Using 5-inch squares gives a blanket body around:
25 × 30 inches
before joining and border.
JOINING THE SQUARES
Arrange all squares before joining.
Make sure every cat is facing the same direction.
You can join with:
- mattress stitch
- whip stitch
- slip stitch
- single crochet join
For the cleanest appearance, use the same color as the square background.
Simple Blanket Border
After all squares are joined:
Join background yarn in any outer corner.
Border Round 1
Sc evenly around.
At each corner:
3 sc
Join.
Border Round 2
Sc in every stitch.
At each corner:
3 sc in the center corner stitch
Join.
Fasten off.
MAKE A CAT CUSHION
Make:
9 cat squares
Arrange:
3 × 3
Join them.
Make a plain crochet panel the same size for the back.
Sew three sides together.
Insert a cushion form.
Close the final side.
MAKE A TOTE BAG
Make:
4 cat squares for the front
and:
4 squares for the back
Arrange each side:
2 × 2
Join.
Crochet a long strip for:
- first side
- bottom
- second side
Join the front and back.
Add two handles.
Line with fabric if desired.
MAKE A CARDIGAN
These small cat motifs can also be mixed with plain granny squares.
Use the cat squares as:
- pocket motifs
- lower-front accents
- back-panel feature squares
- sleeve accents
For wearables, make a gauge swatch and calculate the total assembled measurements before making all the squares.
If the Cat Head Ruffles
Your increases may be too loose.
Round 3 should contain:
36 stitches
Make sure you are repeating:
dc, 2 dc
rather than adding extra increases.
You can also use a slightly smaller hook for the cat appliqué.
If the Cat Head Cups
Your tension may be too tight.
Try:
- relaxing your dc stitches
- using a slightly larger hook
The head should lie nearly flat before sewing.
If the Ears Look Too Large
Reduce the ear center from:
3 dc, ch 2, 3 dc
to:
2 dc, ch 2, 2 dc
Keep both ears identical.
If the Ears Look Too Round
Make the ear-tip chain:
ch 3 instead of ch 2
and gently block the point.
Do not increase the entire ear size.
If the Square Is Too Small
Add another granny-square round.
At each new round:
work:
3 dc in each side space
and:
3 dc, ch 2, 3 dc
in each corner.
Each additional round increases the overall square size.
If the Square Is Too Large
Stop after Round 2 or use:
- lighter yarn
- smaller hook
The important thing is that the cat leaves a visible background frame.
If the Cat Pulls the Square Out of Shape
Do not sew the appliqué on under tension.
Block both pieces first.
Lay them flat.
Pin the cat lightly in place.
Then sew.
The white square should remain perfectly square after attachment.
Color Ideas
Classic Orange Cat
Cat:
pumpkin orange
Square:
cream
Nose:
soft pink
Whiskers:
dark brown
Black Cat
Cat:
charcoal black
Square:
soft gray
Nose:
dusty rose
Whiskers:
light gray
Calico-Inspired Cat
Make the cat in:
cream
Then embroider or surface-crochet small:
orange and brown patches
before attaching it to the square.
Pastel Nursery Cats
Use cat colors such as:
- blush
- pale blue
- sage
- lavender
- butter yellow
Use the same white square background throughout.
Final Pattern at a Glance
Cat Head
Round 1
12 dc
Round 2
24 dc
Round 3
36 dc
Ears
Add two small pointed ear sections along the top of the circular head.
Each ear progresses:
sc → hdc → dc → pointed ch-space → dc → hdc → sc
Keep approximately:
5–6 stitches
between the ears.
Face
Embroider:
- small pink nose
- optional mouth
- 2 whiskers on each side
- optional eyes
White Square
Make a solid granny square around a magic ring.
Work approximately:
3 rounds
or until it measures:
5–5½ inches
Add optional sc edging.
Assembly
Block the square.
Center the cat.
Sew around the complete head and ear edges.
Weave in all ends.
The finished motif is a cute dimensional crochet cat face centered on a crisp contrasting granny square, ready to use in blankets, bags, cushions, clothing, and other crochet projects.