Crochet Christmas Star Wind Spinner Ornament
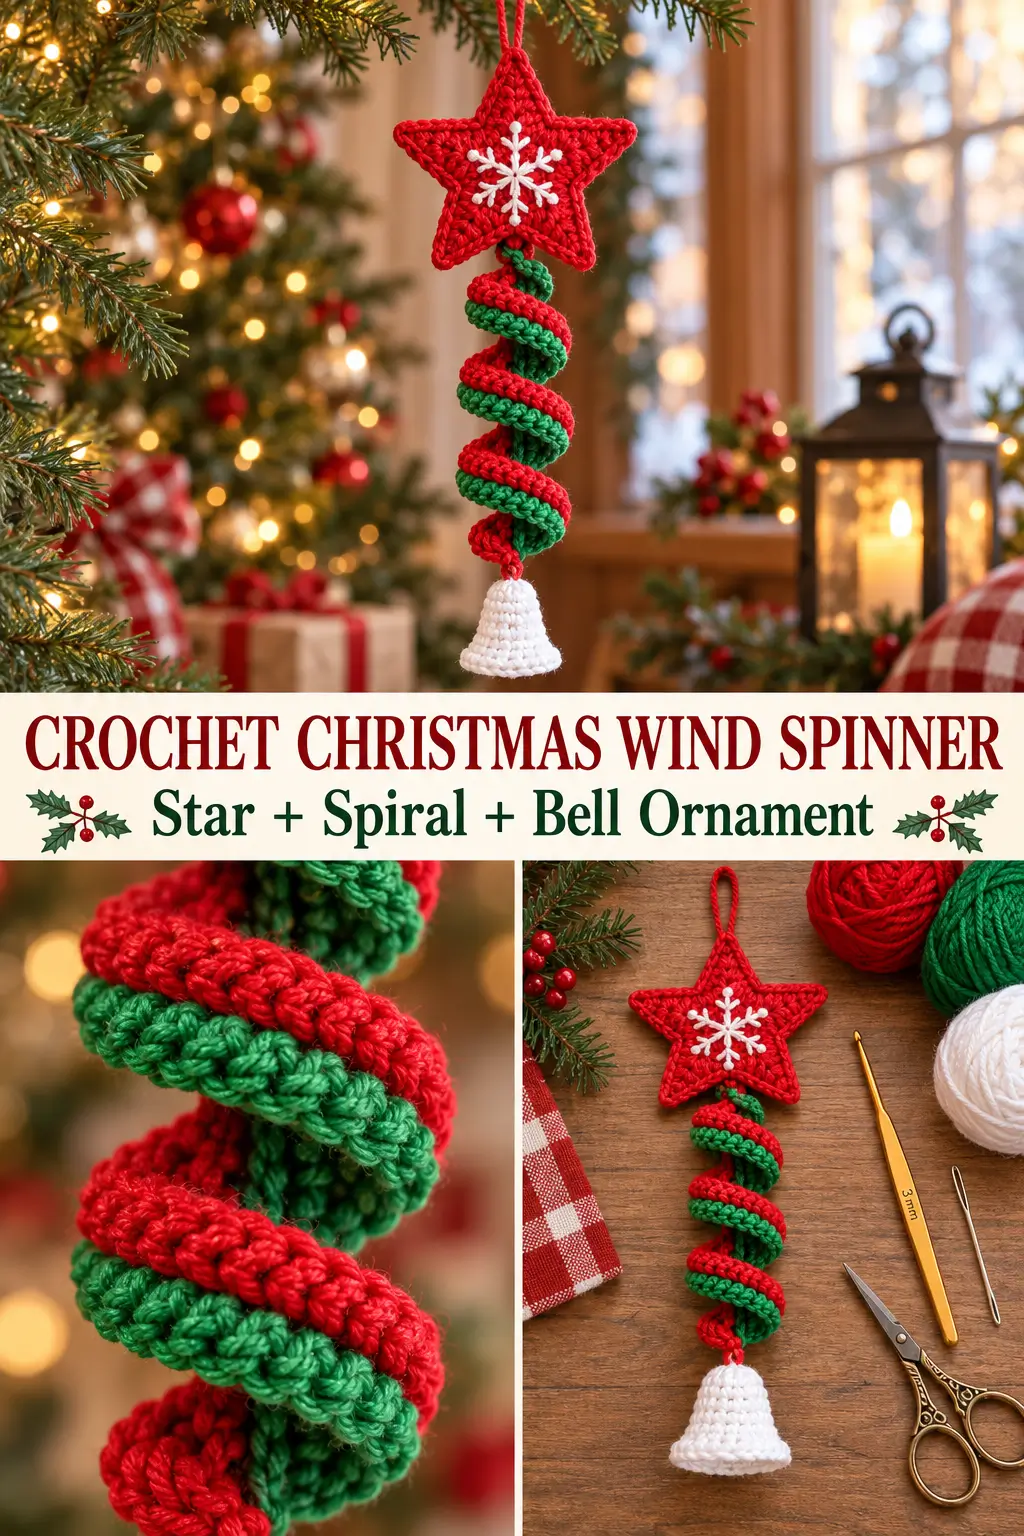
This festive crochet Christmas ornament combines a five-point star, a two-color spiral spinner, and a small crochet bell into one hanging decoration.
The center section is made from two textured crochet strips built along opposite sides of the same foundation. After crocheting, the strips are gently twisted around the foundation to create the candy-cane-style spiral. A double-layer red star finishes the top, while a white crochet bell hangs from the bottom.
Using medium-weight yarn and a 3 mm hook keeps the ornament compact and gives the stitches enough structure to hold their shape. Pasted text
Finished Size
Approximately:
11–13 inches / 28–33 cm long
from the top of the star to the bottom of the bell, excluding the hanging loop.
Approximate individual measurements:
- Star: 3½–4 inches / 9–10 cm across
- Spiral section: 5–6 inches / 13–15 cm long
- Bell: about 2 inches / 5 cm tall
Exact measurements will vary with yarn and tension.
Materials
- Medium weight #4 anti-pilling acrylic yarn
- Color A: Christmas red
- Color B: Christmas green
- Color C: white
- 3 mm crochet hook
- Yarn needle
- Scissors
- Stitch marker, optional
Use red and green for the spiral, red for the star, and white for the bell and embroidered snowflake.
Skill Level
Confident beginner to intermediate
You should know how to make:
- chain
- slip stitch
- single crochet
- double crochet
- treble crochet
- magic ring
- increases
- working around stitch posts
- joining crochet pieces
Abbreviations
This pattern uses US crochet terminology.
ch — chain
sl st — slip stitch
sc — single crochet
hdc — half double crochet
dc — double crochet
tr — treble crochet
inc — 2 sc in the same stitch
st / sts — stitch / stitches
MR — magic ring
PART 1 — MAKE THE SPIRAL FOUNDATION
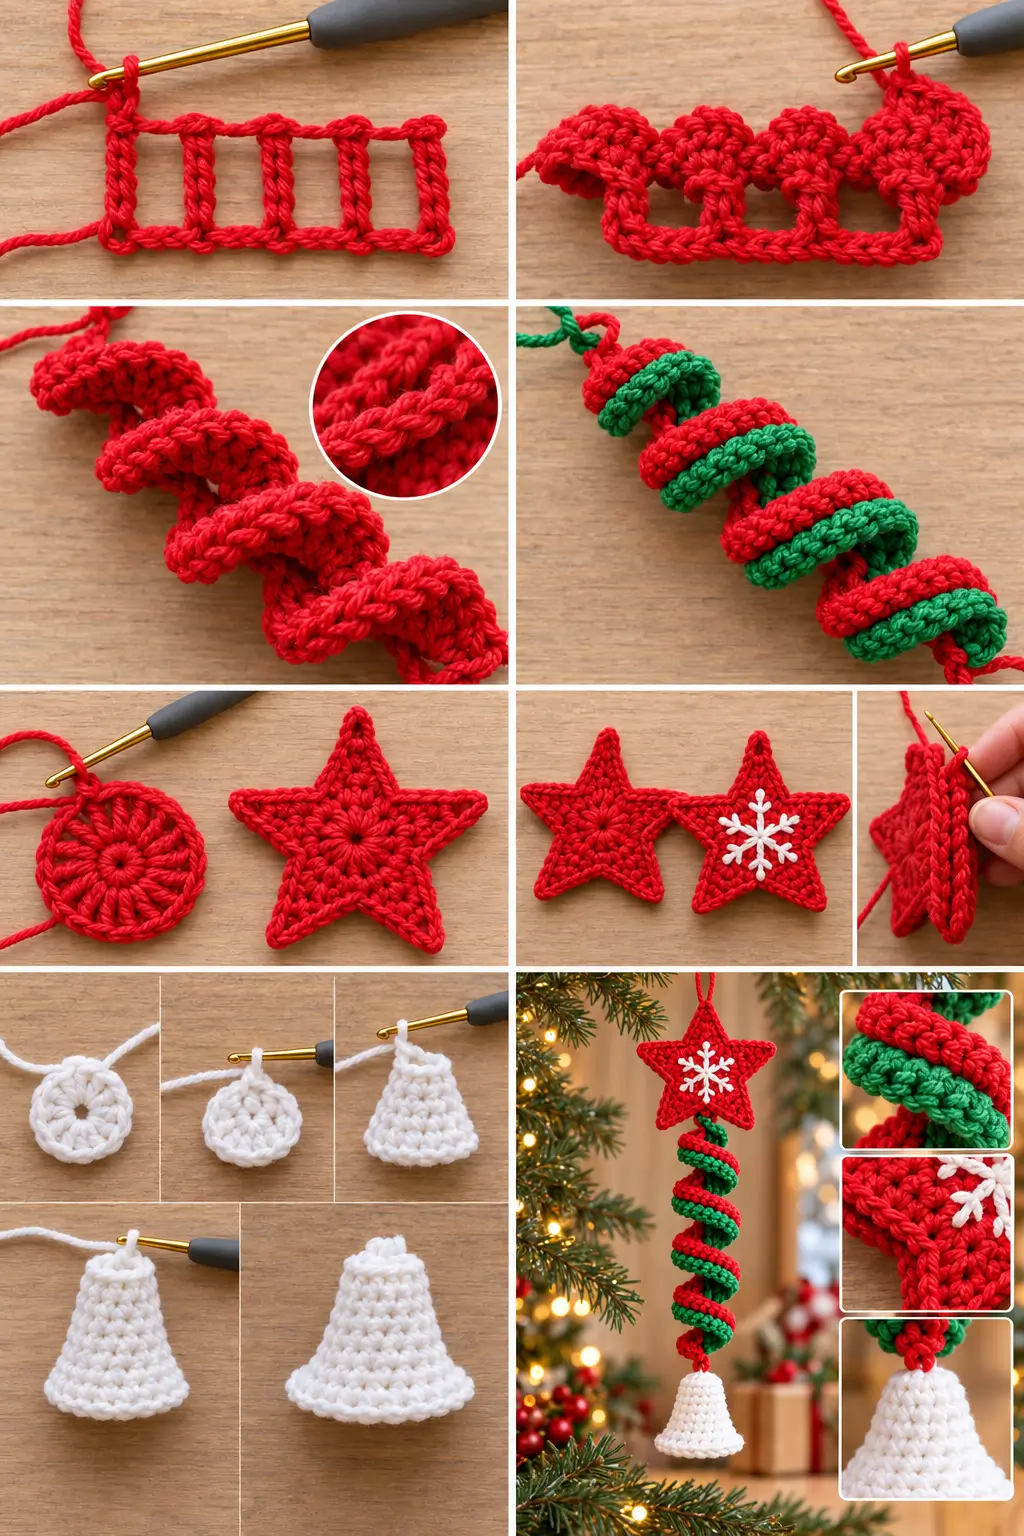
The spiral begins with a narrow ladder-like foundation made from five tall units.
Each unit has two long sides. One side will hold the red textured strip and the opposite side will hold the green textured strip.
With red yarn, make a slip knot.
Ch:
5
Work:
1 tr into the first chain made
This creates the first tall foundation unit.
Without fastening off:
Ch 5 again.
Work:
1 tr into the first chain of this new ch-5
Repeat this process until you have made:
5 foundation units total
The original construction uses five of these tall units; adding more makes the finished spiral longer, while using fewer makes it shorter. Pasted text
PART 2 — FIRST SPIRAL STRIP
Turn the foundation so one long side of the five units is easy to reach.
Do not work into normal top loops.
Instead, crochet around the tall vertical post of each foundation unit.
Row 1
Ch 1.
Around the first tall post work:
7 sc
Around the next tall post work:
7 sc
Continue in the same way across all five foundation sections.
You will have:
5 groups × 7 sc = 35 sc
The stitches should be crowded around the posts.
That fullness is intentional and begins creating the curl. Pasted text
Row 2 — Increase
Ch 1.
Turn.
Work:
2 sc in every stitch across
You began with 35 stitches, so you will now have:
70 sc
The strip should begin curling noticeably.
The doubling of every stitch creates the strong ruffled shape needed for the spinner. Pasted text
PART 3 — TWISTED SINGLE CROCHET EDGE
Ch 1.
Turn.
Work one twisted single crochet in every stitch across.
How to Make a Twisted Single Crochet
Insert the hook into the next stitch.
Yarn over and pull up a loop.
With two loops on the hook, rotate the hook so the loops twist around one another.
Yarn over.
Pull through both loops.
One twisted sc is complete.
Repeat across all:
70 stitches
This creates the firm corded edge that helps the spiral hold its shape. Pasted text
Fasten off.
PART 4 — SECOND SPIRAL COLOR
Turn the foundation over.
You should still have the opposite long side of the foundation available.
Join green yarn to the first foundation section.
Repeat exactly the same three rows.
Green Row 1
Work:
7 sc around each of the 5 foundation posts
35 sc total
Green Row 2
Ch 1 and turn.
Work:
2 sc in every stitch
70 sc
Green Row 3
Ch 1 and turn.
Work:
1 twisted sc in every stitch
70 twisted sc
Fasten off.
The second color is worked with the same sequence as the first color. Pasted text
SHAPE THE SPIRAL
Hold the foundation vertically.
The red and green strips will already be heavily curled.
Gently rotate the strips around the center foundation.
Let the red strip spiral in one direction while the green strip follows between its turns.
Continue adjusting the crochet until the coils look evenly spaced from top to bottom.
Do not pull the strips flat.
The curling is what creates the finished wind-spinner shape. Pasted text
Once you like the arrangement, use a yarn needle and matching yarn to make a few hidden tack stitches at the top and bottom.
These stitches prevent the spiral from unwinding.
Set the spinner aside.
PART 5 — CROCHET THE FIVE-POINT STAR
Make 2 identical red stars.
The stars will be joined together to create a firmer ornament top.
For the five-point version, begin with 15 double crochet stitches so the five points can be spaced evenly.
Star Center
With red yarn, make a magic ring.
Ch 3.
The ch-3 counts as the first dc.
Work:
14 dc into the MR
Including the beginning ch-3, you have:
15 dc
Pull the magic ring closed.
Join with a sl st to the top of the beginning ch-3.
First Star Point
Ch:
5
Beginning in the second chain from the hook work:
sl st in next ch
sc in next ch
hdc in next ch
dc in final ch
You have created one pointed arm.
Now skip:
2 stitches
Sl st into the:
next stitch
The source uses this same graduated chain-point construction—slip stitch, single crochet, half double crochet, then double crochet—to create the star points. Pasted text
Remaining Star Points
Repeat:
ch 5
Then down the chain:
sl st, sc, hdc, dc
Skip the next:
2 base stitches
Sl st into the next stitch.
Repeat until you have:
5 evenly spaced points
Join neatly at the base of the first point.
Fasten off.
Make the Second Star
Repeat the complete star pattern.
You should now have:
2 matching red five-point stars
ADD THE WHITE SNOWFLAKE DETAIL
Decorate only the front star.
Thread white yarn onto a yarn needle.
Bring the needle up through the center.
Make several straight stitches radiating outward from the center.
A simple design can use:
6–8 short spokes
Then add one or two small diagonal stitches across several spokes to create a snowflake appearance.
Keep all embroidery inside the star center so the red points remain clearly visible.
Secure the white yarn on the back.
The decorative stitching can be arranged freely; it does not affect the star’s construction. Pasted text
JOIN THE TWO STARS
Place both stars together with wrong sides touching.
The embroidered star should face outward.
Join red yarn near the base of one point.
Slip stitch through corresponding edge loops of both stars.
Work slowly around:
- each side of every point
- each point tip
- every valley between points
Keep the join relaxed so the points remain flat.
Continue until the stars are completely joined.
Fasten off and weave in the tail.
This creates a neat double-layer star without requiring stuffing. The tutorial likewise joins two completed star pieces together around their edges. Pasted text
PART 6 — CROCHET THE WHITE BELL
The bell is worked in joined rounds.
With white yarn, make a magic ring.
Bell Round 1
Ch 1.
Work:
10 sc into the MR
Pull the ring closed.
Join with a sl st to the first sc.
10 sts Pasted text
Bell Round 2
Ch 1.
Sc in the same stitch.
Work:
2 sc in the next stitch
Repeat:
1 sc, 2 sc in next st
around.
Join.
15 sts Pasted text
Bell Rounds 3–6
Ch 1.
Work:
1 sc in every stitch around
Join.
15 sts
Repeat this straight round until you have completed:
4 straight sc rounds
These rounds form the sides of the bell. Pasted text
Bell Round 7 — Flared Bottom
Ch 1.
Repeat:
1 sc in next st, 2 sc in next st
seven times.
Work:
1 sc in the final stitch
Join with a sl st.
22 sts
This final increase round flares the bottom edge outward to create the bell shape. Pasted text
Fasten off, leaving a long tail for assembly.
SHAPE THE BELL
Place the bell over your fingertip.
Gently push the closed top upward.
Spread the final increase round outward slightly.
The bell should have:
- narrow closed top
- straight sides
- gently flared lower edge
- open bottom
Do not stuff the bell.
PART 7 — ASSEMBLE THE ORNAMENT
Lay the pieces in this order:
Star
↓
Red-and-green spiral
↓
White bell
Before sewing, make sure the spiral hangs vertically without twisting sideways.
Attach the Spiral to the Star
Thread a long strand of red yarn onto a yarn needle.
Pass through the top end of the spiral foundation several times.
Then sew securely through the bottom center of the double-layer star.
Make several passes.
Knot securely on the back of the star.
Hide the tail between the two star layers.
Secure the Bottom of the Spiral
Bring the two curled strips together at the bottom.
Use a few hidden stitches through the central foundation and both colored strips.
This prevents the red and green coils from separating.
Attach the Bell
Thread the long white bell tail onto a yarn needle.
Pass through the top center of the bell.
Then pass securely through the bottom end of the spiral foundation.
Repeat several times.
Pull only until the bell sits directly below the spiral.
Do not pull so tightly that the spiral becomes compressed.
Knot securely.
Hide the knot inside the bell.
The tutorial assembles the finished spiral, star, and bell only after all individual components have been completed. Pasted text
ADD THE HANGING LOOP
Join red yarn at the top point of the star.
For a hanging loop approximately 2½–3 inches long:
Ch:
24
Bring the chain back to the same attachment point.
Sl st securely into the star.
Fasten off.
Weave both ends into the back star layer.
A longer hanging loop can be made simply by adding more chains. The original construction also finishes by reattaching yarn at the top and chaining the hanger. Pasted text
FINAL SHAPING
Hold the ornament by the hanging loop.
Allow the spiral to hang freely.
With your fingers:
- spread all five star points
- straighten the white snowflake
- rotate the red and green coils until evenly spaced
- center the bell
- spread the bell’s lower edge
The ornament should hang in one straight vertical line.
HOW TO MAKE THE SPINNER LONGER
The main spiral uses:
5 foundation units
For a longer decoration, increase the number of units.
For example:
6 units
gives a moderately longer spinner.
7 units
creates a much longer hanging decoration.
For every added foundation unit, remember to work:
7 sc around its post
on both colored sides.
Then double every sc in Row 2 and finish with the twisted-sc row exactly as before.
HOW TO MAKE THE SPINNER SHORTER
Use:
4 foundation units
instead of 5.
Then each first-color row begins with:
4 × 7 = 28 sc
After doubling:
56 sc
Repeat the same counts for the second color.
THREE-COLOR SPIRAL OPTION
For a fuller Christmas version, add white as a third spiral color.
Create a three-sided tall foundation rather than the two-sided version, giving each color its own rail.
Then work the same sequence along every rail:
7 sc per foundation section
then:
2 sc in every stitch
then:
twisted sc across
Use:
- red
- green
- white
Twist all three strips evenly around the center.
Keep the three coils equally spaced.
IF THE SPIRAL DOES NOT CURL
Check Row 2.
Every stitch must receive:
2 sc
If you accidentally worked only one sc into some stitches, the strip may remain too flat.
Also make sure your sc stitches in Row 1 are packed tightly around the foundation posts.
IF THE SPIRAL IS TOO TIGHT
Do not pull the twisted-single-crochet edge tightly.
A very tight final row can compress the coil.
Work the twisted sc with relaxed tension and then shape the spinner manually.
IF THE STAR POINTS CURL
The point stitches gradually increase in height:
sl st → sc → hdc → dc
Keep these stitches relaxed.
The joining round between the two stars should also remain loose.
If necessary, gently dampen the points and shape them flat.
IF THE BELL IS TOO NARROW
Round 2 should contain:
15 stitches
If you accidentally miss an increase, the bell will become too narrow.
The final round should widen to:
22 stitches
for the flared bottom.
FINAL PATTERN AT A GLANCE
Spiral Foundation
Make 5 tall foundation units:
ch 5, tr into first chain
repeated 5 times.
Red Spiral Side
Work:
7 sc around each of 5 posts = 35 sc
Next row:
2 sc in every st = 70 sc
Next row:
twisted sc in every st
Green Spiral Side
Repeat the same three rows on the opposite foundation rail.
Twist both strips around the center.
Star — Make 2
MR.
15 dc total
For each of 5 points:
ch 5
then:
sl st, sc, hdc, dc
back down the chain.
Skip 2 base sts.
Sl st into next st.
Decorate one star with white snowflake embroidery.
Join both stars together.
Bell
Round 1
10 sc in MR.
Round 2
(sc, inc) × 5
15 sts
Rounds 3–6
Sc around.
15 sts
Round 7
(sc, inc) × 7, sc
22 sts
Fasten off.
Assembly
Attach:
red star → red-and-green spiral → white bell
Add a red chain hanging loop to the top star point.
The finished ornament combines a double-layer five-point Christmas star, highly curled two-color spiral body, white crochet bell, and hanging loop into one festive decoration suitable for a Christmas tree, window, door, mantel, or handmade holiday gift.