
This crochet daisy car visor wrap is a cheerful little project that adds a handmade touch to your car without being bulky or distracting. The design uses a soft sage-green crochet band with an open textured center and a large white daisy applique positioned in the middle.
The wrap is worked as a long rectangle sized to fit around a standard sun visor, then joined at the back so it stays in place. A dimensional daisy with a warm yellow center is attached to the front, creating the same fresh floral look as the inspiration while keeping the construction simple and practical.
Description
The finished crochet car visor accessory is a narrow sage-green rectangular sleeve with softly rounded corners. The main band has a slightly open, textured crochet pattern through the center and firmer rows along the top and bottom edges. A large white daisy sits in the center, with plump raised petals surrounding a small golden-yellow center.
The wrap should fit snugly around the visor without covering the mirror, warning labels, hinges, clips, or moving parts.
Materials
- Worsted or aran-weight yarn in sage green
- Worsted or aran-weight yarn in white
- Small amount of golden-yellow yarn
- 4 mm crochet hook
- Yarn needle
- Scissors
- Stitch markers
- Flexible measuring tape
Abbreviations
- ch – chain
- sl st – slip stitch
- sc – single crochet
- hdc – half double crochet
- dc – double crochet
- tr – treble crochet
- st – stitch
- sts – stitches
- sp – space
Pattern Notes
US crochet terminology is used.
This is an original pattern inspired by the visible crochet visor-wrap idea.
Measure your visor before beginning because vehicle visors vary considerably.
The finished rectangle should:
- wrap comfortably around the visor
- remain snug enough not to slide
- leave the vanity mirror unobstructed
- leave all hinges and clips fully accessible
For a typical visor, a finished rectangle around 12–14 in / 30–36 cm long and 3.5–4.5 in / 9–11.5 cm wide may work well, but use your own measurements.
The main wrap is worked flat and joined at the back.
Step-by-Step Instructions
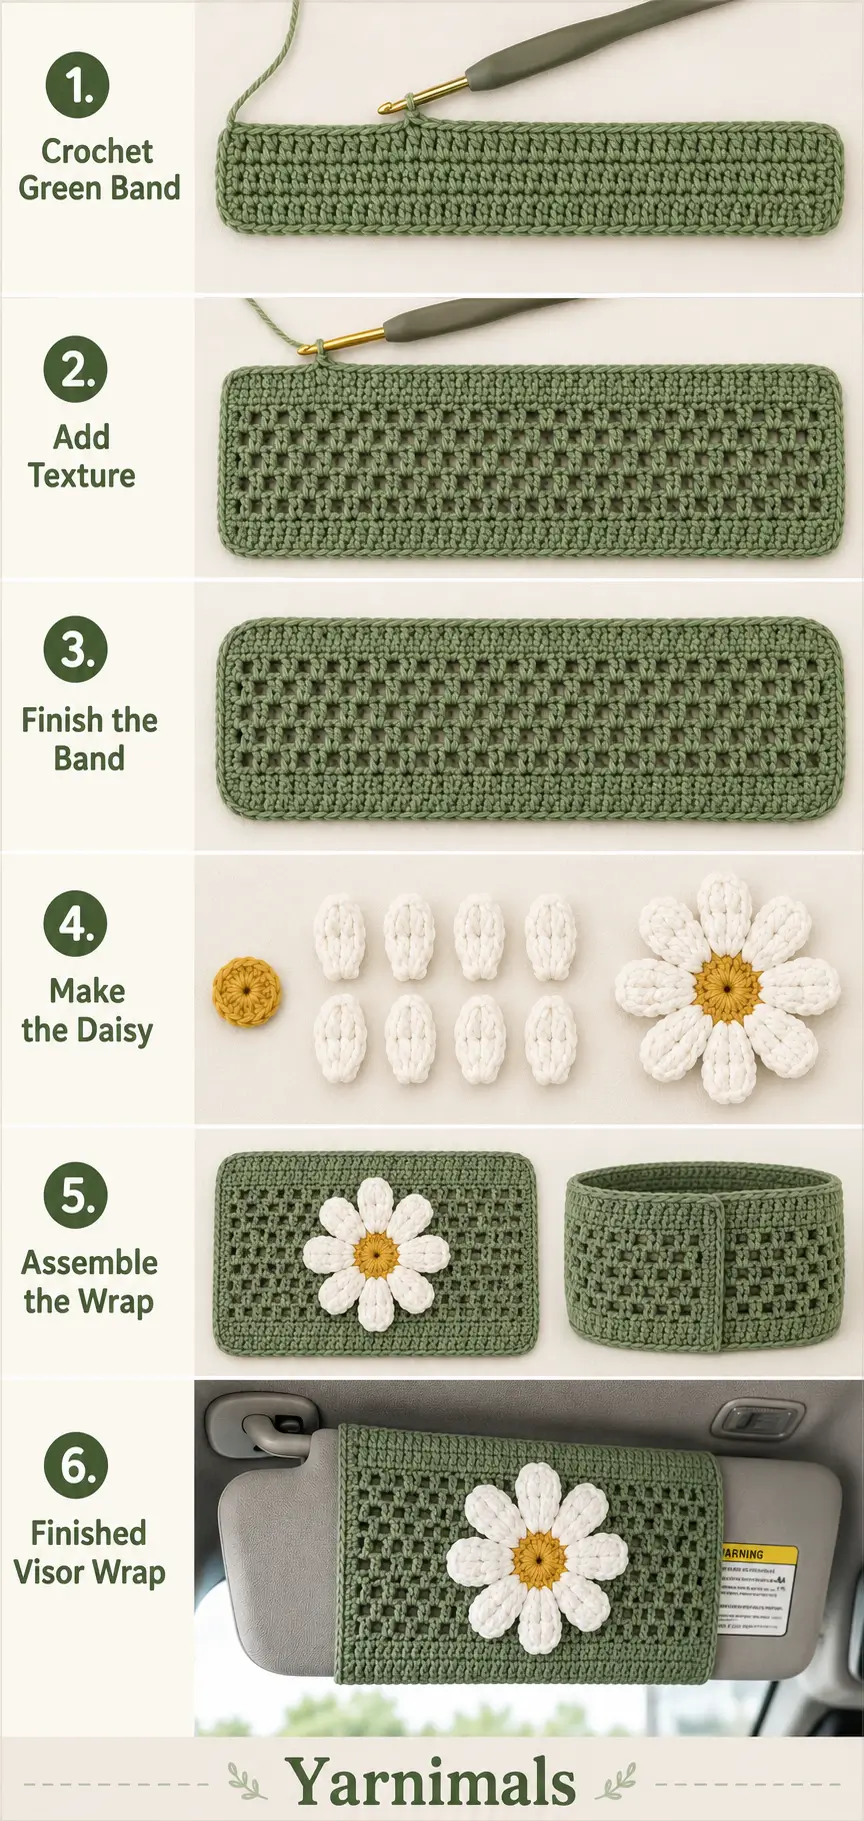
Part 1 – Sage Green Visor Band
Using sage-green yarn.
Foundation
Chain until the foundation measures approximately the length needed to wrap around your visor.
For medium yarn and a 4 mm hook, start with approximately 45–55 chains, then check against the visor.
Your foundation should stretch comfortably around the visor without being loose.
Row 1
Hdc in the second ch from hook.
Hdc in every ch across.
Ch 1 and turn.
Row 2
Hdc in every st across.
Ch 1 and turn.
This creates a firm lower section.
Textured Openwork Section
Row 3
Hdc in first 2 sts.
Ch 1.
Skip 1 st.
Dc in next st.
Ch 1.
Skip 1 st.
Dc in next st.
Continue repeating:
ch 1, skip 1, dc in next st
until 2 sts remain.
Hdc in final 2 sts.
Ch 1 and turn.
Row 4
Hdc in first 2 sts.
Work 2 dc into each ch-1 sp across.
Hdc in final 2 sts.
Ch 1 and turn.
Row 5
Repeat Row 3.
Row 6
Repeat Row 4.
This creates the slightly open clustered texture visible through the middle of the green band.
Upper Firm Section
Rows 7–8
Hdc in every st across.
Ch 1 and turn after Row 7.
Fasten off after Row 8.
If you need a wider visor wrap, add extra hdc rows before fastening off.
Round the Corners
Join sage-green yarn at one corner.
Work sc evenly around the entire rectangle.
At each corner, work:
3 sc in the corner
Continue around.
Join with sl st.
Fasten off.
This creates the softly rounded outer edge visible in the finished accessory.
Part 2 – White Daisy
The daisy is made separately and attached to the center of the visor band.
Use golden-yellow yarn first.
Daisy Center – Round 1
Make a magic ring.
Work 8 sc into the ring.
Pull closed.
Join with sl st.
8 sts.
Daisy Center – Round 2
Work 2 sc in every st around.
Join.
16 sts.
Fasten off yellow.
The center should remain compact rather than oversized.
White Daisy Petals
Join white yarn into any yellow stitch.
The finished flower should have 8 large dimensional petals.
Each petal is worked across 2 yellow stitches.
Petal 1
Sl st into first yellow st.
Ch 2.
In the same stitch work:
- 2 dc
- 2 tr
In the next yellow stitch work:
- 2 tr
- 2 dc
Ch 2.
Sl st into the same stitch.
One petal complete.
Remaining Petals
Move to the next yellow stitch.
Repeat the same petal sequence across the next pair of stitches.
Continue around until you have:
8 white petals
Join and fasten off, leaving a long white tail for attaching the flower.
Shape the Daisy
Gently pull each petal outward.
The petals should be:
- broad
- softly rounded
- slightly raised
- evenly spaced
Do not aggressively flatten them.
The flower should have a dimensional applique appearance.
Attach the Daisy
Lay the green visor band flat.
Find the exact center.
Position the daisy so it sits horizontally and visually centered on the green rectangle.
Thread the long white yarn tail onto a yarn needle.
Sew around the inner base of each petal.
Avoid stitching through the outer tips because they should remain slightly raised.
Secure the yellow center as well if needed.
Weave in all ends.
Join the Visor Wrap
Wrap the green rectangle around the visor to test the fit before joining.
The seam should sit at the back or underside where it will be least visible.
Place the short ends together.
Using sage-green yarn, either:
- whip stitch the ends together
- slip stitch through both layers
- single crochet through both layers
A flat whip stitch usually creates the least bulky seam.
Do not pull the seam too tightly.
The finished wrap should stretch slightly over the visor but should not distort the crochet stitches.
Optional Removable Closure
If you prefer not to permanently seam the wrap, add a simple removable closure.
Along one short edge, crochet 3–4 small chain loops.
Sew flat crochet tabs or suitable buttons to the opposite edge.
Only use this option if the closures sit on the back of the visor and cannot interfere with normal use.
For the cleanest appearance, a permanently joined sleeve is simpler.
Design Consistency Lock
To keep the finished accessory matching the intended design, use:
- sage-green main band
- rectangular visor sleeve
- softly rounded corners
- firm top and bottom crochet rows
- slightly open textured center section
- one large centered daisy
- golden-yellow daisy center
- 8 large white petals
- no additional flowers
- no leaves
- no vines
- no beads
- no tassels
- no hanging decorations
- no fringe
The finished item should look clean, simple, and floral rather than heavily decorated.
Sizing Guide
Because car visors differ, measuring is more reliable than using a fixed stitch count.
Measure around the visor at its widest usable section.
Make the crochet rectangle approximately 0.5–1 in / 1–2.5 cm shorter than that measurement if your yarn has moderate stretch.
This gives the finished sleeve a snug fit.
For the width, measure only the section that can safely be covered.
Do not allow crochet to overlap:
- mirror openings
- warning labels that must remain visible
- visor hinges
- retaining clips
- lights
- controls
Tips & Variations
Cotton or cotton-acrylic yarn is a good choice because it creates a defined shape without becoming overly fuzzy.
Keep the band relatively flat. Very thick yarn can interfere with visor movement.
If your visor is wider, add more center texture rows rather than stretching the fabric excessively.
For a softer look, use muted sage green with creamy-white petals.
For a brighter version, use fresh leaf green with clean white petals and a sunflower-yellow center.
If the daisy feels too heavy, make the petals with double crochet only instead of using treble crochet.
The same basic band can also be used without the flower for a simple crochet visor cover.
FAQ
Is this definitely a crochet project?
Yes. The visible accessory can be recreated naturally with crochet. The band uses standard crochet rows with an open textured section, and the flower is a separate crochet applique.
How do I make sure it fits my car visor?
Measure around your visor before crocheting. Make the rectangle slightly smaller than the visor circumference so the yarn’s natural stretch holds it securely in place.
Can I add several daisies?
You can, but the single large centered daisy is what gives this design its clean recognizable look. Multiple flowers would create a different finished style.
Conclusion
This crochet daisy car visor wrap is a quick handmade accessory that combines a practical fitted sleeve with a bold floral detail. The sage-green textured band keeps the design soft and simple, while the large white daisy and warm yellow center create the cheerful focal point. Adjust the starting chain to your own visor measurements, keep the flower centered, and you can easily make a custom crochet car accessory that fits your vehicle neatly.



