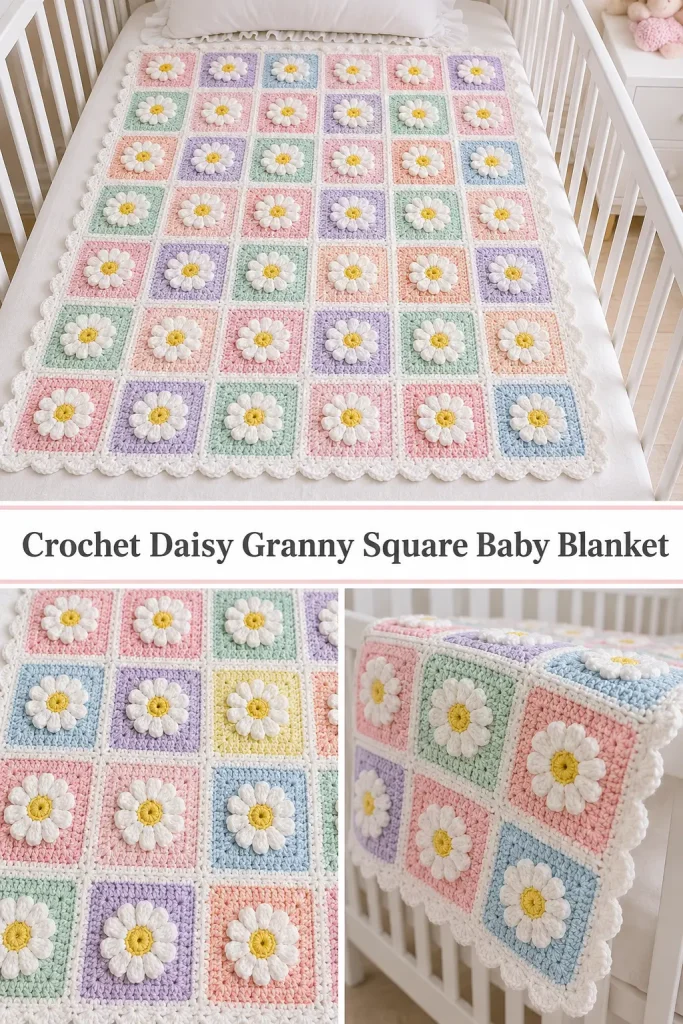
This soft crochet daisy granny square baby blanket has the sweetest nursery look, with raised white flowers sitting in the center of pastel-colored squares. The mix of pink, lavender, mint, pale yellow, peach, and baby blue gives the blanket a gentle patchwork effect without making it look too busy.
The blanket is built from individual floral granny squares, then joined with white yarn so every pastel square is clearly framed. A simple white textured border finishes the outside edge and gives the blanket the neat, slightly scalloped appearance visible in the design.
Description
The finished baby blanket is made from a grid of pastel crochet granny squares. Every square has the same three-dimensional daisy in the center: a small golden-yellow flower center surrounded by plump white petals. The background of each square is worked in one pastel color, while white joining rounds create narrow borders between the motifs.
For a blanket close to the proportions shown, make approximately 30 squares arranged 5 squares across by 6 squares long. You can easily add or remove rows of squares to change the finished size.
The completed blanket has:
- raised white daisy flowers
- golden-yellow flower centers
- pastel pink squares
- lavender squares
- mint-green squares
- pale yellow squares
- soft peach squares
- baby-blue squares
- white borders around every square
- a white outer blanket border
Materials
- DK or light worsted yarn in white
- Small amount of golden-yellow yarn
- Pastel pink yarn
- Pastel lavender yarn
- Pastel mint-green yarn
- Pastel pale-yellow yarn
- Pastel peach yarn
- Pastel baby-blue yarn
- 4 mm crochet hook
- Yarn needle
- Scissors
- Stitch markers
- Blocking mats and pins, optional
Choose soft, washable baby yarn for a blanket intended for regular nursery use.
Abbreviations
- ch – chain
- sl st – slip stitch
- sc – single crochet
- hdc – half double crochet
- dc – double crochet
- tr – treble crochet
- st – stitch
- sts – stitches
- sp – space
- rep – repeat
Pattern Notes
US crochet terminology is used.
Each square is made from the center outward.
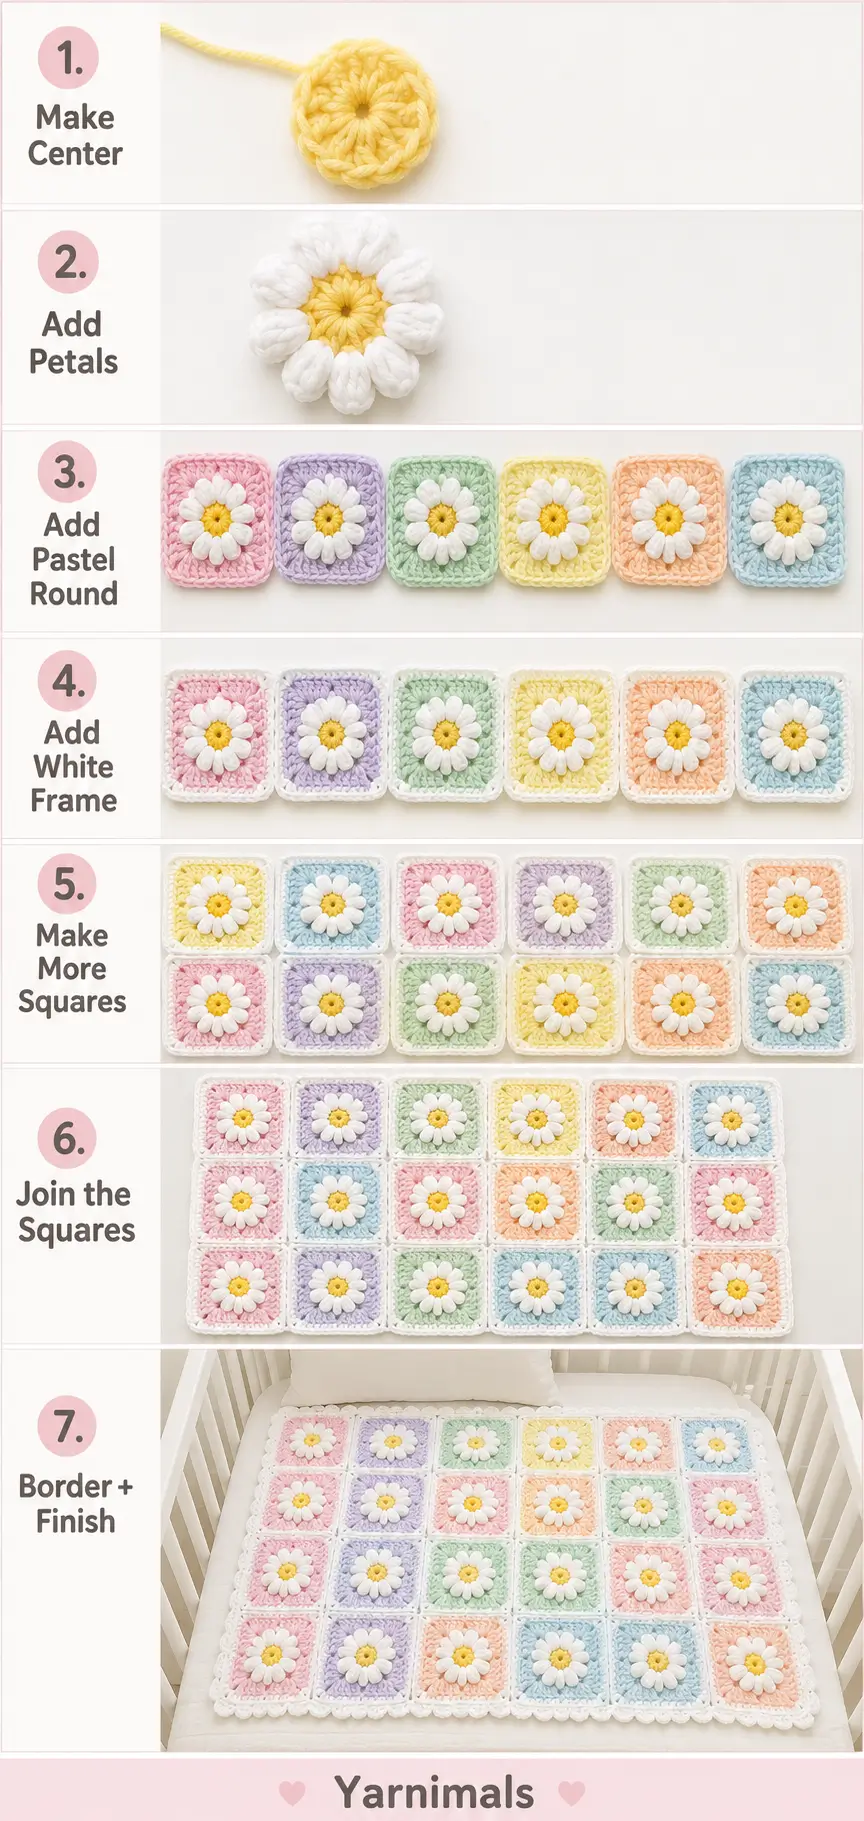
The construction order is:
- yellow flower center
- white raised petals
- pastel background
- white outer round
- joining
- final blanket border
Keep the flower colors identical on every square.
Only the pastel background color changes.
For the most balanced nursery look, distribute the pastel colors throughout the blanket instead of placing identical colors directly beside each other whenever possible.
Approximate square size after blocking:
5–5.5 in / 12.5–14 cm
A 5 x 6 arrangement gives a baby blanket approximately:
27–30 in wide x 32–35 in long, before the final border.
Gauge is not critical as long as all squares are the same size.
Step-by-Step Instructions
Daisy Granny Square
Make 30 squares for the sample layout.
Use the pastel colors in approximately equal quantities.
Round 1 – Yellow Daisy Center
Using golden-yellow yarn.
Make a magic ring.
Ch 1.
Work 8 sc into the ring.
Pull the ring closed.
Join with sl st to the first sc.
Fasten off.
You should have:
8 sts
This small yellow circle forms the center of the daisy.
Round 2 – White Daisy Petals
Join white yarn into any yellow stitch.
The flower has 8 petals, one worked into each yellow stitch.
First Petal
Ch 2.
Work into the same yellow stitch:
- 2 dc
- 1 tr
- 2 dc
Ch 2.
Sl st into the same stitch.
One petal completed.
Remaining Petals
Sl st into the next yellow stitch.
Repeat:
ch 2, 2 dc, 1 tr, 2 dc, ch 2, sl st into same stitch
Repeat in every yellow stitch around.
You should have:
8 full white petals
Join and fasten off.
Gently push the petals toward the front.
The flower should remain raised rather than completely flat.
Round 3 – Begin Pastel Background
Choose one pastel background color.
Work behind the flower petals.
Join the pastel yarn into the space between two petals.
Ch 3.
Work 2 dc into the same space.
Ch 1.
Into the next space between petals:
Work 3 dc.
Ch 1.
Continue around, working:
3 dc, ch 1
into every space between petals.
You should have 8 groups of 3 dc.
Join with sl st.
Do not fasten off.
Round 4 – Begin Squaring the Motif
Ch 3.
Work 2 dc into the same ch-1 space.
Ch 1.
Work 3 dc into the next ch-1 space.
You now need to establish four corners.
Into every second ch-1 space around, work a corner:
3 dc, ch 2, 3 dc
In the spaces between corners, work:
3 dc, ch 1
Continue around so you finish with four evenly spaced corners.
Join with sl st.
The circular flower motif should now begin forming a square.
Round 5 – Pastel Square Round
Sl st into the nearest corner space.
Ch 3.
Work:
2 dc, ch 2, 3 dc
into the same corner.
Ch 1.
In each side ch-1 space:
Work 3 dc.
Ch 1 between groups.
In each corner:
Work:
3 dc, ch 2, 3 dc
Continue around.
Join.
Fasten off the pastel yarn.
At this stage, the daisy should sit clearly in the center of a pastel square.
Round 6 – White Framing Round
Join white yarn into any corner ch-2 space.
Ch 3.
Work:
2 dc, ch 2, 3 dc
in the same corner.
Along each side:
Work 3 dc into every ch-1 space.
Ch 1 between groups.
At every corner:
Work:
3 dc, ch 2, 3 dc
Continue around.
Join with sl st.
Fasten off.
The narrow white round gives every square the clean framed appearance shown in the design.
Make the Color Set
Create the squares using these pastel colors:
- soft pink
- lavender
- mint green
- pale yellow
- soft peach
- baby blue
For 30 squares, a balanced distribution could be:
- 5 pink
- 5 lavender
- 5 mint
- 5 yellow
- 5 peach
- 5 blue
You can change the quantities slightly if you prefer a more random pastel arrangement.
Blocking the Squares
Before joining, gently block every square to the same measurement.
Lay each motif flat.
Straighten the corners.
Make sure the white petals remain raised and are not flattened under blocking pins.
Allow the squares to dry completely.
Equal-sized squares make joining much easier and produce a straighter finished blanket.
Arrange the Blanket
Lay the squares out before joining.
For a blanket close to the reference proportions, arrange:
5 squares across
and
6 squares down
Mix the colors so the same color does not form obvious vertical or horizontal lines.
A sample arrangement:
Row 1
Pink – Peach – Pink – Blue – Mint
Row 2
Lavender – Yellow – Pink – Lavender – Blue
Row 3
Mint – Peach – Yellow – Pink – Lavender
Row 4
Blue – Mint – Peach – Lavender – Yellow
Row 5
Pink – Blue – Mint – Yellow – Peach
Row 6
Lavender – Pink – Blue – Mint – Yellow
The exact order does not matter as long as the overall color distribution feels balanced.
Joining the Granny Squares
Use white yarn.
The visible design has clear white lines separating every square.
A simple single crochet join works well.
Place two squares with wrong sides together.
Insert the hook through corresponding edge stitches of both squares.
Join white yarn.
Ch 1.
Sc through both layers.
Continue sc evenly across the entire edge.
Fasten off or continue directly into the next pair.
Join all squares into horizontal rows first.
Then join the rows together.
Keep the joining tension relaxed so the blanket does not pucker.
Alternative Flat Join
If you prefer flatter seams, whip stitch the squares together using white yarn and a yarn needle.
Match stitch to stitch carefully.
The white framing rounds will still create the same clean grid between the pastel motifs.
Outer Blanket Border
Once all squares are joined, attach white yarn in any outer corner.
Border Round 1
Ch 1.
Sc evenly around the entire blanket.
Work 3 sc in each outer corner.
Along the edges, aim for even stitch spacing.
Join with sl st.
Border Round 2
Ch 3.
Dc in every st around.
At each corner work:
2 dc, ch 2, 2 dc
Join.
Border Round 3 – Soft Decorative Edge
Ch 1.
Sc in first st.
Skip 1 st.
Work 5 dc into next st.
Skip 1 st.
Sc into next st.
Repeat:
skip 1, 5 dc in next st, skip 1, sc in next st
around the blanket.
Adjust slightly near corners if needed so one shell sits neatly around each corner.
Join and fasten off.
This gives the outside of the blanket a soft textured scalloped finish without overpowering the floral squares.
Finishing
Weave in all yarn tails securely.
Check every flower center.
Gently shape the petals so they sit evenly around the yellow center.
Straighten every square and seam.
Lightly block the complete blanket if needed.
Do not aggressively flatten the flowers.
The daisy petals should remain slightly dimensional.
Design Consistency Lock
For the closest match to the intended blanket, keep these details consistent:
- 8 white petals on every flower
- small golden-yellow flower center
- one flower centered in every square
- pastel background colors only
- pink, peach, mint, yellow, lavender, and baby blue
- narrow white frame around every square
- white joining seams
- white outer border
- slightly raised floral texture
- square motifs arranged in a regular grid
Do not add green leaves.
Do not add stems.
Do not use multicolored flowers.
Do not make some flowers different from the others.
Do not remove the white borders between squares.
Tips & Variations
For a very soft baby blanket, use smooth anti-pilling acrylic or a washable cotton-acrylic blend.
If you want the flower petals to stand out more, use a hook 0.5 mm smaller for the flower rounds and return to the regular hook size for the pastel background.
Keep the yellow centers small. Oversized centers will change the delicate daisy appearance.
If the pastel squares begin curling, lightly block them before joining.
A cream-white yarn can create a slightly warmer vintage nursery look, while bright white gives the blanket a cleaner pastel appearance.
For a larger child-sized blanket, make additional squares and use a 6 x 8 or 7 x 9 layout.
For a stroller blanket, use a 4 x 5 layout.
The same flower square can also be used individually for cushions, bags, nursery bunting, or other crochet home decor.
FAQ
Is this a granny square pattern?
Yes. It is a floral granny square pattern built from a dimensional daisy center and then squared off with granny-style double crochet groups.
How many squares do I need for a baby blanket?
For the proportions shown, approximately 30 squares arranged 5 across by 6 down works well. You can add or remove squares depending on your yarn, gauge, and preferred blanket size.
Can I make all the squares one color?
Yes. The construction stays exactly the same. However, using several soft pastel backgrounds creates the colorful patchwork effect that gives this particular daisy blanket its nursery style.
Conclusion
This crochet daisy granny square baby blanket combines a classic floral motif with a soft pastel color palette that works beautifully in a nursery. The raised white daisies bring texture to every square, while the clean white joins keep the different pastel colors looking coordinated. Make the full 5-by-6 baby blanket, resize it with more or fewer squares, or use the same cheerful daisy motif for other handmade crochet projects.



