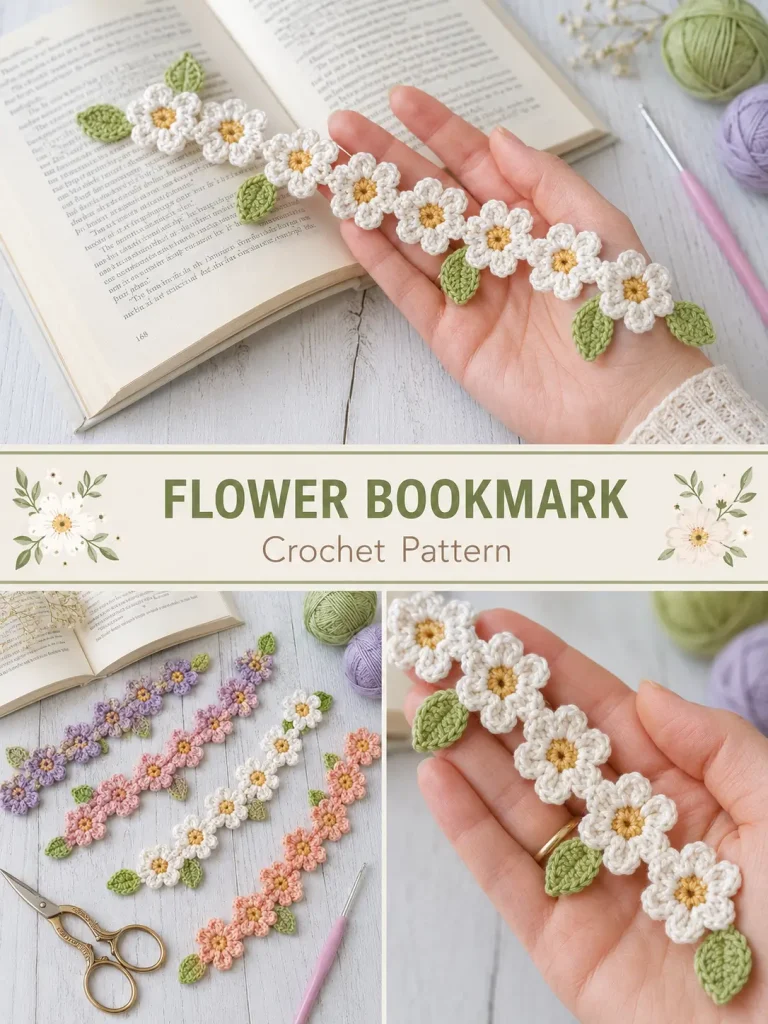
This delicate crochet flower bookmark is made from a continuous chain of flower centers, so there are no individual flowers to sew together afterward.
First, make all of the small golden centers in one connected strip. Then crochet the petals directly around each center. Finally, add several tiny green leaves directly to the connecting chain.
For this version, I’m using:
- warm golden yellow centers
- soft ivory petals
- fresh sage-green leaves
The finished bookmark is thin, flexible, and decorative without being bulky inside a book.
Pattern at a Glance
Skill level: Confident beginner
Terminology: US crochet terms
Suggested yarn: Fingering-weight / thin cotton
Hook: 2.25 mm
Construction: Connected flower-center strip with petals and leaves added directly
Flowers: 8
Petals per flower: 6
Leaves: 4
Finished length: Approximately 9½–11 inches
Flower diameter: Approximately 1–1¼ inches
Gauge is not critical.
Materials
You will need:
- Thin cotton yarn in warm golden yellow
- Thin cotton yarn in soft ivory
- Thin cotton yarn in sage green
- 2.25 mm crochet hook
- Small yarn needle
- Scissors
Smooth mercerized cotton or fingering-weight cotton works especially well because the small flower stitches remain crisp.
Abbreviations
- ch = chain
- sc = single crochet
- hdc = half double crochet
- dc = double crochet
- sl st = slip stitch
- st = stitch
- sts = stitches
- rep = repeat
Construction Overview
The bookmark is made in three parts:
- Crochet all 8 yellow flower centers as one connected strip.
- Add 6 ivory petals directly around every center.
- Crochet 4 green leaves directly onto selected connectors.
The flowers are never crocheted separately and then sewn together.
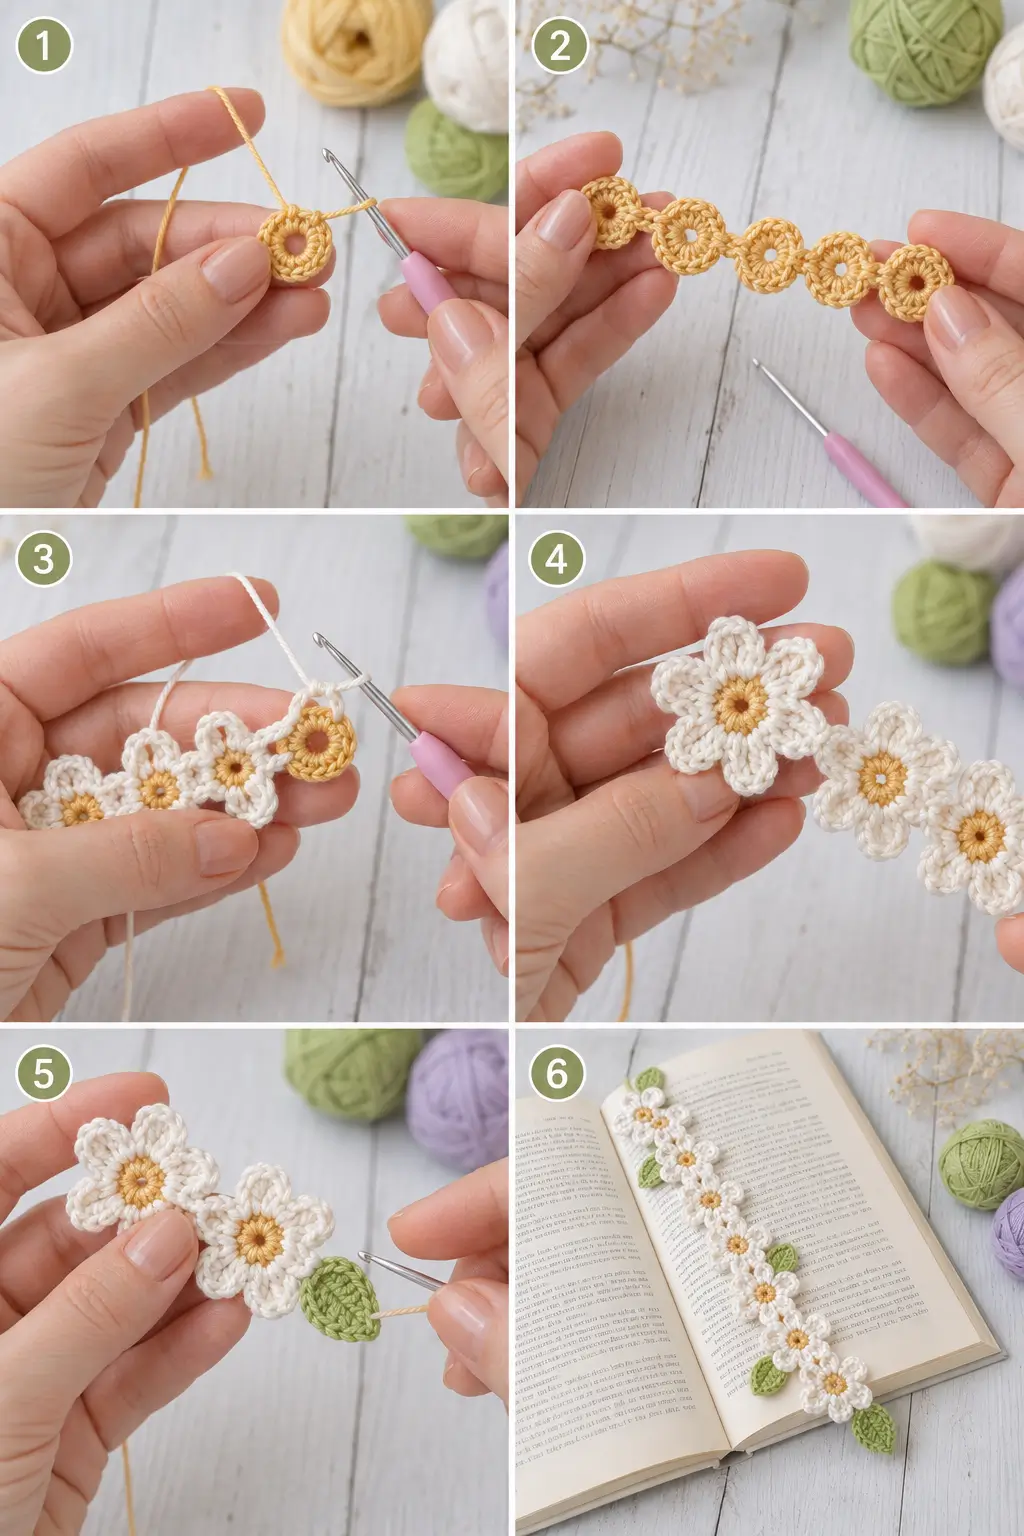
PART 1 — MAKE THE CONNECTED FLOWER CENTERS
Using golden-yellow yarn:
Flower Center 1
Ch 4.
Sl st into the first chain to form a small ring.
Work:
12 sc into the ring
Sl st into the first sc.
Do not fasten off.
You now have the first flower center.
Connector
Ch:
4
These four chains connect one flower center to the next.
Keep the connector fairly relaxed.
Flower Center 2
Now ch:
4 more
Sl st into the first of these newest 4 chains.
This forms another small ring.
Work:
12 sc into this ring
Sl st into the first sc.
You now have:
2 flower centers connected by a ch-4 bridge.
Continue the Center Strip
Repeat:
Ch 4 for connector
then:
Ch 4, sl st into first of those 4 chains to form ring
then:
12 sc into ring
then:
sl st into first sc
until you have:
8 flower centers
connected in one straight strip.
After the eighth center, fasten off.
Check the Center Strip
Lay it flat.
You should have:
8 small yellow circles
with:
7 short yellow chain connectors
between them.
The circles should all face approximately the same direction.
Don’t worry if the strip curls slightly at this stage.
The petals and light blocking will help straighten it.
PART 2 — ADD THE IVORY PETALS
Each center contains:
12 sc
We will use those 12 stitches to make:
6 petals
Each petal uses two center stitches.
Petal Repeat
Join ivory yarn into any stitch of the first yellow center.
Repeat the following around:
First stitch
Sl st in next st
Next stitch
Work all of the following into the same stitch:
sc, hdc, 2 dc, hdc, sc
That creates one rounded petal.
Repeat:
sl st in next st, petal in next st
around.
You should have:
6 ivory petals
around the yellow center.
Sl st into the beginning point.
Fasten off.
Shape the Flower
Gently spread the six petals around the yellow center.
The finished flower should have:
- visible golden center
- exactly 6 rounded petals
- compact daisy-like shape
- no separate sewn pieces
Repeat for All Flowers
Work the same petal round around every yellow center.
When finished, you should have:
8 connected flowers
with:
48 petals total
The yellow connecting chains remain between the flowers and hold the entire bookmark together.
Faster Petal Method
If you dislike weaving in many ivory ends, you can carry the ivory yarn between neighboring flowers.
After finishing one flower:
Sl st loosely along the yellow connecting chain until you reach the next center.
Then crochet its six petals.
This creates a small ivory overlay along the connector.
Either method works.
For the cleanest appearance, I prefer fastening off after each flower.
PART 3 — CROCHET THE LEAVES
The leaves are crocheted directly into the connector chains.
For the 8-flower bookmark, add four leaves.
A balanced layout is:
- between Flowers 1 and 2
- between Flowers 3 and 4
- between Flowers 5 and 6
- between Flowers 7 and 8
Alternate which side of the bookmark each leaf points toward.
Leaf
Using sage-green yarn, join with a sl st around or into one of the middle chains of a connector.
Ch:
7
Starting in the second chain from the hook, work:
sl st in next ch
sc in next ch
hdc in next ch
dc in next ch
hdc in next ch
In the final chain work:
3 sc
Rotate the work.
Now crochet along the unused loops on the opposite side of the foundation chain:
hdc in next ch
dc in next ch
hdc in next ch
sc in next ch
sl st in final ch
Sl st back into the same connector where the leaf began.
Fasten off.
Shape the Leaf
Gently pinch the end of the leaf to make it slightly pointed.
It should look like a small oval leaf rather than a round circle.
Make the Remaining Leaves
Repeat until you have:
4 leaves
Alternate their direction.
For example:
Leaf 1
Points downward
Leaf 2
Points upward
Leaf 3
Points downward
Leaf 4
Points upward
This keeps the bookmark visually balanced.
Finished Structure
Your bookmark should now contain:
- 8 golden centers
- 6 ivory petals per flower
- 48 petals total
- 7 connecting sections
- 4 sage leaves
- no sewn flower motifs
- no separate leaf pieces
Everything decorative is crocheted directly onto the connected foundation.
PART 4 — WEAVE IN THE ENDS
Because this is a small project, secure the yarn tails carefully.
Thread each tail onto a yarn needle.
Weave through several matching-color stitches.
Change direction once.
Trim close to the crochet.
Avoid leaving bulky knots behind the flowers because the bookmark should remain relatively flat.
PART 5 — LIGHT BLOCKING
Blocking makes a noticeable difference with this project.
Lay the bookmark on a towel or blocking mat.
Straighten the flower chain.
Arrange all six petals on every flower.
Shape each leaf.
Pin lightly if needed.
Use the blocking method appropriate for your yarn.
Allow to dry completely.
Finished Measurements
With thin cotton and a 2.25 mm hook, expect approximately:
9½–11 inches long
and:
1–1¼ inches wide at the flowers
Your size may vary.
That is fine for a bookmark.
How to Make It Longer
The pattern is completely adjustable.
Before fastening off the yellow center strip, simply continue adding:
connector → center → connector → center
Every additional center becomes another flower.
Then add petals normally.
For a longer bookmark, try:
9 or 10 flowers.
How to Make It Shorter
Stop the yellow center strip earlier.
For example:
Small bookmark
6 flowers
Standard bookmark
8 flowers
Long bookmark
10 flowers
The flower construction never changes.
What If the Flowers Overlap Too Much?
Increase the connector from:
ch 4
to:
ch 5
or:
ch 6
Use the same connector length throughout the bookmark.
What If the Flowers Are Too Far Apart?
Reduce the connector to:
ch 3
This gives a denser floral chain.
Do not remove the connector entirely because the petals need a little room.
What If the Petals Curl?
Possible causes include:
- tight tension
- hook too small
- very stiff cotton
Try:
- loosening the petal stitches
- using a 2.5 mm hook for the ivory petals
- lightly blocking the finished bookmark
What If the Flower Center Disappears?
The petal stitches may be too bulky.
Make sure you work each petal into the yellow center stitches, not into the center ring itself.
The yellow circle should remain visible in the middle.
What If My Flower Has the Wrong Number of Petals?
Every center must contain:
12 sc
The petal repeat consumes:
2 stitches
So:
12 ÷ 2 = 6 petals
If you have only five petals or suddenly have seven, recount the yellow center stitches.
Why Use 12 Center Stitches?
Twelve stitches divide evenly into six petals.
Each petal gets:
- one anchoring slip stitch
- one stitch containing the full petal
That makes the spacing predictable and keeps all the flowers similar.
Can I Make Five-Petal Flowers?
Yes, but the center construction should change.
For this written version, I recommend keeping:
12 center stitches + 6 petals
because the math is straightforward and produces a balanced little flower.
Color Variation — Pink Blossoms
Use:
Centers
Antique gold
Petals
Dusty pink
Leaves
Sage
Color Variation — Lavender Flowers
Use:
Centers
Soft mustard
Petals
Light lavender
Leaves
Muted olive
Color Variation — Tiny Blue Flowers
Use:
Centers
Warm cream
Petals
Powder blue
Leaves
Fresh green
Scrappy Flower Bookmark
Every flower can use a different petal color.
For example:
- Dusty rose
- Lavender
- Coral
- Cream
- Soft blue
- Peach
- Mauve
- Pale yellow
Keep all centers golden and all leaves green to make the different flowers feel intentional.
Can I Use Crochet Thread?
Yes.
Fine crochet cotton will make smaller, more delicate flowers.
Use a hook appropriate to the thread.
The bookmark will become narrower and thinner.
Can I Use DK Yarn?
Yes, but the flowers will become substantially larger and thicker.
For an actual bookmark, thin cotton is preferable because it doesn’t create too much bulk between book pages.
Can I Turn It Into a Bracelet?
Yes.
Make fewer flowers and adjust the length to fit around the wrist.
For wearable use, add an appropriate closure instead of simply tying the ends together.
Can I Turn It Into a Headband?
The floral chain can also be adapted into a decorative headband.
Make enough flowers to reach the desired length and attach the floral section to a comfortable elastic or crocheted band.
For a bookmark, no elastic is needed.
Can I Use It as Decoration?
Yes.
The same flower chain can decorate:
- crochet baskets
- handmade bags
- gift wrapping
- hats
- cardigans
- nursery decor
If attaching it to another item, stitch through the yellow connector sections rather than crushing the flower petals.
Why This Construction Works
The clever part is the first yellow strip.
Instead of making:
flower → cut yarn → flower → cut yarn → sew everything together
you first create the structural backbone.
Every yellow center is already connected to the next one.
The ivory petals simply transform those circles into flowers.
Then the green leaves are added directly to the same backbone.
The final result looks like many little motifs joined together, but the joining structure was built before the flowers even existed.
Frequently Asked Questions
Are the flowers crocheted separately?
No.
Their centers are already connected before the petals are added.
Do I sew the flowers together?
No.
The yellow ch-4 connectors join them automatically.
How many flowers are in the sample?
8
How many petals does each flower have?
6
How many leaves are added?
4
What hook size should I use?
The sample is designed around:
2.25 mm
with thin cotton yarn.
Is the bookmark worked in rows?
Not in the traditional sense.
It starts as a sequence of small connected rings, then petals and leaves are added directly to that structure.
Can beginners make it?
Yes, if you already know:
- chain
- slip stitch
- single crochet
- half double crochet
- double crochet
- working into a ring
The project is small enough that it is also a good way to practice these stitches.
Final Thoughts
This is one of those little crochet projects where the construction is more clever than difficult.
First you have a strange-looking row of tiny yellow circles.
Then one circle gets six petals.
Suddenly it is a flower.
Add petals to the next one, and the bookmark begins to take shape.
A few little green leaves finish it without adding any complicated assembly.
The final piece looks like eight tiny flowers carefully joined into a delicate floral chain, even though you never had to sew the flowers together at all.



