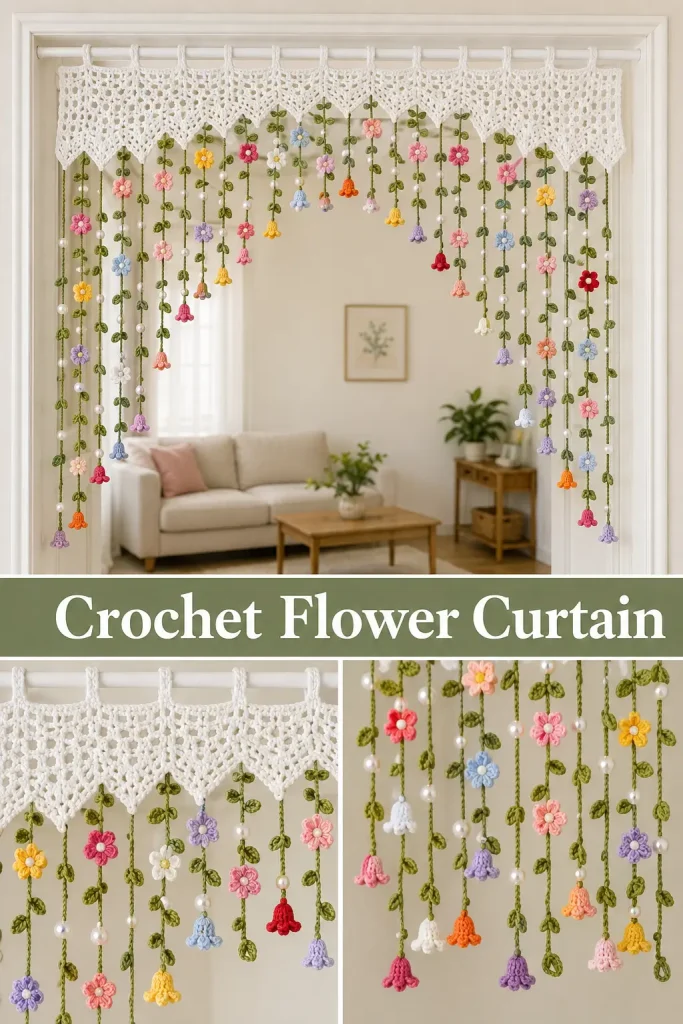
This crochet flower curtain is a beautiful way to turn a doorway, window, balcony entrance, or room divider into a soft hanging garden. The design combines a white crochet valance across the top with dozens of slim green hanging vines decorated with colorful crochet flowers, tiny leaves, and pearl-style beads.
The finished piece looks light and airy instead of heavy like a traditional curtain. Each vine hangs independently, so the flowers move gently and create a whimsical botanical effect while still leaving the room bright and open.
Description
The finished crochet curtain has two main parts:
- a wide white openwork crochet valance attached across the top
- many long olive-green crochet strands hanging vertically underneath
The white top section has an airy mesh structure with a softly pointed lower edge and evenly spaced hanging loops along the top for attaching to a rod.
The green strands vary slightly in length to create a soft arch toward the middle. Each strand is decorated with a mixture of:
- small flat flowers
- tiny bell-shaped flowers
- small green leaves
- white pearl-style beads
The flower colors are mixed throughout the curtain in soft and bright shades including pink, red, yellow, lavender, blue, white, peach, and purple.
Materials
- DK or light worsted yarn in white
- DK or light worsted yarn in olive or moss green
- Small amounts of yarn in:
- bright pink
- soft pink
- red
- pale yellow
- golden yellow
- lavender
- purple
- baby blue
- white
- peach
- 3.5 mm crochet hook
- Yarn needle
- Scissors
- Stitch markers
- Small white pearl beads with holes large enough for your chosen thread or yarn
- Curtain rod or tension rod
- Optional clear sewing thread for securing beads
Abbreviations
- ch – chain
- sl st – slip stitch
- sc – single crochet
- hdc – half double crochet
- dc – double crochet
- st – stitch
- sts – stitches
- sp – space
- rep – repeat
Pattern Notes
US crochet terminology is used.
This is an original construction inspired by the visible hanging flower curtain concept.
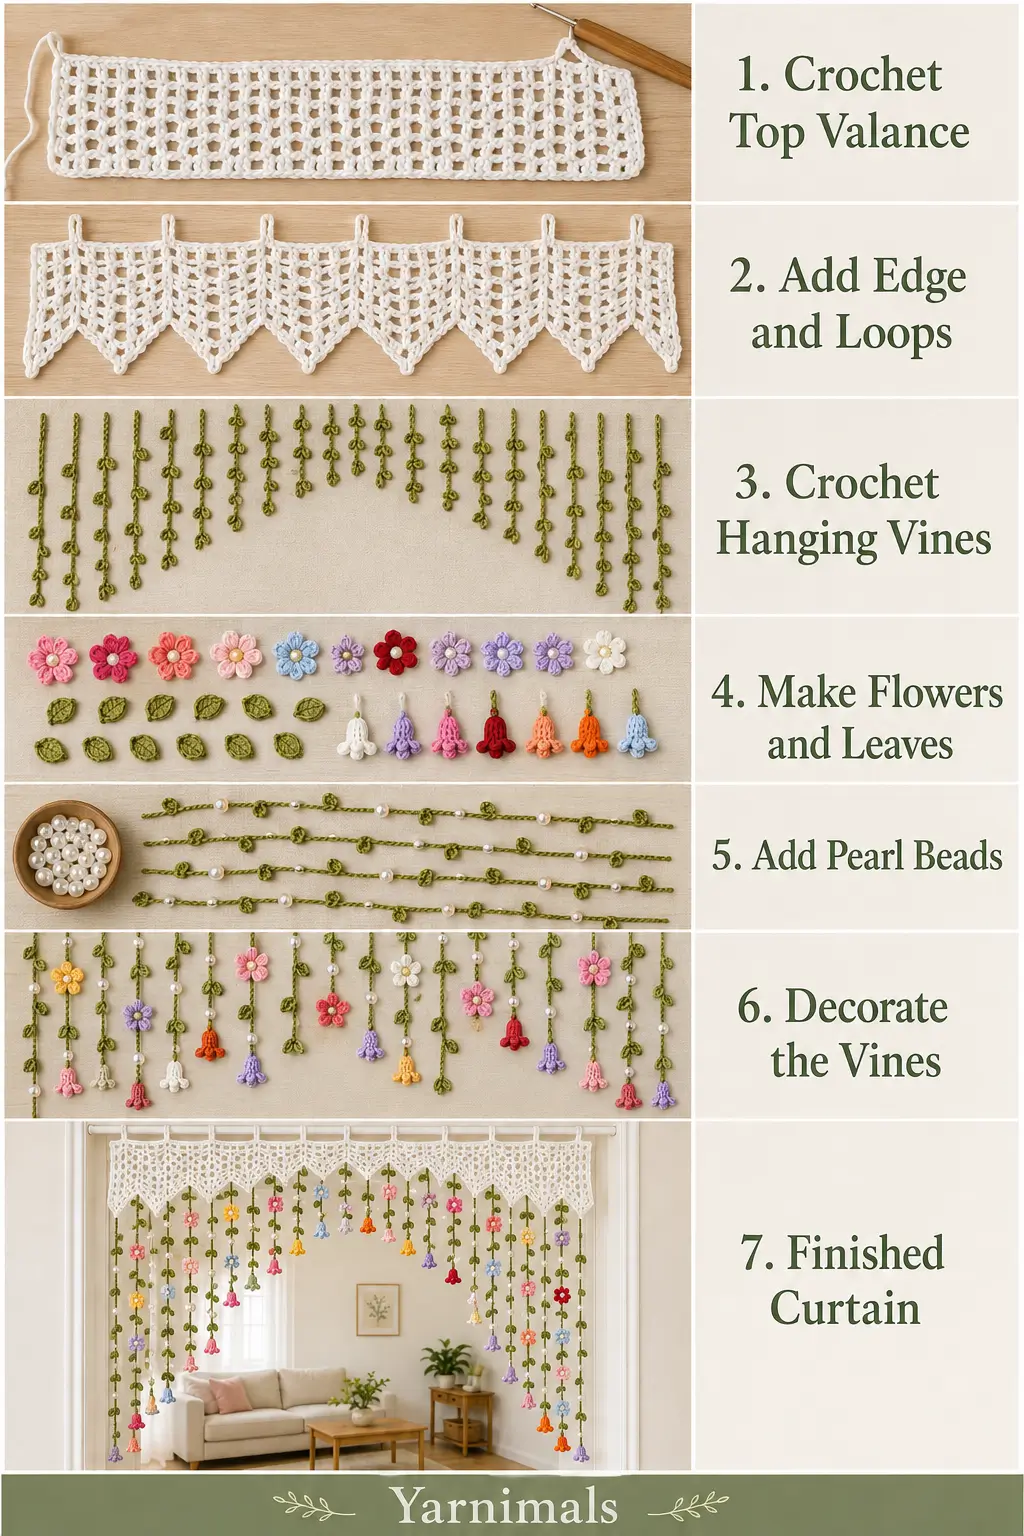
The curtain is made in separate sections:
- white upper valance
- green hanging vines
- flat flowers
- bell flowers
- tiny leaves
- pearl accents
- assembly
The sample curtain uses approximately 20–24 hanging vines, but you can adjust the number to suit your doorway or window width.
The vines should not all be identical. Varying their lengths and flower placement gives the curtain its natural hanging-garden appearance.
For a standard doorway, aim for a finished width of approximately:
34–40 in / 86–102 cm
The total hanging length can be approximately:
45–55 in / 114–140 cm
depending on your space.
Step-by-Step Instructions
Part 1 – White Crochet Valance
Measure your curtain rod or opening.
Make the foundation chain long enough to span the width of the opening.
For a medium-width doorway, begin with approximately:
ch 145–165
The exact stitch count is less important than the finished width.
Row 1
Dc in the 4th ch from hook.
Dc in every ch across.
Turn.
Row 2 – Mesh Row
Ch 4.
Skip 1 st.
Dc in next st.
Repeat:
ch 1, skip 1, dc in next st
across.
Turn.
Row 3
Ch 3.
Dc in every dc and every ch-1 sp across.
Turn.
Row 4 – Second Mesh Row
Repeat Row 2.
Row 5
Repeat Row 3.
You now have alternating solid and open mesh rows.
Lower Decorative Edge
Row 6
Ch 1.
Sc in first st.
Skip 2 sts.
Work 5 dc in next st.
Skip 2 sts.
Sc in next st.
Repeat:
skip 2, 5 dc in next st, skip 2, sc in next st
across.
This creates a softly scalloped lower edge.
Row 7 – Pointed Detail
Work along the shell edge.
In the center dc of each 5-dc shell:
Work:
sc, ch 3, sc
This creates a small downward point.
Sl st or sc between shells as needed.
Fasten off.
Part 2 – Top Hanging Loops
Join white yarn along the top edge.
Make loops approximately every 3–4 inches.
For each loop:
Sc into the top edge.
Ch 12.
Skip approximately 6–8 sts.
Sc into the next selected stitch.
Repeat across the entire width.
Make sure the loops are large enough to slide easily over your curtain rod.
For a wide curtain, you may need approximately:
10–14 loops
Fasten off.
Part 3 – Green Hanging Vines
Make approximately 20–24 vines.
Using olive-green yarn.
Each vine begins at the lower edge of the white valance.
Do not make every vine the same length.
Use three approximate lengths:
Short Vines
30–34 in / 76–86 cm
Medium Vines
36–42 in / 91–107 cm
Long Vines
44–50 in / 112–127 cm
Use longer vines toward the sides and shorter vines near the center if you want the curtain to form an upward center arch like the inspiration.
Vine
Join green yarn to one lower valance point.
Ch until the vine reaches the desired length.
Then sl st back through approximately every second chain if you want a thicker, sturdier vine.
For a lighter vine, leave the chain as-is.
Fasten off at the bottom.
Repeat across the entire valance, spacing vines evenly.
Part 4 – Tiny Crochet Leaves
Make many small leaves in green.
You will need approximately 40–60 leaves depending on how full you want the curtain.
Leaf
Ch 6.
Sl st in 2nd ch from hook.
Sc in next ch.
Hdc in next 2 ch.
Sc in final ch.
Working along the opposite side of the foundation:
Sc in next ch.
Hdc in next 2 ch.
Sc in next ch.
Sl st into the tip.
Fasten off, leaving a short sewing tail.
The finished leaf should be small, pointed, and narrow.
Part 5 – Small Five-Petal Flowers
Use different colors throughout the curtain.
Make approximately 35–45 small flowers.
Flower Center
Make a magic ring.
Work 5 sc into the ring.
Pull closed.
Join with sl st.
Petals
In each of the 5 sts work:
sl st, ch 2, 2 dc, ch 2, sl st
Repeat around.
You will have:
5 petals
Fasten off.
Make flowers in:
- pink
- red
- yellow
- lavender
- blue
- white
- peach
- purple
Keep the flowers small enough that the vines remain light.
Part 6 – Small Six-Petal Flowers
Add a second flower shape to make the curtain more varied.
Make approximately 15–20.
Center
Magic ring.
Work 6 sc into ring.
Join.
Petals
In each stitch:
ch 2, hdc, dc, hdc, ch 2, sl st
Repeat around.
Fasten off.
These flowers are slightly more open than the five-petal version.
Part 7 – Bell Flowers
The lower ends of many vines have hanging bell-shaped flowers.
Make approximately 12–16.
Using any flower color.
Round 1
Magic ring.
Work 6 sc.
Join.
Round 2
Work 2 sc in every st.
12 sts.
Round 3
Sc around.
12 sts.
Round 4
Repeat:
sc in next st, 2 sc in next st
around.
18 sts.
Round 5 – Flared Edge
Repeat:
sl st in next st, ch 2, sl st in next st
around.
Fasten off.
Gently shape the flower downward into a bell.
Part 8 – Pearl Accents
Add small white pearl beads directly to selected vines.
Do not place pearls on every vine.
Aim for approximately:
2–5 beads per decorated vine
Space them unevenly for a more natural appearance.
You can attach pearls using:
- green thread
- fine sewing thread
- crochet thread
Secure every bead firmly.
Keep the pearls small so they do not overwhelm the crochet flowers.
Part 9 – Arrange the Decorations
Lay the curtain flat before sewing anything permanently.
Spread all vines out.
Now arrange:
- flowers
- leaves
- pearls
- bell flowers
across the vines.
Do not make every strand identical.
A balanced vine might contain:
- 2 small flowers
- 2 leaves
- 2 pearl beads
- 1 bell flower at the bottom
Another might contain:
- 3 small flowers
- 1 leaf
- 4 pearls
Another might contain:
- 1 flower
- 3 leaves
- 2 pearls
- 1 bell flower
This irregular distribution is important for the natural hanging-garden appearance.
Part 10 – Attach Flat Flowers
Using matching yarn and a yarn needle:
Position a flower directly over the green vine.
Sew through the flower center and around the vine several times.
Secure firmly.
Weave in ends.
Repeat for all flat flowers.
Part 11 – Attach Leaves
Place leaves at different angles along the vines.
Some should point left.
Some should point right.
Some can sit immediately underneath a flower.
Sew only the base of each leaf to the vine.
Leave the pointed end free.
Part 12 – Attach Bell Flowers
Place bell flowers primarily near the bottom ends of vines.
Thread the vine through the top center of the flower or sew the flower firmly onto the final few chain stitches.
The bell opening should face downward.
Some vines can end with:
- one bell flower
Others can end with:
- two smaller bells
Keep the hanging shapes varied.
Part 13 – Create the Center Arch
To reproduce the softly raised center opening visible in the design, organize the vines by length.
At the far left and right:
Use the longest strands.
Moving toward the center:
Gradually shorten each vine.
At the center:
Use the shortest vines.
This creates an inverted arch under the curtain and keeps the central area visually open.
Suggested Vine Layout
For 21 vines:
- Vines 1–3: long
- Vines 4–6: medium-long
- Vines 7–9: medium
- Vines 10–12: shortest
- Vines 13–15: medium
- Vines 16–18: medium-long
- Vines 19–21: long
Do not make the transition perfectly geometric. Slight variation looks more natural.
Finishing
Weave in all yarn ends.
Check every flower, leaf, and bead.
Make sure nothing is loosely attached.
Hang the white valance on the rod.
Allow the vines to fall naturally.
Separate any strands that twist around each other.
Shape flowers and leaves with your fingers.
Gently steam-block the white valance if necessary, but avoid steaming plastic pearl beads.
Design Consistency Lock
For this exact flower curtain, keep:
- white openwork crochet valance
- scalloped pointed lower valance edge
- top hanging loops
- olive-green hanging vines
- many colorful small crochet flowers
- small green leaves
- white pearl accents
- bell-shaped flowers near the lower ends
- varied vine lengths
- shorter vines near the center
- longer vines toward the outer edges
- airy open curtain effect
Use flower colors including:
- bright pink
- pale pink
- red
- yellow
- lavender
- purple
- baby blue
- white
- peach
Do not turn the curtain into one solid crochet panel.
Do not make all flowers identical.
Do not add fabric backing.
Do not add heavy tassels.
Do not use thick bulky yarn.
Do not make all hanging strands the same length.
Tips & Variations
Cotton or cotton-blend yarn is an excellent choice because the flowers and leaves hold their shape well.
Use slightly thinner yarn for the flowers if you want a more delicate curtain.
Make the green vines first and hang them temporarily before attaching decorations. This makes it much easier to judge flower placement.
Do not overcrowd every vine. Empty green sections help the individual flowers remain visible.
If the curtain will hang in a sunny window, choose colorfast yarn to help prevent fading.
For a simpler version, omit the pearls and use only crochet flowers and leaves.
For a romantic version, use mostly blush, cream, lavender, and pale blue flowers.
For a brighter garden version, keep the full mixed-color palette.
FAQ
Can I adjust this crochet curtain to my doorway?
Yes. Make the white valance to the exact width of your opening, then add as many hanging vines as needed.
Do all the flower strands need to be the same length?
No. Different lengths are part of the design. Shortening the middle strands creates the open arch visible in the finished curtain.
Are all the flowers made with the same pattern?
No. Using a mixture of flat five-petal flowers, slightly larger six-petal flowers, and hanging bell flowers creates a much more natural floral effect.
Conclusion
This crochet flower curtain turns a simple white valance and green crochet chains into a colorful hanging garden. The mixed flowers, tiny leaves, pearl details, bell-shaped blooms, and varied vine lengths give the finished curtain a light whimsical look while keeping the doorway open and bright. Customize the width and flower placement to your own space, then save the pattern and create your own combination of favorite garden colors.



