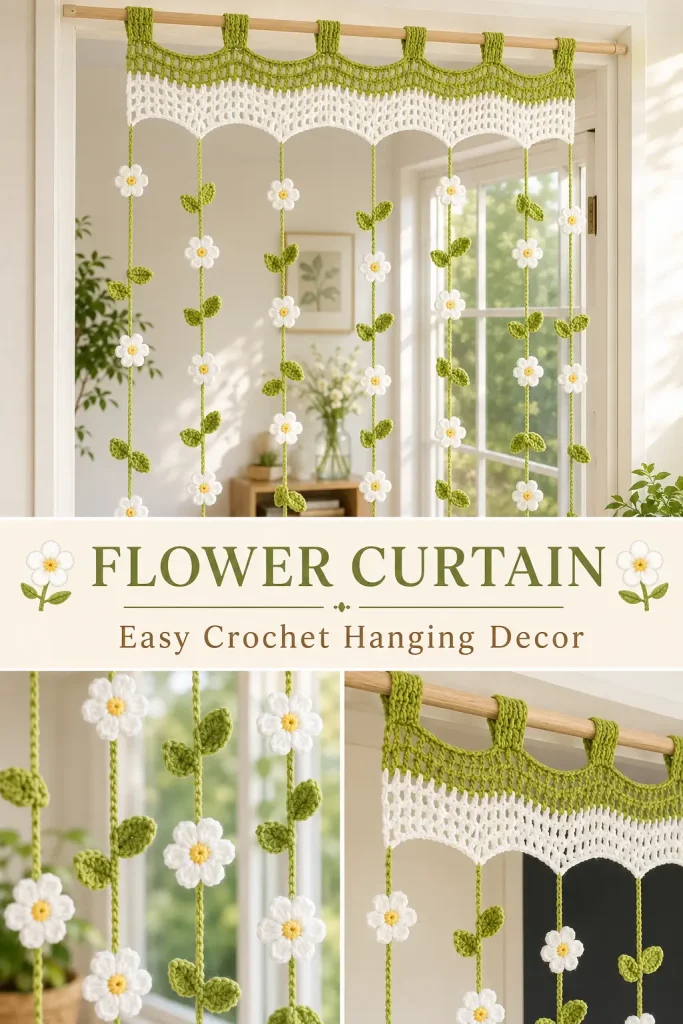
This crochet flower curtain brings the feeling of a small indoor garden to a doorway, window, nursery, or reading corner. A light green and cream filet valance hangs from a wooden rod, while long leafy vines fall beneath it with small white flowers and soft yellow centers.
The curtain is easy to customize because the width begins with a simple foundation chain and the hanging branches can be shortened or lengthened. The alternating vine layouts prevent the flowers and leaves from lining up in rigid rows, creating the natural cascading look shown in the finished design.
Description
The finished crochet curtain has a rectangular filet-mesh valance worked in three green rows and four cream rows. Eight matching green tabs fold around a wooden rod and hold the valance securely in place.
Eight long green branches hang from the lower edge. Each branch begins with a softly stuffed teardrop weight and includes six shaped crochet leaves. Two branch layouts alternate across the curtain so the leaves sit at different heights. Small six-petal white flowers with yellow centers are attached between the leaves, producing an airy floral curtain with gentle movement.
The sample uses a 90 cm wooden rod, an approximately 82 cm-wide valance beginning with 160 chains, eight hanging tabs, and branches measuring about 87 cm.
Materials
- DK or light worsted-weight yarn in leaf green, approximately 100–150 g
- DK or light worsted-weight yarn in cream or warm white, approximately 80–100 g
- Small amount of yellow yarn for flower centers
- 4 mm crochet hook
- Yarn needle
- Scissors
- Stitch markers
- Small amount of polyester fiberfill
- Wooden dowel or curtain rod, approximately 90 cm for the sample
- Measuring tape
- Sewing pins, optional
Abbreviations
- ch: chain
- dc: double crochet
- dec: decrease
- hdc: half double crochet
- inc: two single crochet stitches in the same stitch
- MR: magic ring
- rnd: round
- sc: single crochet
- sl st: slip stitch
- sp: space
- st: stitch
- sts: stitches
Finished Size
Sample dimensions:
- Wooden rod: approximately 90 cm
- Valance width: approximately 82 cm
- Hanging branch length: approximately 87 cm
- Approximate total curtain drop: 95–100 cm
- Valance tabs: eight
The finished dimensions depend on yarn, tension, branch count, and the size of the doorway or window.
Pattern Notes
- This pattern uses US crochet terminology.
- The valance is worked flat in turning rows.
- The flower centers, teardrop weights, and leaves are worked separately.
- Each flower has six petals.
- Each hanging branch has six leaves.
- Branch Type One begins with 18 chains before its first leaf.
- Branch Type Two begins with 30 chains before its first leaf.
- Both branch styles use 24 chains between leaves.
- Branch Type One ends with 24 chains.
- Branch Type Two ends with 12 chains.
- Alternate the two branch styles across the curtain.
- The sample uses eight hanging branches: four of each type.
- Sew the flowers to the vines for the most secure finish.
- Keep the same right side facing forward when attaching all tabs, vines, leaves, and flowers.
- Difficulty level: confident beginner to intermediate.
Step-by-Step Instructions
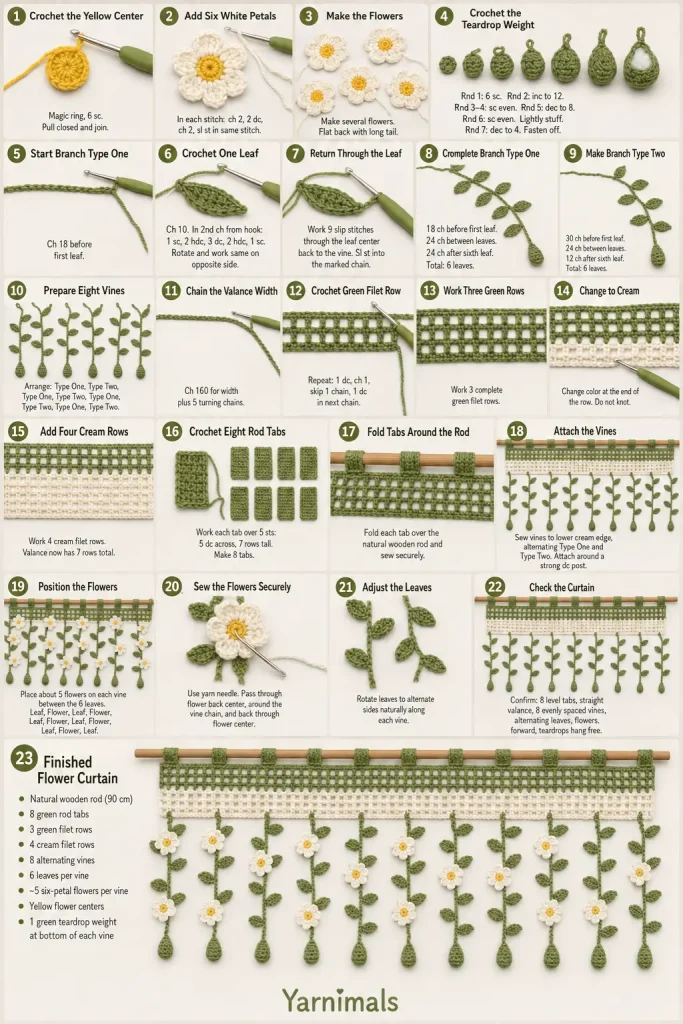
Six-Petal Crochet Flowers
Make approximately 40 flowers for the eight-branch sample, allowing five flowers for each branch.
Yellow Center
Using yellow yarn:
Round 1
Make 6 sc in a MR.
Pull the ring firmly closed.
Join with a sl st to the first sc.
Ch 1 and fasten off.
6 sts
White Petals
Join cream or white yarn in any yellow center stitch.
Petal 1
In the same stitch, work:
- Ch 2
- 2 dc
- Ch 2
- Sl st in the same stitch
Sl st in the next yellow sc.
Petals 2–6
Repeat the same petal instructions in each remaining yellow sc:
- Ch 2
- 2 dc
- Ch 2
- Sl st in the same stitch
- Sl st in the next yellow sc
After completing the sixth petal, fasten off.
Leave a long cream tail when the flower will be sewn to a vine.
The completed flower should have:
- One small yellow center
- Six rounded white petals
- A flat back
- No loose center opening
Teardrop Vine Weight
Make one for each hanging branch.
Using green yarn:
Round 1
Make 6 sc in a MR.
6 sts
Round 2
Inc in every st around.
12 sts
Rounds 3–4
Sc in each st around.
12 sts
Round 5
Repeat four times:
- Sc in the next st
- Dec
8 sts
Round 6
Sc in each st around.
8 sts
Add a small amount of fiberfill.
Keep the piece lightly stuffed so it hangs without becoming bulky.
Round 7
Dec four times.
4 sts
Flatten the remaining opening.
Work sc through the front and back layers to close it.
Do not fasten off. Continue directly into the selected branch pattern.
Crochet Leaf
Every leaf begins with 10 chains.
Leaf Foundation
Ch 10.
Beginning in the second ch from the hook, work:
- Sc in the first ch
- Hdc in each of the next 2 ch
- Dc in each of the next 3 ch
- Hdc in each of the next 2 ch
- Sc in the final ch
Rotate the foundation chain.
Working along the unused loops on the opposite side, work:
- Sc in the same final chain
- Hdc in each of the next 2 loops
- Dc in each of the next 3 loops
- Hdc in each of the next 2 loops
- Sc in the final loop
Join with a sl st to the first sc.
Return Through the Leaf Center
Work 9 sl sts through the center spine of the leaf, returning toward the branch.
Sl st into the marked branch chain where the leaf began.
The finished leaf should be pointed at both ends with a firm central spine.
Branch Type One
Make four.
Complete the green teardrop weight without fastening off.
First Stem Section
Ch 18.
Place a marker in the eighteenth chain.
Make one leaf:
- Ch 10
- Work the complete leaf pattern
- Sl st back through the leaf center
- Sl st into the marked eighteenth chain
Remaining Leaves
Ch 24.
Make the second leaf using the same instructions.
Repeat until the branch contains six leaves total.
Always work 24 chains between leaves.
Final Stem Section
After completing the sixth leaf, ch 24.
Fasten off, leaving a long tail for attaching the branch to the valance.
Branch Type One contains:
- One teardrop weight
- 18 chains before the first leaf
- Six leaves
- 24 chains between leaves
- 24 chains after the final leaf
The finished branch should measure approximately 87 cm.
Branch Type Two
Make four.
Complete the green teardrop weight without fastening off.
First Stem Section
Ch 30.
Place a marker in the thirtieth chain.
Make the first leaf using the complete leaf instructions.
Sl st back through the leaf center and into the marked branch chain.
Remaining Leaves
Ch 24.
Make the second leaf.
Continue until the branch contains six leaves, always using 24 chains between leaves.
Final Stem Section
After completing the sixth leaf, ch 12.
Fasten off, leaving a long attachment tail.
Branch Type Two contains:
- One teardrop weight
- 30 chains before the first leaf
- Six leaves
- 24 chains between leaves
- 12 chains after the final leaf
Alternating Type One and Type Two makes the leaves sit at different heights.
Crochet the Filet Valance
The sample begins with 160 foundation chains and measures approximately 82 cm wide.
To customize the width, make a foundation chain that fits the doorway or window. Use an even number of chains.
Using green yarn:
Foundation
Ch 160.
Ch 5 more for the turning height and first mesh space.
You now have 165 chains.
Row 1
Work 1 dc in the sixth ch from the hook.
Ch 1.
Skip the next foundation ch.
Work 1 dc in the following ch.
Repeat across:
- Ch 1
- Skip 1 ch
- Dc in the next ch
Turn.
Row 2
Ch 4.
The first 3 chains count as the first dc, and the fourth chain forms the first ch-1 sp.
Work 1 dc in the next dc.
Repeat across:
- Ch 1
- Dc in the next dc
At the end, work the final dc into the third chain of the previous turning chain.
Turn.
Row 3
Repeat Row 2 using green.
Fasten off green at the end of Row 3.
Rows 4–7
Join cream yarn.
Repeat Row 2 for four rows.
The completed valance contains:
- Three green filet rows
- Four cream filet rows
- Seven rows total
- No increases or decreases
Fasten off after Row 7.
Crochet the Rod Tabs
Make eight tabs using green yarn.
Arrange the tabs evenly across the upper green edge. The sample spaces the tabs by approximately ten top-edge mesh positions.
Each tab spans five top-edge positions and is seven rows long.
Tab Row 1
With the valance right side facing, join green yarn at the selected top-edge position.
Ch 3. This counts as the first dc.
Work 1 dc in each of the next 4 top-edge positions.
Turn.
5 dc
Tab Rows 2–7
Ch 3.
Dc in each of the next 4 sts.
Turn.
5 dc
Fasten off after Row 7, leaving a long sewing tail.
Repeat for all eight tabs.
Keep every tab attached from the same side of the valance.
Attach the Tabs Around the Rod
Place the wooden rod across the upper edge.
Fold each tab over the rod.
Align the final tab row with the base of the tab.
Using the long green tail, sew the folded end securely to the valance.
Pass the yarn needle through:
- One stitch from the final tab row
- The corresponding stitch at the tab base
Continue across all five stitches.
Knot securely and weave in the yarn.
Repeat for all eight tabs.
Check that:
- The rod slides through all loops
- Every tab faces the same direction
- The valance hangs level
- The tabs are evenly spaced
Attach the Hanging Branches
Lay the valance flat with the right side facing upward.
Arrange the eight branches below the lower cream edge in this order:
- Type One
- Type Two
- Type One
- Type Two
- Type One
- Type Two
- Type One
- Type Two
Space them evenly across the width.
The teardrop weights should hang at the bottom.
The leaves should face forward.
Using each branch’s long green tail:
- Pass the tail through the lower cream edge.
- Tie it securely around a stable dc or ch-sp.
- Sew through the branch chain several times.
- Weave the remaining tail into the green chain.
Do not attach the branches to loose chain loops alone. Secure them around the stronger dc posts whenever possible.
Attach the Flowers
Place five flowers along each branch.
Arrange them between the six leaves so the pattern reads:
- Leaf
- Flower
- Leaf
- Flower
- Leaf
- Flower
- Leaf
- Flower
- Leaf
- Flower
- Leaf
Position some flowers on the left of the stem and others on the right so the curtain looks natural.
Using the long cream tail:
- Sew through the back center of the flower.
- Pass the needle around the green branch chain.
- Return through the flower center.
- Repeat several times.
- Secure the tail behind the flower.
Keep every flower facing forward.
Do not sew through the flower petals more than necessary.
Adjust the Flower and Leaf Direction
Hang the curtain temporarily from the rod.
Stand back and inspect the placement.
Rotate individual leaves and flowers so:
- The leaves alternate naturally
- The flowers do not form rigid horizontal rows
- Both curtain sides have similar visual weight
- The teardrops hang freely
- No branches twist backward
Add small hidden stitches where a leaf or flower refuses to face forward.
Final Finishing
Weave in every remaining yarn end.
Check that:
- The valance lies flat
- The green and cream rows remain straight
- All eight tabs are secure
- The rod is fully supported
- The branches alternate Type One and Type Two
- Every branch contains six leaves
- Each branch has approximately five flowers
- All motifs face forward
- The teardrop weights are lightly stuffed
- No loose sewing tails remain
Lightly steam or damp-block the valance if needed.
Do not press directly onto the raised petals or stuffed teardrops.
Hang the curtain and allow the branches to settle naturally.
Tips & Variations
Use cotton or a cotton-acrylic blend when you want crisp flowers and leaves. Soft acrylic creates a lighter curtain with more movement.
Add or remove foundation chains to match the width of the rod. Keep the foundation count even so the filet repeat remains balanced.
Shorten the curtain by using fewer leaves or fewer chains between leaves.
Lengthen it by adding more 24-chain sections and additional leaves.
For a denser curtain, add more branches while keeping them evenly spaced.
Use warm white petals with yellow centers for the daisy look shown here, or try pale pink, lavender, or light blue flowers.
Replace the cream valance section with white when decorating a bright, modern room.
For a child’s room, sew every flower securely rather than attaching it with glue.
The rod tabs can be widened by using more than five dc, but all tabs should use the same width.
FAQ
How do I resize the curtain for another window?
Measure the rod or opening and make an even-numbered foundation chain that reaches the required width without stretching. Work the same seven valance rows, then distribute the tabs and branches evenly.
Why do the two branch patterns begin with different chain lengths?
The first branch begins with 18 chains and the second begins with 30 chains so the leaves and flowers sit at alternating heights. This prevents the curtain from looking too uniform.
Can I make the flowers directly on the vines?
The flowers are easier to shape when made separately. Sewing them to the vines also gives you more control over their placement and direction.
Conclusion
This crochet flower curtain combines a simple green-and-cream filet valance with long leafy branches, small white flowers, and gently weighted ends. The alternating vine layouts give the finished curtain a natural garden-inspired appearance while keeping the individual crochet pieces easy to repeat.
Make the curtain to fit a doorway, window, nursery wall, or cozy reading corner, then adjust the branch length and flower colors to create a handmade crochet home decoration that suits your space.




Simply lovely💝
I want to make it for my new home🥰
You sent the instructions via PDF for a table runner edged in pink flowers, and sage green leaves. I loved it and purchased the yarn and when I began to crochet it, the pattern had disappeared online. I’m so upset because I spent a lot of money on yarn and anticipation of making this table runner and now I can’t and I don’t know what to do with all the yarn. It was supposed to be a gift for somebody. Is there any way to get the pattern?
Hi there, I am so sorry you are in this situation! It is incredibly frustrating to have the yarn ready for a special gift and no pattern to follow.
I want to clarify that I do not sell patterns on my page—everything I share here is always free. It sounds like you may have purchased the PDF from another creator. I highly recommend checking your email receipts, bank statements, or download history to find the original source of the purchase so you can reach out to them directly.
However, I definitely do not want your beautiful pink and sage green yarn to go to waste. If you can describe exactly what the table runner looked like, I can recommend a similar pattern for you. Alternatively, if it sounds like a fantastic design, I could even try building a new pattern for you and sharing it with the rest of my audience!