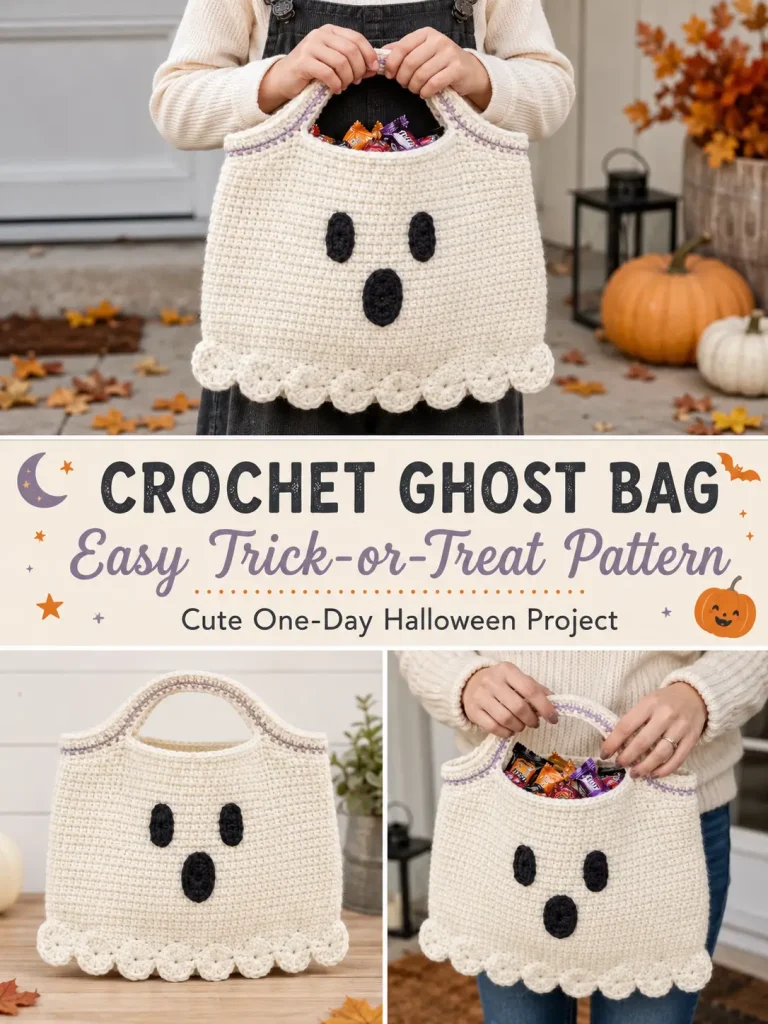
This little crochet ghost is cute enough to carry around before Halloween—but the best part is that it is actually a working trick-or-treat bag.
The construction is intentionally simple.
You crochet a small oval base, work the body straight upward, build the handles directly into the final rounds, and then add three small face pieces.
A row of soft scallops around the bottom gives the bag that recognizable wavy ghost shape without making the actual bottom uneven or difficult to use.
There are:
- no complicated color changes
- no separate front and back panels
- no zipper
- no lining required
- no safety eyes
- no complicated shaping
A confident beginner could comfortably make this as a one-day Halloween project.
Pattern at a Glance
Skill level: Confident beginner
Terminology: US crochet terms
Construction: Bottom-up in continuous rounds
Finished width: Approximately 8½–10 inches when laid flat
Finished height: Approximately 9–10 inches, excluding handle opening
Main stitch: Half double crochet
Suggested yarn: Worsted-weight / Category 4
Hook: 5 mm
Main color: Warm ivory
Face: Charcoal black
Optional accent: Dusty lavender
Exact finished measurements will depend on yarn, hook, and tension.
Materials
You will need:
- Worsted-weight / Category 4 yarn in warm ivory
- Small amount of charcoal-black worsted yarn
- Optional small amount of dusty-lavender yarn
- 5 mm crochet hook
- Yarn needle
- Scissors
- Stitch marker
- Measuring tape
For a children’s bag, choose a durable washable yarn.
A smooth acrylic, cotton blend, or similar medium-weight yarn works well.
Abbreviations
- ch = chain
- sc = single crochet
- hdc = half double crochet
- dc = double crochet
- sl st = slip stitch
- inc = 2 sc in the same stitch
- BLO = back loop only
- FLO = front loop only
- st = stitch
- sts = stitches
The bag is worked in continuous rounds unless otherwise stated.
Move your stitch marker to the first stitch of every new round.
PART 1 — CROCHET THE OVAL BASE
Using warm-ivory yarn:
Ch 25.
We are going to crochet around both sides of this foundation chain.
Round 1
Starting in the second chain from the hook:
Work:
2 sc in the first chain
Sc in each of the next:
22 chains
In the final chain work:
4 sc
Now rotate the chain so you can work along the opposite side of the foundation.
Work:
1 sc in each of the next 22 chain loops
In the same foundation chain where you worked the first 2 sc, work:
2 more sc
You should have:
52 sts
Place your stitch marker in the first stitch.
Do not join.
Round 2
Work:
Inc in each of the first 2 sts
Sc in each of the next:
22 sts
Work:
Inc in each of the next 4 sts
Sc in each of the next:
22 sts
Work:
Inc in each of the final 2 sts
You should now have:
60 sts
The base should look like a neat elongated oval.
Check the Base
Lay it flat.
The oval should:
- remain flat
- have gently rounded ends
- show no strong ruffling
- show no severe cupping
A little softness is fine.
PART 2 — CREATE THE TURNING RIDGE
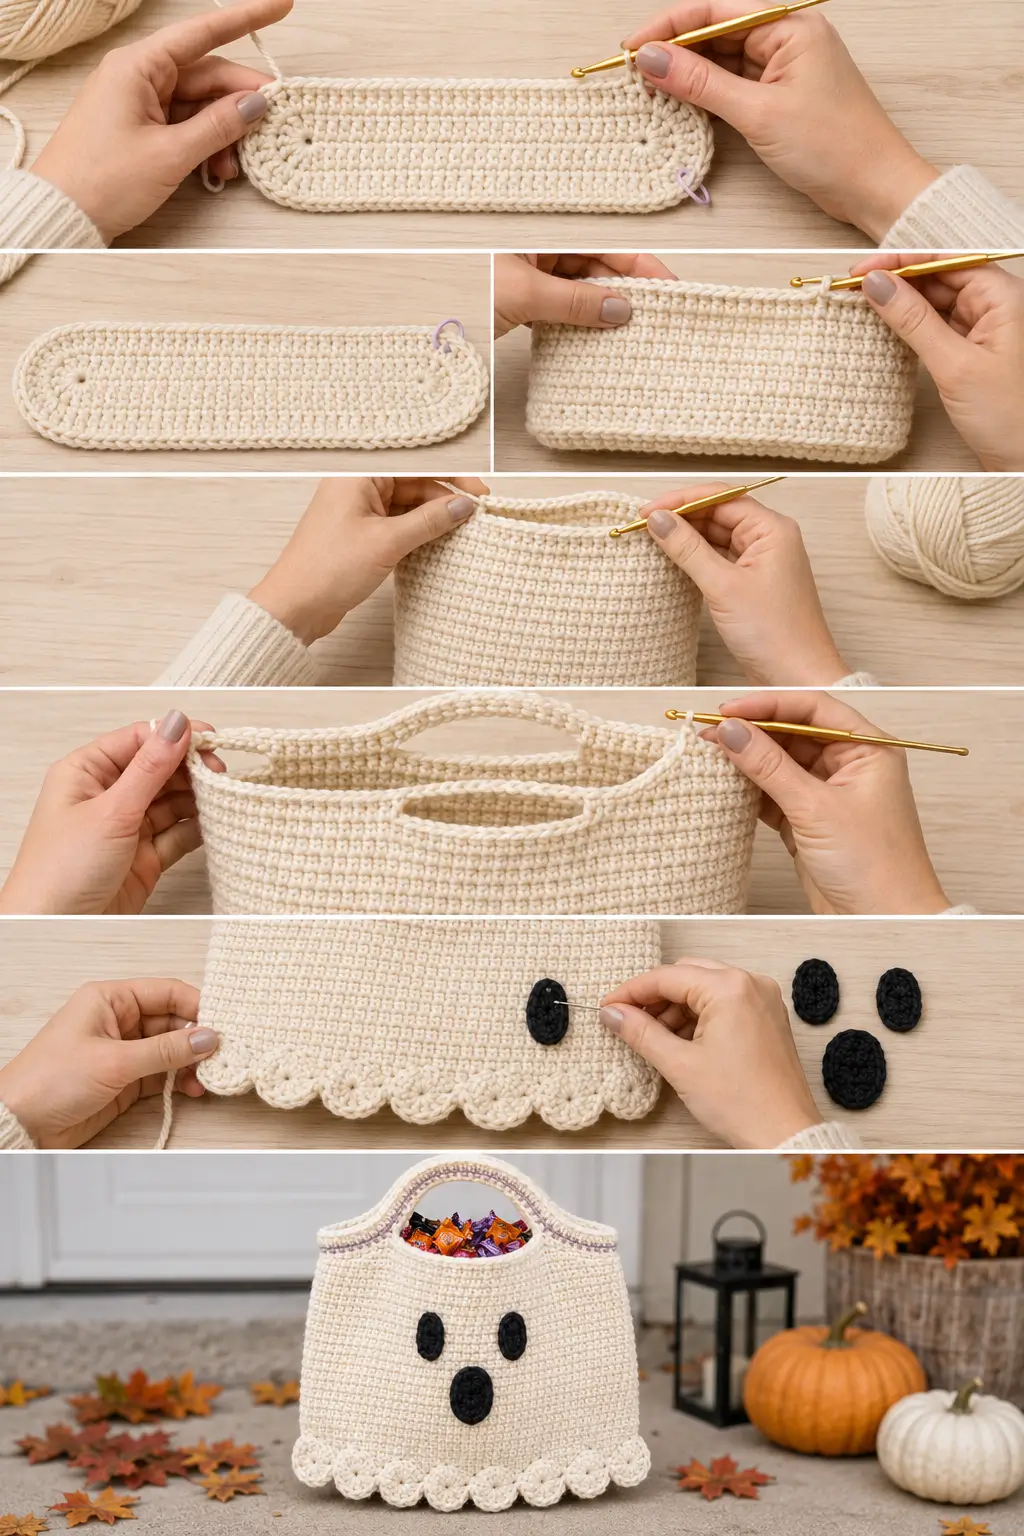
Round 3
Working in the back loop only:
Sc BLO in every stitch around
Keep:
60 sts
This creates a subtle ridge and encourages the sides of the bag to begin turning upward.
Important
The unused front loops from Round 2 will be used later for the decorative ghost scallops.
Do not crochet into them.
PART 3 — CROCHET THE GHOST BODY
Return to working through both loops.
Round 4
Hdc in every stitch around.
60 hdc
Rounds 5–20
Continue:
Hdc in every stitch around
Keep:
60 sts per round
You will work:
17 hdc rounds total from Rounds 4–20
The bag should gradually become a simple upright pouch.
There are no increases.
Check the Height
At the end of Round 20, measure from the base ridge upward.
You should have approximately:
6½–7½ inches
depending on your yarn and gauge.
If you want a slightly taller candy bag, add:
1–3 additional hdc rounds
before continuing.
Always keep:
60 sts
PART 4 — STABILIZE THE TOP
Round 21
Work:
1 sc in every stitch around
60 sts
Single crochet creates a slightly firmer edge before the handle openings.
PART 5 — MAKE THE INTEGRATED HANDLES
The two handle openings are built directly into the bag.
There is no separate strap to sew on.
Lay the bag flat and make sure the beginning of the round sits approximately at one side.
Round 22 — Handle Openings
Sc in the next:
10 sts
Now make the first handle opening:
Ch 12
Skip the next:
10 sts
Sc in the next:
20 sts
Make the second handle:
Ch 12
Skip the next:
10 sts
Sc in the final:
10 sts
You now have two matching openings directly opposite one another.
Check the Handle Placement
Lay the bag flat.
You should see:
- one centered opening on the front
- one centered opening on the back
If one opening looks noticeably off-center, undo this round and reposition it before continuing.
PART 6 — REINFORCE THE HANDLES
Round 23
Sc in the first:
10 sts
When you reach the first ch-12 opening, do not work 12 stitches into it.
Instead, work:
10 sc evenly around the entire chain-12 space
Continue:
Sc in next 20 sts
At the second handle opening:
10 sc evenly around the chain-12 space
Then:
Sc in final 10 sts
You should again have:
60 sts
This is important.
Working only 10 sc around each 12-chain handle keeps the bag from suddenly flaring outward.
Round 24
Work:
1 sc in every stitch around
60 sts
Round 25
Repeat:
1 sc in every stitch around
60 sts
Fasten off.
Optional Lavender Handle Accent
If you want the soft lavender detail from this version, join dusty-lavender yarn anywhere along one handle opening.
Work:
sl st loosely around the entire handle opening
Fasten off.
Repeat on the second handle.
Keep these slip stitches relaxed so they do not shrink the openings.
This accent is optional.
PART 7 — ADD THE WAVY GHOST HEM
Remember the unused front loops from Round 2?
We are going to crochet into those loops now.
This gives the bottom of the bag a cute ghost-like wave while leaving the actual oval base completely closed and functional.
Turn the bag upside down so the unused loops are easy to reach.
Join warm-ivory yarn in any unused front loop.
Ghost Scallop Round
Repeat the following around:
Sl st in next front loop
Skip the next:
2 front loops
Work:
5 dc in the next front loop
Skip:
2 front loops
Repeat around.
Because the base has 60 stitches, you should create:
10 scallops
around the bag.
Join with a slip stitch.
Fasten off.
What the Ghost Hem Should Look Like
The scallops should hang gently around the lower edge.
They should create:
soft waves rather than a stiff ruffle
The oval base remains underneath, so candy cannot fall through the decorative edge.
If the Scallops Curl Too Much
Possible causes:
- very tight tension
- hook too small
- stiff yarn
Try gently shaping the scallops with your fingers.
If necessary, lightly block the lower edge according to your yarn’s care instructions.
PART 8 — CROCHET THE GHOST EYES
Use charcoal-black yarn.
Make:
2 identical eyes
Eye
Ch:
5
Starting in the second chain from the hook:
Work:
2 sc in first chain
Sc in each of the next:
2 chains
In the last chain work:
4 sc
Now work along the opposite side:
Sc in each of the next:
2 chain loops
In the starting chain work:
2 sc
You should have:
12 sts
Join with sl st.
Fasten off, leaving a long sewing tail.
Shape the Eyes
The eyes should be small vertical ovals.
Gently stretch each piece lengthwise with your fingers.
Do not block them wide.
PART 9 — CROCHET THE MOUTH
Using charcoal-black yarn:
Ch 7
Starting in the second chain:
Work:
2 sc in first chain
Sc in each of the next:
4 chains
Work:
4 sc in the final chain
Continue along the opposite side:
Sc in each of the next:
4 chain loops
Work:
2 sc in the starting chain
You should have:
16 sts
Join.
Fasten off, leaving a long sewing tail.
This creates a slightly larger oval mouth.
PART 10 — POSITION THE FACE
Lay the bag flat.
Choose one side as the front.
Place the eyes approximately:
2–2½ inches below the handle opening
Space them approximately:
2–2½ inches apart
depending on your actual finished bag width.
Place the mouth:
1–1½ inches below the eyes
The mouth should sit vertically or very slightly tilted.
Check the Expression
Before sewing:
- Pin the pieces temporarily.
- Hold the bag upright.
- Look at it from several feet away.
The face should be:
- easy to recognize
- centered
- cute rather than frightening
Move the pieces until you like the expression.
PART 11 — SEW ON THE FACE
Thread the eye tail onto a yarn needle.
Using small stitches, sew around the outer edge of the eye.
Catch only the bag fabric beneath it.
Do not pull so tightly that the bag puckers.
Repeat for the second eye.
Then sew the mouth securely in the same way.
Weave all tails inside the bag.
Why I Prefer Crochet Face Pieces
For a children’s trick-or-treat bag, crocheted facial features are practical because there are:
- no plastic safety eyes
- no buttons
- no glued felt pieces
Everything can be sewn securely to the bag.
PART 12 — FINAL FINISHING
Turn the bag inside out.
Inspect all yarn ends.
Weave them securely through several stitches.
Change direction at least once before trimming.
Turn the bag right side out again.
Shape:
- oval base
- ghost scallops
- handle openings
- face
with your fingers.
Finished Size
Using worsted-weight yarn and a 5 mm hook, expect approximately:
8½–10 inches wide when laid flat
and:
9–10 inches high
depending on whether you added optional body rounds.
The size is intentionally suitable for a child’s Halloween candy bag without becoming huge or heavy.
What If the Bag Is Too Small?
If you notice while crocheting the body that you want more capacity, the easiest adjustment is to add height.
Add:
2–4 additional hdc rounds
before Round 21.
This increases capacity without changing the handle math.
What If I Need a Wider Bag?
For a significantly wider bag, you will need a larger oval base.
The easiest method is to begin with a longer foundation chain and increase the number of straight stitches on both sides equally.
However, if you change the final stitch count, you will also need to recalculate the centered handle placement.
For the beginner version, I recommend keeping the:
60-stitch body
because all later sections fit cleanly.
What If the Sides Flare Out?
Make sure you did not accidentally increase during the body rounds.
Rounds 4 onward should remain:
60 stitches
until the handle round.
What If the Bag Narrows?
Count your stitches.
Half double crochet stitches near the beginning of the round can sometimes become hidden.
Use a stitch marker every round.
You should always have:
60 stitches
through the body.
What If the Handle Openings Stretch?
The reinforcement rounds are important.
Make sure you completed:
- Round 23
- Round 24
- Round 25
If you expect the bag to carry a lot of candy, you can add:
one extra sc reinforcement round
before fastening off.
Optional Extra Handle Reinforcement
For an especially sturdy handle, thread a long strand of ivory yarn onto a needle.
Run a line of backstitch around the inside edge of each handle opening.
Keep the stitching hidden inside the crochet fabric.
This provides extra support without changing the outside appearance.
Can I Add a Fabric Lining?
Yes, but it is optional.
A lining can help if the bag will carry:
- lots of small candy
- heavy treats
- small objects that could poke through crochet stitches
Cut two fabric rectangles slightly smaller than the finished interior.
Sew them together along:
- sides
- bottom
Leave the top open.
Insert into the bag and hand sew around the upper edge below the handles.
Easy Color Variations
Classic Ghost
Body:
Warm ivory
Face:
Charcoal
No accent.
Soft Halloween Ghost
Body:
Warm ivory
Face:
Charcoal
Handle trim:
Dusty lavender
Candy-Corn Accent
Body:
Warm ivory
Face:
Charcoal
Handle trim:
Muted pumpkin orange
Friendly Pastel Ghost
Body:
Pale lavender
Face:
Charcoal
Scallop trim:
Warm ivory
Can I Make the Bag in Chunky Yarn?
Yes, but it will become substantially larger.
Do not automatically use the same stitch counts if you want the same finished dimensions.
With chunky yarn, make a swatch and consider:
- smaller foundation chain
- fewer body rounds
- larger hook appropriate to the yarn
Can I Use Cotton Yarn?
Yes.
Cotton creates a sturdy bag with excellent stitch definition.
A cotton/acrylic blend can also work nicely because it combines structure with a little softness.
Can Beginners Make This?
Yes, especially if you already know:
- chain
- single crochet
- half double crochet
- double crochet
- increasing
- working in continuous rounds
The most important part is simply counting the stitches in the oval base and body.
How Long Does It Take?
This is designed as a relatively quick Halloween project.
A confident crocheter can reasonably finish it in an afternoon or evening.
A newer crocheter may prefer to spread it across a day.
The bag is intentionally much quicker than:
- a Halloween blanket
- detailed amigurumi
- complicated character bags
- colorwork projects
Make One for Siblings
Because the pattern is simple, it is easy to make several without changing the construction.
Give each child a different handle accent:
- lavender
- sage
- dusty orange
- muted teal
- berry
The ghost body and face can remain identical.
Add a Name Without Changing the Pattern
If you want to personalize the bag, embroider a small child’s first initial on the back using a contrasting yarn.
Keep it small so the front ghost face remains the visual focus.
What Can the Bag Hold?
The standard size works well for:
- wrapped Halloween candy
- small treats
- lightweight Halloween toys
Do not overload the bag with very heavy items.
Crochet handles can stretch when heavily loaded.
Why the Bottom Scallops Work
The bag itself needs a closed stable base.
If we crocheted the actual bottom into deep waves, the bag would not sit well and would be harder to construct.
Instead, the oval base remains functional.
The unused front loops from the turning round give us a perfect place to attach a separate-looking scalloped edge without sewing anything on.
That gives us:
stable bag + ghost silhouette
at the same time.
Frequently Asked Questions
Is the bag worked from separate panels?
No.
The entire main bag is crocheted in one piece from the oval base upward.
How many stitches are in the main body?
60 stitches
Are the handles separate pieces?
No.
Both openings are built directly into the top of the bag.
How many ghost scallops are around the bottom?
10 scallops
Is the face made from felt?
No.
The eyes and mouth in this version are crocheted in black yarn and sewn securely to the bag.
Do I need a lining?
No.
The dense worsted-weight crochet fabric works well without one for ordinary wrapped candy.
A lining is optional if you want additional structure.
Can I skip the bottom scallops?
Yes.
The bag will still look like a ghost because of the ivory body and face.
The scallops simply make the silhouette more playful.
Is this suitable as a toy?
This pattern is designed as a trick-or-treat bag, not a stuffed toy.
Children should use handmade bags appropriately and under normal adult supervision.
Final Thoughts
The thing I like most about this Halloween project is how little complicated construction is hiding behind the finished result.
You make:
one oval
then:
one straight pouch
then:
two handle openings
The ghost waves are crocheted into loops that were already waiting at the bottom.
And the face is only three tiny pieces.
Once those eyes and mouth are sewn on, the plain ivory bag suddenly has a personality.
Fill it with Halloween candy, and it becomes even cuter.
For a project that can realistically be made in a day, it has exactly the kind of finished visual payoff I want from an easy Halloween crochet pattern.



