Crochet Lily-of-the-Valley Bracelet With Tiny White Flowers and Pearls
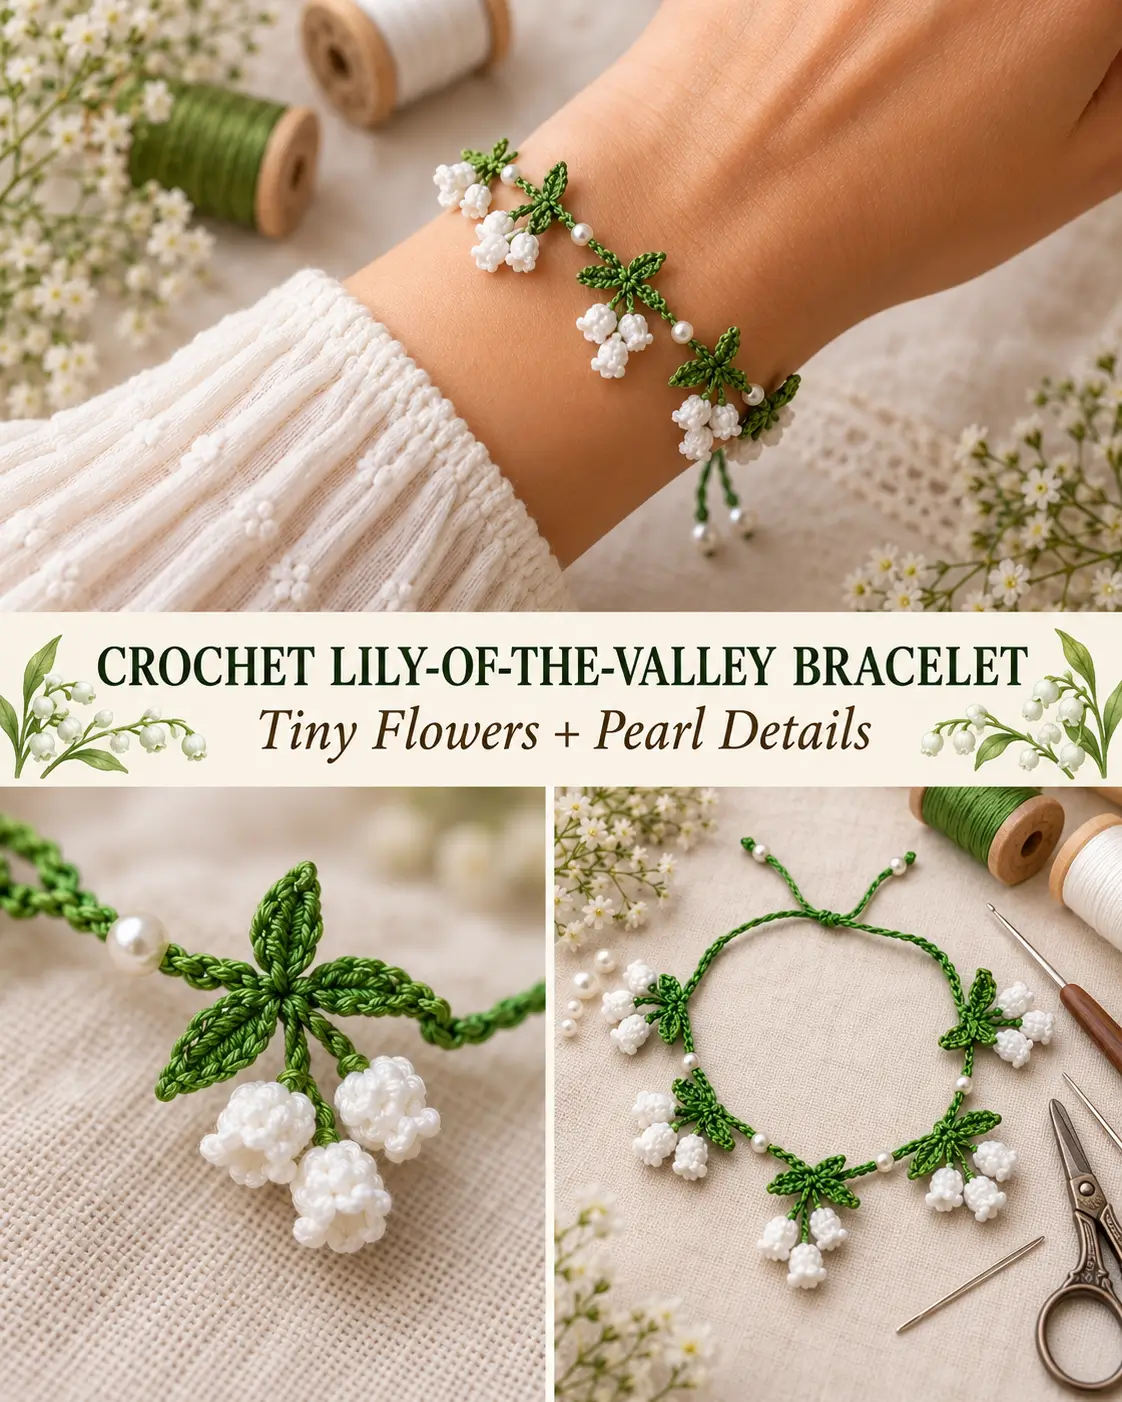
This delicate crochet bracelet combines a slim green vine, tiny pointed leaves, clusters of white bell-shaped flowers, and small pearl beads.
The bracelet is designed to match the graceful botanical look of the finished piece: five small floral sprigs spaced along a narrow green cord, pearl accents between the motifs, and two adjustable tie ends tipped with pearls.
The flowers and leaves are intentionally kept very small so the finished bracelet remains lightweight rather than looking like a floral garland.
Finished Size
Decorative floral section:
approximately 6–6½ inches / 15–16.5 cm
Tie cords:
approximately 2½–3 inches / 6–7.5 cm on each end
Finished length before tying:
approximately 11–12 inches / 28–30 cm
This fits most adult wrists because the two ends are tied to the desired size.
Materials
- Size 10 crochet cotton or another fine crochet thread
- Green thread for the vine, stems, and leaves
- White thread for the flowers
- 1.25–1.5 mm crochet hook
- 7 small white pearl beads, approximately 3–4 mm
- Fine yarn needle
- Beading or sewing needle
- Matching sewing thread
- Small scissors
A smooth mercerized cotton works especially well because it keeps the leaves crisp and the flowers clearly defined.
Skill Level
Intermediate beginner
You should know how to make:
- chain
- slip stitch
- single crochet
- half double crochet
- double crochet cluster
- sewing small motifs together
Abbreviations
US crochet terminology:
ch — chain
sl st — slip stitch
sc — single crochet
hdc — half double crochet
dc — double crochet
st / sts — stitch / stitches
MR — magic ring
2dc-cl — 2-double-crochet cluster
Special Stitch — 2-Double-Crochet Cluster
Yarn over.
Insert the hook into the indicated stitch or ring.
Yarn over and pull up a loop.
Yarn over and pull through 2 loops.
Leave the final loops on the hook.
Yarn over again.
Insert into the same place.
Yarn over and pull up a loop.
Yarn over and pull through 2 loops.
You should have:
3 loops on the hook
Yarn over.
Pull through all 3 loops.
One 2dc cluster is complete.
MAIN GREEN VINE
The bracelet begins with one narrow crochet cord.
Instead of relying on a fixed chain count, make the cord to the measurement below because fine thread varies significantly between brands.
With green thread:
Chain until the chain measures approximately:
11½ inches / 29 cm
Keep the chain relaxed.
Beginning in the second chain from the hook:
Work:
1 sl st in every chain back to the beginning
Do not pull the slip stitches tightly.
Fasten off, leaving a long tail.
You now have a thin green cord with enough length for:
- approximately 6–6½ inches of floral decoration
- approximately 2½ inches of tie cord at each end
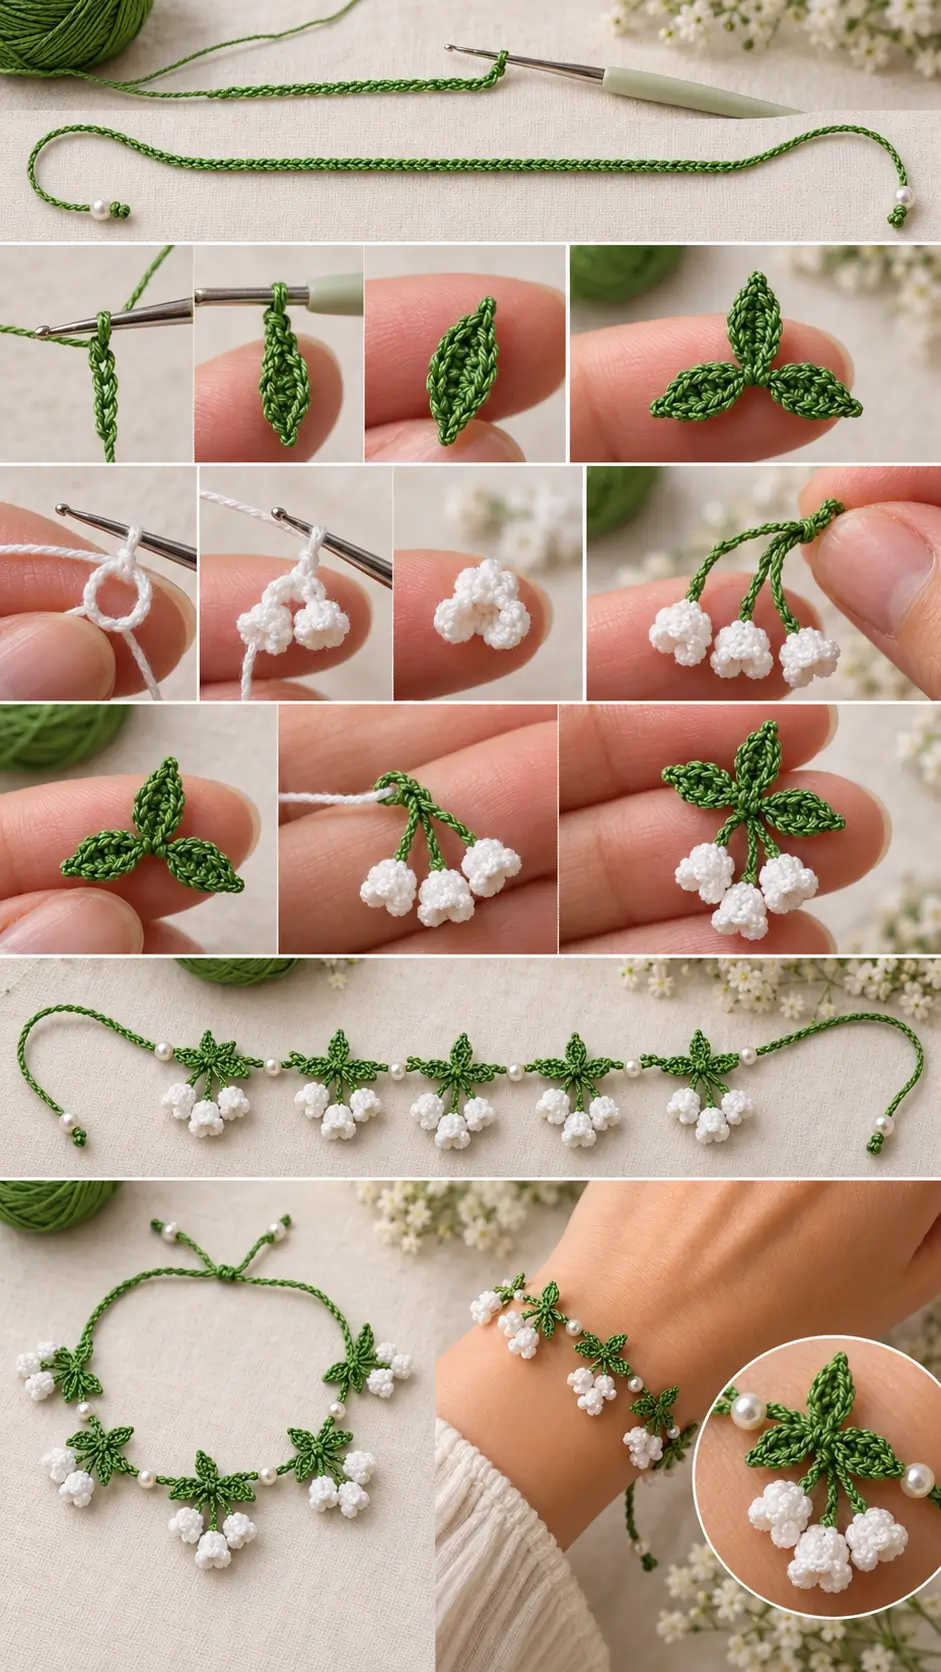
Mark the Decorative Section
Lay the cord flat.
Measure approximately:
2½ inches / 6 cm
from one end and place a stitch marker.
Measure approximately:
2½ inches / 6 cm
from the opposite end and place another marker.
The section between the markers is where the flowers, leaves, and pearls will be attached.
Do not decorate the tie ends.
TINY GREEN LEAF
Each botanical sprig uses three small pointed leaves.
The leaves are deliberately narrow and delicate.
With green thread:
Ch:
4
Beginning in the second chain from hook:
Sl st in next chain.
Sc in next chain.
Hdc in final chain.
Do not turn.
Rotate the chain so you can work along the unused loops on the opposite side.
Work:
hdc in first available loop
sc in next loop
sl st in final loop
Fasten off.
One pointed leaf is complete.
The leaf should measure approximately:
½–¾ inch / 1.25–2 cm
depending on your thread.
Make the Leaf Sprigs
For each floral motif you need:
3 tiny leaves
Make:
15 leaves total
These will be arranged into:
5 three-leaf sprigs
Assemble One Three-Leaf Sprig
Place three leaves together.
Arrange them like a small botanical fan:
- one leaf pointing upward
- one leaf angled left
- one leaf angled right
Thread green yarn onto a fine needle.
Take several tiny stitches through the bases of all three leaves.
Secure firmly.
Do not sew through the entire leaf surface.
Only the bases should be joined.
Make:
5 identical leaf sprigs
TINY WHITE BELL FLOWER
The bracelet uses small clustered flowers rather than large flat daisies.
With white thread:
Make a small magic ring.
Ch:
1
Into the ring work:
2dc-cl
Ch 1.
Sl st into the ring.
Repeat two more times:
2dc-cl, ch 1, sl st into ring
You should have:
3 small rounded petals
Pull the magic ring mostly closed, but do not crush the petals together.
Fasten off, leaving a sewing tail.
Gently pinch the three petals toward one another.
This gives the flower a tiny cupped or bell-like appearance.
Make the Flowers
Each floral sprig contains:
3 white bell flowers
Make:
15 flowers total
Keep all 15 approximately the same size.
Make One Flower Cluster
Cut a green thread tail approximately:
8 inches / 20 cm
Thread it onto a needle.
Attach one white flower to the end.
Make a short green stem approximately:
¼–⅜ inch / 6–10 mm
by wrapping or stitching the green thread through the flower base and leaving a short length before the central connection point.
Add a second flower on another short stem.
Add the third flower on a slightly shorter or longer stem.
The three blossoms should hang close together but not sit directly on top of one another.
The finished cluster should resemble a tiny group of white bells hanging from one green point.
Make:
5 three-flower clusters
Combine the Leaves and Flowers
Take one three-leaf sprig.
Position one three-flower cluster beneath it.
The flowers should hang below the leaves.
Using green thread, sew the flower stems securely to the center of the leaf sprig.
The finished motif should contain:
- 3 pointed green leaves
- 3 tiny white flowers
- one compact green attachment point
Make:
5 complete floral sprigs
Arrange the Five Sprigs
Lay the green bracelet cord flat.
Arrange the five motifs across the marked decorative section.
Space them approximately:
1–1¼ inches / 2.5–3 cm apart
Do not position every sprig exactly the same way.
For the flowing botanical appearance, alternate them:
Sprig 1
Flowers angled slightly downward-left.
Sprig 2
Flowers angled slightly downward-right.
Sprig 3
Flowers hanging downward near the center.
Sprig 4
Angle opposite Sprig 2.
Sprig 5
Angle opposite Sprig 1.
This alternating placement creates the natural vine-like appearance.
Attach the Floral Sprigs to the Vine
Thread green yarn onto a fine needle.
Position the first sprig over the cord.
Sew only through:
- the central green base of the sprig
- the green bracelet cord
Make several tiny secure stitches.
Do not sew through the white flower petals.
Repeat with all five sprigs.
The motifs should remain flexible enough to move slightly when the bracelet is worn.
Pearl Placement
Use:
5 pearls along the decorated vine
plus:
2 pearls for the tie ends
for a total of:
7 pearls
Place one pearl in the open section between neighboring floral sprigs.
The decorative sequence should look approximately like:
sprig → pearl → sprig → pearl → sprig → pearl → sprig → pearl → sprig
A fifth decorative pearl can be positioned close to one outer floral motif if needed for visual balance.
The pearls should sit directly against the green vine rather than hanging far below it.
Sew the Pearls in Place
Using fine matching sewing thread:
Pass the needle through the green cord.
Pass through the pearl.
Return through the green cord.
Repeat several times.
Knot securely on the back.
Hide the thread end inside the crochet cord.
Do not pull tightly enough to bend the vine.
Finish the Tie Ends
At one end of the bracelet cord, thread on one pearl.
Position it approximately:
⅛–¼ inch / 3–6 mm
from the tip.
Stitch through the pearl several times.
Secure the thread.
Repeat on the opposite end.
The pearl-tipped cords should remain long enough to tie comfortably.
Optional Tiny Green Stopper Knot
If you want the pearl tips to look more finished:
Join green thread immediately below the pearl.
Ch:
2
Sl st back into the bracelet cord.
Fasten off.
This creates a tiny green knot beneath the pearl and helps visually finish the tie.
Repeat at the opposite end.
How to Wear the Bracelet
Wrap the floral section around the top of your wrist.
Bring both green tie ends underneath.
Tie with:
- a small bow
- a square knot
- a double knot
Because the decorative section stays on top of the wrist, the flowers and pearls remain visible.
Keeping the Bracelet Flexible
Do not stiffen the entire bracelet.
The cord should remain soft enough to wrap comfortably around the wrist.
If desired, you can lightly block only the leaves before assembly.
Avoid blocking the white flowers completely flat.
They should stay softly dimensional.
If the Flowers Look Too Large
Use:
- finer thread
- a smaller hook
- 2dc clusters instead of larger clusters
Do not add more petals.
The design depends on tiny flower clusters rather than large individual blossoms.
If the Flowers Look Flat
After fastening off:
Pinch the three petals gently upward.
Run the flower tail through the petal bases and pull very slightly.
Secure.
This draws the petals toward each other and creates the bell shape.
If the Leaves Curl Too Much
Use a slightly larger hook for the green leaves.
You can also lightly dampen the completed leaves and press them under a towel until dry.
Do not iron fine crochet thread directly.
If the Bracelet Twists
Check the way the motifs are attached.
Every sprig base should be sewn directly to the top edge of the cord.
Do not wrap the floral stems completely around the bracelet cord.
Also keep the pearls centered on the cord.
If the Tie Ends Are Too Short
The bracelet should have approximately:
2½–3 inches
of undecorated cord on both sides.
If your wrist requires more room, make the original green vine longer before attaching anything.
Smaller Bracelet
For a smaller wrist:
Use:
4 floral sprigs
instead of 5.
Keep approximately:
¾–1 inch
between motifs.
Maintain the two tie cords.
Fuller Floral Bracelet
For a more decorative version:
Use:
6 floral sprigs
and:
5–6 pearls
along the vine.
Keep the flowers small so the bracelet still looks delicate.
Matching Anklet
Make the green vine longer so the decorative section fits comfortably around the ankle.
Use:
6–7 floral sprigs
and pearl accents between them.
Keep longer tie ends for easy fastening.
Matching Necklace
Use the same construction on a longer green cord.
Place the floral motifs primarily across the front center rather than around the entire cord.
A delicate floral necklace can use:
7–9 sprigs
with pearls between them.
Final Pattern at a Glance
Main Vine
With green:
Chain to approximately:
11½ inches / 29 cm
Sl st back along the entire chain.
Leave approximately:
2½–3 inches
undecorated at each end.
Leaves
For each leaf:
Ch 4
Work:
sl st, sc, hdc
down one side.
Rotate.
Work:
hdc, sc, sl st
along the opposite side.
Make:
15 leaves
Join them into:
5 three-leaf sprigs
White Flowers
For each flower:
MR.
Repeat 3 times:
2dc-cl, ch 1, sl st into ring
Make:
15 flowers
Arrange:
3 flowers per cluster
Make:
5 clusters
Complete Floral Motifs
Combine:
1 three-leaf sprig + 1 three-flower cluster
Make:
5 complete motifs
Assembly
Attach the five motifs evenly along the decorative section of the green vine.
Alternate their direction slightly.
Add pearl beads between the motifs.
Attach one pearl to each tie end.
The finished bracelet has a slender green crochet vine decorated with five tiny leafy sprays, hanging white bell-flower clusters, delicate pearl accents, and pearl-tipped adjustable ties, creating the same light botanical jewelry look shown in the design.