Crochet Mesh Tote Bag With Solid Base and Long Handles
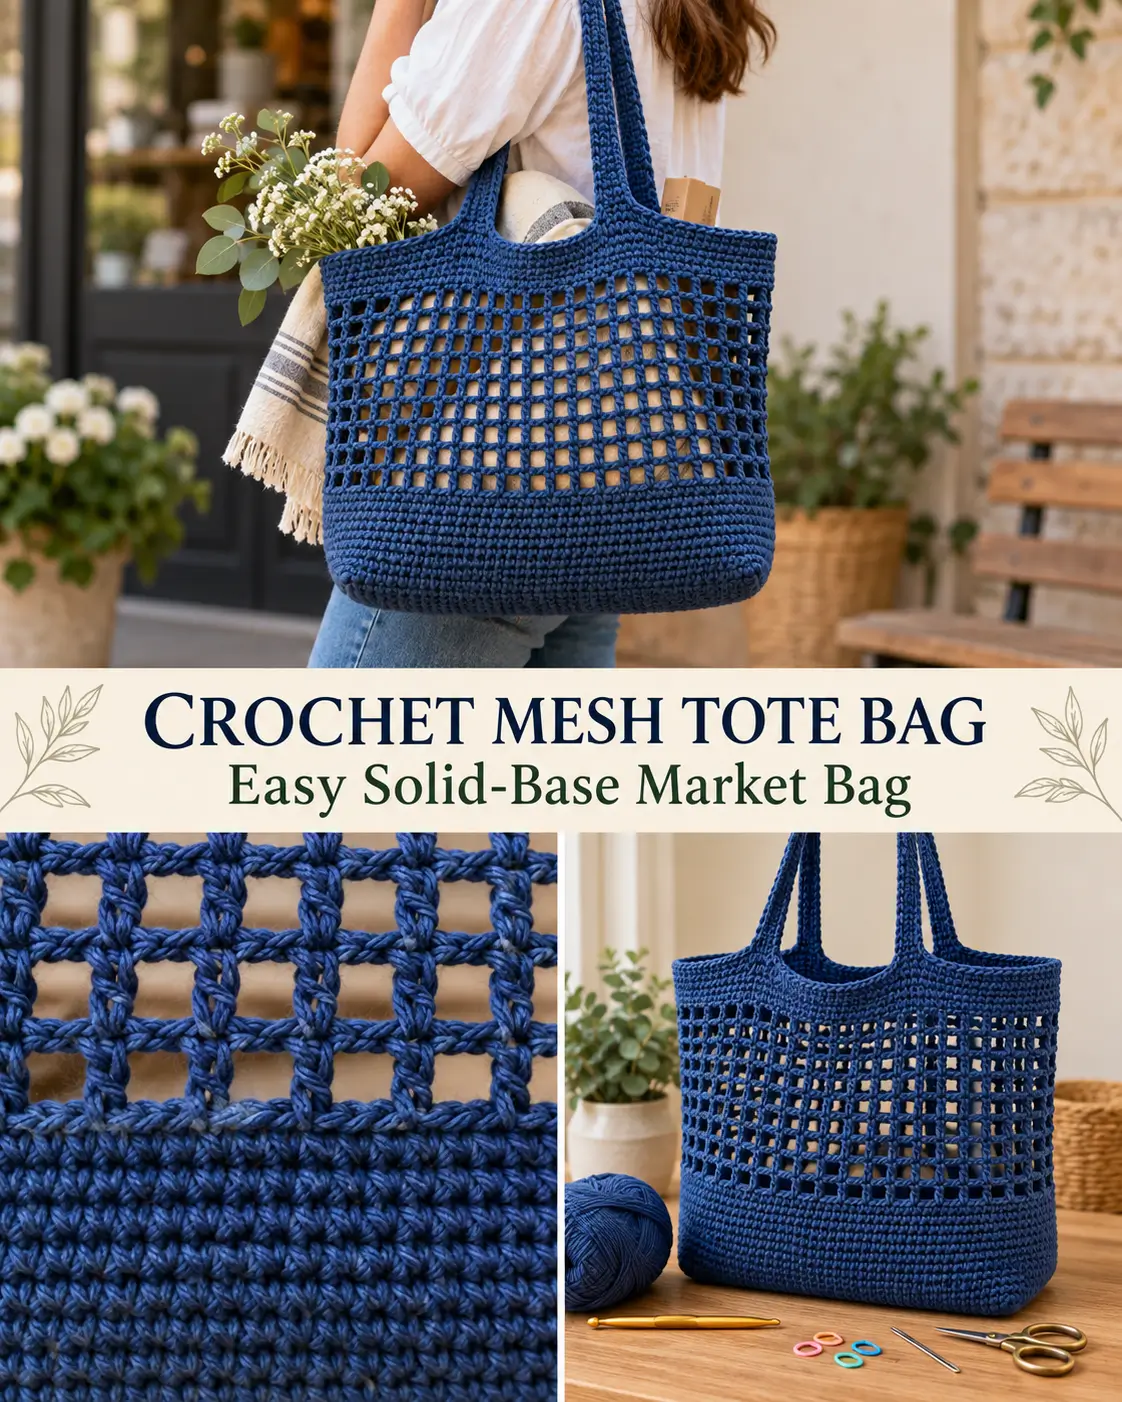
This crochet mesh tote bag combines a firm rectangular bottom with a dense lower section, an airy mesh body, and two long built-in handles.
The bag is worked from the bottom upward. First, a flat rectangular base is crocheted in rows. A round of single crochet is then worked around the entire base to create the exact stitch count for the body. Several solid rounds strengthen the bottom of the bag before the open mesh begins.
The upper edge returns to solid crochet before the handles are added, giving the tote enough structure to hold its shape while keeping the center light and flexible.
The finished bag is useful for yarn, groceries, books, beach supplies, or everyday carry.
Finished Size
Approximately:
13–14 inches / 33–36 cm wide
12–13 inches / 30–33 cm tall, not including handles
Base:
approximately 11 × 4 inches / 28 × 10 cm
Handle drop:
approximately 10–11 inches / 25–28 cm
The mesh stretches when the bag is filled.
Materials
- Medium weight #4 cotton or cotton-blend yarn
- Approximately 450–550 yards / 410–500 meters
- 4 mm crochet hook
- Yarn needle
- Scissors
- Stitch markers
- Measuring tape
For a bag similar to the example, use a:
deep denim blue / navy blue
A smooth cotton yarn or firm cotton blend works especially well because it gives the bottom and handles good structure.
Skill Level
Confident beginner
You should know how to make:
- chain
- single crochet
- half double crochet
- double crochet
- slip stitch
- working around row ends
- skipping stitches
- working into chain spaces
Abbreviations
This pattern uses US crochet terminology.
ch — chain
sc — single crochet
hdc — half double crochet
dc — double crochet
sl st — slip stitch
st / sts — stitch / stitches
sp / sps — space / spaces
BLO — back loop only
Construction
The tote is made in five sections:
- Flat rectangular base
- Bottom turning round
- Solid lower body
- Open mesh body
- Solid upper band and long handles
The bag is made as one continuous piece after the rectangular base is complete.
There are no side seams.
Gauge
Approximately:
17 sc × 19 rows = 4 inches / 10 cm
Gauge does not have to be exact, but a firm fabric is important.
If your base feels loose or floppy, move down to a 3.5 mm hook.
If your fabric is very stiff, try a 4.5 mm hook.
RECTANGULAR BASE
Foundation
Ch:
41
Base Row 1
Beginning in the second chain from the hook:
Sc in each chain across.
40 sc
Ch 1.
Turn.
Base Rows 2–16
Sc in every stitch across.
40 sc
Ch 1 and turn after Rows 2–15.
After Row 16, do not turn.
You should now have a rectangle containing:
40 stitches × 16 rows
The base should measure approximately:
11 inches long
by:
4 inches wide
depending on your tension.
WORK AROUND THE BASE
The next round establishes the exact body circumference.
Place a stitch marker in the first stitch.
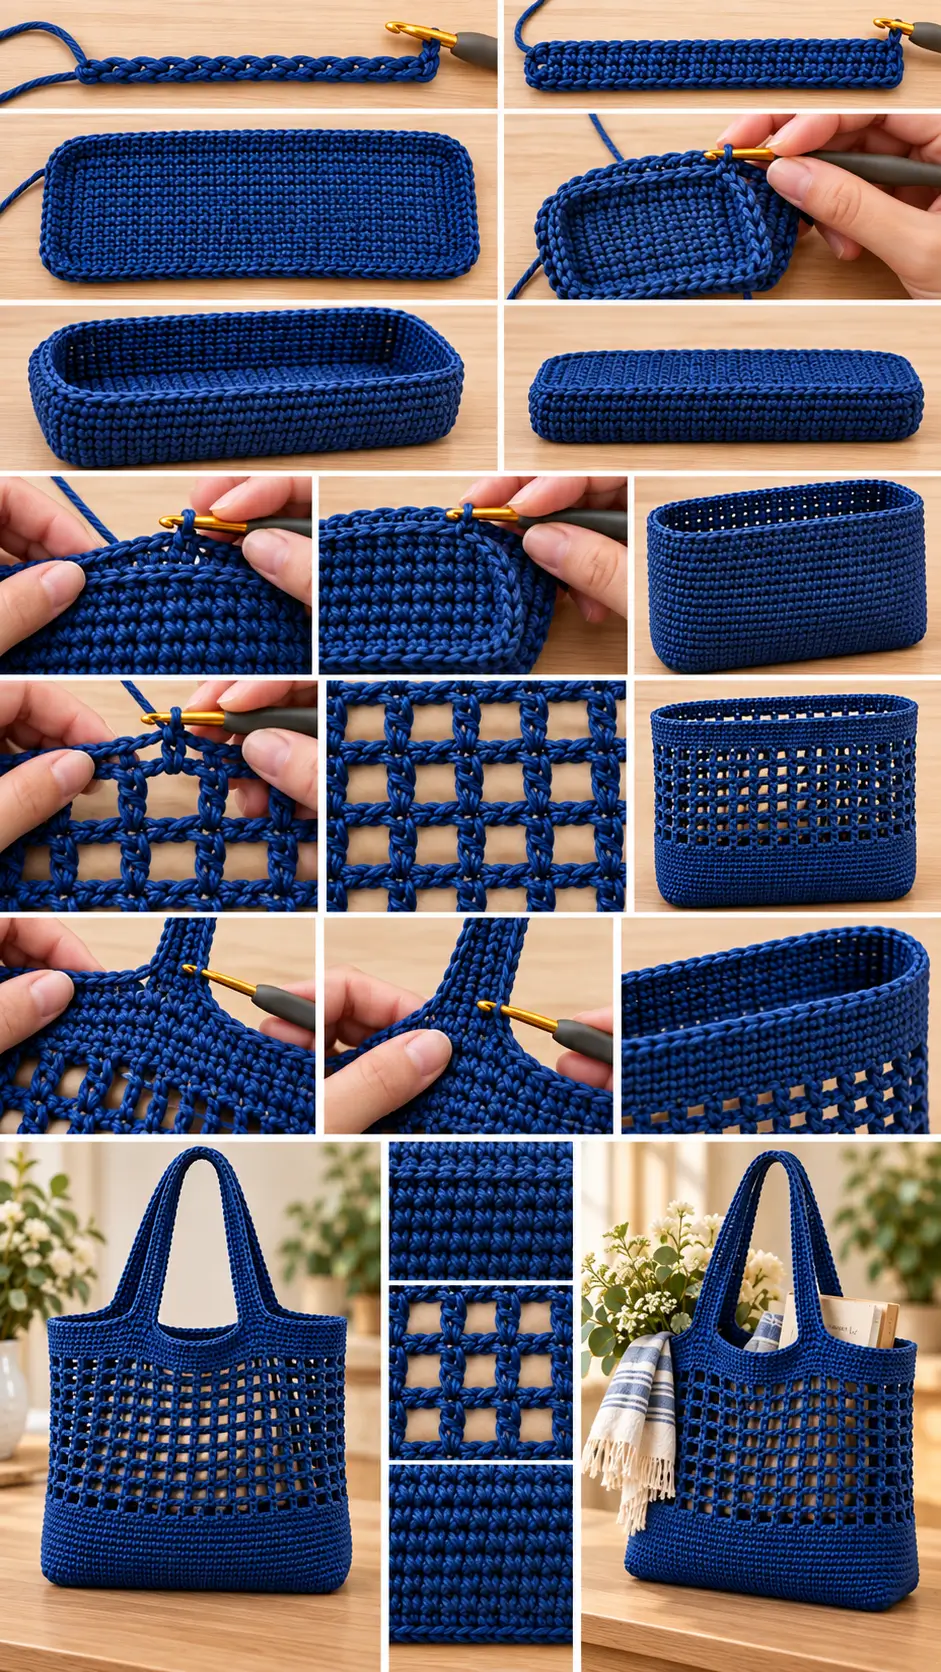
Base Perimeter Round
Ch 1.
Working across the final row:
Sc in each of the 40 stitches.
At the first corner, work:
1 additional sc
Now work down the first short side.
Work:
1 sc in each of the next 14 row ends
At the next corner work:
2 sc in the corner
Work across the underside of the foundation:
1 sc in each of the 40 foundation chains
At the next corner work:
2 sc
Work up the final short side:
1 sc in each of the next 14 row ends
At the final corner work:
1 additional sc
Join with a sl st to the first sc.
You should have:
112 sc
From this point onward, maintain:
112 stitch positions
around the bag until the handles are made.
TURN THE BASE UPWARD
Round 1
Ch 1.
Working in the:
back loop only
sc in every stitch around.
Join with a sl st.
112 sc
The unused front loops create a visible ridge around the rectangular bottom.
This ridge helps the bag turn upward cleanly.
SOLID LOWER BODY
Round 2
Ch 1.
Hdc in every stitch around.
Join.
112 hdc
Rounds 3–5
Repeat Round 2.
112 hdc each round
The solid lower body should measure approximately:
1½–2 inches / 4–5 cm
above the base ridge.
This dense section helps support heavier items and keeps small objects from slipping through the bottom of the bag.
BEGIN THE MESH
The mesh uses a simple:
dc, ch 1, skip 1
repeat.
Because the bag has 112 stitch positions, every mesh round will contain:
56 dc
and:
56 ch-1 spaces
Mesh Round 1
Ch 3.
The ch-3 counts as the first dc.
Ch 1.
Skip the next stitch.
Dc in the next stitch.
Repeat:
ch 1, skip 1 st, dc in next st
around.
After the final ch-1:
Join with a sl st to the top of the beginning ch-3.
You should have:
56 dc
and:
56 ch-1 spaces
Mesh Round 2
Sl st into the first ch-1 space.
Ch 3.
The ch-3 counts as a dc.
Ch 1.
Dc in the next dc.
Continue:
ch 1, dc in next dc
around.
Join with a sl st to the beginning ch-3.
This keeps the mesh openings stacked neatly.
Rounds 3–14 of Mesh
Repeat Mesh Round 2.
Maintain:
56 dc
and:
56 ch-1 spaces
in every round.
The mesh section should measure approximately:
7–8 inches / 18–20 cm
when relaxed.
HOW THE MESH SHOULD LOOK
The finished mesh should have small rectangular or square openings.
It should look:
- open
- lightweight
- regular
- strong enough to stretch
- evenly spaced
The openings should not be large enough for ordinary yarn balls or medium groceries to fall through.
Keep the ch-1 stitches relaxed but not loose.
IF YOU WANT A DEEPER BAG
Continue repeating the mesh round before closing the top.
Each additional mesh round adds approximately:
½ inch / 1.25 cm
depending on tension.
Always keep:
56 dc + 56 ch-1 spaces
RETURN TO SOLID CROCHET
The upper section needs to become solid before the handles are added.
Upper Band Round 1
Ch 1.
Sc in the same stitch.
Work:
1 sc in the next ch-1 space
Then:
1 sc in the next dc
Continue alternating:
sc in ch-1 sp, sc in next dc
around.
Join.
You should have:
112 sc
Upper Band Round 2
Ch 1.
Sc in every stitch around.
Join.
112 sc
Upper Band Round 3
Repeat Round 2.
112 sc
The upper edge should now feel noticeably firmer than the mesh body.
HANDLE PLACEMENT
The handles are positioned directly opposite each other.
Each handle replaces:
20 stitches
along the upper edge.
The layout is:
18 sc
handle
36 sc
handle
18 sc
This totals the original:
112 stitches
around the bag opening.
HANDLE ROUND
Ch 1.
Sc in the first:
18 stitches
Now make the first handle:
Ch:
50
Skip the next:
20 stitches
Sc in the next:
36 stitches
Make the second handle:
Ch:
50
Skip the next:
20 stitches
Sc in the final:
18 stitches
Join with a sl st to the first sc.
Both handles should sit directly opposite each other.
Before continuing, hold the bag by the chains and confirm that the handles are the same length.
ADJUSTING HANDLE LENGTH
For shorter hand-carry handles, use:
ch 35–40
For the medium shoulder handles in this pattern:
ch 50
For longer shoulder straps:
ch 60–65
Always use the same chain count for both handles.
Remember that cotton handles relax slightly with use.
HANDLE REINFORCEMENT ROUND 1
Ch 1.
Sc in each of the first:
18 body stitches
Now work:
1 sc in every chain of the first handle
50 sc
Sc in the next:
36 body stitches
Work:
1 sc in every chain of the second handle
50 sc
Sc in the final:
18 body stitches
Join.
The round now contains:
172 stitches
because the ch-50 handles replaced the skipped 20-stitch sections.
HANDLE REINFORCEMENT ROUND 2
Ch 1.
Sc in every stitch around the entire bag opening and both handles.
172 sc
Join.
Keep your tension even around the curved handle sections.
Do not crochet more tightly at the top of the handle.
HANDLE REINFORCEMENT ROUND 3
Repeat the previous round.
Sc in every stitch around.
172 sc
Join.
The handles should now feel substantially stronger and flatter.
FINAL EDGE
For a neat corded finish, work one final slip-stitch round.
Ch 1.
Working loosely:
sl st BLO in every stitch around
Do not pull these stitches tightly.
A tight slip-stitch round can make the handles curl or shorten.
Join.
Fasten off.
FINISHING
Cut the yarn, leaving a tail approximately:
6–8 inches / 15–20 cm
Thread the tail onto a yarn needle.
Weave it through several stitches on the inside of the upper band.
Change direction and weave through several more stitches.
Trim the excess.
Weave in the foundation tail securely on the underside of the base.
SHAPING THE BAG
Place the finished tote upright on a flat surface.
Push the four base corners outward with your fingers.
Smooth the solid lower body upward.
Gently stretch the mesh vertically.
Straighten both handles.
The finished bag should have:
- flat rectangular bottom
- firm lower body
- flexible mesh center
- solid upper rim
- two equal shoulder handles
OPTIONAL BLOCKING
Cotton bags usually need only light shaping.
If necessary:
Lightly dampen the bag.
Insert a folded towel inside.
Shape the base and sides.
Lay the handles flat.
Allow everything to dry completely.
Do not aggressively stretch the handles.
IF THE BASE CURLS
The base should remain flat before you begin the perimeter round.
If it curls:
- loosen your tension
- use a slightly larger hook
- lightly block the rectangle
Do not continue into the body if the base is severely distorted.
IF THE BAG SIDES FLARE OUTWARD
Check the perimeter count.
You should have:
112 stitches
Do not increase after the perimeter round.
Every solid body round remains:
112 stitches
The mesh also maintains the same 112 stitch positions.
IF THE BAG BECOMES NARROWER
Count the mesh.
Every mesh round should contain:
56 dc
and:
56 ch-1 spaces
The most common mistake is accidentally skipping a dc when working the next round.
IF THE MESH HOLES BECOME UNEVEN
Always work the new dc into:
the dc from the previous round
Do not work the dc into the ch-1 space.
The ch-1 spaces should remain directly above one another.
This keeps the openings neat and consistent.
IF YOU WANT A MORE OFFSET MESH
For a slightly more diagonal mesh appearance, alternate the placement.
On every second mesh round:
Work the dc into the:
ch-1 spaces
instead of the dc stitches.
Then on the next round return to working into the dc.
This creates a staggered mesh.
For the cleaner vertical mesh used in the main pattern, continue working dc above dc.
IF THE HANDLES STRETCH
Cotton handles naturally relax under weight.
For firmer handles:
- use a 3.5 mm hook for the handle reinforcement rounds
- add one extra sc round
- crochet the reinforcement rounds with slightly firmer tension
Do not tighten the original handle chains excessively.
SHORTER TOTE VERSION
Reduce the mesh section.
Instead of 14 mesh rounds, work:
9–10 mesh rounds
Then complete the upper band and handles normally.
This creates a compact tote suitable for:
- yarn projects
- books
- small groceries
- everyday accessories
TALLER MARKET BAG VERSION
Work:
18–20 mesh rounds
before beginning the upper band.
This creates a deeper expandable market bag.
Keep all stitch counts unchanged.
WIDER BAG VERSION
To make the bag wider, increase the rectangular base.
For example:
Ch:
49
Work:
48 sc
for each row.
Make:
16 base rows
When working the perimeter, maintain an even stitch count and reposition the handles so they remain centered opposite each other.
The exact 112-stitch handle instructions in the main pattern are designed specifically for the 40-stitch × 16-row base.
OPTIONAL INNER POCKET
For a small solid pocket:
Ch:
25
Sc in the second chain and across.
24 sc
Work:
14 rows
Fasten off, leaving a long sewing tail.
Position the pocket inside the solid upper section of the bag.
Sew along:
- left side
- bottom
- right side
Leave the top open.
Do not attach the pocket to the mesh section.
OPTIONAL BUTTON LOOP
If you want the top of the tote to close slightly:
At the center of one side of the upper band, join yarn.
Ch:
10–12
Sl st back into the same attachment point.
Fasten off.
Sew a large button directly opposite the loop.
For a completely washable bag, use a wooden, coconut-shell, or washable plastic button.
YARN IDEAS
This mesh tote works particularly well in:
Deep Denim Blue
for a casual everyday bag.
Natural Cream
for a minimalist market tote.
Olive Green
for an earthy reusable shopping bag.
Terracotta
for a warm summer look.
Black
for a modern city tote.
A solid color keeps the mesh texture clean and easy to see.
FINAL PATTERN AT A GLANCE
Base
Ch:
41
Rows 1–16
Sc across.
40 sc
Perimeter
Work evenly around the rectangular base.
112 sc
Turning Round
Sc BLO around.
112 sts
Solid Lower Body
Work:
4 rounds hdc
112 sts per round
Mesh
Repeat:
dc, ch 1, skip 1
around.
Maintain:
56 dc + 56 ch-1 spaces
Work approximately:
14 mesh rounds
Upper Band
Work:
3 solid sc rounds
112 sc
Handle Round
18 sc
ch 50, skip 20
36 sc
ch 50, skip 20
18 sc
Reinforce Handles
Work sc around the full upper edge and into every handle chain.
Then work:
2 additional sc rounds
around the complete handle-and-rim path.
Final Round
Work:
sl st BLO loosely around
Fasten off.
The completed tote has a flat solid rectangular base, reinforced lower section, lightweight blue mesh body, firm upper band, and two long built-in crochet handles, creating a practical reusable bag with the same clean structured-and-mesh look.