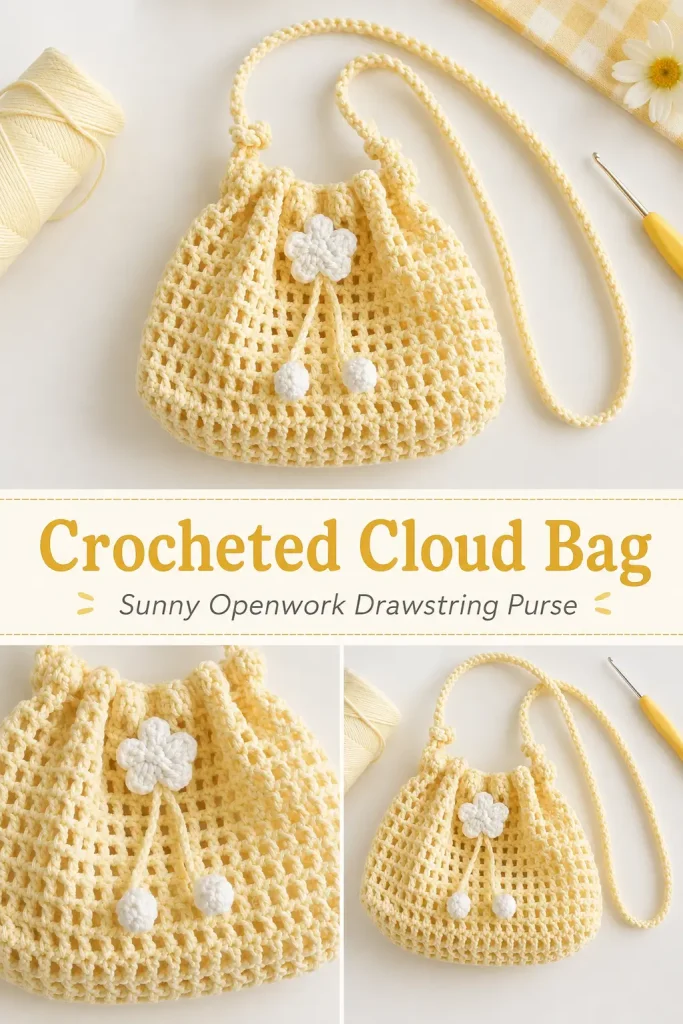
This crocheted cloud bag is a light and cheerful accessory with a soft rounded shape, an airy mesh texture, and sweet white flower details. The pale yellow yarn gives it a sunny look, while the gathered drawstring closure keeps small essentials safely inside.
The bag is worked from a flat rectangular base before the body is crocheted upward in continuous mesh rounds. A white double-layer flower, two small crochet ball ends, and a long textured shoulder strap complete the design.
This free crochet bag pattern is best suited to an advanced beginner who is comfortable with chains, double crochet, single crochet, working around a rectangle, and counting mesh repeats.
Description
The finished project is a small openwork crochet drawstring bag made with pale buttery-yellow cotton yarn. It has a softly rounded pouch body, a gathered top, a matching crochet drawstring, one white five-petal flower at the center front, two white crochet balls on the cord ends, and a long narrow Romanian-style crochet strap. The lightweight mesh construction makes it a lovely summer crochet project for carrying a phone, keys, cards, or other small items.
Materials
- 2 mm hollow cotton yarn in pale buttery yellow
- Small amount of white yarn in a similar thickness
- 3.5 mm crochet hook
- Yarn needle
- Stitch markers
- Scissors
- Measuring tape
Abbreviations
- ch – chain
- ch-sp – chain space
- dc – double crochet
- MR – magic ring
- rep – repeat
- rnd – round
- sc – single crochet
- sl st – slip stitch
- st – stitch
- sts – stitches
Pattern Notes
- This pattern uses US crochet terminology.
- The bag begins with a seven-row rectangular mesh panel.
- The body is created by crocheting around all four sides of that panel.
- Each mesh section consists of one double crochet post followed by one chain.
- The first body round contains 56 double crochet posts: 21 along each long side and 7 along each short side.
- The mesh body is worked through Round 10.
- Round 11 is a solid double crochet round containing 112 stitches.
- The flower is made from two matching pieces sewn together.
- The white crochet balls are secured directly around the ends of the drawstring.
- The strap uses a Romanian cord technique, also called shrimp braid.
- Keep the mesh relaxed so the bag remains soft and flexible.
The source design specifies 2 mm hollow cotton, a 3.5 mm hook, a foundation chain of 46, seven flat mesh rows, 56 mesh sections around the bag body, and 112 double crochet stitches in the solid top round.
Step-by-Step Instructions
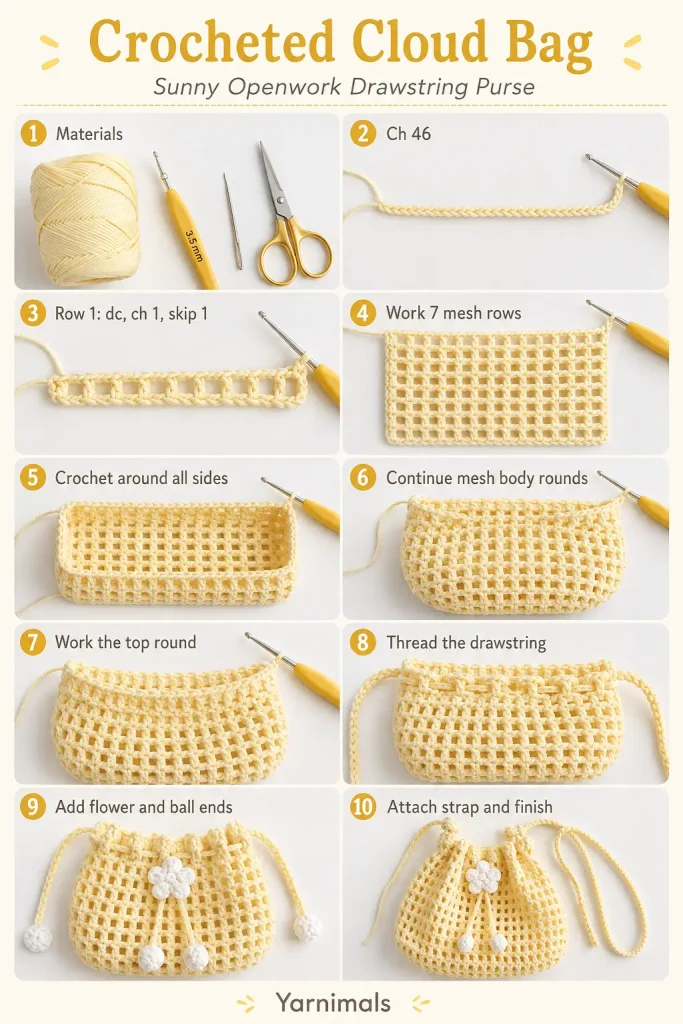
Part One: Crochet the Flat Base Panel
Foundation Chain
Using pale yellow yarn, ch 46.
Row 1
Dc in the 6th ch from the hook.
The skipped chains form the turning chain and first ch-1 space.
Work:
Ch 1, skip the next ch, dc in the next ch.
Repeat the sequence across the foundation chain until you have worked 20 repeats after the first dc.
You should have:
- 21 dc posts
- 20 ch-1 spaces
Row 2
Ch 4 and turn.
The beginning ch 4 counts as the first dc and ch 1.
Skip the first dc and work 1 dc in the next dc.
Continue across:
Ch 1, dc in the next dc.
Repeat across the row, working only into the dc posts from the previous row.
You should keep the same number of dc posts and chain spaces.
Rows 3–7
Repeat Row 2.
At the end of Row 7, do not fasten off.
You should now have a flat rectangular mesh panel with 21 dc posts across and seven rows in total.
Part Two: Begin the Bag Body
The bag body is worked around all four sides of the flat panel.
Place a stitch marker at the beginning of the round.
Body Round 1
Ch 4.
The ch 4 counts as the first dc and ch 1.
Continue across the final row of the panel, working one dc into each dc post with ch 1 between every dc.
This first long side should contain 21 dc posts, including the beginning turning chain.
First Short Side
Ch 1.
Work 1 dc around the end of each of the seven mesh rows.
Place ch 1 between every dc.
You should have 7 dc posts along this short side.
Foundation Edge
Ch 1.
Work across the underside of the foundation chain, placing one dc at each corresponding mesh post position.
Place ch 1 between every dc.
You should have 21 dc posts along this second long side.
Second Short Side
Ch 1.
Work 1 dc around the end of each of the seven rows.
Place ch 1 between every dc.
You should have 7 dc posts along this side.
Ch 1 and join with a sl st in the third ch of the beginning ch 4.
The completed round should contain:
- 21 dc posts on the first long side
- 7 dc posts on the first short side
- 21 dc posts on the second long side
- 7 dc posts on the second short side
- 56 dc posts in total
- One ch-1 space between every dc post
The work should now begin forming a shallow open box around the rectangular base.
Part Three: Crochet the Openwork Body
Body Round 2
Ch 4.
The ch 4 counts as the first dc and ch 1.
Dc in the next dc.
Continue around:
Ch 1, dc in the next dc.
Work into the dc posts only and skip over each ch-1 space.
After the last dc, ch 1 and join with a sl st in the third ch of the beginning ch 4.
Keep 56 dc posts around the bag.
Body Rounds 3–10
Repeat Body Round 2.
Do not increase or decrease.
As the rounds grow, the flat rectangular base will develop into a soft rounded pouch. The openwork body should remain straight until the drawstring is tightened.
At the end of Round 10, join with a sl st as before.
Part Four: Crochet the Solid Top Round
Body Round 11
Ch 3.
The ch 3 counts as the first dc.
Work 1 dc in the first ch-1 space.
Continue around, working:
- 1 dc in every dc
- 1 dc in every ch-1 space
Join with a sl st in the top of the beginning ch 3.
You should have 112 dc around the top.
Fasten off and weave in the yarn tail.
This solid round strengthens the opening and helps the top hold its gathered shape.
Part Five: Make the Drawstring
Using pale yellow yarn, make a chain long enough to pass completely around the bag opening and leave two generous hanging ends at the front.
Before fastening off, thread the chain through the openings directly below the solid top round. Use the ch-1 spaces from Body Round 10 as the drawstring channel.
Weave the cord over and under the mesh sections all the way around the opening.
Bring both cord ends out together at the center front.
Test the closure by pulling both ends. The top should gather neatly without twisting the bag.
Add or remove chains until both ends hang evenly.
Fasten off and secure the final chain.
Part Six: Crochet the White Flower
The flower is made from two identical pieces.
Flower Piece
Using white yarn, make an MR.
Round 1
Ch 1.
Work 5 sc into the ring.
Pull the ring closed.
Join with a sl st in the first sc.
You should have 5 sc.
Round 2
Work the following petal sequence around the five stitches:
Ch 2, work 2 dc in the current sc, ch 2, sl st in the next sc.
Repeat around until five petals have been formed.
Join neatly and fasten off, leaving a long tail for assembly.
Make a second identical flower.
Assemble the Flower Slider
Place the two flower pieces together with their wrong sides facing.
Using the long white yarn tail, sew around the outer edges of the petals.
Do not sew the flower completely closed. Leave a small opening or channel through the center so both pale yellow drawstring ends can pass through it.
Thread both drawstring ends through the flower.
Slide the flower upward until it rests against the gathered front of the bag.
Finish sewing the flower pieces together while keeping the central channel loose enough for the cords to move.
The flower should sit centered at the front and act as a decorative slider.
Part Seven: Crochet the White Ball Ends
Make two identical balls.
Using white yarn, make an MR.
Ball Round 1
Ch 1.
Work 6 sc into the ring.
Pull the ring closed.
Join with a sl st in the first sc.
You should have 6 sc.
Ball Round 2
Ch 1.
Work 1 sc in each st around.
Join with a sl st.
You should have 6 sc.
Ball Round 3
Repeat Round 2.
Fasten off, leaving a long tail.
Do not fill the balls with heavy stuffing. The cord end will help support the shape.
Attach a Ball to Each Drawstring End
Insert one pale yellow cord end into the open top of a white crochet ball.
Push enough of the cord inside to hold it securely.
Using the long white yarn tail, sew through the six stitches around the opening.
Pull tightly to close the ball around the cord.
Stitch through the cord several times so the ball cannot slide off.
Knot securely and weave the white yarn tail inside the ball.
Repeat with the second cord end.
The finished bag should now have one white ball hanging from each end below the flower.
Part Eight: Crochet the Romanian Cord Strap
The reference design uses a firm shrimp braid or Romanian-style crochet cord rather than a simple chain.
Using pale yellow yarn, leave a long beginning tail for attachment.
Begin the Cord
Ch 2.
Work 1 sc in the second ch from the hook.
Form the Cord
Rotate the small piece clockwise.
You will see a horizontal side loop along the edge.
Insert the hook under this side loop and work 1 sc.
Rotate the cord clockwise again.
Two small side loops should now be visible along the left edge.
Insert the hook under both side loops and work 1 sc.
Continue repeating:
Rotate clockwise, insert the hook under the two side loops, and work 1 sc.
The narrow cord will grow downward and develop a firm braided texture.
Continue until the strap reaches your preferred shoulder or crossbody length.
Leave a long finishing tail and fasten off.
Attach the Strap
Position one end of the strap at the upper left side of the bag and the other end at the upper right side.
Pass each strap end through a strong mesh space directly beneath the solid top round.
Tie each end securely around the side of the bag.
Use the yarn tails and a yarn needle to stitch through the knots and surrounding crochet several times.
The attachment points must be strong enough to support the contents of the bag.
Weave the tails into the strap and trim the excess.
Final Finishing
Check that the flower is centered.
Pull both drawstring ends evenly so the top gathers symmetrically.
Arrange the two white balls so they hang at the same length.
Gently stretch the mesh body into shape.
Check all strap and cord attachments before using the bag.
Weave in any remaining yarn tails.
The completed bag should have:
- A rectangular mesh base
- A rounded openwork body
- A solid upper round
- A gathered drawstring opening
- One white five-petal flower at the front
- Two white crochet ball ends
- One long pale yellow textured shoulder strap
Tips and Variations
Use a smooth cotton or cotton-blend yarn that creates clear mesh stitches. Very fuzzy yarn can hide the openwork pattern and make the flower details less visible.
Keep the foundation chain loose. A tight beginning chain can pull the base out of shape.
Count the seven side rows carefully when working the first body round. Uneven side placement can cause the bag to lean.
Use stitch markers at all four corners while crocheting around the base. This makes it easier to confirm the 21, 7, 21, and 7 stitch distribution.
For a wider bag, add foundation chains in multiples of two. Keep the mesh repeat of ch 1, skip 1, dc in the next stitch.
For a deeper bag, add more body rounds before the solid top round.
For a shorter pouch, work fewer than ten mesh body rounds.
Make the strap longer for a crossbody bag or shorter for a child-sized shoulder bag.
The flower and ball ends can be made in cream, pink, or another soft contrasting color, but keep all three embellishments the same color for a coordinated finish.
Because the body is openwork, very small items may slip through the mesh. Place them inside a small fabric pouch before putting them into the bag.
Frequently Asked Questions
Why does the bag begin with a flat rectangular panel?
The seven-row rectangle creates a structured base. Crocheting around all four sides allows the body to rise evenly without sewing separate front and back panels together.
How many mesh sections should the bag body have?
The first body round should contain 56 double crochet posts with a chain space between each one. There are 21 posts on each long side and 7 posts on each short side.
Where should the drawstring be threaded?
Thread it through the final mesh openings directly beneath the solid double crochet top round. Pull both ends out together at the center front before adding the flower and white balls.
Can I use a simple chain for the shoulder strap?
A simple chain may stretch and twist under the weight of the bag. The Romanian cord creates the thicker braided strap visible in the finished design and provides better support.
Conclusion
This crocheted cloud bag combines a simple open mesh pattern with a cheerful pale yellow color and delicate white details. The drawstring flower, matching crochet balls, and braided shoulder strap give the finished purse its distinctive handmade look. Save this free crochet pattern and make the bag in your favorite sunny colors for a lightweight summer accessory or a thoughtful handmade gift.




Great ideas
What a beautiful pattern thank u mum
I have done the first row and I come up with 21 chain 1 spaces and 22double crochet posts on the first row which you say the chain 4 is first double crochet and chain 1 so what am I doing wrong because I can’t come up with the numbers you are. I even tried it twice thinking I may have did too many chain or didn’t skip a stitch. Please let me know what I have done wrong. I have been crocheting for mamy, many years