Introduction
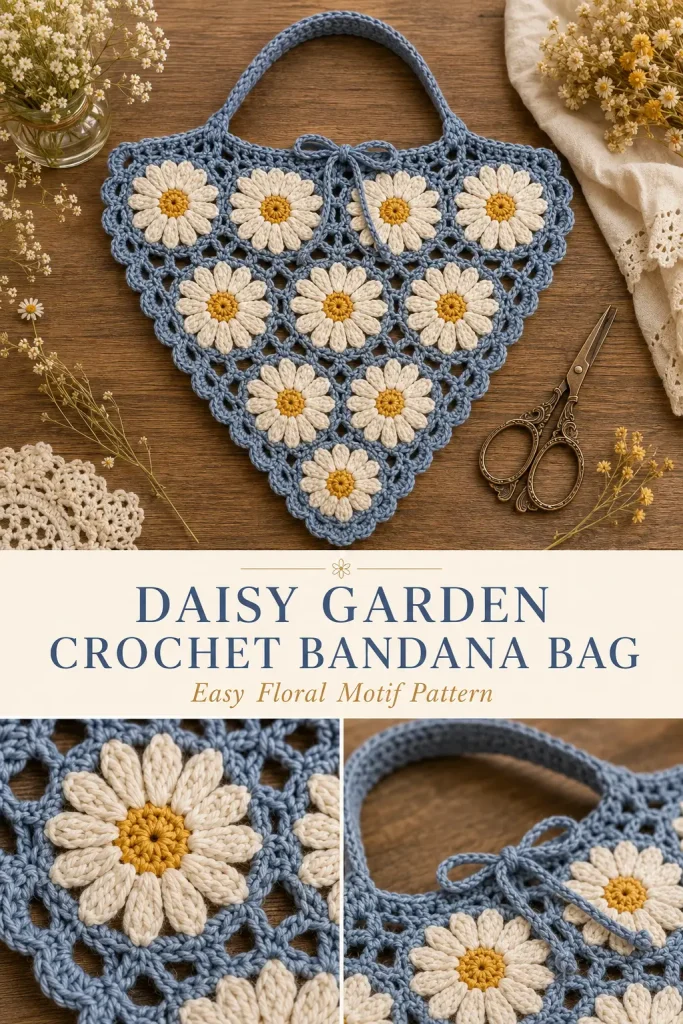
A crochet daisy accessory has such a fresh handmade feeling. It feels cheerful, soft, and perfect for spring outfits, summer markets, garden days, or a cute handmade gift. This Daisy Garden Crochet Bandana Bag is designed with open granny-style squares, white daisy petals, golden centers, and a dusty blue joining border for a sweet vintage look.
Since the original written pattern is not available, this is a new original pattern created from the visible design idea. The construction is made to be realistic and buildable: you will crochet individual daisy square motifs, join them into a triangle-shaped panel, add a sturdy border, then finish with a small top handle and tie strap.
The finished piece can be used as a lightweight decorative crochet bag, wall-hanging pouch, gift bag, or cottagecore accessory. It is not designed for heavy items, but it works beautifully for small lightweight things like a scarf, yarn notions, sunglasses, or a little handmade gift.
Description
The Daisy Garden Crochet Bandana Bag has a triangular shape made from crochet daisy motifs arranged in rows. Each motif has a bright yellow center, long white petals, and a dusty blue granny-style frame. The motifs are joined together with visible open spaces, creating a lace-like floral texture.
The outer border is worked in dusty blue with soft scalloped corners and a clean top edge. A small crochet loop handle is added at the top, while a simple tie strap can be used to close or hang the bag. The overall look is floral, airy, and handmade with a soft cottagecore style.
This crochet pattern is best for confident beginners or intermediate crocheters who are comfortable making motifs, joining squares, and working borders.
Materials
- Worsted weight cotton yarn in dusty blue for motif frames, joining, border, and handle
- Worsted weight cotton yarn in white or warm ivory for daisy petals
- Worsted weight cotton yarn in golden yellow for flower centers
- 4.5 mm crochet hook
- Yarn needle
- Scissors
- Stitch markers or pins
- Measuring tape
Finished Size
Approximate finished size:
- Width across top: 14–16 inches
- Length from top edge to bottom point: 13–15 inches
- Motif size: about 4 inches across
Finished size may vary depending on yarn, hook size, and tension.
Gauge
Gauge is not critical, but all motifs should be the same size.
Make one daisy square first. If it is too small, use a larger hook. If it is too loose or floppy, use a smaller hook.
Abbreviations
- MR: magic ring
- ch: chain
- sc: single crochet
- hdc: half double crochet
- dc: double crochet
- tr: treble crochet
- sl st: slip stitch
- sp: space
- st: stitch
- sts: stitches
- FO: fasten off
Pattern Notes
This project is made from separate daisy square motifs.
The motifs are joined into a triangle layout.
The sample uses 10 full daisy squares arranged in rows: 4 motifs, 3 motifs, 2 motifs, and 1 motif.
Half motifs are added along the top sides to make the upper edge smoother.
The border is worked after all motifs are joined.
Use cotton yarn for a cleaner shape and better structure.
This is a lightweight decorative bag. Add a fabric lining if you want to carry small items more securely.
Step-by-Step Instructions
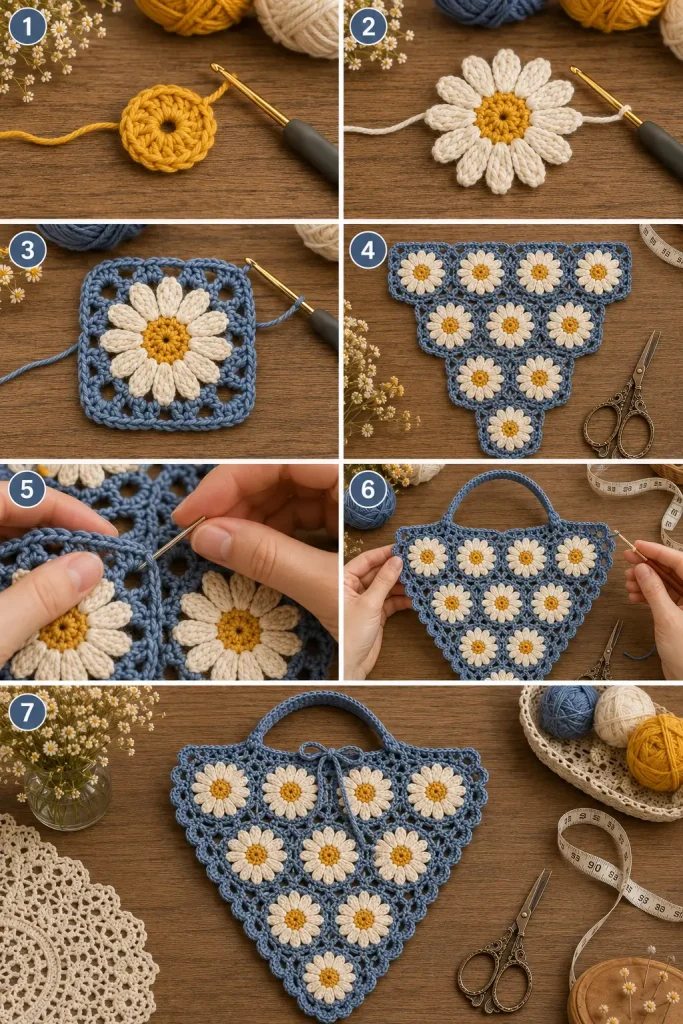
Daisy Square Motif
Make 10 full motifs.
Use golden yellow yarn.
Round 1: Flower Center
Make a MR.
Ch 1, work 8 sc into the ring.
Pull ring closed.
Join with sl st to first sc. (8)
FO yellow.
Round 2: Daisy Petals
Join white yarn to any stitch.
Ch 6.
Starting in the 2nd ch from hook, work: sc, hdc, dc, hdc, sc.
Sl st into the same center stitch.
Sl st into the next center stitch.
Repeat around until you have 8 long white petals.
Join with sl st after the final petal.
FO white.
You should have a flat daisy with 8 petals.
Round 3: Dusty Blue Corner Frame
Join dusty blue yarn in the space between any two petals.
Ch 3.
Work 2 dc in the same space.
Ch 2.
Work 3 dc in the next space between petals.
Ch 1.
Work 3 dc in the next space.
Ch 2.
Work 3 dc in the next space.
Ch 1.
Work 3 dc in the next space.
Ch 2.
Work 3 dc in the next space.
Ch 1.
Work 3 dc in the next space.
Ch 2.
Work 3 dc in the final space.
Ch 1.
Join with sl st to top of beginning ch 3.
You should have 4 corners and 4 side spaces.
Round 4: Square Edge
Ch 1.
Sc in each dc around.
In each corner ch-2 space, work: sc, ch 2, sc.
In each side ch-1 space, work 1 sc.
Join with sl st to first sc.
FO, leaving a long tail if you plan to sew the motifs together.
Block lightly if needed.
Half Daisy Motif
Make 4 half motifs for the top edge.
Use golden yellow yarn.
Row 1: Half Center
Make a MR.
Ch 1, work 5 sc into the ring.
Pull ring closed.
Turn. (5)
Row 2: Half Daisy Petals
Join white yarn if needed.
Ch 6.
Starting in the 2nd ch from hook, work: sc, hdc, dc, hdc, sc.
Sl st into the same center stitch.
Sl st into the next center stitch.
Repeat across the 5 center stitches to make 5 petals.
FO white.
Row 3: Dusty Blue Half Frame
Join dusty blue yarn at one side edge.
Ch 3, 2 dc in same edge space.
Ch 1.
Work 3 dc between the first and second petals.
Ch 1.
Work 3 dc between the next petals.
Ch 1.
Work 3 dc between the next petals.
Ch 1.
Work 3 dc at the opposite side edge.
FO.
This creates a half floral motif that can help smooth the top edge.
Motif Layout
Lay the full motifs on a flat surface.
Arrange them into a triangle:
- Row 1: 4 full motifs across
- Row 2: 3 full motifs centered below
- Row 3: 2 full motifs centered below
- Row 4: 1 full motif at the bottom point
Place the 4 half motifs along the upper sides or top gaps where needed to make the top edge look more balanced.
Pin everything in place before joining.
Joining the Motifs
Use dusty blue yarn and a yarn needle, or join with slip stitches using your hook.
Sewn Join Method
Place two motifs with wrong sides together.
Whip stitch through the outer loops of matching stitches.
Join motif edges neatly, keeping the corners aligned.
Continue joining all motifs according to the triangle layout.
Weave in ends as you go.
Slip Stitch Join Method
Hold two motif edges together with wrong sides facing.
Insert hook through both outer loops.
Sl st across the edge.
Do not pull too tightly, or the panel may pucker.
Continue until the full triangle panel is joined.
Outer Border
Join dusty blue yarn at the top left corner of the triangle panel.
Border Round 1
Ch 1.
Sc evenly around the entire outer edge.
Work 3 sc in the bottom point.
Work extra stitches where motifs meet if needed to keep the edge smooth.
Join with sl st to first sc.
Border Round 2
Ch 1.
Sc in each st around.
Work 3 sc in the bottom point and in any sharp outer corners.
Join with sl st.
Border Round 3: Soft Scallop Edge
Ch 1.
Repeat around: skip next st, 5 dc in next st, skip next st, sl st in next st.
Adjust near corners if needed so the scallops sit evenly.
FO and weave in ends.
If you want a cleaner, less decorative edge, skip the scallop round and work one more round of sc instead.
Top Opening Edge
If your joined panel will be used as a bag, fold the triangle panel slightly so the top edge forms an opening.
Join dusty blue yarn at one top corner.
Ch 1.
Sc evenly across the top opening edge.
Turn.
Work 2 more rows of sc across the top edge for extra strength.
FO and weave in ends.
Top Handle
Use dusty blue yarn.
Handle Strap
Ch 46.
Sc in the 2nd ch from hook and in each ch across. (45)
Ch 1, turn.
Sc in each st across. (45)
Ch 1, turn.
Sc in each st across. (45)
FO, leaving a long tail for sewing.
Attaching the Handle
Place one end of the handle on the upper left side of the top edge.
Place the other end on the upper right side of the top edge.
Sew each end securely with several rows of stitches.
For extra strength, sew a small square shape through the handle end and top edge.
Weave in all ends.
Optional Tie Strap
Use dusty blue yarn.
Ch 90.
Sl st in the 2nd ch from hook and in each ch across.
FO.
Thread the tie strap through the top edge or around the handle area.
Tie into a small bow.
This can be used as a decorative closure or hanging tie.
Optional Lining
For a more functional bag, add a simple fabric lining.
Cut two triangle fabric pieces slightly smaller than the crochet panel.
Sew the fabric pieces together along the side edges, leaving the top open.
Place the lining inside the crochet bag.
Hand stitch the top of the lining to the inside top edge.
This helps small items stay inside and gives the bag more structure.
Finishing
Weave in all remaining yarn ends.
Lay the bag flat and gently shape the motifs.
Lightly steam-block if your yarn label allows it.
Do not flatten the daisy petals too much.
Check the handle and joining seams for strength.
The bag is now ready to use for lightweight items or display.
Tips & Variations
Use cotton yarn for the best structure and stitch definition.
Use dusty blue, white, and yellow for a soft daisy garden look.
Try sage green instead of blue for a more botanical style.
Use cream petals and mustard centers for a vintage farmhouse version.
Use blush pink or lavender frames for a softer spring accessory.
Make the bag larger by adding another row of motifs across the top.
Make it smaller by using 6 full motifs in a 3, 2, 1 triangle layout.
For a sturdier bag, add a fabric lining and reinforce the handle.
For wall decor, skip the lining and use the piece as a floral hanging pouch.
FAQ
Is this daisy crochet bag beginner-friendly?
This pattern is best for confident beginners. The daisy motifs are simple, but joining several motifs into a triangle takes patience.
Can I make this without half motifs?
Yes. You can use only full motifs for a more open triangle shape. The half motifs simply help smooth the upper edge.
What yarn works best?
Cotton yarn works best because it gives the bag structure and helps the flowers hold their shape.
Can I carry heavy items in this bag?
No. This is a lightweight crochet accessory. For more function, add lining and reinforced handles, and use it only for small lightweight items.
Can I turn this into a bandana or kerchief instead?
Yes. Skip the lining and handle, make the triangle panel as written, then add long ties to the top corners.
Conclusion
The Daisy Garden Crochet Bandana Bag is a cheerful floral crochet project with a soft handmade charm. The white daisy motifs, golden centers, dusty blue joining, and scalloped border create a fresh cottagecore look that feels perfect for spring and summer.
Use it as a lightweight bag, decorative wall pouch, gift holder, or floral kerchief-style accessory. With simple motifs and careful joining, this pattern creates something unique, pretty, and full of handmade personality.



