Intro
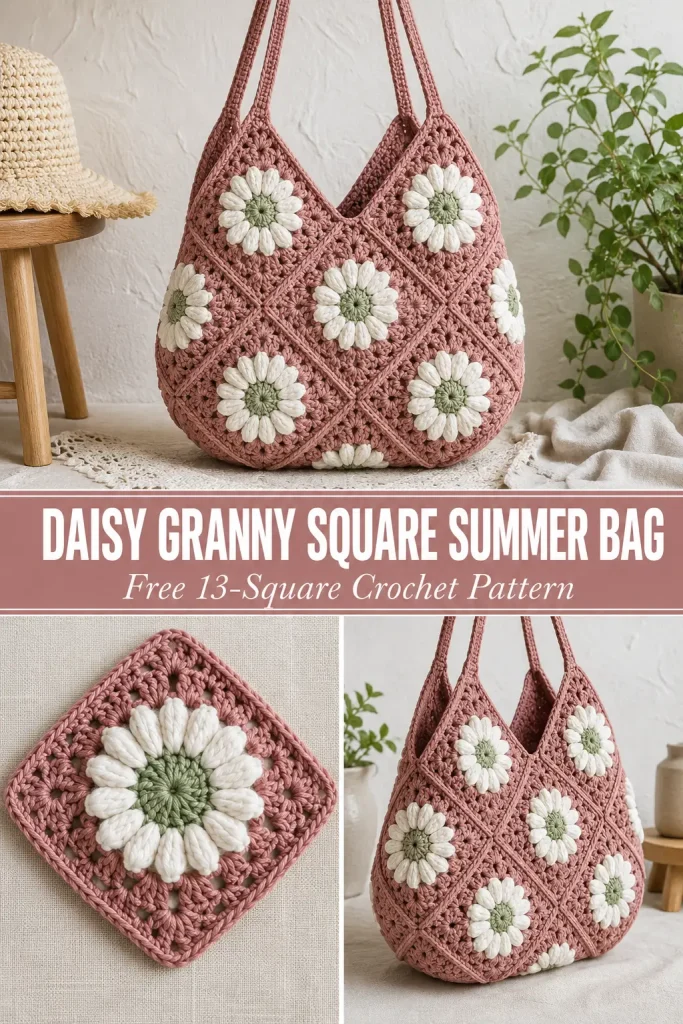
This pink daisy granny square bag has such a pretty handmade summer look. Dusty rose squares are centered with soft sage green and white flowers, then joined in an unusual diamond arrangement that creates the rounded body and deep V-shaped opening visible in the finished bag.
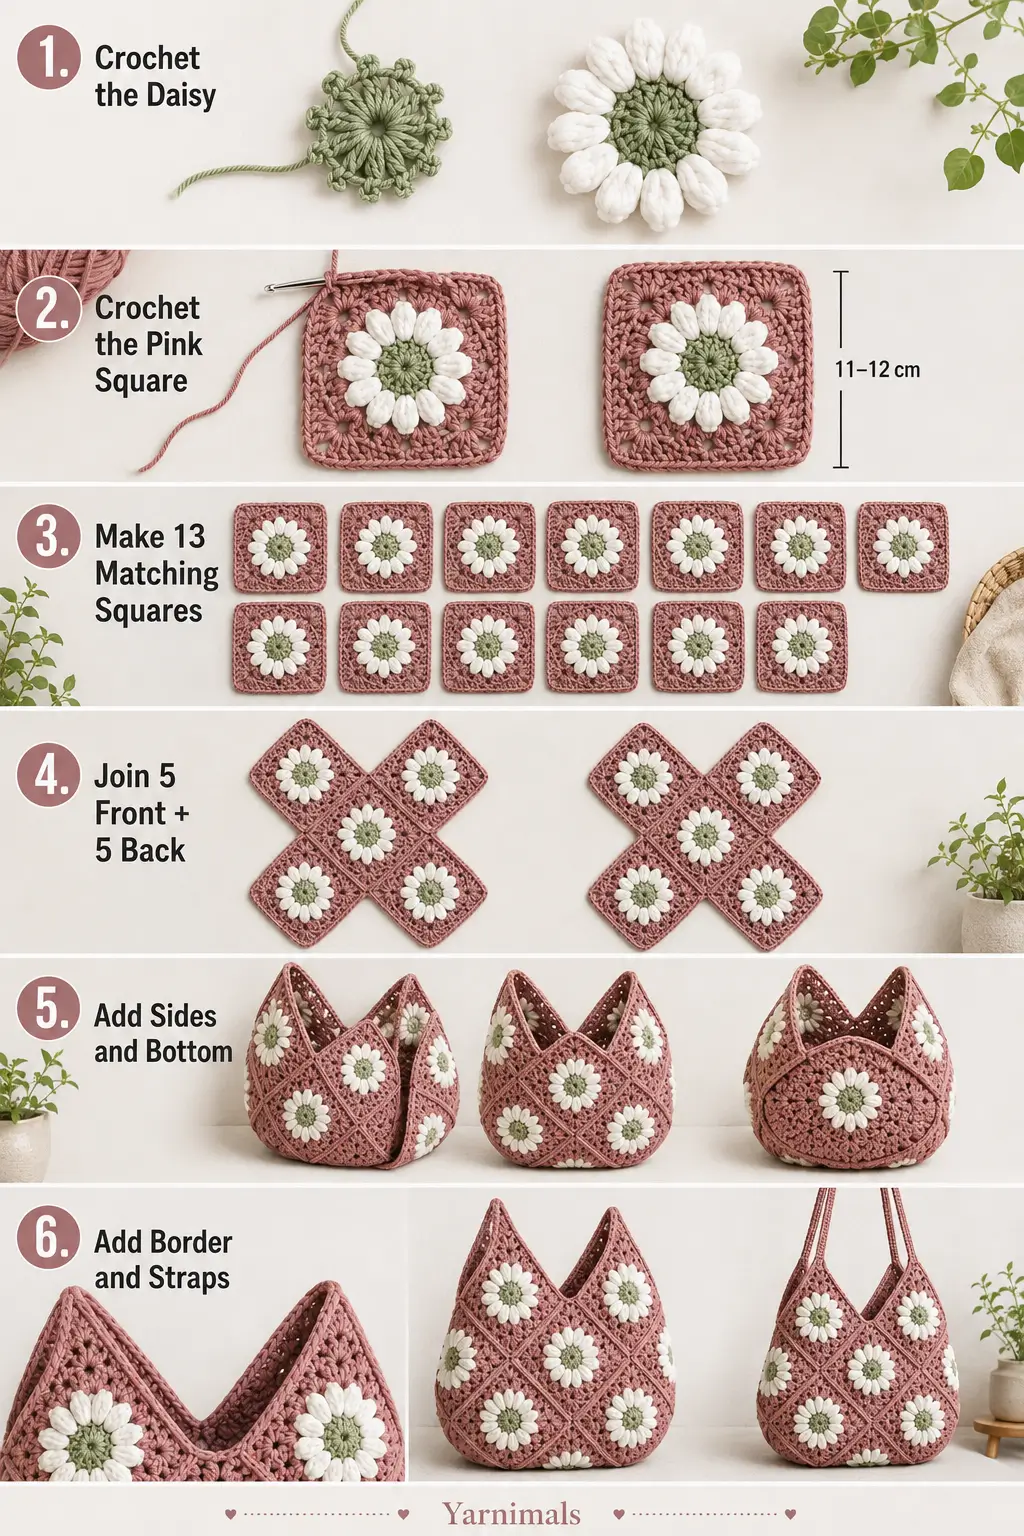
Instead of making simple rectangular front and back panels, this crochet shoulder bag uses 13 flower granny squares. Five motifs form the front, five form the back, two create the side gussets, and one completes the bottom. Once joined, the diamond-oriented squares naturally shape the bag without complicated increases or decreases.
Two long pink crochet straps finish the design, making this a comfortable summer shoulder bag that works beautifully with cotton yarn.
Description
The finished bag is a medium-size granny square shoulder tote made from 13 matching daisy flower squares.
Every motif has:
- a sage green circular center
- a ring of dimensional white petals
- dusty rose pink outer rounds
- a square shape with defined corners
The motifs are rotated into diamond positions during assembly.
The finished construction includes:
- 5 granny squares on the front
- 5 granny squares on the back
- 1 granny square on each side
- 1 granny square forming the bottom
- a V-shaped upper opening
- a pink crochet border around the opening
- 2 long dusty rose shoulder straps
The finished bag has the relaxed rounded silhouette visible in the inspiration rather than the boxy shape of a traditional rectangular granny square tote.
Approximate Finished Size
Using squares blocked to approximately 11–12 cm:
- Bag width: approximately 34–38 cm
- Bag height: approximately 31–34 cm
- Depth: approximately 11–12 cm
- Strap length: approximately 65–70 cm each
- Strap width: approximately 2–2.5 cm
- Shoulder drop: approximately 30–32 cm
Exact measurements will depend on yarn, hook size, and blocking.
Materials
- DK or light worsted weight cotton or cotton-blend yarn
- Approximately 450–550 g dusty rose pink
- Approximately 70–90 g white
- Approximately 50–70 g soft sage green
- 4 mm crochet hook
- Yarn needle
- Scissors
- Stitch markers
- Measuring tape
- Blocking pins and mat
- Optional cotton fabric for lining
- Optional magnetic snap
Abbreviations
- MR – magic ring
- ch – chain
- sc – single crochet
- dc – double crochet
- sl st – slip stitch
- sp – space
- st – stitch
- sts – stitches
- puff – puff stitch
Special Stitch
Puff Stitch
Yarn over, insert hook into the indicated stitch or space and pull up a loop.
Repeat this 3 times in the same place.
You should have 7 loops on the hook.
Yarn over and pull through the first 6 loops.
Yarn over and pull through the final 2 loops.
This creates one plump white flower petal.
Pattern Notes
- US crochet terminology is used.
- Difficulty: confident beginner/intermediate.
- Make 13 identical granny squares.
- Block all squares before joining.
- Each finished square should measure approximately 11–12 cm.
- The squares are assembled as diamonds, with one corner pointing upward.
- Use dusty rose yarn for all joining so the seams disappear into the outer rounds.
- The bag is constructed from front and back five-square sections, then the side and bottom motifs are inserted.
- The straps are made separately and sewn securely to the four upper points.
- Cotton yarn is recommended because it gives the flower motifs and bag body useful structure.
- Keep your joining stitches relaxed so the seams do not pucker.
Step-by-Step Instructions
Part 1: Crochet the Sage Flower Center
Using sage green yarn:
Round 1
Make an MR.
Ch 2. This does not count as a stitch.
Work:
12 dc into MR
Pull the ring closed.
Join with sl st to the first dc.
12 sts
Fasten off sage.
The center should remain a small flat circle.
Part 2: Crochet the White Daisy Petals
Join white yarn in any dc.
Ch 1.
Work one puff in the same stitch.
Ch 1.
Continue around:
[puff in next st, ch 1]
Repeat in every stitch.
You should have:
12 white puff petals
Join with sl st to the first puff.
Fasten off white.
Gently separate the petals with your fingers so the sage center remains visible.
Part 3: Turn the Flower into a Pink Square
Join dusty rose yarn in any ch-1 space between two petals.
The 12 petal spaces will be divided into four corners, with three spaces assigned to each side.
Pink Round 1
In the first space work:
(3 dc, ch 2, 3 dc)
This is Corner 1.
Ch 1.
Work 3 dc in next ch-1 sp.
Ch 1.
Work 3 dc in next ch-1 sp.
Ch 1.
In the next space work:
(3 dc, ch 2, 3 dc)
This forms Corner 2.
Continue around in the same sequence:
Corner, 2 side clusters, corner
until all four corners are formed.
Join with sl st to the first dc.
You should now clearly see a square beginning to form around the flower.
Part 4: Second Pink Square Round
Sl st across until you reach the first corner space.
In the corner work:
(3 dc, ch 2, 3 dc)
Ch 1.
In each ch-1 space along the side work:
3 dc, ch 1
At the next corner work:
(3 dc, ch 2, 3 dc)
Continue around.
Join with sl st.
Part 5: Third Pink Square Round
Repeat the previous round.
In every corner:
(3 dc, ch 2, 3 dc)
In every side ch-1 space:
3 dc
Place ch 1 between groups.
Join.
Part 6: Final Pink Border
Ch 1.
Sc in every dc and every ch-1 space around.
In each ch-2 corner work:
3 sc
Join with sl st.
Fasten off.
The completed motif should have:
- sage center
- 12 white petals
- wide dusty rose background
- four defined pink corners
- neat pink outer edge
Block to approximately:
11–12 cm square
Part 7: Make All 13 Squares
Make:
13 identical flower granny squares
Keep every motif consistent:
- same sage center
- same white petal count
- same dusty rose rounds
- same final dimensions
Do not begin assembly until all 13 squares are blocked and completely dry.
Part 8: Understand the 13-Square Bag Construction
The bag is built from:
Front
5 squares
Back
5 squares
Left Side
1 square
Right Side
1 square
Bottom
1 square
13 squares total
The squares are rotated so each motif looks like a diamond.
Part 9: Arrange the Five Front Squares
Label five motifs:
A, B, C, D, E
Place them like this:
      A       B

          C

      D       E
Every square should be rotated with one corner pointing straight upward.
The squares are joined by full edges, not just by their corners.
Join A to C
Join the lower-right edge of A to the upper-left edge of C.
Join B to C
Join the lower-left edge of B to the upper-right edge of C.
Join D to C
Join the upper-right edge of D to the lower-left edge of C.
Join E to C
Join the upper-left edge of E to the lower-right edge of C.
The panel now has an X-like shape.
The two top motifs create the beginnings of the V-shaped bag opening.
Part 10: Joining Method
Place two matching motif edges together with right sides facing outward.
Using dusty rose yarn, work slip stitches through the corresponding outer loops of both motifs.
Work one sl st for each matching stitch.
Keep the yarn relaxed.
Alternatively, use a mattress stitch with a yarn needle if you prefer a nearly invisible sewn seam.
Use the same method for every seam throughout the bag.
Part 11: Make the Back Panel
Using five more squares, make an identical second section.
Label them:
F, G, H, I, J
Arrange:
      F       G

          H

      I       J
Join:
- F lower-right to H upper-left
- G lower-left to H upper-right
- I upper-right to H lower-left
- J upper-left to H lower-right
You now have:
- 1 front five-square section
- 1 back five-square section
Part 12: Add the Left Side Square
Take Square K.
This becomes the left gusset.
On the front section, there is an open V-shaped space between Squares A and D.
Position K inside this side opening.
Join one upper edge of K to the free lower-left edge of A.
Join the adjacent lower edge of K to the free upper-left edge of D.
Now bring the back panel toward the other side of Square K.
Join the remaining corresponding edges of K to Squares F and I on the back.
Square K now forms the complete left side of the bag.
Part 13: Add the Right Side Square
Take Square L.
Position it between Squares B and E on the right side of the front.
Join:
- one edge to B
- the adjacent edge to E
Then join the two remaining corresponding edges to:
- G
- J
on the back panel.
You now have both side gussets.
The bag should begin folding naturally into a three-dimensional shape.
Part 14: Add the Bottom Square
Take the final Square M.
At the lower front of the bag, Squares D and E create another V-shaped opening.
Position M inside this opening.
Join:
- one upper edge of M to the lower-right free edge of D
- the adjacent upper edge of M to the lower-left free edge of E
Turn the bag toward the back.
Join the remaining two edges of M to the corresponding lower free edges of Squares I and J.
The final square now forms the bag bottom.
You should have no large openings remaining except the intended top opening.
Part 15: Check the Bag Shape
Turn the bag right side out.
The finished body should have:
- two high pink points on the front
- two high pink points on the back
- a V-shaped opening between the front top squares
- a matching V on the back
- rounded side gussets
- a softly curved lower edge
- one flower motif partially visible at the bottom
This is what creates the unusual rounded granny square silhouette.
Part 16: Crochet the Top Opening Border
Join dusty rose yarn at one side of the bag opening.
Ch 1.
Work sc evenly around every open top edge.
Along straight granny-square edges:
1 sc in every stitch
At outward upper corners:
3 sc in the corner stitch
At deep inward V points:
Work sc2tog across the stitches immediately before and after the valley if needed to keep the border flat.
Continue completely around the opening.
Join with sl st.
Border Round 2
Ch 1.
Sc around again.
At outward points, work:
3 sc in the center corner stitch
At inward V sections, use a gentle sc decrease if needed.
Join.
Fasten off.
The opening should now look clean and reinforced without losing its V-shaped silhouette.
Part 17: Crochet the First Shoulder Strap
Using dusty rose yarn:
Ch 115, or chain until the foundation measures approximately 65–70 cm without stretching.
Row 1
Sc in the second ch from the hook.
Sc across.
Ch 1 and turn.
Row 2
Sc in every stitch across.
Ch 1 and turn.
Row 3
Sc across.
Fasten off, leaving long tails at both ends.
The strap should measure approximately:
2–2.5 cm wide
Part 18: Make the Second Strap
Make a second strap exactly the same way.
Compare the straps before attachment.
They should have:
- equal stitch counts
- equal lengths
- equal widths
Part 19: Attach the Front Strap
The front handle joins the two highest points of Squares A and B.
Position one strap end along the inside of the upper point of A.
Overlap approximately:
4–5 cm
Pin securely.
Position the opposite end at the highest point of B.
Make sure the strap is not twisted.
Using dusty rose yarn and a yarn needle, sew through:
- the strap
- the top border
- several rows of the granny square
Use repeated horizontal and vertical stitches.
Reinforce both attachment points thoroughly.
Part 20: Attach the Back Strap
Repeat with the second strap.
Attach it between the highest points of:
F and G
on the back panel.
Check that the two straps have the same drop.
When the bag is worn, the two handles should sit together naturally on the shoulder.
Part 21: Reinforce the Strap Attachments
For each of the four attachment points, add several extra stitches through the inside of the bag.
Do not rely on only the top crochet border to support the weight.
The sewing should extend into the solid pink outer rounds of the granny squares.
Weave in the tails securely.
Part 22: Optional Fabric Lining
A lining is useful if the bag will carry keys, cosmetics, or other small items because the granny square stitches contain small openings.
Lay the finished bag flat and trace its approximate body shape onto cotton fabric.
Cut two lining pieces with approximately 1.5 cm seam allowance.
Sew the fabric pieces together around the sides and bottom.
Leave the top open.
Insert the lining into the bag.
Fold the raw upper edge inward.
Hand-sew the lining just below the crochet top border.
Keep the stitches invisible from the outside.
Part 23: Optional Magnetic Snap
If you want a slightly more secure bag opening, attach a small magnetic snap to the lining at the center front and back.
Do not pull the two V-shaped peaks together.
The snap should simply hold the middle of the opening closed while preserving the original shape.
Finishing
Weave in all yarn ends.
Check every granny-square seam.
Reinforce any seam that feels loose.
Gently shape the bag by hand.
Straighten:
- the V-shaped opening
- both side gussets
- bottom square
- shoulder straps
If necessary, lightly steam the pink outer sections according to your yarn’s care instructions.
Do not flatten the dimensional white petals.
Design Consistency Lock
To keep the finished bag consistent with the visible design, preserve these exact features.
Granny Squares
Use:
- sage green flower centers
- white raised petals
- dusty rose pink square backgrounds
Every motif must be identical.
Motif Count
Use exactly:
13 granny squares
Broken down as:
- 5 front
- 5 back
- 2 sides
- 1 bottom
Front Appearance
The visible front should show:
- 2 upper flower diamonds
- 1 center flower diamond
- 2 lower flower diamonds
Additional parts of the side and bottom motifs naturally appear around the outer edges.
Top Shape
Keep the distinctive:
- double-point upper front
- center V-shaped opening
- matching back V
Do not add a straight rectangular top panel.
Handles
Use:
- 2 long dusty rose crochet straps
- one strap on the front
- one on the back
- no wooden handles
- no rings
- no leather
Overall Colors
Use only:
- dusty rose pink
- soft sage green
- white
Do not add extra border colors.
Tips & Variations
Choose Cotton for Summer Structure
Cotton or a cotton-acrylic blend works especially well for this summer crochet bag because the squares keep their shape while still remaining comfortable to carry.
Block Every Square
Do not skip blocking.
With 13 joined motifs, even a small difference in square size can make the finished bag twist or become uneven.
Block every square to the same measurement before joining.
Make the Bag Larger
For a larger bag, do not change the 13-square construction.
Instead, make each granny square approximately 13–14 cm.
The same assembly will automatically produce a larger finished tote.
Make a Smaller Bag
Use DK yarn with a smaller hook and block the squares to approximately 9–10 cm.
Alternative Color Ideas
Try:
Coastal
- dusty blue square
- cream petals
- sage center
Cottage Garden
- lavender square
- ivory petals
- yellow center
Neutral
- oatmeal square
- cream petals
- taupe center
Keep the three-color structure consistent across all 13 squares.
FAQ
How many granny squares do I need for this bag?
You need 13 granny squares total: five for the front, five for the back, two for the sides, and one for the bottom.
Why are the squares joined like diamonds?
Rotating the squares creates the distinctive V-shaped opening and rounded summer-bag silhouette. If the motifs are assembled as ordinary upright squares, the finished shape will be completely different.
Can I use acrylic yarn?
Yes, but cotton is recommended because it gives the bag more structure and reduces stretching. If using acrylic, consider adding a fabric lining.
Can I make the straps longer?
Yes. Simply add more foundation chains before crocheting the strap rows. Try the strap against your shoulder before sewing it permanently to the bag.
Conclusion
This daisy granny square summer bag turns just 13 flower motifs into a surprisingly dimensional shoulder tote. The sage-and-white flowers, dusty rose backgrounds, diamond assembly, deep V-shaped opening, rounded lower body, and long pink straps create a bag that looks much more detailed than the individual crochet steps suggest.
Once you understand the five-square front and back arrangement, the two side gussets and single bottom motif bring everything together naturally. Save this free crochet granny square bag pattern and make it in the soft pink floral palette or customize the same construction with your favorite summer colors.



