Easy 1-Row Slanted Shell Crochet Baby Blanket With Bow
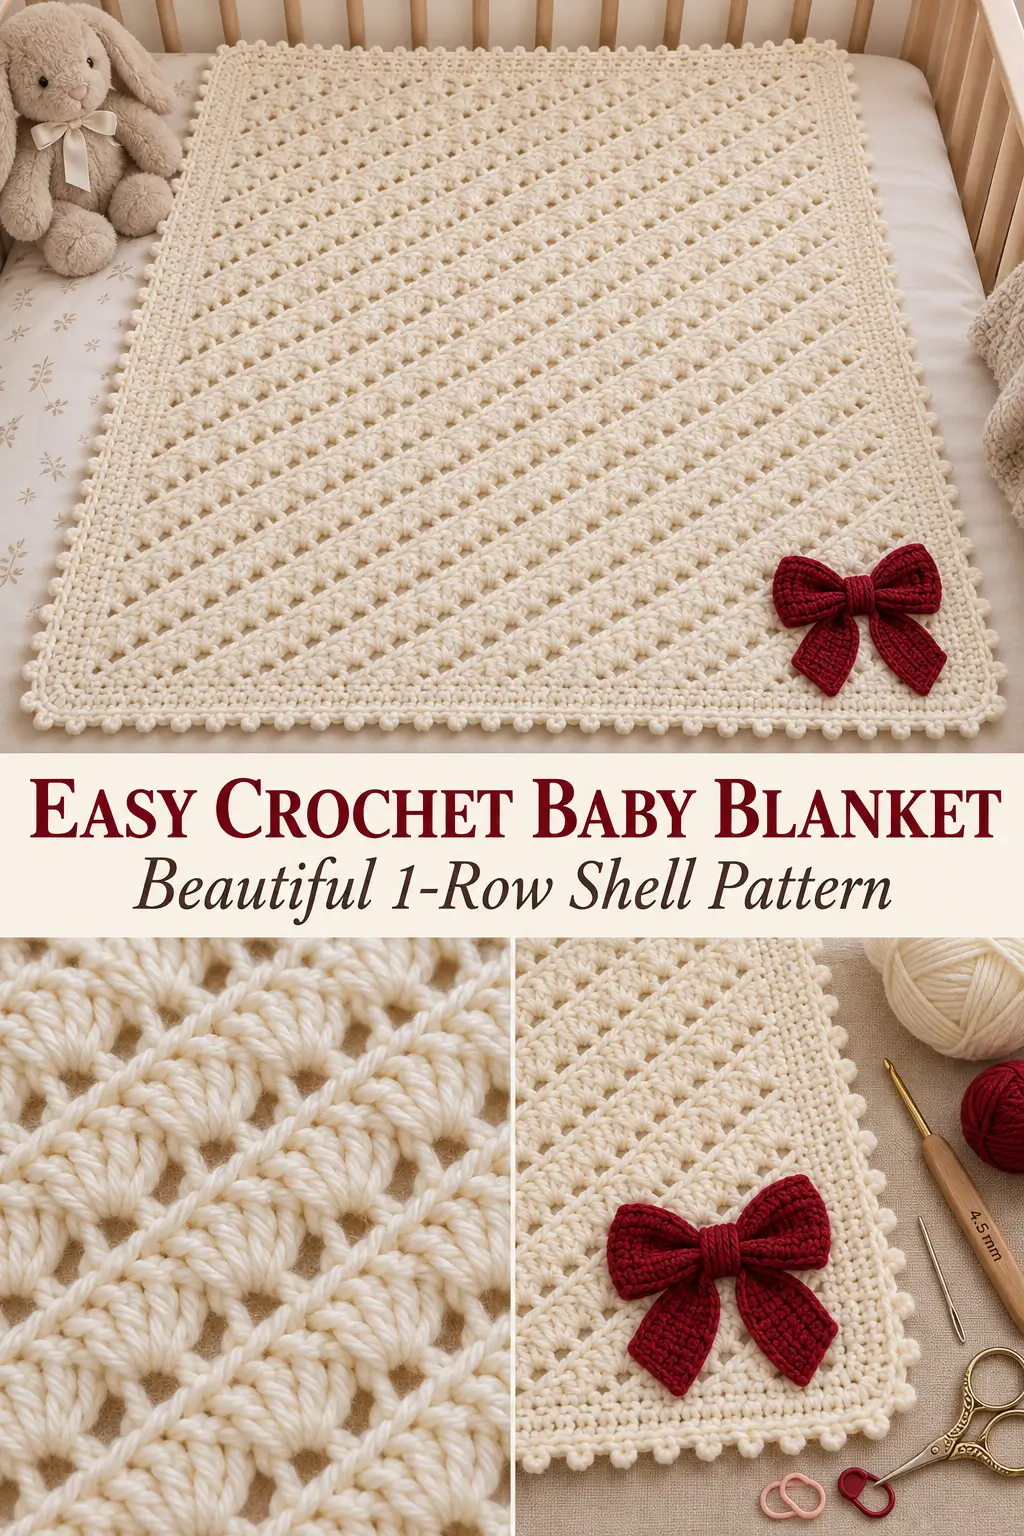
This soft crochet baby blanket uses a simple one-row repeat to create rows of overlapping slanted shells. Each shell leans gently into the next, giving the fabric a textured woven appearance without complicated stitch changes.
The blanket is worked back and forth in one rectangle using warm ivory yarn. A narrow picot-style edging finishes all four sides, and an optional deep-red crochet bow can be attached to one corner for a classic handmade finish.
Once the setup row is complete, you repeat the same row for the entire blanket.
Finished Size
Approximately:
30–32 inches / 76–81 cm wide
by:
35–36 inches / 89–91 cm long
including the edging.
This is a comfortable size for:
- stroller use
- crib layering
- tummy time
- baby gifts
- newborn photos
The pattern can easily be made larger or smaller.
Materials
- DK / light #3 yarn
- Approximately 1,050–1,200 yards / 960–1,100 meters of ivory or cream
- Small amount of DK yarn in deep red for the optional bow
- 4.5 mm crochet hook
- Yarn needle
- Scissors
- Stitch markers
- Measuring tape
Choose a soft washable yarn suitable for baby items.
Suggested Colors
For the blanket:
Warm Ivory / Soft Cream
For the bow:
Deep Red / Burgundy
The solid cream color keeps the stitch texture easy to see.
Skill Level
Easy / confident beginner
You should know how to make:
- chain
- single crochet
- half double crochet
- double crochet
- slip stitch
Abbreviations
This pattern uses US crochet terminology.
ch — chain
sc — single crochet
hdc — half double crochet
dc — double crochet
sl st — slip stitch
st / sts — stitch / stitches
sp — space
rep — repeat
Special Stitch — Slanted Shell
Work all of the following into the same stitch or ch-2 space:
1 sc, ch 2, 3 dc
That complete group counts as one slanted shell.
The single crochet pulls one side of the group down while the three double crochets rise beside it, creating the diagonal shell shape.
Pattern Multiple
The starting chain is:
a multiple of 4 + 1
For the blanket size shown here:
Ch 121
This creates:
30 shell motifs across
with one edge stitch on each side.
To resize the blanket, add or remove foundation chains in groups of:
4
Foundation Chain
With cream yarn:
Ch:
121
Keep the chain relaxed.
If you naturally crochet foundation chains tightly, make the chain with a 5 mm hook and switch to the 4.5 mm hook for the body.
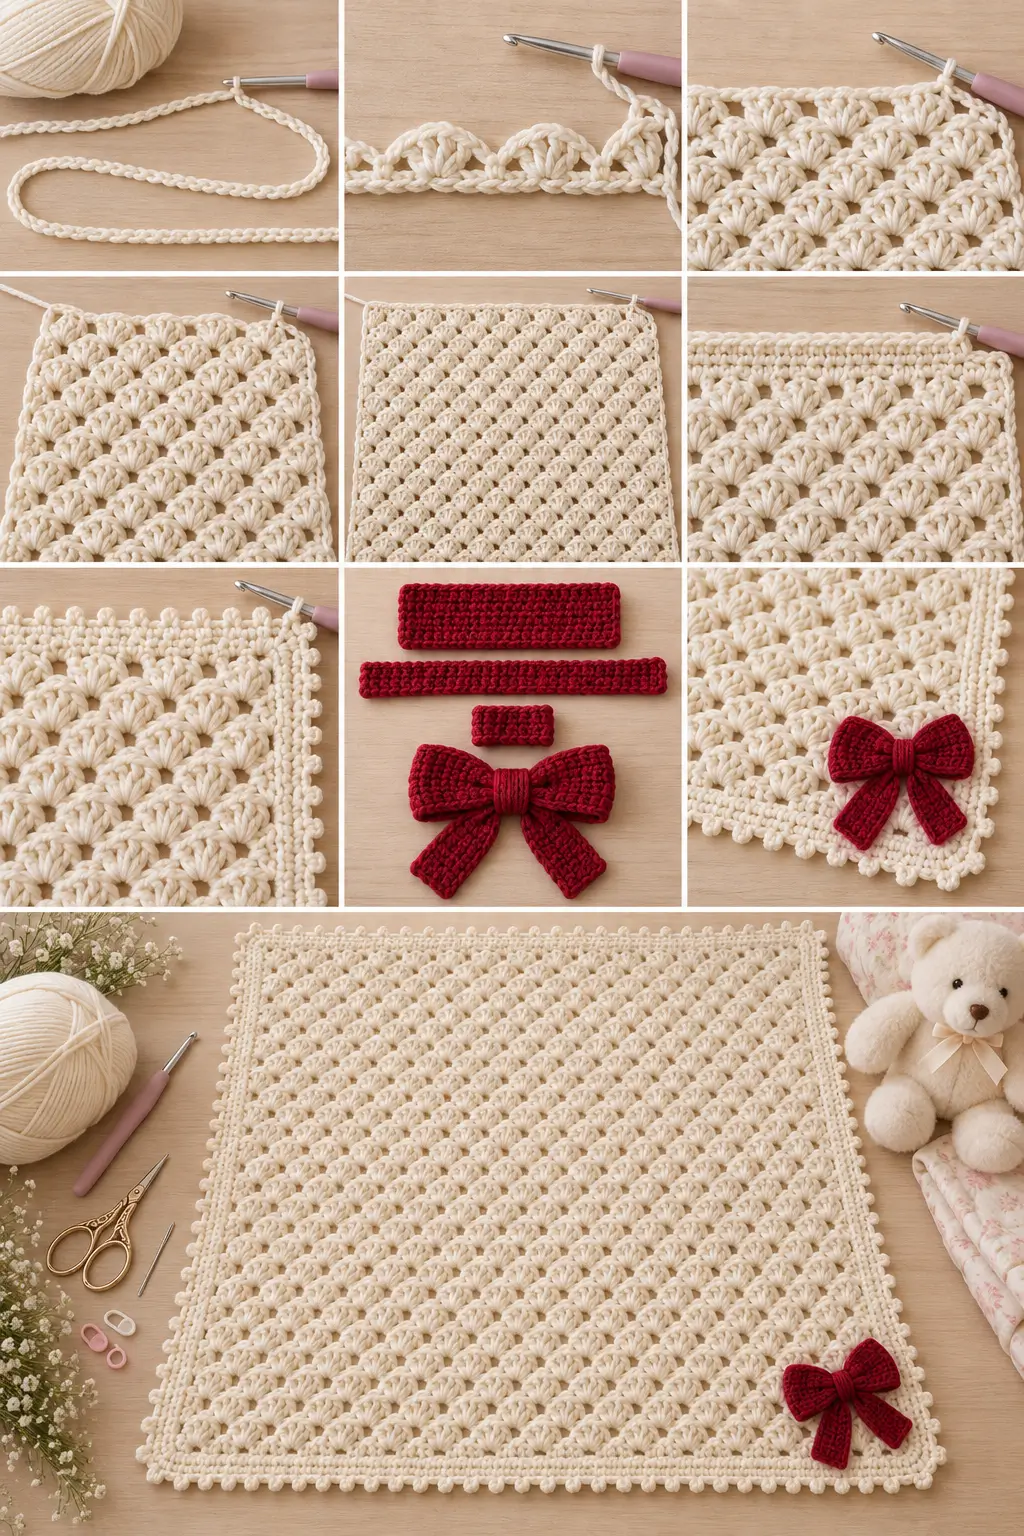
Row 1 — Setup Row
The first 3 chains count as the first edge dc.
In the:
4th chain from the hook
work:
1 sc, ch 2, 3 dc
all into the same chain.
You have made the first slanted shell.
Now repeat:
skip the next 3 chains
then work:
1 sc, ch 2, 3 dc
in the next chain.
Continue repeating:
skip 3, slanted shell in next chain
across.
When only:
1 chain remains
work:
1 dc in the final chain
You should have:
30 slanted shells
with one dc edge at each side.
Turn.
Row 2 — One-Row Repeat
Ch:
3
The ch-3 counts as the first dc.
Work one complete slanted shell:
1 sc, ch 2, 3 dc
into the first:
ch-2 space
from the row below.
Continue across, working:
1 sc, ch 2, 3 dc
into every ch-2 space.
After the final shell, work:
1 dc in the top of the beginning ch-3 from the previous row
Turn.
Repeat Row
Repeat Row 2 for the entire blanket.
Every row is worked exactly the same way:
Ch 3, turn.
Work:
1 slanted shell in every ch-2 space.
Finish with:
1 dc in the top of the previous row’s turning chain.
Turn.
That is the complete blanket-body pattern.
How the Pattern Develops
Each new shell is worked directly into the ch-2 opening inside the shell below.
Because the shell itself contains:
1 short sc
followed by:
3 taller dc
the motifs naturally lean in one direction.
As more rows are added, the shells create:
- raised diagonal texture
- small repeating openings
- dense overlapping sections
- a soft woven appearance
- identical motif placement on every row
There are no complicated row changes to memorize.
Counting the Shells
You should always have:
30 complete shells
between the two edge stitches.
Count the ch-2 spaces occasionally.
Each ch-2 space represents:
one shell
for the next row.
If you have 30 ch-2 spaces, your stitch pattern is still correct.
Keeping the Side Edges Straight
Every row begins with:
ch 3
and ends with:
1 dc in the top of the previous ch-3
Do not work the final dc into the side of the last shell.
Place a stitch marker in the top of the turning chain if you have difficulty seeing it.
Missing this edge stitch will make the blanket gradually become narrower.
Continue to the Correct Length
Continue repeating Row 2 until the blanket body measures approximately:
34 inches / 86 cm long
The exact number of rows will depend on your tension.
Measuring the blanket is more reliable than forcing a specific row count.
Finish after any complete row.
Do not fasten off if you want to continue directly into the edging.
Straightening the Top Edge
The shell pattern naturally creates small rises and dips along the top.
Before adding the border, work one leveling row.
Ch 1.
Turn.
Sc in the first edge stitch.
Across each shell:
Work:
1 sc in the sc
1 sc in the ch-2 space
1 sc in each of the 3 dc
Continue across.
Work one final sc into the edge turning chain.
Keep these stitches relaxed.
The top should become straight without pulling the blanket narrower.
Blanket Border
The border is kept narrow so the slanted-shell texture remains the main feature.
Border Round 1
Continue from the leveling row or join cream yarn at any corner.
Ch 1.
Work:
3 sc in the corner
Across the top:
Work approximately:
1 sc in every stitch
At the next corner:
3 sc
Down the long side:
Work approximately:
2 sc around each dc-height row end
Because tension varies, check the edge frequently.
It should lie flat.
At the next corner:
3 sc
Across the foundation edge:
Work sc evenly into the foundation chains.
At the final corner:
3 sc
Work evenly up the remaining side.
Join with a sl st to the first sc.
Border Round 2
Ch 1.
Sc in every stitch around.
At each corner, locate the middle stitch of the previous:
3-sc corner
Work:
3 sc in that stitch
Continue around.
Join.
Border Round 3 — Tiny Picot Edge
Ch 1.
Sc in the same stitch.
Work:
sc in next stitch
Then make a picot:
Ch 3.
Sl st into the first chain of the ch-3.
Continue:
sc in next 2 stitches, picot
around the blanket.
Picot Corners
At each corner, work:
sc in the corner stitch
Ch 3.
Sl st into the first chain to make a picot.
Work:
another sc in the same corner stitch
Then continue the regular edging along the next side.
This keeps the corner defined without creating a large ruffle.
Join with a sl st when the round is complete.
Fasten off.
Optional Red Crochet Bow
The bow is worked separately and sewn securely to one corner after the blanket is finished.
The finished bow measures approximately:
5 inches / 12.5 cm wide
Bow Main Piece
With deep-red yarn:
Ch:
31
Beginning in the second chain from the hook:
Sc in every chain across.
30 sc
Ch 1.
Turn.
Bow Rows 2–10
Sc in every stitch across.
30 sc
Ch 1 and turn after Rows 2–9.
After Row 10:
Fasten off, leaving a long sewing tail.
You should have a rectangular piece approximately:
7½–8 inches / 19–20 cm wide
and:
2½–3 inches / 6–7.5 cm tall
depending on tension.
Form the Bow Loops
Bring the two short ends of the rectangle together.
Using the yarn tail, sew the short ends together.
Turn the seam to the back.
Flatten the loop with the seam centered at the back.
Pinch the middle firmly.
The fabric should form two rounded bow loops.
Bow Tail Piece
Ch:
41
Beginning in the second chain from the hook:
Hdc in every chain across.
40 hdc
Ch 1.
Turn.
Tail Rows 2–4
Hdc in every stitch across.
40 hdc
After Row 4:
Fasten off.
Shape the Bow Tails
Fold the long tail strip in half.
Place its center behind the pinched bow loops.
Angle the two ends downward in opposite directions.
For a more decorative finish, fold the very end of each tail slightly diagonally before attaching.
Bow Center Band
Ch:
8
Beginning in the second chain:
Sc across.
7 sc
Work:
4 rows total
of sc.
Fasten off, leaving a sewing tail.
Assemble the Bow
Stack the pieces in this order:
- Tail strip at the back
- Bow-loop piece in front
- Small center band wrapped around both
Wrap the center band tightly around the middle.
Bring its ends together at the back.
Sew securely.
Weave in the ends.
The bow should have:
- two full loops
- two hanging tails
- narrow wrapped center
- three-dimensional shape
Attach the Bow to the Blanket
Choose one blanket corner.
Place the bow approximately:
1½–2 inches / 4–5 cm
in from both edges.
Thread matching red yarn onto a yarn needle.
Sew through the back center of the bow and the blanket fabric.
Add several secure stitches.
Also add one small hidden stitch under each bow loop if necessary to stop it twisting.
Do not sew through the outermost edges of the loops.
They should remain raised and three-dimensional.
Important Safety Note
If the blanket is intended for an unsupervised infant sleeping space, leave off the decorative bow.
A plain blanket is easier to wash and avoids adding a raised embellishment that can be pulled or chewed.
The bow works especially well for:
- stroller blankets
- decorative nursery blankets
- supervised use
- photography props
- keepsake gifts
Making the Blanket Smaller
Use any starting chain following:
multiple of 4 + 1
For example:
Ch 97
creates:
24 shells
and makes a smaller blanket.
Continue the same one-row repeat until the blanket reaches the length you want.
Making the Blanket Wider
Add chains in groups of:
4
For example:
Ch 129
creates:
32 shells
Ch 137
creates:
34 shells
Ch 145
creates:
36 shells
The stitch instructions remain unchanged.
Stroller Blanket
For approximately:
26–28 inches wide
begin with:
Ch 105
This creates:
26 shells
Continue until approximately:
32 inches / 81 cm long
before adding the border.
Baby Blanket
For approximately:
30–32 inches wide
use:
Ch 121
This creates:
30 shells
Continue until approximately:
34 inches / 86 cm
before edging.
Larger Crib-Style Blanket
For approximately:
36–38 inches wide
begin with:
Ch 145
This creates:
36 shells
Continue until approximately:
42–44 inches / 107–112 cm long
before adding the border.
If the Shells Are Too Tight
A complete shell contains:
1 sc, ch 2, 3 dc
all worked into the same space.
The dc stitches should spread slightly rather than bunch tightly together.
If the fabric feels stiff:
- loosen your tension
- use a 5 mm hook
- make the ch-2 spaces slightly more relaxed
If the Blanket Has Large Holes
Small openings are part of the pattern, but they should not dominate the fabric.
If the openings are too large:
- tighten the ch-2 slightly
- move down to a 4 mm hook
- use a slightly fuller DK yarn
Do not remove the ch-2 because it is the placement space for the next row.
If the Shell Pattern Stops Looking Diagonal
Check where you are placing each new shell.
Every shell after Row 1 must be worked into:
the ch-2 space of the shell directly below
Do not work into one of the dc stitches.
Do not work around the entire ch-2 chain.
Insert the hook through the open ch-2 space.
If the Blanket Becomes Narrower
Count your shells.
You should have:
30 shells on every row
for this size.
The most common cause is missing:
- the first ch-2 space
- the last ch-2 space
- the final edge dc
If the Blanket Becomes Wider
Check that you are working only:
one shell into each ch-2 space
Do not work into the gap between neighboring shells.
Also make sure you have not accidentally worked an additional shell into the final turning chain.
If One Side Looks Uneven
Place a marker in:
the top of the ch-3
at the beginning of every row.
When you return to that edge, the final dc goes into the marked stitch.
This creates a much cleaner and more consistent side edge.
Yarn Suggestions
The stitch works beautifully in:
- cream
- ivory
- white
- pale blush
- soft sage
- baby blue
- oatmeal
- pale gray
Solid colors make the diagonal shell texture easiest to see.
A lightly speckled yarn also works if the color changes are subtle.
Final Pattern at a Glance
Foundation
Ch:
121
Row 1
The first 3 chains count as the edge dc.
In 4th ch from hook:
(sc, ch 2, 3 dc)
Repeat:
skip 3 chains, (sc, ch 2, 3 dc) in next chain
until 1 chain remains.
Dc in final chain.
Turn.
30 shells
Row 2
Ch 3.
Work:
(sc, ch 2, 3 dc)
in every ch-2 space across.
Dc in top of previous turning chain.
Turn.
30 shells
Repeat
Repeat:
Row 2 only
until the blanket reaches approximately:
34 inches / 86 cm long
Work one leveling sc row.
Add:
2 rounds of single crochet
followed by:
1 tiny picot edging round
Attach the optional deep-red crochet bow securely to one corner.
The finished blanket measures approximately 30–32 × 35–36 inches / 76–81 × 89–91 cm, with a soft ivory one-row slanted-shell texture, a delicate picot edge, and an optional dimensional red bow.