Easy 2-Row Braided Cable Crochet Blanket
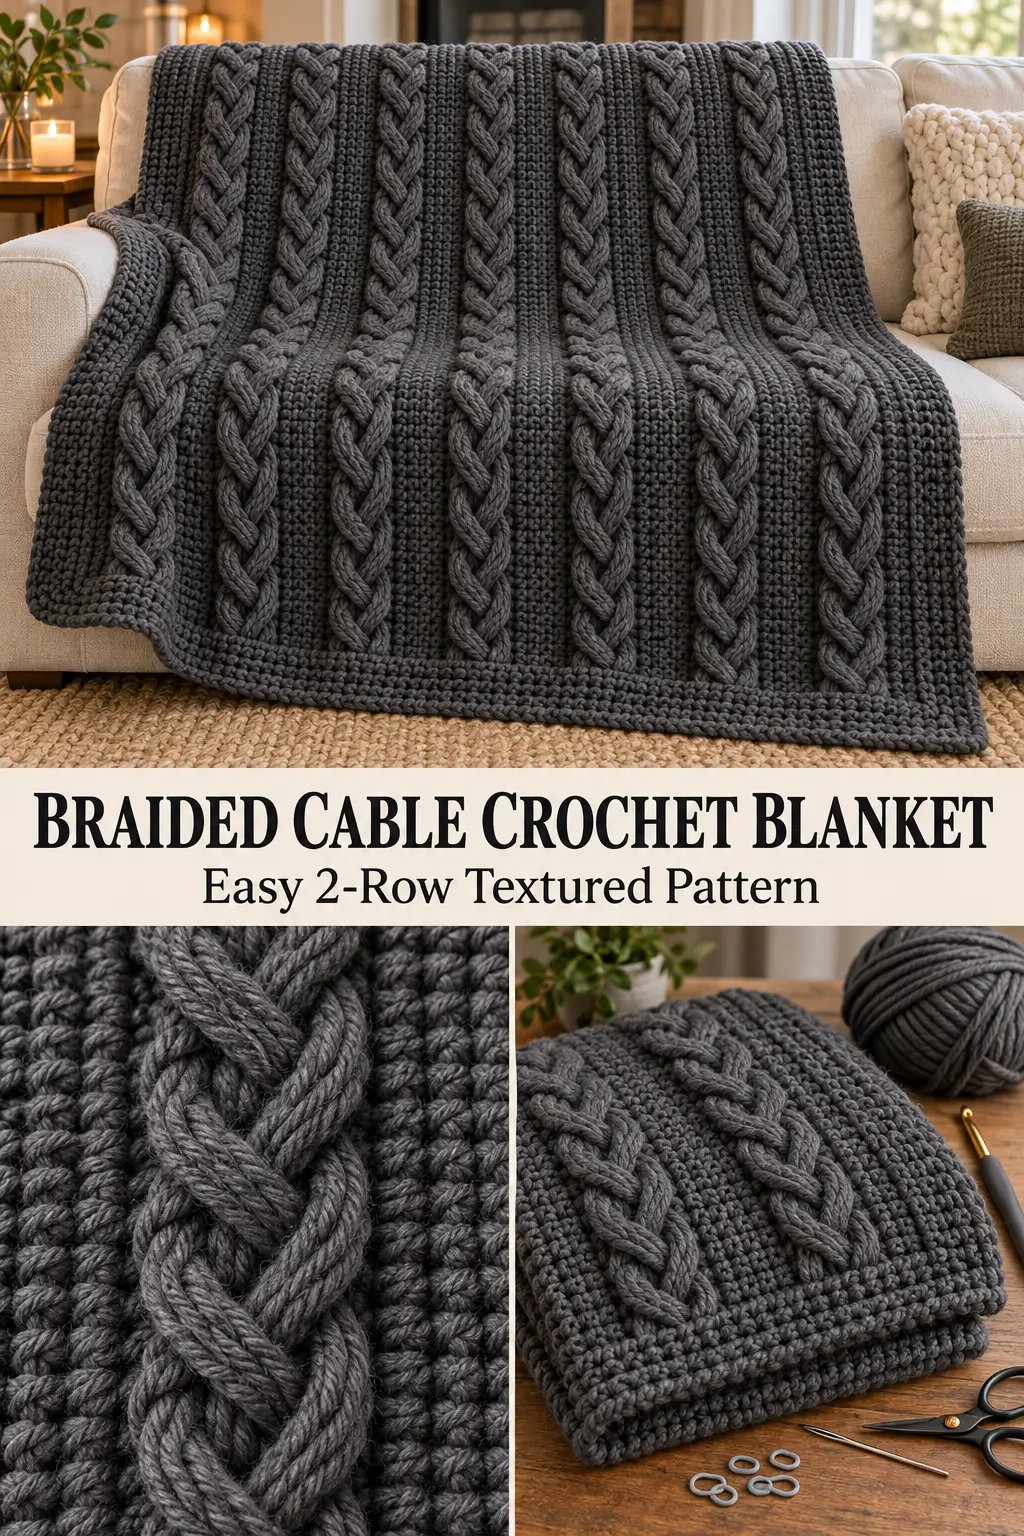
This richly textured crochet blanket uses a simple two-row repeat to create bold vertical braided columns across a dense background.
The raised texture is created with four-stitch front-post treble crochet cables. One row forms the dramatic crossing stitches, and the next row is worked completely in half double crochet to stabilize the fabric and prepare the posts for the next cable row.
The result is a thick, warm blanket with continuous braided-looking columns running from the bottom edge to the top.
Despite the detailed appearance, there are only two pattern rows to remember.
Finished Size
Approximately:
46 inches / 117 cm wide
by
58 inches / 147 cm long
including the border.
The pattern is easy to resize because the stitch multiple is:
6 stitches + 2
Materials
- Bulky weight #5 yarn
- Approximately 1,800–2,200 yards / 1,645–2,010 meters
- 6.5 mm crochet hook
- Yarn needle
- Scissors
- Stitch markers
- Measuring tape
Use a smooth yarn with good stitch definition so the raised cables remain clearly visible.
For the dark modern look, use:
charcoal gray, graphite, slate, or deep pewter
Skill Level
Intermediate beginner
You should know how to make:
- chain
- half double crochet
- front post treble crochet
- single crochet
- slip stitch
The cable itself is made from four front-post treble crochets worked out of order.
Abbreviations
This pattern uses US crochet terminology.
ch — chain
sc — single crochet
hdc — half double crochet
FPtr — front post treble crochet
sl st — slip stitch
st / sts — stitch / stitches
rep — repeat
Gauge
Approximately:
10 hdc = 4 inches / 10 cm
and:
7–8 rows = 4 inches / 10 cm
The cable texture may pull the finished fabric slightly narrower than a plain half double crochet swatch.
Measure after completing at least 8 pattern rows.
Pattern Multiple
The body uses:
multiple of 6 + 2 stitches
For the approximately 44-inch-wide body used here:
110 working stitches
Begin with:
112 chains
The extra 2 chains are used for turning and do not count as stitches.
Special Stitch — Front Post Treble Crochet
Yarn over twice.
Insert the hook from front to back and then back to front around the post of the indicated stitch.
Yarn over and pull up a loop.
You should have 4 loops on the hook.
Yarn over and pull through 2 loops.
Yarn over and pull through 2 loops again.
Yarn over and pull through the final 2 loops.
One FPtr is complete.
When working the cable stitches, pull the first loop up to the height of the current row before finishing the stitch. This prevents the cable from pulling the blanket inward.
Four-Stitch Braided Cable
The raised cable is worked over:
4 consecutive stitches
To make one cable:
Skip the next:
2 stitches
Work:
1 FPtr around the post of each of the next 2 stitches
You have now made 2 raised post stitches.
Working in front of those 2 FPtr, go back to the first skipped stitch.
Work:
1 FPtr around the post of the first skipped stitch
Then:
1 FPtr around the post of the second skipped stitch
You have now worked 4 FPtr total.
The two pairs cross in the center, creating one raised cable segment.
Move directly to the stitches after the four cable stitches.
Do not return later to the unused top loops underneath the cable.
Foundation Chain
Ch:
112
Keep the foundation chain relaxed.
If your chains are naturally tight, make the foundation with a 7 mm hook and switch back to the 6.5 mm hook for the blanket.
Setup Row
Beginning in the:
3rd chain from the hook
work:
1 hdc in each chain across
You should have:
110 hdc
Ch 2.
Turn.
The ch-2 does not count as a stitch here or anywhere else in the pattern.
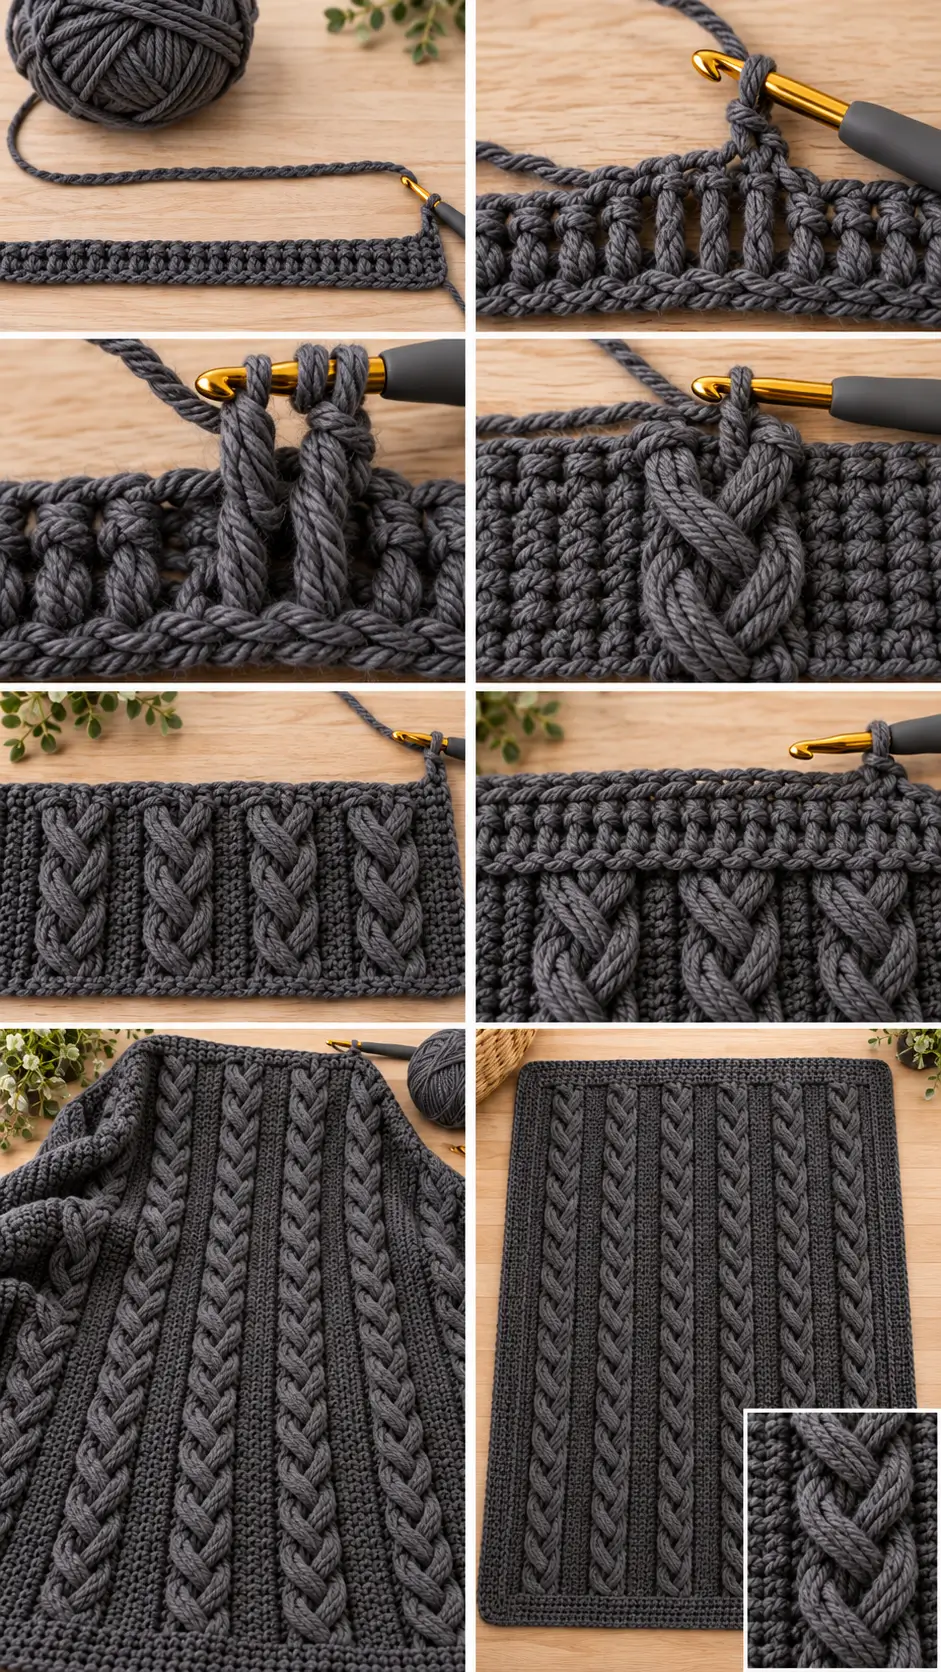
Row 1 — Cable Row
Hdc in the first:
2 stitches
Now begin the repeating cable pattern.
Repeat:
4-stitch braided cable over the next 4 stitches
then:
hdc in the next 2 stitches
across the row.
Your repeat is:
[4-st cable, 2 hdc]
Continue until the end.
You should finish with:
2 hdc
Ch 2.
Turn.
Row 2 — Plain Stabilizing Row
Hdc in every stitch across.
Make sure you work into the tops of the FPtr stitches from the previous row.
Do not work into the unused loops underneath the cable stitches.
You should still have:
110 stitches
Ch 2.
Turn.
Main Two-Row Repeat
Repeat:
Row 1 — cable row
then:
Row 2 — plain hdc row
for the entire blanket.
That is the complete body pattern.
How the Texture Develops
Every cable row places another crossed four-stitch section directly above the cable below it.
The plain half double crochet row between cable rows does two things:
- keeps the blanket dense
- provides clean posts for the next cable
As the rows accumulate, the crossed stitches visually connect into tall braided columns.
Between the braids are narrow two-stitch columns of flatter crochet.
This contrast makes the cables stand out strongly.
Keeping the Cable Columns Straight
The stitch placement must remain consistent.
Every cable row begins with:
2 hdc
Then repeat:
4 cable stitches + 2 hdc
Do not shift the cable repeat by even one stitch.
If you do, the raised columns will begin moving diagonally instead of stacking vertically.
Count the Stitches Regularly
Every row contains:
110 stitches
Even though the cable stitches are worked around posts, every FPtr still counts as one stitch.
One cable contains:
4 stitches
The two hdc between cables contain:
2 stitches
So every complete repeat contains:
6 stitches
Continue to the Desired Length
Repeat the two pattern rows until the blanket body measures approximately:
56 inches / 142 cm long
Finish after a plain hdc row.
Ending with the plain row gives you a straight top edge for the border.
Straightening the Top Edge
After the final plain row:
Ch 1.
Turn.
Sc in every stitch across.
110 sc
Do not fasten off.
You can continue directly into the border.
Crochet Border
A simple dense border frames the cables without competing with the texture.
Border Round 1
Continue from the final top-edge sc row.
At the first corner work:
2 additional sc in the same stitch
Together with the existing sc, this creates a 3-sc corner.
Now work down the first long side.
Work approximately:
1 sc into each row end
Keep the stitches evenly spaced.
Do not cram extra stitches into the sides.
At the bottom corner:
3 sc in the corner stitch
Across the foundation edge:
1 sc in each foundation stitch
At the next corner:
3 sc
Work up the second long side:
approximately 1 sc per row end
At the final corner, complete the corner with enough sc so it contains:
3 sc total
Join with a sl st to the first sc.
Check the Border
Lay the blanket flat.
The border should not:
- pull the blanket inward
- form large waves
- curl upward
If the long sides ruffle, use fewer sc along the row ends.
If they pull inward, add a few more evenly distributed sc.
The exact side count is less important than a flat border.
Border Round 2
Ch 1.
Sc in every stitch around.
At each corner, locate the center stitch of the previous round’s 3-sc corner.
Work:
3 sc in that center corner stitch
Continue around.
Join with a sl st.
Border Round 3
Repeat Border Round 2.
This creates a clean approximately:
1-inch / 2.5 cm border
around the blanket.
Fasten off after joining.
Finishing
Cut the yarn, leaving a tail approximately:
8 inches / 20 cm
Thread the tail onto a yarn needle.
Weave through several stitches on the wrong side.
Change direction and weave through several more stitches.
Trim the remaining yarn.
Repeat for all other yarn ends.
Blocking the Blanket
Blocking helps straighten the cable columns and relax the surrounding fabric.
Check your yarn label before blocking.
Lay the blanket flat.
Gently straighten:
- both long sides
- top and bottom edges
- each vertical cable column
Do not flatten the raised cables.
The braid texture should remain dimensional.
Allow the blanket to dry completely before moving it.
How to Make the Blanket Narrower
Use any working stitch count that follows:
multiple of 6 + 2
Then add:
2 chains
for the foundation.
For example:
74 working stitches
74 = 6 × 12 + 2
Foundation:
ch 76
86 working stitches
86 = 6 × 14 + 2
Foundation:
ch 88
98 working stitches
98 = 6 × 16 + 2
Foundation:
ch 100
110 working stitches
110 = 6 × 18 + 2
Foundation:
ch 112
This is the throw-size version used in the main pattern.
122 working stitches
122 = 6 × 20 + 2
Foundation:
ch 124
Baby Blanket Version
For an approximately:
32–34 inch / 81–86 cm wide
baby blanket, begin with:
ch 88
This gives:
86 working stitches
Work the same two-row repeat until the blanket measures approximately:
38–40 inches / 97–102 cm long
Then add the border.
Lap Blanket Version
For approximately:
39–41 inches / 99–104 cm wide
begin with:
ch 100
This gives:
98 working stitches
Continue until the body measures approximately:
48–50 inches / 122–127 cm
Then finish with the border.
Throw Blanket Version
Use:
ch 112
for:
110 working stitches
Continue the body to approximately:
56 inches / 142 cm
Add the border for an approximate finished size of:
46 × 58 inches / 117 × 147 cm
Larger Couch Blanket
Begin with:
ch 124
for:
122 working stitches
Work the pattern until the blanket reaches approximately:
60–64 inches / 152–163 cm
before adding the border.
Yarn requirements will increase considerably.
If the Cable Looks Flat
Make sure you are inserting the hook:
around the post
rather than into the top loops.
All four cable stitches should be:
front post treble crochet
The tall stitches need to sit on the surface of the fabric.
Also make sure the second pair of FPtr is worked so it crosses in front of the first pair.
If the Cable Is Too Tight
Pull the first loop of every FPtr higher.
The stitch has to travel diagonally across the fabric.
If the loop is too short, the cable will pull strongly and the blanket may buckle.
You can also move up half a hook size for the cable row only if necessary.
If the Blanket Is Becoming Narrower
Count the stitches.
Every row must remain:
110 stitches
for this size.
The most common mistake is accidentally forgetting that all four FPtr stitches count as stitches.
After making a cable, move to the two stitches immediately following the four posts used by the cable.
If the Blanket Is Curling
A small amount of curling can happen while the piece is still short.
The plain hdc rows, additional weight, and border usually help it relax.
Severe curling often means the post stitches are too tight.
Pull each FPtr loop up fully before completing the stitch.
If the Cable Columns Lean Sideways
Check where you begin each cable row.
The row must always start with:
2 hdc
Then work:
4-st cable
Then:
2 hdc
Repeat that exact arrangement.
If the repeat starts one stitch early or late, all later cables will shift.
If You Lose Your Place
Look at the previous row.
If the previous row contains visible raised cable crossings, your next row is:
plain hdc across
If the previous row is completely plain hdc, your next row is:
the cable row
That makes the two-row repeat very easy to identify without counting every row.
Optional Firmer Border
For a more substantial finish, add one additional border round.
Work:
sc BLO in every stitch
At every corner:
3 sc BLO in the center corner stitch
This produces a subtle raised line around the blanket.
Yarn Color Ideas
The heavy braided texture works particularly well in solid colors.
Try:
Graphite Gray
for a modern neutral blanket.
Cream
for a soft cable-knit-inspired look.
Deep Forest Green
for a cozy woodland style.
Navy Blue
for a classic masculine throw.
Warm Taupe
for understated home decor.
Using one solid color makes the cable texture much easier to see than a highly variegated yarn.
Final Pattern at a Glance
Foundation
Ch:
112
Setup Row
Hdc in 3rd ch from hook and across.
110 hdc
Row 1 — Cable Row
2 hdc.
Repeat:
4-stitch FPtr cable, 2 hdc
across.
110 sts
Row 2 — Plain Row
Hdc in every stitch across.
110 sts
Repeat:
Rows 1 and 2
until the blanket measures approximately:
56 inches / 142 cm
Finish after a plain hdc row.
Work one sc row across the top.
Then work:
3 rounds of single crochet
around the entire blanket, placing:
3 sc in every corner
The finished throw measures approximately 46 × 58 inches / 117 × 147 cm, with dense charcoal fabric, narrow background columns, and continuous raised braided cables running vertically across the entire blanket.