Easy 2-Row Flower Shell Crochet Blanket
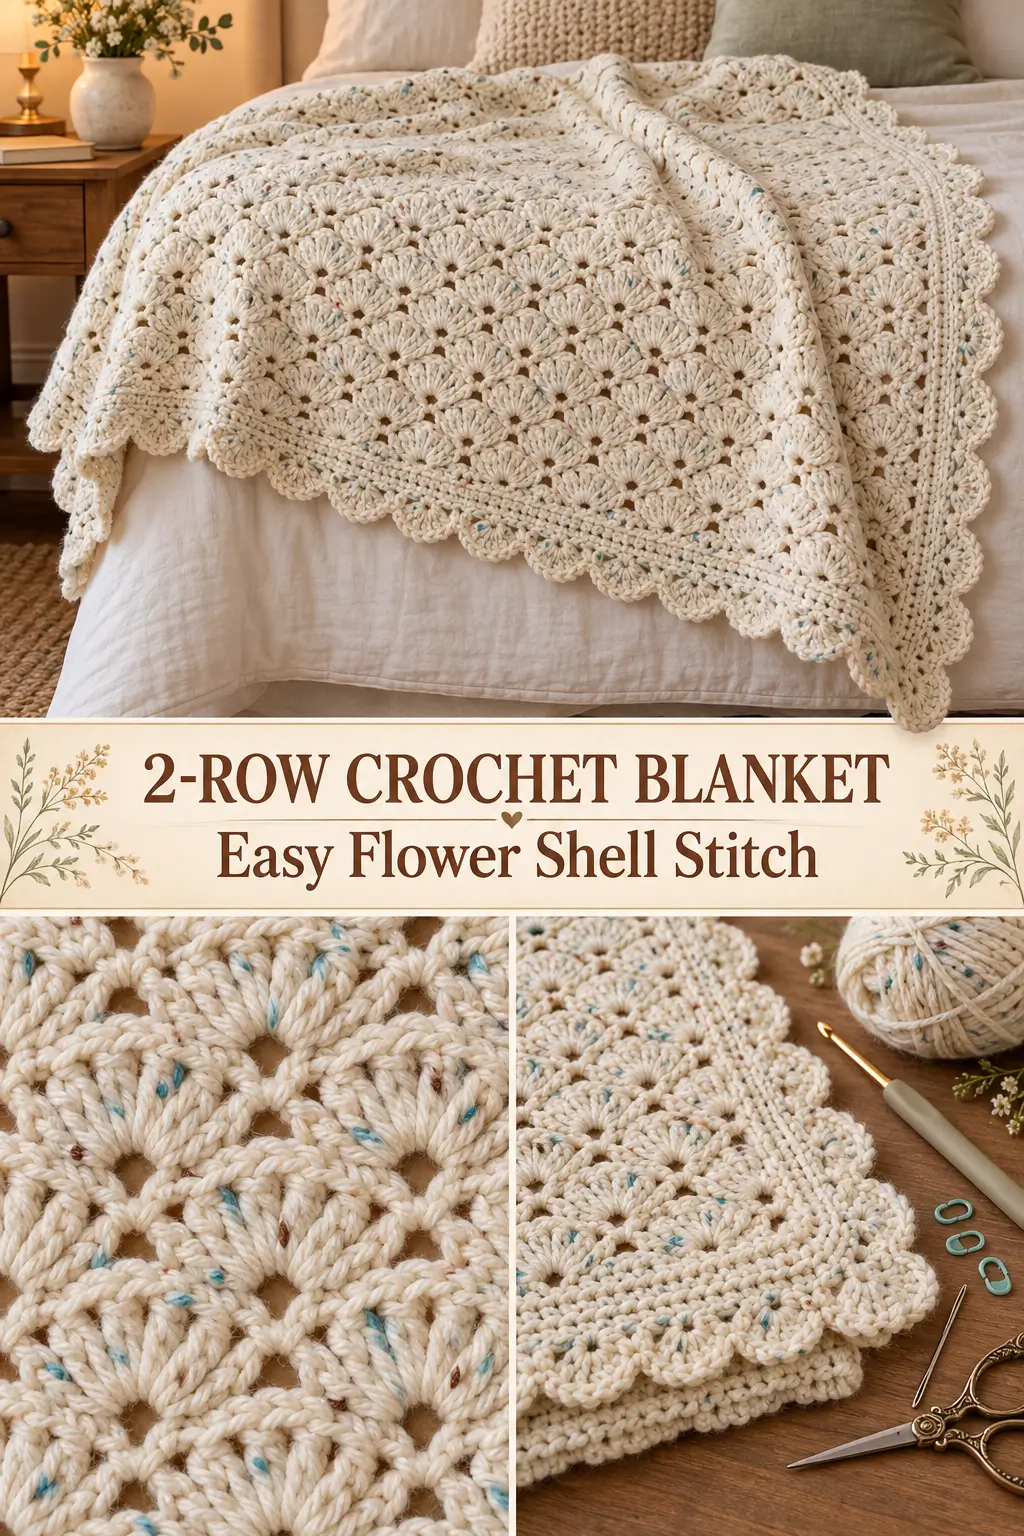
This soft textured crochet blanket uses a simple two-row repeat to create rows of overlapping flower-like shells. The tall stitches fan outward from small anchor points, producing a repeating pattern of rounded petals and little open spaces between the motifs.
Worked in a warm cream tweed yarn with tiny blue and brown flecks, the stitch pattern has enough detail to look decorative without becoming difficult to memorize.
The blanket is worked back and forth in one rectangular piece. There are no motifs to join and no complicated shaping.
Finished Size
Approximately:
44 inches / 112 cm wide
by:
56 inches / 142 cm long
including the edging.
The pattern is easy to resize.
Materials
- Medium weight #4 yarn
- Approximately 1,700–2,000 yards / 1,555–1,830 meters
- 5.5 mm crochet hook
- Yarn needle
- Scissors
- Stitch markers
- Measuring tape
For a look similar to the blanket shown, choose:
warm ivory or cream tweed yarn with small aqua-blue and brown flecks
A smooth or lightly twisted yarn works best because it keeps the shell stitches clearly defined.
Skill Level
Confident beginner
You should know how to make:
- chain
- single crochet
- double crochet
- slip stitch
- working several stitches into one stitch
- skipping stitches
Once the setup row is complete, only two rows are repeated.
Abbreviations
This pattern uses US crochet terminology.
ch — chain
sc — single crochet
dc — double crochet
sl st — slip stitch
st / sts — stitch / stitches
sp — space
rep — repeat
Turning chains do not count as stitches unless specifically stated.
Stitch Pattern
The texture is created with:
5-dc shells
anchored by:
single crochet stitches
The shell rows are offset from one another.
A shell is worked into the single crochet below, while a single crochet is worked into the middle stitch of the shell below.
This makes each new row fit between the motifs of the previous row.
Special Stitch — 5-Double-Crochet Shell
Work:
5 dc in the same stitch
The third dc is the center stitch of the shell.
On the following row, the anchoring sc is worked into this third dc.
Pattern Multiple
The foundation is:
a multiple of 6 + 1
For the throw-size blanket, begin with:
145 chains
Because:
144 + 1 = 145
If you want to change the width, add or remove chains in groups of:
6
Foundation Chain
Ch:
145
Keep the chain loose.
If your foundation chains are tight, make them with a 6 mm hook, then switch back to the 5.5 mm hook for the blanket.
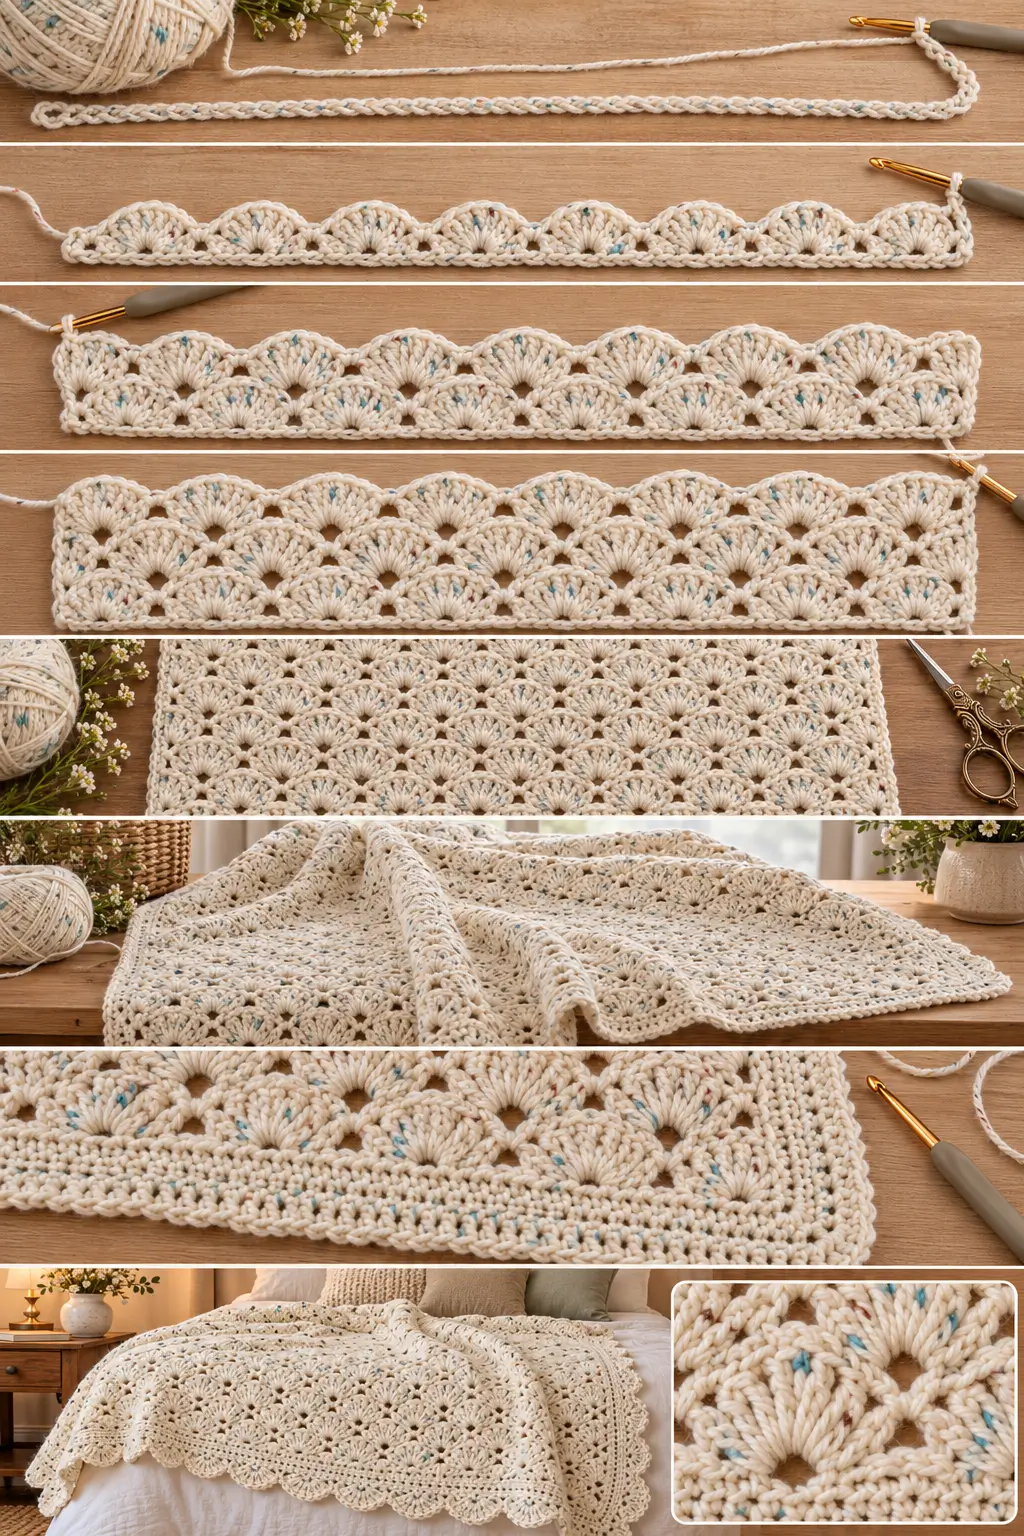
Row 1 — First Shell Row
Beginning in the:
2nd chain from the hook
work:
1 sc
Skip the next:
2 chains
Work:
5 dc in the next chain
Skip the next:
2 chains
Work:
1 sc in the next chain
Repeat:
skip 2, 5 dc in next ch, skip 2, sc in next ch
across the row.
You should finish with:
1 sc
Turn.
Do not make the turning chain yet.
The row should already show rounded fans separated by small anchor stitches.
Row 2 — Offset Shell Row
Ch:
3
The ch-3 does not count as a stitch.
Work:
2 dc in the first sc
This creates a half shell at the edge.
Now locate the first 5-dc shell from Row 1.
Work:
1 sc in the 3rd dc of the shell
The third dc is the center stitch.
Now work:
5 dc in the next sc
Then:
1 sc in the 3rd dc of the next shell
Repeat:
5 dc in next sc, sc in center dc of next shell
across.
When you reach the final sc of the row, work:
3 dc in the final sc
Turn.
You now have half shells at both edges and full shells across the center.
Row 3
Ch:
1
Work:
1 sc in the first dc
Now work:
5 dc in the next sc
Find the center stitch of the next full shell.
Work:
1 sc in the 3rd dc of that shell
Then:
5 dc in the next sc
Continue repeating:
5 dc in next sc, sc in center dc of next shell
across.
At the final edge half shell, work:
1 sc in the top of the final dc
Turn.
The shells should now sit between the shells from the previous row.
The 2-Row Repeat
Repeat:
Row 2
then:
Row 3
for the remainder of the blanket.
That is the complete body pattern.
What the Pattern Should Look Like
After several rows, the fabric should show repeating rounded motifs.
Each full shell contains:
5 dc
Each shell is anchored at its center by:
1 sc on the following row
The offset construction creates:
- flower-like shapes
- small diamond openings
- diagonal lines between motifs
- a lightly scalloped texture
- dense enough fabric for a warm blanket
The blanket should remain flexible rather than stiff.
Finding the Center of Each Shell
Every shell has:
5 dc
Count:
1, 2, 3, 4, 5
Always work the anchoring sc into:
dc number 3
If you accidentally work into dc 2 or dc 4, the pattern will begin leaning sideways.
Keeping the Edges Straight
The two alternating rows have different edge treatments.
Row 2
Begins with:
3 dc in the first edge position
and ends with:
3 dc in the final edge position
Row 3
Begins with:
1 sc
and ends with:
1 sc
Always check the first and last stitch before turning.
This prevents the blanket from becoming narrower.
Continue the Blanket
Repeat Rows 2 and 3 until the blanket body measures approximately:
54 inches / 137 cm long
Finish after completing a:
Row 3
so both the top and bottom edges have a similar structure.
Do not fasten off.
Straightening the Top Edge
The shell pattern naturally creates a slightly shaped edge.
Before adding the border, work one leveling row.
Ch 1.
Turn.
Sc in the first stitch.
Across each full shell:
Work:
1 sc in each of the 5 dc
Across each anchor sc:
Work:
1 sc
Continue evenly across.
Do not increase inside the shells.
The goal is to create a firm straight edge without pulling the fabric.
Fasten off only if you want to start the border at a different corner.
Crochet Border
The finished blanket uses a simple border that supports the textured pattern without hiding the shell motifs.
Border Round 1
Join yarn at any corner.
Ch 1.
Work:
3 sc in the corner
Continue across the top with:
1 sc in each stitch
At the next corner:
3 sc
Now work down the long side.
The shell rows have different heights, so place the side stitches by appearance rather than forcing an exact number.
Work approximately:
2 sc around the end of each dc-height row
and:
1 sc around the end of each sc-height section
Spread the blanket flat every few inches.
At the next corner:
3 sc
Work across the foundation edge evenly.
At the final corner:
3 sc
Work evenly up the remaining side.
Join with a sl st to the first sc.
Border Round 2
Ch 1.
Sc in every stitch around.
At each corner, locate the center stitch of the previous:
3-sc corner
Work:
3 sc in that stitch
Continue around.
Join.
Decorative Shell Border
The final round repeats the soft shell shape from the blanket body.
Border Round 3
Ch 1.
Sc in the first stitch.
Skip:
2 stitches
Work:
5 dc in the next stitch
Skip:
2 stitches
Sc in the next stitch.
Repeat:
skip 2, 5 dc in next st, skip 2, sc in next st
around the blanket.
Adjusting the Corners
When approaching a corner, do not force the six-stitch repeat if it does not fit perfectly.
At each corner, work:
7 dc in the corner stitch
This creates enough fullness for the shell to turn around the corner without pulling.
After the corner shell, resume:
skip 2, sc, skip 2, 5 dc
along the next side.
If one or two stitches remain before a corner, distribute them evenly by skipping one fewer or one extra stitch.
The border should lie flat.
Finish the Border
After completing the final side:
Join with a sl st to the first sc.
Fasten off.
Cut the yarn, leaving approximately:
8 inches / 20 cm
for weaving in.
Weaving In the Ends
Thread each yarn tail onto a yarn needle.
On the wrong side of the blanket:
Weave through several nearby stitches.
Change direction.
Weave through another few stitches.
Avoid pulling tightly enough to distort a shell.
Trim the excess.
Finished Measurements
After edging, the blanket should measure approximately:
44 × 56 inches / 112 × 142 cm
A difference of an inch or two is normal.
Your exact size depends on:
- yarn thickness
- hook size
- tension
- number of repeat rows
Making a Baby Blanket
For a blanket approximately:
32–34 inches wide
use a shorter foundation following:
multiple of 6 + 1
A convenient starting chain is:
109 chains
because:
108 + 1 = 109
Work the same pattern until the body is approximately:
38 inches / 97 cm long
Then add the border.
Making a Lap Blanket
For approximately:
38–40 inches wide
begin with:
127 chains
because:
126 + 1 = 127
Continue until approximately:
48–50 inches / 122–127 cm long
before edging.
Making the Full Throw
Use:
145 chains
Continue to approximately:
54 inches / 137 cm
before adding the border.
Finished size:
approximately 44 × 56 inches
Making a Larger Blanket
Add foundation chains in groups of:
6
For example:
151 chains
157 chains
163 chains
169 chains
All maintain the stitch repeat.
Continue repeating Rows 2 and 3 until the blanket reaches your desired length.
If the Shells Look Too Tight
The 5 dc stitches should spread naturally into a fan.
If they bunch tightly together:
- loosen your tension
- pull the dc loops slightly taller
- try a 6 mm hook
The shells should be rounded and clearly visible.
If the Blanket Is Too Open
A little open space is part of the pattern.
However, very large holes usually mean:
- the skipped stitches are too loose
- your hook is too large
- your dc stitches are unusually tall
Try moving down to a 5 mm hook.
If the Pattern Starts Leaning
Check every anchoring single crochet.
It must be worked into:
the 3rd dc of the 5-dc shell
not into the space beside the shell.
Correcting this placement keeps the flower motifs aligned vertically.
If Your Stitch Count Changes
Look first at the edges.
The center repeat is very difficult to accidentally increase if you continue alternating shells and anchors.
Most stitch-count problems happen when:
- the first edge stitch is skipped
- an extra shell is worked into the turning chain
- the final edge stitch is missed
Place a stitch marker in both edge stitches if necessary.
If the Blanket Becomes Wider
Make sure you are working only:
5 dc
in every full shell.
Do not accidentally work 6 dc.
Also make sure every shell is followed by an anchoring sc before beginning the next shell.
If the Blanket Becomes Narrower
Check that you have not skipped an anchor point.
Every Row 3 shell is worked into a sc from the previous row.
Every Row 2 sc is worked into the middle dc of a shell.
Missing either one removes an entire pattern repeat.
Choosing Yarn
A lightly speckled cream yarn works especially well because the small colored flecks add interest without hiding the texture.
Good choices include:
- ivory tweed
- oatmeal tweed
- cream with blue flecks
- cream with brown flecks
- pale gray speckle yarn
Solid yarn also works beautifully.
Avoid highly variegated yarn if you want the flower-like structure to remain easy to see.
Final Pattern at a Glance
Foundation
Ch:
145
Row 1
Sc in 2nd ch.
Repeat:
skip 2, 5 dc in next ch, skip 2, sc in next ch
across.
Turn.
Row 2
Ch 3.
2 dc in first sc.
Sc in center dc of next shell.
Repeat:
5 dc in next sc, sc in center dc of next shell
across.
3 dc in final sc.
Turn.
Row 3
Ch 1.
Sc in first stitch.
Repeat:
5 dc in next sc, sc in center dc of next shell
across.
Finish with sc.
Turn.
Repeat:
Rows 2 and 3
until the blanket reaches approximately:
54 inches / 137 cm
Work one leveling sc row.
Add:
2 rounds of single crochet
followed by:
1 decorative 5-dc shell round
with:
7 dc at each corner
for turning.
The finished blanket has a soft cream tweed background, repeating flower-like shell motifs, small decorative openings, gently raised texture, and a matching scalloped shell edge.