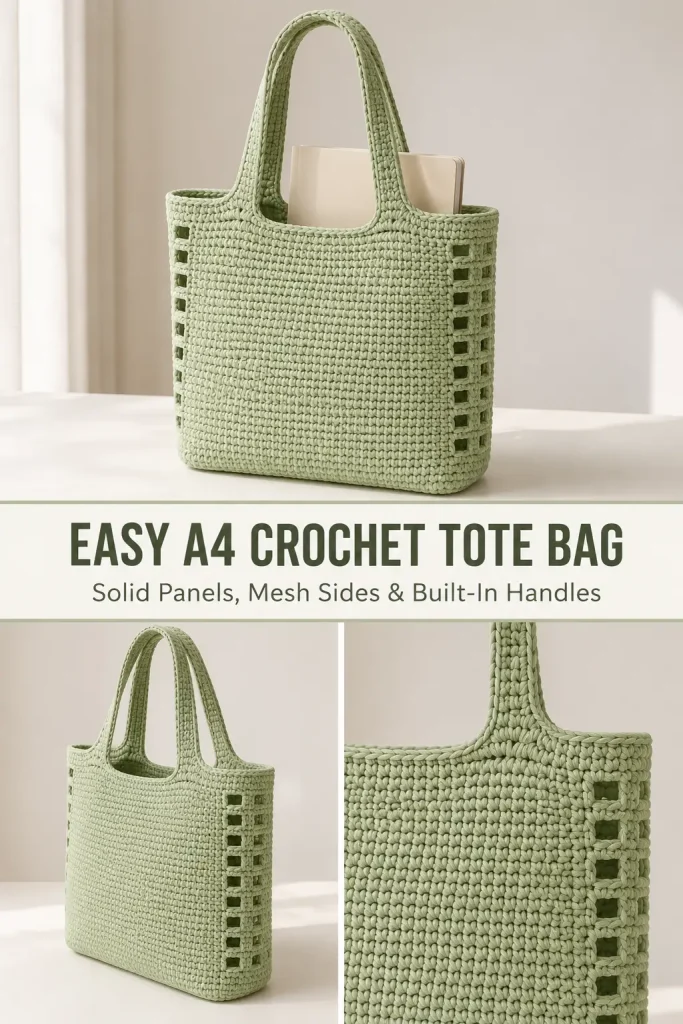
If you love practical crochet bags with a clean modern shape, this A4 crochet tote bag is such a beautiful project to make. It has a structured rectangular base, solid front and back panels, airy filet-style side sections, and long built-in handles that sit comfortably on the shoulder.
This design is especially useful because it fits notebooks, documents, and everyday essentials while still looking soft and handmade. The finished bag has a minimal look, but the side mesh panels make it feel lighter and more elegant.
Description
The finished crochet bag is a roomy A4-size tote worked in a soft sage or pale mint polyester cord. The bottom is a rounded rectangle that grows into a structured body. The front and back are mostly solid double crochet fabric, while both narrow side sections are made in an open filet pattern with evenly spaced square openings. The upper edge grows directly into two flat handles, so there is no separate handle sewing. The bag has a simple polished finish and a functional everyday shape that is great for shopping, notebooks, or daily use.
Materials
- Polyester cord yarn or similar structured bag yarn
- Sample yarn: approximately 100 meters per 180 grams
- Approximately 2.5 skeins
- 5 mm crochet hook
- Stitch markers
- Yarn needle
- Scissors
- Measuring tape
Abbreviations
- ch: chain
- dc: double crochet
- dec: decrease
- rep: repeat
- sl st: slip stitch
- st: stitch
- sts: stitches
Pattern Notes
- This pattern uses US crochet terminology.
- The bag is worked in joined rounds from the base upward.
- The base begins with a chain and is worked around both sides.
- The bottom is shaped into a rounded rectangle, then widened with four marked corner increase points.
- The body uses two stitch textures:
- solid dc fabric on the wide front and back panels
- filet mesh on the narrow side sections
- The handles are built directly into the top of the bag.
- The sample was made with relaxed tension so the fabric stays soft and flexible.
- Difficulty: confident beginner to intermediate.
- Finished sample measurements:
- base: approximately 26 cm x 12 cm
- bag width: approximately 33 cm
- body depth: approximately 26 cm before handles
- total height with base and top shaping: approximately 32 cm
- handle length: approximately 40 cm
- The finished size comfortably suits an A4-format bag.
Step-by-Step Instructions
Foundation Chain
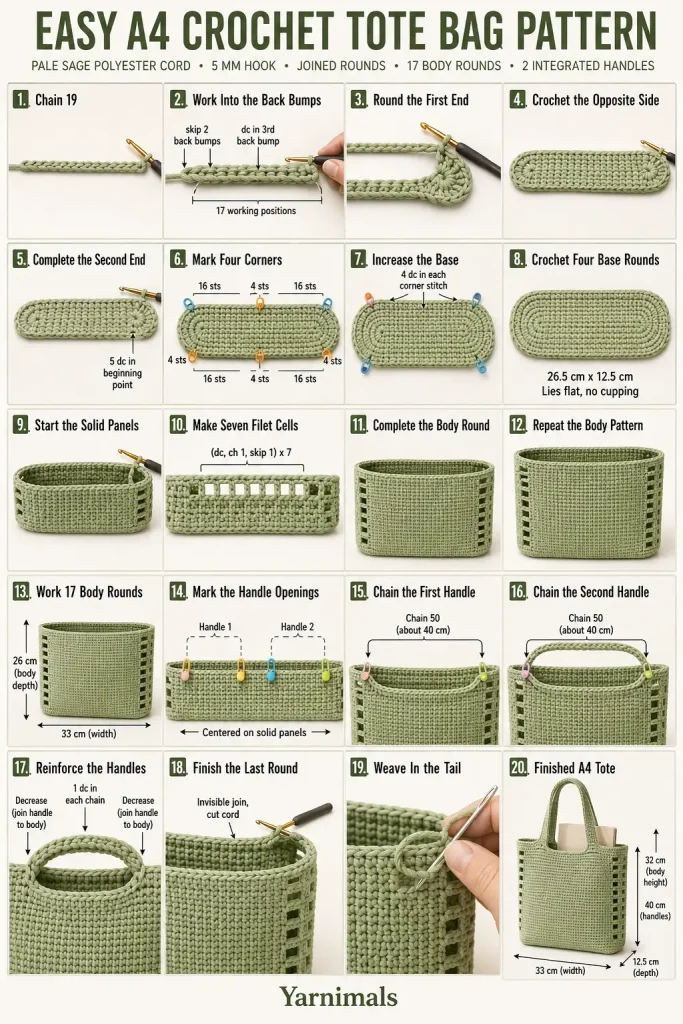
Ch 19.
Base
Round 1
Turn the foundation chain over and work into the back bumps.
Skip the first 2 back bumps.
Work 1 dc in the 3rd back bump and continue working 1 dc in each back bump to the end of the chain.
You should have 17 dc along this first long side.
In the last back bump, work 7 dc total to form the first rounded end.
Now continue on the opposite side of the foundation chain, working along the edge loops.
Work 1 dc in each stitch across the opposite side.
When you reach the starting end, complete that rounded end with 5 dc in the first point, because the turning chain and first dc already count as the other 2 stitches of that curve.
Join with an invisible join or a neat sl st join.
You now have an oval base with two rounded ends.
Mark the Corners
Before beginning the next round, place 4 stitch markers to define the corners of the future rectangular base.
You should have:
- 16 stitches between markers along one long side
- 16 stitches between markers along the other long side
- 4 stitches between markers across one short end
- 4 stitches between markers across the other short end
These marked stitches will be the corner increase points.
Round 2
Begin the round with 1 ch or your preferred starting method for dc rounds.
Work 1 dc in each st until the first marker.
In the marked corner stitch, work 4 dc.
Continue with 1 dc in each st until the next marker.
Again, work 4 dc in the marked stitch.
Repeat the same at all 4 marked corner stitches.
As you finish each increase, move the marker to the center of the increase group so you can find the corner point in the next round.
Join the round neatly.
Round 3
Repeat Round 2:
- 1 dc in each st across the sides
- 4 dc in each marked corner stitch
Move each marker again to the center stitch of the new corner increase.
Join.
Round 4
Repeat Round 3 one more time.
After this round, the base should measure approximately:
- 26.5 cm along the long side
- 12.5 cm along the short side
The base is now a rounded rectangle.
Bag Body
From this point on, the wide front and back panels stay solid, and the narrow side panels switch to filet mesh.
Round 5
Work 1 dc in each st from the beginning of the round up to the first marker.
Remove the marker.
In the marked corner stitch, work 1 dc.
Now begin the filet side section.
Work:
- ch 1
- skip 1 st
- 1 dc in the next st
Repeat this sequence across the side panel.
You should create 7 filet cells across this side section.
At the next marked corner stitch, work 1 dc.
Now work 1 dc in each st across the next long side until the next marker.
At the next short side, repeat the filet pattern:
- ch 1
- skip 1 st
- 1 dc in the next st
Again make 7 filet cells across this side section.
Complete the rest of the round in pattern and join neatly.
At the end of this round, the bag body begins to show:
- 2 solid wide panels
- 2 open filet side panels
Rounds 6–17
Repeat Round 5 for every round.
This means:
- work solid dc across the wide front panel
- work 7 filet cells across the narrow side panel
- work solid dc across the wide back panel
- work 7 filet cells across the second narrow side panel
Keep the filet cells aligned directly above each other in every round.
Continue until you have worked 17 rounds total from the base.
At this stage, the body depth is approximately 26 cm, and the bag width is approximately 33 cm.
Mark the Handles
After the body reaches the required depth, mark the handle starting points on both upper sides.
Each handle begins on one side of the bag and is attached to the opposite side after a long chain.
The sample uses 2 built-in handles of equal length.
Handle Round
Round 18
Begin the round in pattern.
Work across the bag until you reach the first handle marker.
If the side section here is filet, continue following the established filet pattern until the marker.
Remove the marker.
Work the last dc into the marked point.
Now form the first handle:
- ch 50
Without twisting the chain, attach it to the corresponding handle marker on the opposite side with 1 dc.
Continue working around the bag in the established pattern until you reach the second handle marker.
Form the second handle in exactly the same way:
- ch 50
- attach with 1 dc at the opposite marked point
Finish the round in pattern and join.
Each chain handle should measure about 40 cm without strong tension.
Final Shaping Round
Round 19
This round thickens the handles and smooths the handle joins.
Begin the round in pattern and work until you reach the base of the first handle.
At the handle join, work a decrease across:
- the last stitch of the bag body
- and the first stitch of the handle
This creates a neater tucked transition.
Now work 1 dc in each chain stitch across the handle.
When you reach the opposite base of the handle, work another decrease to join the handle smoothly back into the bag body.
Continue around the rest of the bag in the established pattern.
Repeat the same process for the second handle:
- work a decrease at the beginning of the handle
- 1 dc in each chain across
- work a decrease at the end of the handle
Finish the round and join neatly.
Finishing
Cut the yarn, leaving a short tail.
Fasten off with a neat invisible finish.
Use a yarn needle to weave in all ends on the inside of the bag.
If desired, gently shape the bag by hand so the filet side panels open evenly and the handles lie flat.
Construction Summary
The finished bag includes:
- a 4-round rounded rectangular base
- solid wide front and back panels
- open filet side sections with 7 mesh cells on each side
- 17 body rounds before the handle round
- 2 built-in chain handles
- 1 final round worked over the handles for thickness and structure
Tips & Variations
If your yarn is thicker or thinner than the sample, keep the same construction method and use the measurements rather than copying the exact stitch size.
Work loosely. This bag looks best when the stitches are relaxed and the fabric stays soft and pliable.
If you want a deeper bag, add more body rounds before starting the handles.
If you want a longer handle drop, increase the handle chain from 50 to 55 or 60.
For a firmer bag, you can add a fabric lining after finishing.
This design also looks beautiful in:
- beige
- dusty rose
- taupe
- gray
- black
- soft blue
If you would like the side panels to look more open, be careful not to tighten the chain-1 spaces in the filet sections.
FAQ
Will this crochet bag fit A4 notebooks or documents?
Yes. The sample size is designed as an A4 crochet tote bag and is roomy enough for A4 papers, notebooks, and similar everyday items.
Can I use cotton yarn instead of polyester cord?
Yes, but the final structure and size may change. A firm cotton cord or structured bag yarn will give the closest result.
Are the handles sewn on separately?
No. The handles are built directly into the bag by chaining across the opening and then working a final round over the chains.
Conclusion
This easy A4 crochet tote bag is a simple, practical, and beautiful crochet project that combines structure with a soft handmade feel. The solid body, airy filet side panels, roomy shape, and built-in handles make it a lovely everyday crochet bag for work, errands, or carrying notebooks and papers. Try it in your favorite neutral color and enjoy making a modern crochet accessory you can use again and again.



