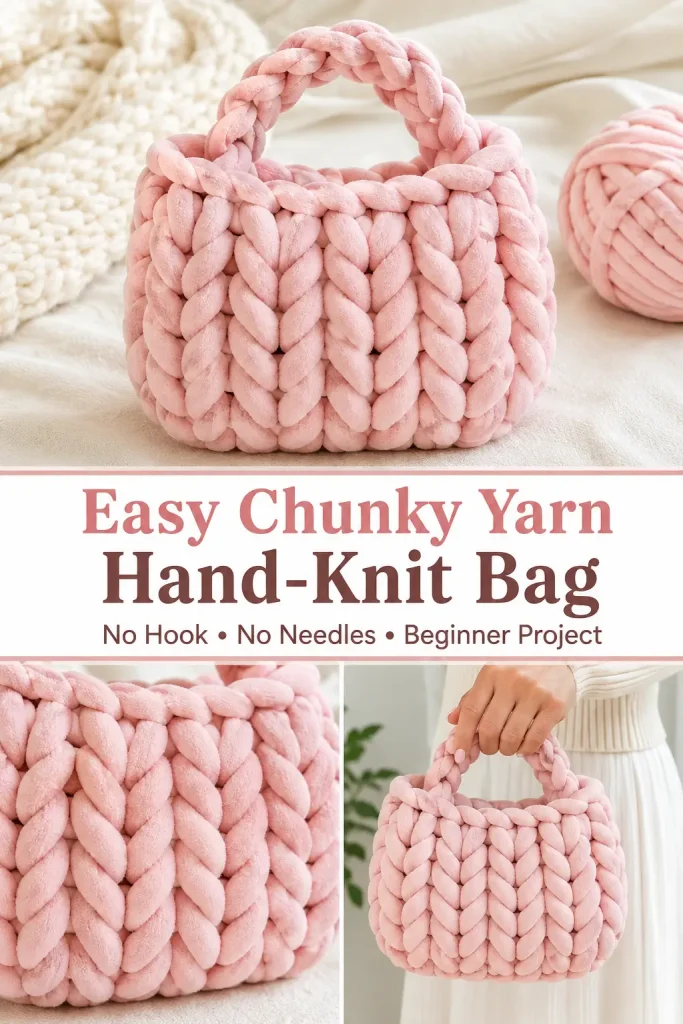
This chunky yarn bag is soft, playful, and surprisingly quick to make. The oversized stitches give the little purse a plush braided texture, while the short finger-knit handle creates a comfortable top grip.
No knitting needles or crochet hook are needed. The entire bag is made with your hands by pulling loops through loops, making it an approachable beginner craft project. Once the technique feels comfortable, the bag can work up in around 30 minutes.
Description
The finished bag is a small rounded handbag made from jumbo tubular or chenille yarn. It begins with a six-stitch foundation that forms the base. Twelve live loops are then worked around both sides of that foundation, creating the front and back of the bag at the same time. Repeated rounds build a thick V-stitch body, and a short finger-chain handle is attached securely across the opening.
The finished measurements will vary considerably depending on the yarn thickness and loop size. With very thick yarn, expect a compact handbag approximately 20–25 cm wide and 16–20 cm tall, excluding the handle.
Materials
- One large ball of jumbo tubular, chenille, or stuffed chunky yarn
- Sharp scissors
- Large yarn needle, optional
- Two removable stitch markers, optional
Abbreviations
This project is worked entirely by hand, so traditional crochet abbreviations are not needed.
The instructions use these terms:
- Working yarn – the yarn connected to the ball
- Live loop – an unsecured loop waiting to be worked
- Finger chain – a chain formed by pulling yarn through the previous loop
- Round – one complete pass through all 12 body loops
Pattern Notes
- The slip knot does not count as one of the six foundation stitches.
- Keep every live loop approximately the same size.
- The body always contains 12 loops: six on the front and six on the back.
- Work with firm, small loops to create a neat bag with fewer gaps.
- Count the front and back loops after every round.
- The body may curl inward while you work. This is normal.
- Turn the bag inside out after completing the body so the large V-shaped stitches face outward.
- Do not pull the finishing strand tightly enough to close the opening.
- This is a finger-knit pattern, not a crochet pattern.
Step-by-Step Instructions
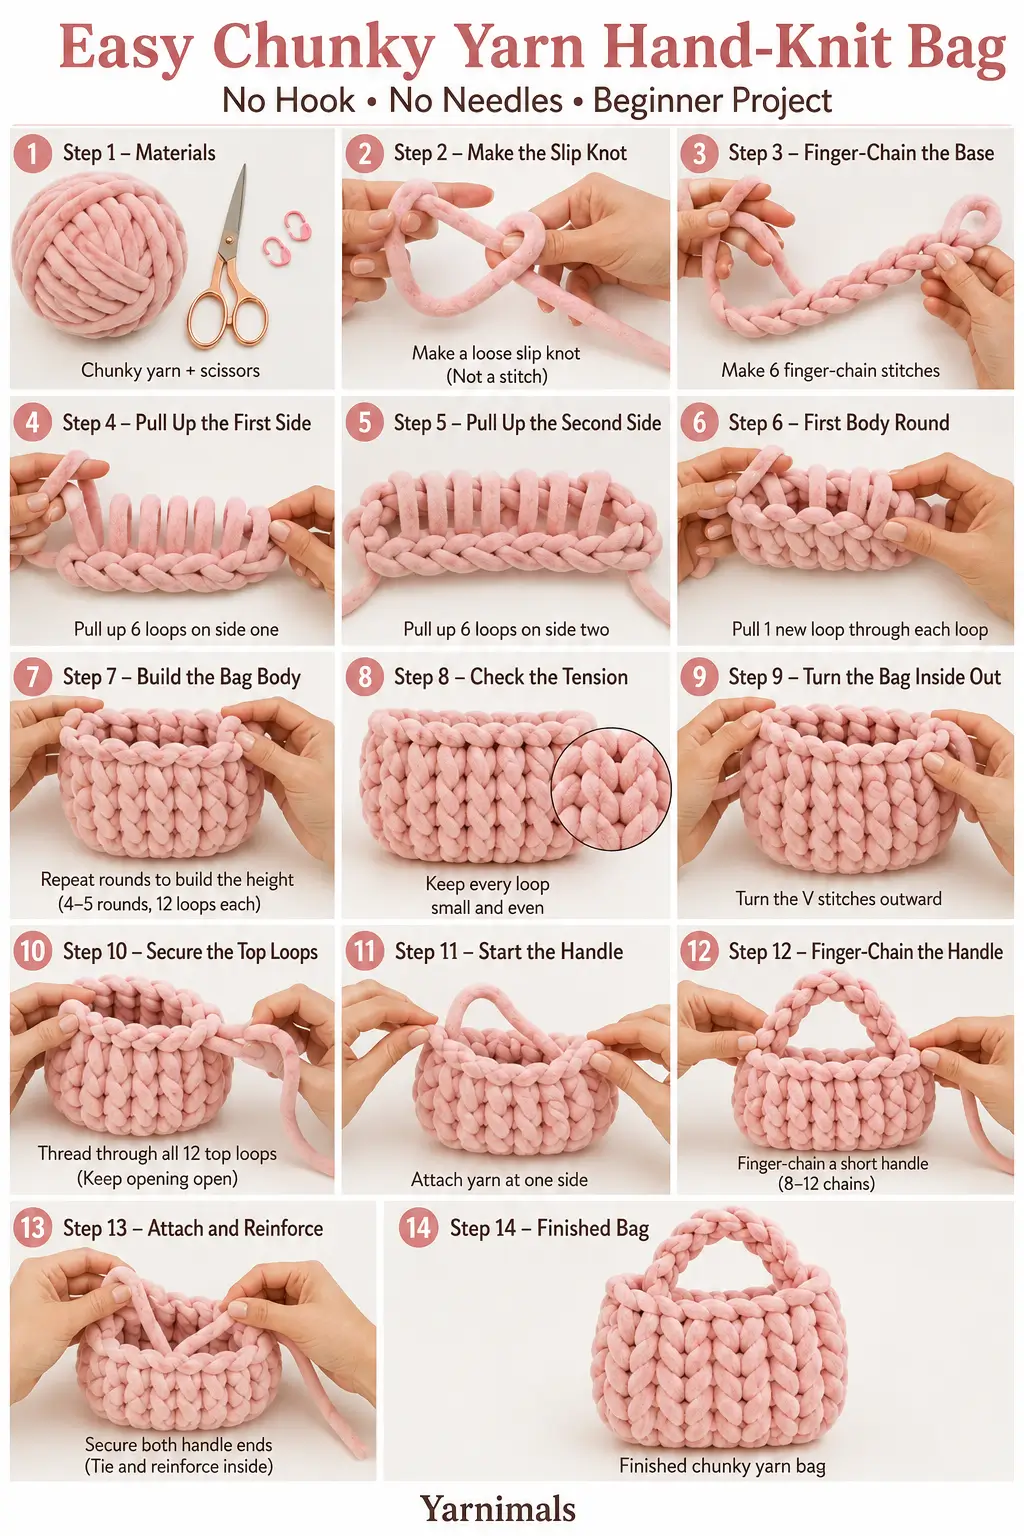
Make the Slip Knot
Lay the yarn end beneath the working yarn to form a loop.
Insert two fingers through the loop.
Catch the working yarn and pull it through.
Gently tighten the original loop around the new loop.
Keep the new loop large enough to fit two fingers comfortably.
The slip knot is only the starting loop. Do not count it as a foundation stitch.
Finger-Chain the Bag Base
Insert two fingers through the live loop.
Catch the working yarn from behind and pull a new loop through.
This forms the first finger-chain stitch.
Continue pulling one new loop through the previous loop until you have six clear V-shaped chain stitches.
Count only the six V shapes. The live loop at the end and the original slip knot are not included in the count.
The chain forms the narrow bottom center of the bag.
Create the First Side
Place the six-stitch chain horizontally.
Begin with the chain opening closest to the live loop.
Insert two fingers through that chain opening.
Catch the working yarn and pull up a new loop.
Leave the new loop standing upright rather than pulling the working yarn all the way through it.
Repeat in each foundation chain across.
You should have six upright live loops along the first side of the base.
Keep the loops close together and approximately the same height.
Create the Second Side
Turn the foundation chain so the unused back bumps or twisted openings are facing you.
Do not work into the original slip knot.
Beginning at the first available back opening, insert two fingers beneath the strand.
Catch the working yarn and pull up one live loop.
Repeat across the remaining foundation openings.
You should now have:
- Six live loops on the first side
- Six live loops on the second side
- Twelve live loops in total
- One narrow chain foundation between the two sides
The project should resemble a small oval ring of loops around the foundation chain.
Body Round 1
Begin with the first live loop beside the working yarn.
Insert two fingers through that loop.
Catch the working yarn from behind.
Pull a new loop completely through the old loop.
Allow the old loop to drop away while keeping the new loop live.
Move to the next old loop and repeat.
Continue pulling one new loop through each of the 12 live loops around the bag.
Count carefully:
- Six new loops across the front
- Six new loops across the back
After completing the final loop, you should still have exactly 12 live loops.
Body Round 2
Turn the bag slightly so the next unworked loop is easy to reach.
Pull one new loop through each of the 12 existing loops.
Keep the new loops slightly smaller than the previous loops.
When working near the side transitions, position the neighboring loops close together. This prevents large gaps from forming at the sides.
Count the loops after completing the round.
You should have 12.
Continue Building the Bag
Repeat the same method:
- Insert two fingers through the next live loop.
- Catch the working yarn behind it.
- Pull one new loop through.
- Release the old loop.
- Keep the new loop live.
- Repeat through all 12 loops.
Continue until the bag reaches the desired height.
Approximately six upward rounds create a taller bag. For the compact rounded design shown in the reference, stop after about four or five body rounds.
Keep both sides even. Each completed round must have six loops on the front and six on the back.
Check the Loop Tension
Pause after every round and inspect the body.
The stitches should be:
- Small enough to keep objects from slipping through
- Large enough for two fingers to enter easily
- Similar in size across the front and back
- Firm without compressing the soft yarn
When a loop is too large, pull gently on the working yarn to reduce it before moving to the next stitch.
When a loop slips free, reopen it and pull the working yarn through again before continuing.
Turn the Bag Inside Out
The body may initially show horizontal bars on the outside.
Carefully push the bottom of the bag through the opening to turn it inside out.
Work slowly and support the live loops around the opening so they do not pull free.
After turning, the large V-shaped stitches should face outward.
Check that all 12 top loops are still secure:
- Six on one side
- Six on the opposite side
Replace any loop that slipped out by pulling the working yarn back through the correct stitch opening.
Secure the Top Opening
Before cutting, measure a yarn tail long enough to travel completely around the opening with extra length for fastening.
Cut the yarn.
Take the cut tail and pass it completely through the first live loop.
Continue threading the tail through every live loop around the opening.
Pass through all 12 loops in order.
Pull gently until the live loops are secured, but do not cinch the bag closed. The top must remain open and wide enough to use.
Keep the upper edge level and evenly tensioned.
Tie a firm knot inside the bag near the finishing point.
Leave enough yarn available when it will also be used to help secure the handle.
Make the Chunky Handle
Attach Yarn at the First Side
Choose one side edge of the bag opening.
Insert the end of a fresh yarn strand from inside the bag through a sturdy side opening just below the finished top edge.
Pull up a large loop.
Leave a generous yarn tail inside the bag for tying and securing later.
Finger-Chain the Handle
Insert two fingers through the new loop.
Catch the working yarn and pull it through to form one chain.
Continue finger chaining until the handle reaches the desired length.
For a short top handle, make approximately eight to twelve chains, depending on the yarn thickness.
Hold the handle above the bag before finishing. It should be long enough to fit comfortably over the hand without becoming a long shoulder strap.
Keep the handle chains firm and even. Loose chains will make the handle stretch and look uneven.
Attach the Second Handle End
Position the unfinished handle end directly opposite the first attachment point.
Pass the working yarn through a strong opening below the top edge on the second side.
Pull the handle gently so both attachment points sit at the same height.
Pass the yarn through the side opening again for additional security.
Tie the handle tail firmly to a nearby interior strand or to the finishing tail when they meet securely.
Make at least two tight knots.
Tuck the yarn ends deeply inside the thick body stitches.
Reinforce the Handle
Because chunky yarn is soft, reinforce both handle attachments before using the bag.
At each side:
- Pass the yarn tail around the side stitch.
- Feed it through the base of the handle.
- Pull firmly without distorting the bag.
- Repeat once or twice.
- Tie securely inside.
The handle should remain centered and should not pull one side higher than the other.
Finishing
Shape the bag gently with your hands.
Arrange the large V stitches so they face in the same direction.
Straighten the top opening.
Check the bottom for loose loops.
Pull the side stitches gently into alignment.
Hide every yarn tail inside the bag.
Do not trim the tails extremely short. Thick plush yarn can loosen more easily than tightly spun yarn, so leave enough length to remain tucked securely.
The finished bag should have:
- A six-stitch foundation base
- Six stitches across the front
- Six stitches across the back
- Twelve body loops in every round
- A compact rounded body
- Large V-shaped exterior stitches
- One short chunky finger-chain handle
- An open top
- No lining, zipper, or hardware
Tips and Variations
Use stuffed tubular yarn for the smooth, rounded stitches shown in the reference design. Traditional twisted jumbo yarn will create a more rustic texture.
Keep the loops smaller than you think you need. The yarn and finished bag will relax slightly during handling.
For a wider handbag, begin with eight foundation stitches. The body will then contain 16 live loops per round.
For a taller bag, add one or two extra body rounds before finishing the top.
For a compact handbag, stop as soon as the body is slightly shorter than the desired finished height. Turning the bag inside out can make it appear taller.
Use pale pink for a soft romantic bag, baby blue for a playful pastel version, or a neutral cream for simple home styling.
A fabric lining may be added to prevent small belongings from passing through the oversized stitches, but the original quick version is unlined.
Avoid carrying heavy items. A single finger-chain handle is best suited to lightweight essentials.
Frequently Asked Questions
Is this bag crocheted or knitted?
It is finger knitted by hand. The loops are pulled through one another without a crochet hook or knitting needles.
Why does the bag have large gaps?
The live loops are probably too loose. Make each new loop smaller and pull gently on the working yarn before moving to the next stitch.
How many stitches should I have around the body?
The six-stitch foundation creates six loops on each side, giving 12 live loops in every body round.
Why is my bag taller on one side?
One side may have received an extra round, or a loop may have been skipped. Count six loops on each side after every round and mark the first loop when necessary.
Can I make a shoulder strap?
Yes, but a single finger chain may stretch under weight. For a longer strap, make two identical chains and twist them together, or use a wider reinforced hand-knit cord.
Conclusion
This easy chunky yarn bag is a quick way to create a soft handmade accessory without hooks or needles. The simple six-stitch base and repeated pull-through rounds make the construction easy to learn, while firm tension gives the finished bag a clean, polished look. Make it in pastel pink, soft blue, or a favorite neutral shade for a playful handbag that can be completed in a single crafting session.



