Easy Cream Bobble Stitch Crochet Blanket
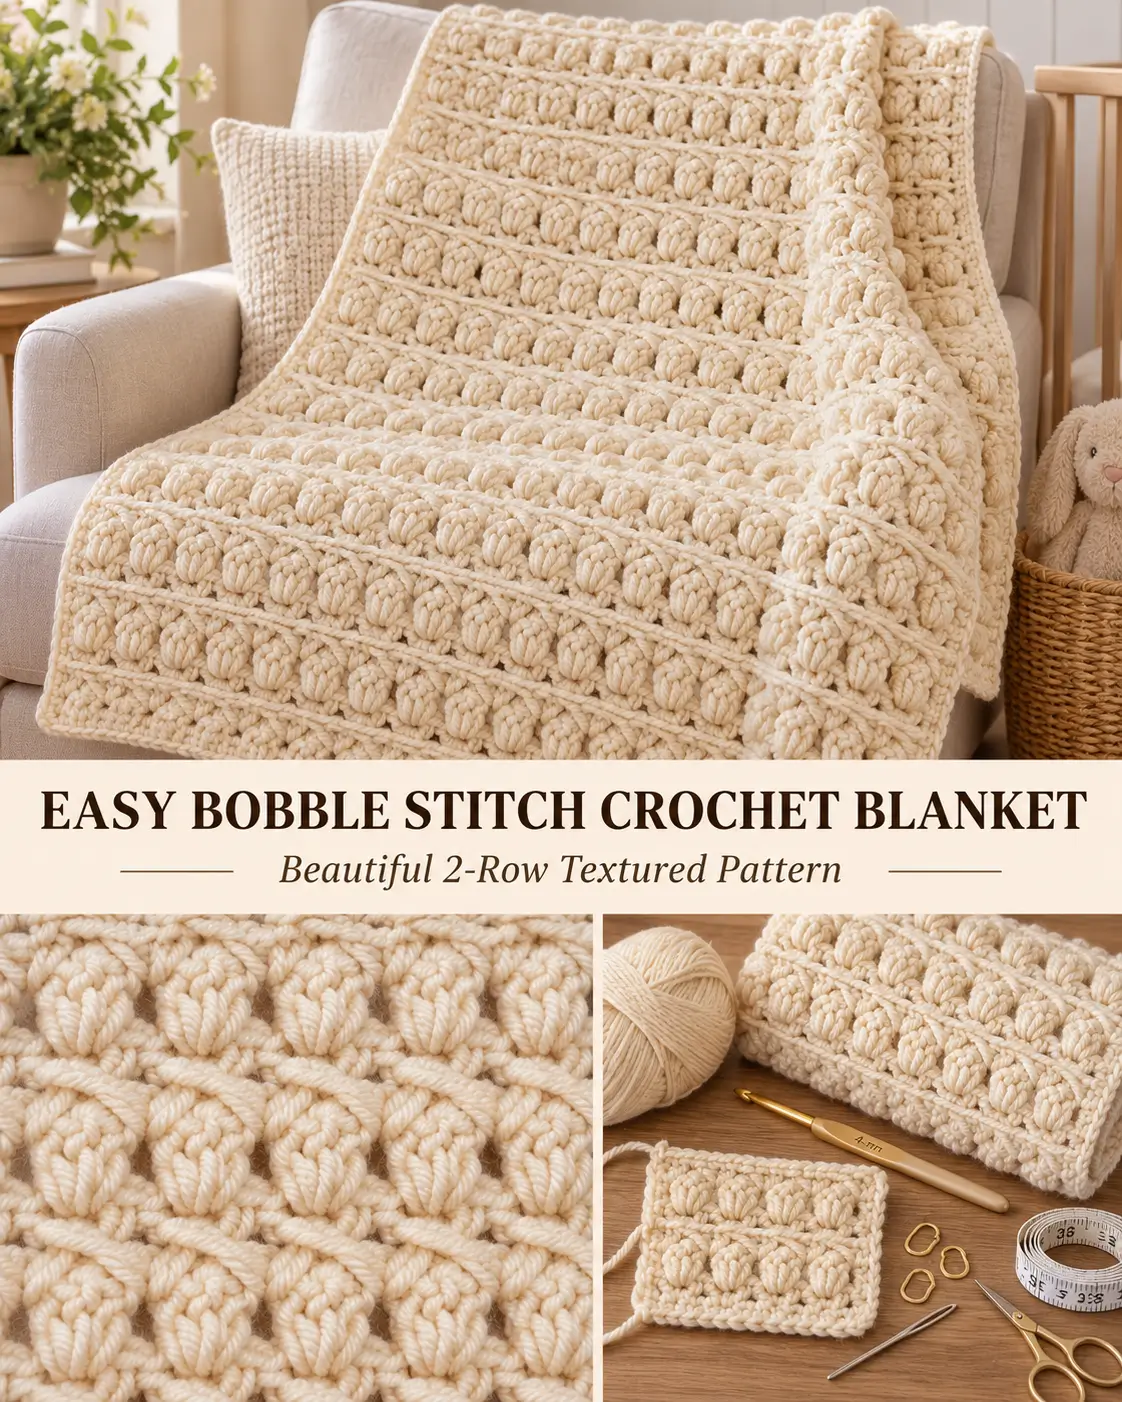
This textured crochet blanket uses repeating rows of small rounded bobbles separated by clean horizontal crochet lines, creating the raised, almost pearl-like pattern shown in the reference.
The blanket is worked flat in one piece using a simple two-row repeat. All of the bobbles are made on the same side of the fabric, so the front develops neat raised rows while the reverse remains flatter and comfortable.
For the closest visual match, keep the color exactly as shown:
warm champagne cream / light beige
Use one solid color for the entire blanket.
Finished Size
The sample blanket is approximately:
36 × 42 inches / 91 × 107 cm
You can easily make it wider or longer.
Materials
- Medium weight #4 / worsted yarn
- Warm champagne cream / light beige
- Approximately 1,400–1,650 yards / 1,280–1,510 m
- 4 mm / G crochet hook
- Yarn needle
- Scissors
- Stitch markers
- Measuring tape
Choose a smooth yarn with good stitch definition.
A slightly silky acrylic or acrylic blend works especially well because it highlights the rounded bobbles and horizontal ridges.
Skill Level
Easy / confident beginner
You should know:
- chain
- half double crochet
- double crochet
- working into chain spaces
- partially completed double crochets
- working flat in rows
Abbreviations
US crochet terminology:
ch — chain
hdc — half double crochet
dc — double crochet
st / sts — stitch / stitches
sp — space
rep — repeat
Bobble — 3-dc bobble worked into one space
Special Stitch — Small 3-DC Bobble
The bobbles are the most important part of this pattern.
All three partial double crochets are worked into the same chain space.
Yarn over.
Insert hook into the indicated space.
Yarn over and pull up a loop.
Yarn over and pull through:
2 loops
Leave the remaining loops on the hook.
You now have:
2 loops
on the hook.
Yarn over again.
Insert hook into the same space.
Pull up a loop.
Yarn over and pull through:
2 loops
You now have:
3 loops
remaining on the hook.
Repeat one more time:
Yarn over.
Insert into the same space.
Pull up a loop.
Yarn over and pull through:
2 loops
You now have:
4 loops
on the hook.
Yarn over.
Pull through:
all 4 loops
The bobble is complete.
Do not make another stitch inside the same chain space unless instructed.
How the Texture Is Formed
The blanket alternates between two types of rows.
Bobble Row
Creates the raised rounded motifs.
HDC Mesh Row
Creates:
- horizontal separating lines
- chain spaces for the next bobble row
- consistent spacing between bobbles
Because there is one plain row between every bobble row, all of the bobbles are made from the same side of the fabric.
This is important.
If you accidentally add or remove a row, some bobbles may begin appearing on the reverse side.
Pattern Multiple
The foundation is:
multiple of 2 + 3 chains
For the approximately 36-inch-wide sample:
Ch 143
If your tension is different, make a small swatch first.
Size Options
You can also start with:
Small Stroller Blanket
Ch 123
Approximately 30–32 inches wide depending on gauge.
Baby Blanket
Ch 143
Approximately 35–36 inches wide.
Larger Blanket
Ch 171
Approximately 42–44 inches wide.
Throw
Ch 191
Approximately 47–49 inches wide.
Always check your actual width after several rows.
Gauge
After the fabric relaxes:
Approximately:
15–16 stitches = 4 inches / 10 cm
The bobble pattern makes row gauge less predictable because different crocheters form bobbles at different heights.
For length, measure the actual blanket instead of relying only on row count.
FOUNDATION
With warm champagne-cream yarn:
Ch:
143
Keep the chain relaxed.
Do not make a tight foundation because it will pull the lower edge inward.
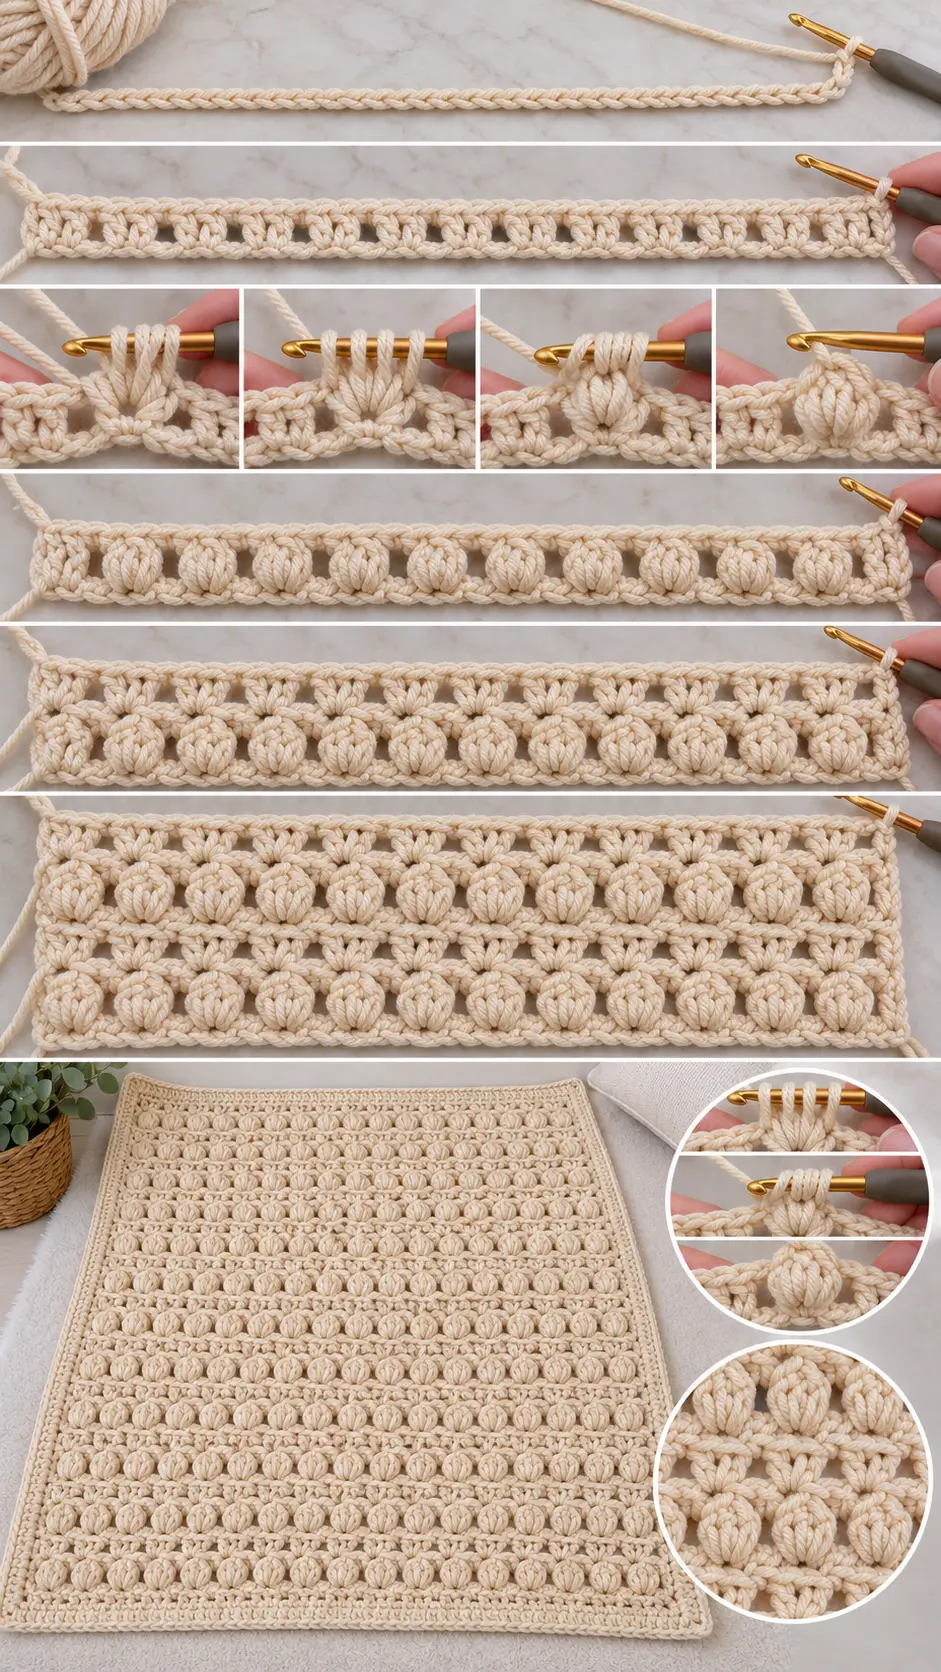
Row 1 — HDC Foundation Pattern
Beginning in the:
3rd chain from the hook
work:
1 hdc
Now repeat:
skip the next chain
In the following chain work:
hdc, ch 1, hdc
Repeat this sequence across until:
2 chains remain
Skip the next chain.
Work:
2 hdc in the final chain
Turn.
You now have a row of small:
hdc V-shaped groups
with:
ch-1 spaces
between the two hdc of each group.
These ch-1 spaces are where the bobbles will be worked.
Check Row 1
Lay the row flat.
You should see:
- reinforced hdc edge
- repeating hdc/ch-1/hdc groups
- small evenly spaced holes
- reinforced hdc edge
The little openings must be clearly visible.
Do not accidentally work into every foundation chain.
Row 2 — First Bobble Row
This is the first textured row.
Ch:
3
Turn.
The ch-3 counts as the first dc.
Work:
1 dc in the first stitch
Now repeat across:
ch 1
Work:
1 Bobble
into the next ch-1 space.
Continue repeating:
ch 1, Bobble in next ch-1 space
across every available ch-1 space.
After the final bobble:
Ch:
1
Work:
2 dc
into the final edge stitch.
Turn.
Push the Bobbles Forward
The bobbles should naturally form on the front surface.
If necessary, gently push each one toward the front with your finger.
After several repeats, this will become automatic.
The bobbles should look:
- small
- rounded
- plump
- evenly spaced
- similar in height
They should not look like huge popcorn balls.
Row 3 — HDC Separator Row
Ch:
2
Turn.
The ch-2 counts as the first hdc.
Work:
1 hdc in the first stitch
Now locate the ch-1 spaces between the bobbles.
In each ch-1 space work:
hdc, ch 1, hdc
Repeat across.
Finish with:
2 hdc in the final edge stitch
Turn.
This row creates the strong horizontal crochet line immediately above the bobbles.
The new ch-1 spaces prepare the next bobble row.
Row 4 — Bobble Row
Ch:
3
Turn.
Work:
1 dc in the first stitch
Then repeat:
ch 1
Bobble in next ch-1 space
across.
After the final bobble:
Ch 1.
Work:
2 dc in the final edge stitch
Turn.
Main Pattern Repeat
Repeat:
Rows 3 and 4
for the remainder of the blanket.
That is the entire main pattern.
Every odd separator row:
hdc, ch 1, hdc
into each chain space.
Every bobble row:
Bobble
into every chain space.
What the Correct Texture Should Look Like
After approximately 8–10 rows, stop and inspect your work.
The front should show:
- straight horizontal rows of bobbles
- rounded oval bobbles
- consistent narrow gaps between bobbles
- thick horizontal crochet lines between each bobble band
- bobbles stacked vertically
- dense but flexible fabric
The image should resemble rows of small raised cream beads separated by smooth horizontal cords.
Important — Keep the Bobbles Aligned
Each new bobble should sit above the bobble from the previous textured row.
Do not shift the bobbles sideways.
The ch-1 spaces in every hdc row control the alignment.
Always work the next bobble into:
the corresponding ch-1 space
not into the top of an hdc stitch.
Continue the Blanket
Repeat Rows 3–4 until the main blanket measures approximately:
40 inches / 102 cm
from the foundation edge.
Finish after:
a Row 3 separator row
rather than after a bobble row.
This gives the top edge a smoother finish.
Suggested Length
For approximately:
36 × 42 inches
work until the unbordered blanket measures roughly:
40–41 inches long
The finishing edge adds a small amount of length.
Because bobble height varies with tension, measure rather than relying on an exact row count.
Keeping Straight Side Edges
The edge treatment is important.
On every bobble row:
begin with:
ch 3 + dc
and finish with:
2 dc
On every hdc separator row:
begin with:
ch 2 + hdc
and finish with:
2 hdc
Do not accidentally crochet into the side of the turning chain.
Work only into the designated final edge stitch.
Finishing the Top Edge
After the final hdc separator row:
Ch:
1
Turn.
Work:
1 sc in every hdc and every ch-1 space
across.
Fasten off.
This creates a neat straight top edge.
SIMPLE BLANKET BORDER
The reference texture is already very decorative, so the border should remain understated.
Use the same:
warm champagne cream
Do not introduce another color.
Border Round 1
Join yarn in any corner.
Ch:
1
Sc evenly around the entire blanket.
Across the top and bottom:
work approximately:
1 sc in every stitch
Along the side edges:
work evenly into the row ends.
A useful starting rhythm is approximately:
2 sc around each dc-row end
and:
1 sc around each hdc-row end
Adjust slightly if necessary so the edge lies flat.
At each corner work:
3 sc
Join with sl st.
Check the Border Before Continuing
Lay the blanket flat.
If the border waves:
you have too many stitches.
Remove several stitches evenly.
If the edge pulls inward:
you have too few stitches.
Add several stitches evenly.
Do not continue until Round 1 lies flat.
Border Round 2
Ch:
1
Sc in every stitch around.
At each corner:
work:
3 sc in the center corner stitch
Join.
Fasten off.
The border should remain narrow and simple.
Weave In the Ends
Thread each yarn tail onto a yarn needle.
Weave through several stitches.
Change direction.
Weave through another section.
Trim close to the fabric.
Make sure the foundation and final tails are especially secure.
Blocking
Light blocking helps:
- straighten the sides
- open the small spaces
- make bobble rows more consistent
- square the corners
- settle the horizontal ridges
Check the yarn label before blocking.
For washable acrylic:
light steam blocking from a safe distance can be used, but never press a hot iron directly against acrylic yarn.
For wool:
wet block according to the yarn manufacturer’s care instructions.
Do Not Flatten the Bobbles
When blocking:
do not stretch the blanket aggressively.
Do not press down on the bobbles.
They should remain rounded and three-dimensional.
Shape only:
- sides
- corners
- border
- overall rectangle
If Your Bobbles Are Too Small
Make sure you are working:
3 partial dc
into the same space before closing them together.
You should have:
4 loops
remaining before the final yarn-over-and-pull-through.
If Your Bobbles Are Too Large
Do not use:
- 5 dc
- 6 dc
- puff stitches with many yarn overs
The visual reference uses relatively compact rounded clusters.
Keep the bobble at:
3 partial dc
for this version.
If the Bobbles Do Not Pop Forward
After completing the bobble:
gently push it toward the front of the fabric.
Also check that every bobble row is being worked from the same side.
The two-row repeat ensures this automatically.
If Some Bobbles Face the Wrong Direction
You probably added or skipped a separator row.
The sequence must always remain:
HDC separator → Bobble → HDC separator → Bobble
Never work two bobble rows consecutively.
If Your Blanket Starts Getting Wider
Check the chain spaces.
Every separator row should create exactly:
one ch-1 space for every bobble
Do not add an extra ch-1 space at the edges.
If Your Blanket Starts Getting Narrower
You may have missed a chain space.
Count the bobbles occasionally.
Every bobble row should contain the same number of bobbles.
Place stitch markers in the first and last pattern repeats if necessary.
If the Horizontal Lines Are Not Clear
Keep the hdc row slightly relaxed.
The hdc stitches should form a continuous band between the raised bobbles.
Also use a smooth yarn rather than fuzzy yarn.
A smooth cream yarn makes the horizontal lines and rounded bobbles much easier to see.
If the Fabric Feels Too Stiff
Move up to:
4.5 mm hook
The blanket should remain cozy and flexible.
Do not loosen it so much that the bobbles become floppy.
If the Fabric Is Too Loose
Try:
3.5 mm hook
The bobbles should feel compact and substantial.
Large gaps between bobbles mean the tension is probably too loose.
Making a Smaller Baby Blanket
Start with:
Ch 123
Follow the pattern exactly.
Continue until approximately:
34–36 inches / 86–91 cm long
Then add the border.
Making a Larger Throw
Start with:
Ch 191
Continue the same two-row repeat until approximately:
55–60 inches / 140–152 cm long
Then work the same simple border.
Yarn Color
For the closest match to the reference, use only:
warm champagne cream / pale beige
The yarn should have a slight warm undertone rather than bright optical white.
Do not add stripes or contrasting bobbles.
Using one color allows the shadows around the raised stitches to create the pattern naturally.
Final Pattern at a Glance
Foundation
Ch 143
Row 1
Hdc in 3rd chain.
Repeat:
skip 1, (hdc, ch 1, hdc) in next
Finish with:
2 hdc
Row 2
Ch 3.
Dc in first stitch.
Repeat:
ch 1, Bobble in next ch-1 space
Finish:
ch 1, 2 dc in final stitch
Row 3
Ch 2.
Hdc in first stitch.
Repeat:
hdc, ch 1, hdc
in every ch-1 space.
Finish with:
2 hdc
Row 4
Repeat Row 2.
Continue
Repeat:
Rows 3–4
until the blanket reaches the desired length.
Finish after a separator row.
Work one final sc row across the top.
Add:
2 simple rounds of sc
around the entire blanket.
The completed blanket should have rows of compact rounded cream bobbles separated by clean raised horizontal crochet bands, creating the same rich, dimensional monochrome texture shown in the reference while keeping the construction easy enough to repeat for an entire blanket.