Easy Crochet Bear Appliqué Baby Beanie — Newborn to Toddler
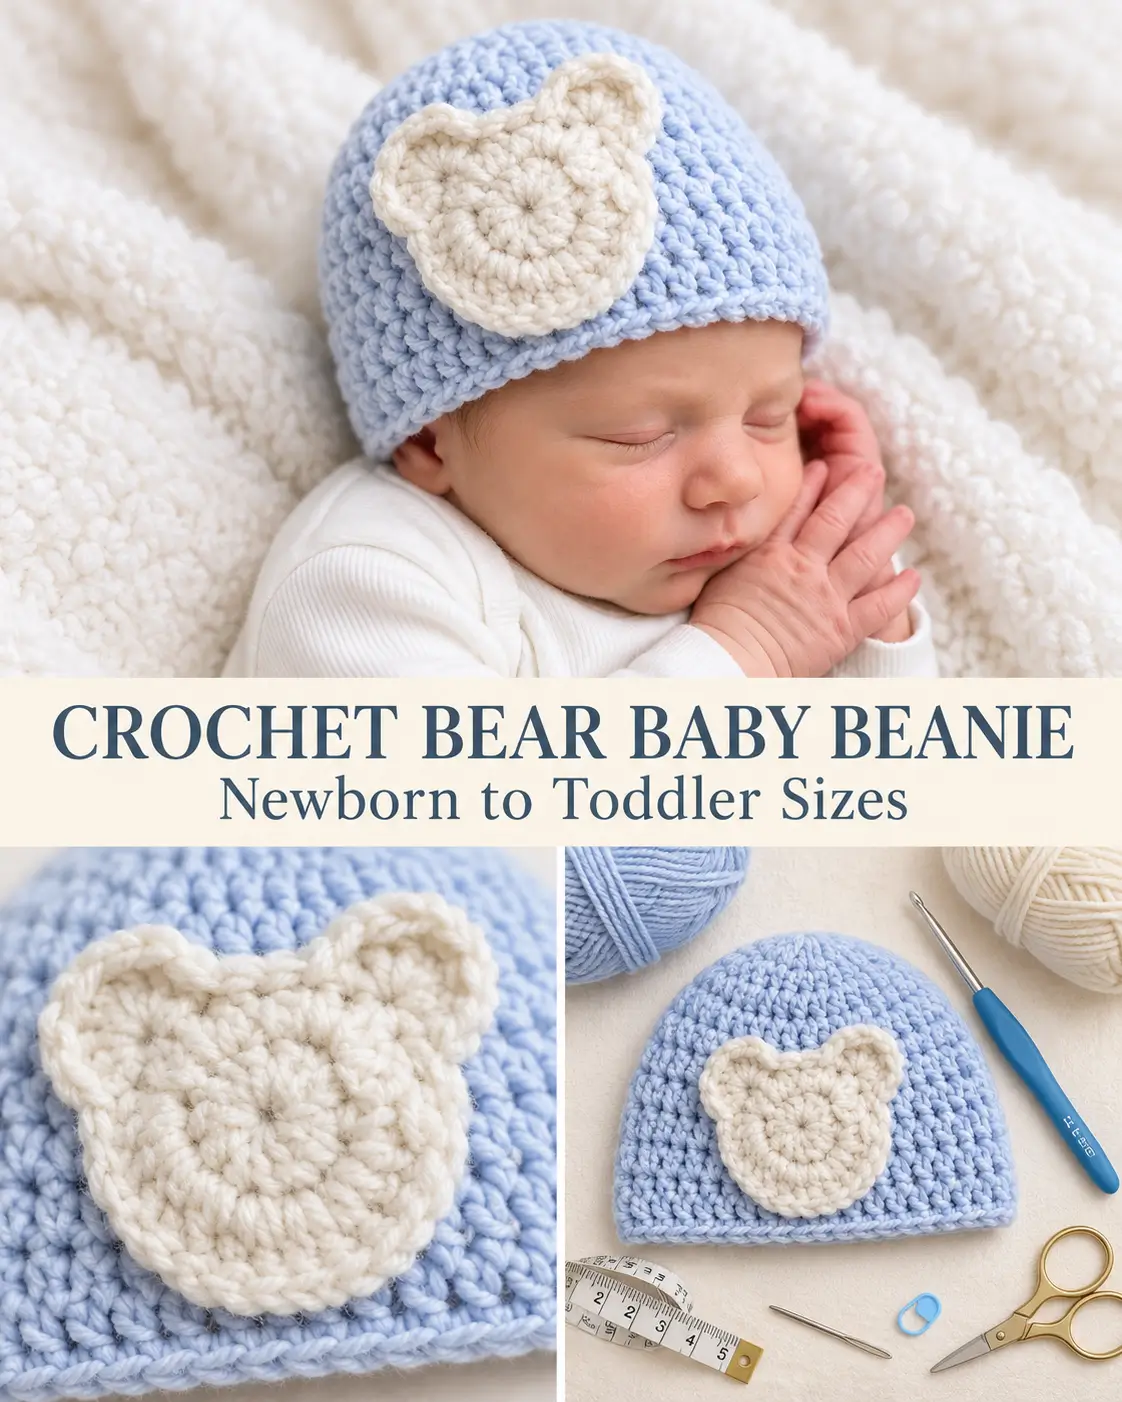
This sweet crochet bear hat combines a simple top-down baby beanie with one soft teddy-bear head appliqué sewn to the front. The design is intentionally minimal: no plastic eyes, buttons, pom-poms, or dangling pieces—just a cozy hat and a softly rounded bear silhouette.
The hat is crocheted from the crown downward in joined rounds. Once the crown reaches the correct size, the increases stop and the sides are worked straight until the desired length is reached.
The bear appliqué is made separately from cream yarn, with two small rounded ears built directly into its outer edge, then sewn securely to the front of the hat.
Finished Sizes
| Size | Approx. Hat Circumference | Finished Length |
|---|---|---|
| Newborn | 13–14 in / 33–35.5 cm | 5 in / 12.5 cm |
| 0–3 Months | 14–15 in / 35.5–38 cm | 5½ in / 14 cm |
| 3–6 Months | 15–16 in / 38–40.5 cm | 6 in / 15 cm |
| 6–12 Months | 16–17 in / 40.5–43 cm | 6½ in / 16.5 cm |
| Toddler | 17–18½ in / 43–47 cm | 7 in / 18 cm |
The hat is meant to stretch slightly around the head, so the finished crochet circumference should be a little smaller than the actual head measurement.
Materials
- Medium weight #4 / worsted yarn
- Main hat color: soft powder blue
- Appliqué color: warm cream / ivory
- 4.5 mm crochet hook
- Yarn needle
- Scissors
- Stitch marker
- Measuring tape
For an especially soft baby hat, choose a smooth baby-friendly acrylic, cotton blend, or velvet-style worsted yarn.
Skill Level
Beginner
You should know:
- magic ring
- chain
- slip stitch
- single crochet
- half double crochet
- double crochet
- increasing
- sewing a crochet appliqué
Abbreviations
US crochet terminology:
ch — chain
sl st — slip stitch
sc — single crochet
hdc — half double crochet
dc — double crochet
inc — 2 dc in the same stitch
MR — magic ring
st / sts — stitch / stitches
R — round
Important Pattern Notes
The hat is worked:
top down in joined rounds
At the end of each double-crochet round:
sl st to the first dc
then:
ch 2
The beginning ch-2 does not count as a stitch.
Your first actual dc is worked into the same stitch at the base of the ch-2.
Place a stitch marker in the first dc if needed.
Gauge
With 4.5 mm hook and worsted yarn:
Approximately:
7 dc = 2 inches / 5 cm
and:
4 dc rounds = approximately 2 inches / 5 cm
Exact gauge is less important than matching the finished circumference in the sizing table.
Make a small crown swatch if necessary.
Choosing the Correct Size
Measure around the baby’s head just above:
- eyebrows
- ears
- widest part of the back of the head
Choose a finished hat circumference approximately:
1–2 inches / 2.5–5 cm smaller
than the actual head measurement.
This gives the beanie gentle stretch without being excessively loose.
PART 1 — CROCHET THE BEANIE
Use the:
powder-blue yarn
and:
4.5 mm hook
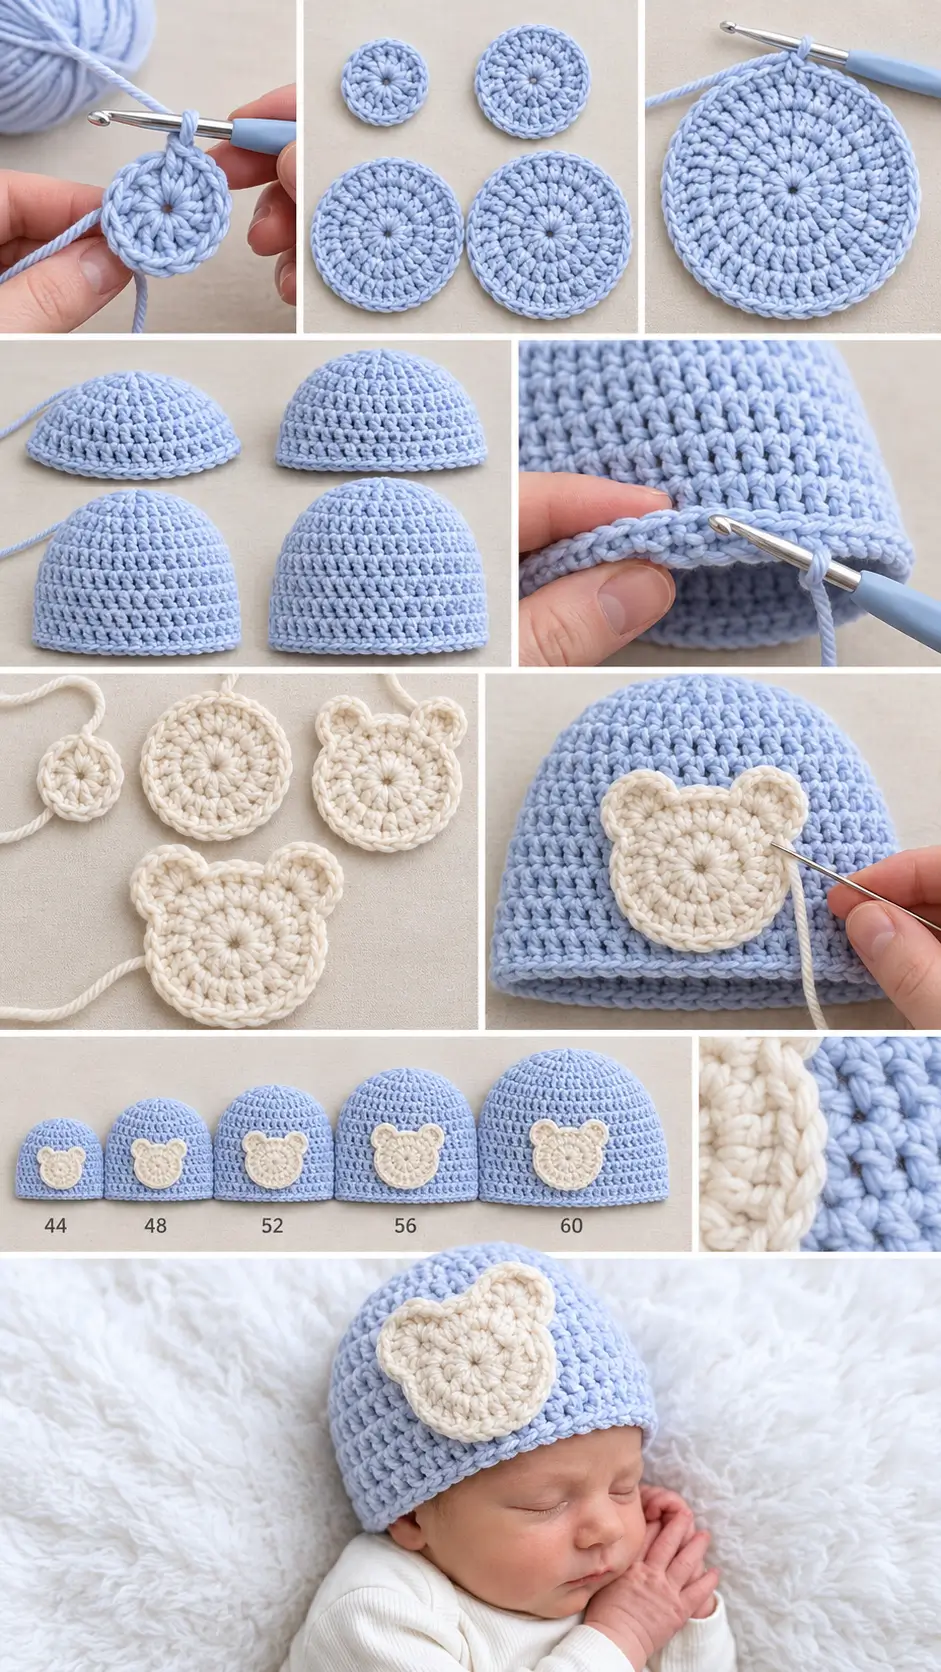
Crown Round 1
Make a magic ring.
Ch 2.
Work:
10 dc into the ring
Pull the center closed.
Join with sl st to the first dc.
10 sts
Crown Round 2
Ch 2.
Work:
2 dc in every stitch around
Join.
20 sts
Crown Round 3
Ch 2.
Repeat around:
dc in next stitch
2 dc in next stitch
Join.
30 sts
Crown Round 4
Ch 2.
Repeat around:
dc in next 2 stitches
2 dc in next stitch
Join.
40 sts
At this point, begin following the instructions for your chosen size.
NEWBORN SIZE
Target:
44 stitches
Newborn Increase Round
Ch 2.
Work:
dc in next 9 stitches, 2 dc in next stitch
Repeat this sequence:
4 times
You should finish with:
44 stitches
Join.
Newborn Body
Work:
1 dc in every stitch around
without increasing.
Continue working even rounds until the hat measures approximately:
4¾ inches / 12 cm
from the crown center to the lower edge.
Newborn Edge
Work:
1 round sc
around.
Then work:
1 loose sl st in every stitch
around.
Fasten off.
Finished length:
approximately 5 inches / 12.5 cm
0–3 MONTH SIZE
Target:
48 stitches
Starting from Crown Round 4 with 40 stitches:
Increase Round
Ch 2.
Repeat:
dc in next 4 stitches
2 dc in next stitch
around.
You should finish with:
48 stitches
Join.
Body
Work dc evenly around without increasing until the hat measures approximately:
5¼ inches / 13.5 cm
from crown center.
Edge
Work:
1 round sc
Then:
1 round loose sl st
Fasten off.
Finished length:
approximately 5½ inches / 14 cm
3–6 MONTH SIZE
Target:
52 stitches
Work the 0–3 month increase round first:
48 stitches
Then work one additional increase round.
Additional Increase Round
Ch 2.
Place:
4 increases evenly around
while working dc in all remaining stitches.
The easiest method is to divide the round into four sections of 12 stitches.
In each section work:
dc in 11 stitches, 2 dc in next stitch
Repeat four times.
52 stitches
Join.
Body
Dc evenly around until the hat measures approximately:
5¾ inches / 14.5 cm
Edge
Work:
1 sc round
then:
1 loose sl-st round
Fasten off.
Finished length:
approximately 6 inches / 15 cm
6–12 MONTH SIZE
Target:
56 stitches
Begin with the:
48-stitch crown
Then add:
8 increases evenly
around the next round.
One simple arrangement is:
repeat:
dc in next 5 stitches, 2 dc in next stitch
for most of the round, spacing the final increases as evenly as necessary.
The important result is:
56 stitches
Body
Continue:
dc in every stitch
without increasing until the hat measures:
6¼ inches / 16 cm
Edge
Work:
1 round sc
then:
1 round loose sl st
Fasten off.
Finished length:
approximately 6½ inches / 16.5 cm
TODDLER SIZE
Target:
60 stitches
After reaching:
48 stitches
work another increase round.
Ch 2.
Repeat:
dc in next 3 stitches
2 dc in next stitch
around.
You should finish with:
60 stitches
Body
Work dc evenly until the hat measures:
6¾ inches / 17 cm
from crown center.
Edge
Work:
1 round sc
then:
1 loose sl-st round
Fasten off.
Finished length:
approximately 7 inches / 18 cm
CHECK THE HAT BEFORE MAKING THE BEAR
Lay the beanie flat.
The crown should be:
- smooth
- gently rounded
- not pointed
- not heavily ruffled
The sides should fall straight down from the crown.
The lower edge should be:
- stretchy
- smooth
- not dramatically tighter than the body
If the edge contracts, your slip stitches are too tight.
PART 2 — TEDDY BEAR HEAD APPLIQUÉ
Use:
cream / ivory yarn
The teddy head should be large enough to be clearly visible without covering most of the beanie.
For newborn and 0–3 month hats, use the pattern exactly as written.
For larger sizes, you may use the same appliqué for a smaller decorative look or add the optional enlargement round later.
Bear Head Round 1
Make a:
magic ring
Ch 2.
Work:
10 dc into the ring
Pull the ring closed.
Join.
10 sts
Bear Head Round 2
Ch 2.
Work:
2 dc in every stitch around
Join.
20 sts
The piece should form a flat cream circle.
Do not fasten off.
Bear Head Round 3 — Ears and Outer Edge
This round converts the circle into the bear-head silhouette.
Ch 1.
Work:
sc in next 2 stitches
Now make the first ear.
First Ear
In the next stitch work:
hdc, 5 dc, hdc
all into the same stitch.
Work:
sc in next 3 stitches
Now make the second ear.
Second Ear
In the next stitch work:
hdc, 5 dc, hdc
all into the same stitch.
Continue:
sc evenly around the remaining stitches
Join to the first sc.
Fasten off, leaving a long sewing tail.
Position the Ears
Lay the appliqué flat.
Gently shape both ear fans with your fingers.
The finished bear head should have:
- round lower face
- gently rounded cheeks
- two small semicircular ears
- ears near the upper left and upper right
- a shallow dip between the ears
The appliqué should resemble the simple cream teddy silhouette shown in the design.
Optional Larger Bear Appliqué
For the 6–12 month and toddler sizes, you can make a slightly larger head.
Before adding the ear round, add one enlargement round:
Ch 2.
Repeat:
dc in next stitch, 2 dc in next stitch
around.
Then add the ears along the top using the same ear construction.
For the larger version, position the ears approximately:
5–6 stitches apart
across the top.
No Face Is Needed
The clean design works especially well with a plain bear silhouette.
Do not add:
- safety eyes
- buttons
- beads
- loose bows
- dangling decorations
This keeps the design visually close to the soft minimalist reference.
If the hat is intended for a very young baby, avoiding small detachable embellishments is also the simplest construction choice.
PART 3 — POSITION THE BEAR ON THE HAT
Lay the finished beanie flat with the round join positioned toward the back.
Choose the opposite side as the front.
Place the bear appliqué:
slightly above the lower edge
rather than directly against the brim.
For the newborn size, position the bottom of the bear approximately:
¾–1 inch / 2–2.5 cm
above the hat edge.
On larger sizes, place it approximately:
1–1½ inches / 2.5–4 cm
above the edge.
Center it visually on the front.
Check the Placement
Before sewing:
Pin or hold the bear temporarily.
Check that:
- ears point upward
- head sits straight
- appliqué does not overlap the brim
- enough blue hat fabric remains visible around it
- the bear does not sit too close to the crown
The design should look balanced when the hat is worn.
PART 4 — SEW THE BEAR TO THE HAT
Thread the long cream tail onto a yarn needle.
Beginning at the lower edge of the bear:
take small stitches through:
outer edge of bear appliqué
and:
surface stitches of the blue hat
Continue slowly around the entire head.
When you reach each ear:
sew around the complete outer edge.
This helps the ears stay flat against the hat instead of folding forward.
Do not pull the sewing thread excessively tight.
The hat must still stretch.
Keep the Sewing Flexible
After sewing several inches:
stretch the hat fabric gently.
If the appliqué area refuses to stretch at all, your sewing stitches are too tight.
Loosen them slightly.
A baby hat needs to remain comfortable and flexible.
Finishing
Bring all yarn ends to the inside of the hat.
Weave through several stitches.
Change direction.
Weave through several more stitches.
Trim the excess.
Check the inside carefully for:
- loose ends
- large knots
- rough yarn tails
The inside should feel smooth.
Final Measurements
Newborn
Approximately:
13–14 in circumference
5 in long
0–3 Months
Approximately:
14–15 in circumference
5½ in long
3–6 Months
Approximately:
15–16 in circumference
6 in long
6–12 Months
Approximately:
16–17 in circumference
6½ in long
Toddler
Approximately:
17–18½ in circumference
7 in long
If the Crown Ruffles
There are too many stitches for your gauge.
If the crown begins forming waves:
remove a few increases from the final increase round.
The crown should lie nearly flat while increasing.
If the Crown Cups Too Early
You may have too few stitches or very tight tension.
Check your gauge.
If necessary:
- use a slightly larger hook
- add a few evenly spaced increases
Do not continue straight until the crown is wide enough.
If the Hat Is Too Loose
Try:
- one hook size smaller
- fewer stitches in the final crown round
Do not make the lower edging dramatically tighter to compensate for an oversized body.
The whole hat should fit evenly.
If the Hat Is Too Tight
Increase your hook size slightly or add:
2–4 evenly spaced stitches
to the crown before beginning the straight body.
If the Bear Appliqué Curls
Lightly dampen it.
Lay it flat.
Shape:
- lower circle
- left ear
- right ear
Allow it to dry completely before sewing.
Do not aggressively stretch the ears.
If the Bear Ears Are Too Large
Instead of:
hdc, 5 dc, hdc
work:
hdc, 4 dc, hdc
in each ear stitch.
If the Bear Ears Are Too Small
Use:
hdc, 6 dc, hdc
in the ear stitch.
Keep both ears identical.
Color Ideas
Classic Baby Blue
Hat:
powder blue
Bear:
warm cream
Neutral Nursery
Hat:
oatmeal
Bear:
ivory
Soft Sage
Hat:
pale sage green
Bear:
cream
Blush
Hat:
dusty blush pink
Bear:
soft white
Teddy Brown
Hat:
warm beige
Bear:
chocolate brown
Make a Matching Baby Set
This little beanie works naturally with other simple crochet baby projects.
A coordinated gift set could include:
- bear beanie
- simple baby booties
- small stroller blanket
- bear appliqué lovey
- matching diaper-cover photo prop
Keep the same two yarn colors throughout the set for a coordinated look.
Final Pattern at a Glance
Hat
Start with:
MR + 10 dc
Increase:
10 → 20 → 30 → 40
Then increase to your size:
Newborn
44 sts
0–3 Months
48 sts
3–6 Months
52 sts
6–12 Months
56 sts
Toddler
60 sts
Work:
dc evenly
to the required length.
Finish with:
1 sc round
then:
1 loose sl-st round
Bear Appliqué
Round 1
10 dc
Round 2
20 dc
Outer Round
Sc around while creating two ears with:
hdc, 5 dc, hdc
in the selected ear stitches.
Fasten off with a long sewing tail.
Assembly
Center the cream bear on the front of the blue hat.
Place it slightly above the lower edge.
Sew securely around:
- head
- both ears
Weave in all ends.
The finished hat should have a smooth powder-blue top-down beanie shape with one large soft cream teddy-bear silhouette centered on the front, matching the simple cozy appearance of the reference while keeping the pattern straightforward enough for a beginner.