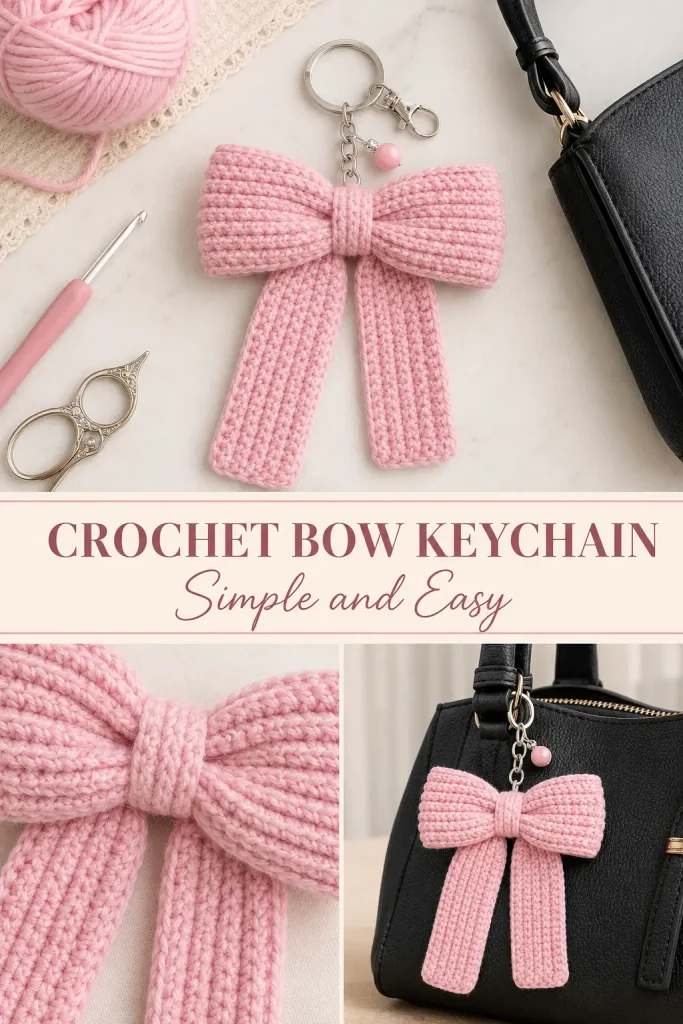
This crochet bow keychain is a sweet little project that looks cute, polished, and very giftable. It has a soft rectangular bow shape, two hanging ribbon tails, a wrapped center, and a keychain ring so it can be clipped onto a handbag, backpack, zipper pouch, keys, or handmade gift.
The design is simple, but the finished result feels boutique-style. The soft pink yarn gives it a feminine accessory look, while the metal keyring, chain, clasp, and bead make it feel finished and ready to use.
This is an original crochet bow keychain pattern inspired by the visible design in the image. It does not copy a paid or copyrighted pattern. The instructions below are written to help you create the same style of crochet bow accessory using basic stitches and simple assembly.
Description
This handmade crochet bow keychain features a wide horizontal bow with two rounded rectangular loops, a tightly wrapped center, and two long vertical ribbon tails hanging down from the middle. The bow is made with textured crochet strips, giving it a neat ribbed look. A silver keyring, short chain, lobster clasp, and pink bead are attached at the top so the bow can hang beautifully from a bag or key set. The finished accessory is soft, lightweight, and perfect for gifts, market items, party favors, or cute bag charms.
Materials
- Medium weight yarn in soft pink
- 3.0 mm or 3.5 mm crochet hook
- Yarn needle
- Scissors
- Stitch marker, optional
- Metal keyring
- Short keychain chain
- Lobster clasp or swivel clasp
- Small pink bead
- Jump rings
- Small pliers for attaching hardware
Abbreviations
- ch = chain
- sl st = slip stitch
- sc = single crochet
- hdc = half double crochet
- blo = back loop only
- st = stitch
- rep = repeat
Pattern Notes
- This pattern is worked in separate pieces and then assembled.
- The bow has 4 crochet parts: the main bow rectangle, 2 hanging tails, and the center wrap.
- The main bow is folded and pinched in the middle to create the bow shape.
- The two tails are sewn behind the center wrap and hang downward.
- The keychain hardware is added last.
- You can make the bow larger or smaller by adjusting the starting chain and number of rows.
- Use firm tension so the bow holds its shape nicely.
Finished Size
Approximate finished bow size:
- Width: 4 to 4.5 inches
- Height from bow top to tail bottom: 4.5 to 5 inches
Size may change depending on yarn weight, hook size, and tension.
Step-by-Step Instructions
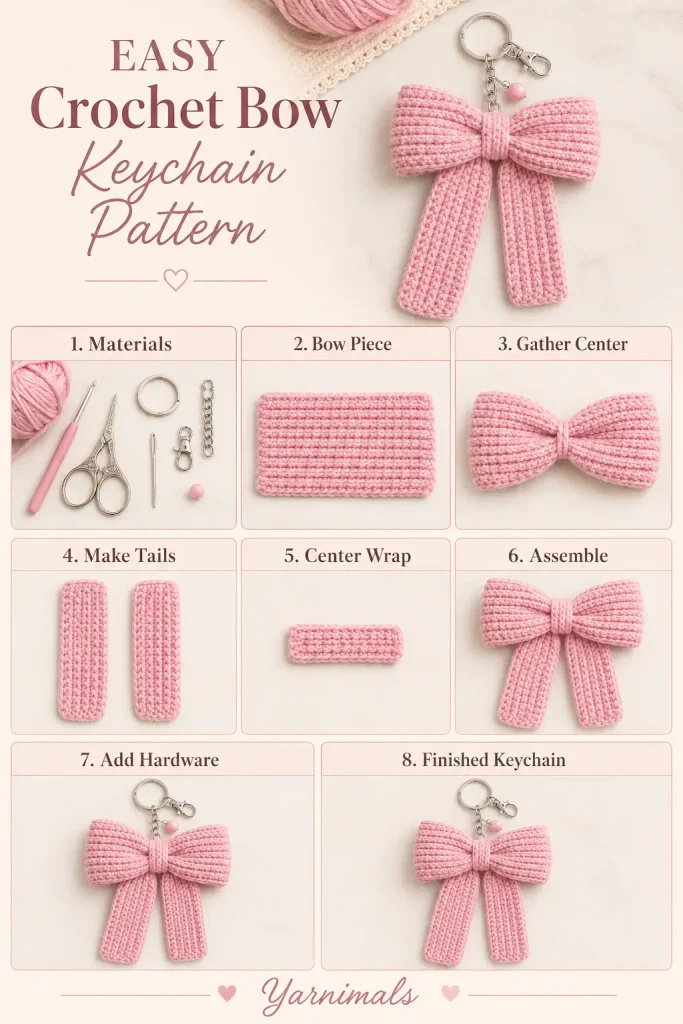
Main Bow Rectangle
The main bow is a long rectangle that will be pinched in the center.
Ch 34.
Row 1: Hdc in the 2nd ch from hook and in each ch across. Ch 1, turn.
33 hdc
Row 2: Hdc blo in each st across. Ch 1, turn.
33 hdc
Rows 3–8: Rep Row 2.
33 hdc
Fasten off, leaving a long tail for sewing.
You should now have a soft rectangular crochet strip with a ribbed texture.
Shape the Main Bow
Lay the rectangle flat horizontally.
Fold the short ends slightly toward the back if you want cleaner rounded edges.
Pinch the center tightly with your fingers to form the bow shape.
Wrap the long yarn tail around the center 6 to 8 times.
Pull firmly so the middle gathers and the two bow loops puff outward.
Use the yarn needle to stitch through the wrapped center several times.
Do not fasten off completely yet if you want to use the same tail to help attach the bow tails.
First Hanging Tail
Ch 12.
Row 1: Hdc in the 2nd ch from hook and in each ch across. Ch 1, turn.
11 hdc
Row 2: Hdc blo in each st across. Ch 1, turn.
11 hdc
Rows 3–4: Rep Row 2.
11 hdc
Fasten off, leaving a long tail for sewing.
Second Hanging Tail
Repeat the same instructions as the first hanging tail.
Ch 12.
Row 1: Hdc in the 2nd ch from hook and in each ch across. Ch 1, turn.
11 hdc
Row 2: Hdc blo in each st across. Ch 1, turn.
11 hdc
Rows 3–4: Rep Row 2.
11 hdc
Fasten off, leaving a long tail for sewing.
Shape the Tail Ends
The image shows simple rectangular ribbon tails with slightly soft corners.
To keep that look, leave the tail bottoms straight.
For a softer handmade finish, use your yarn needle to lightly round the bottom corners by tucking the corner stitches inward and sewing them gently on the back.
Do not make sharp V-cuts, because the visible design has straight hanging tails.
Attach the Tails
Place the main bow face down.
Place the two hanging tails behind the pinched center.
Angle them slightly outward so they hang like ribbon ends.
The left tail should lean slightly left.
The right tail should lean slightly right.
Sew the top edge of each tail firmly to the back of the bow center.
Make several stitches through the center so the tails do not twist or pull loose.
Center Wrap
Ch 7.
Row 1: Sc in the 2nd ch from hook and in each ch across. Ch 1, turn.
6 sc
Rows 2–5: Sc blo in each st across. Ch 1, turn.
6 sc
Fasten off, leaving a long tail for sewing.
Wrap this small strip around the center of the bow, covering the gathered yarn and the tops of the two tails.
Pull it snug, but not so tight that the bow folds too sharply.
Sew the center wrap closed at the back.
Weave in the end securely.
Add the Top Hanging Loop
To attach the hardware neatly, make a small yarn loop at the top center of the bow.
Join pink yarn at the back top center of the bow.
Ch 6.
Sl st back into the same spot to form a small loop.
Fasten off and weave in the ends securely.
This loop will hold the jump ring or chain.
For a stronger keychain, stitch through this loop several times with yarn or thread.
Add the Keychain Hardware
Open a jump ring with pliers.
Slide it through the small crochet loop at the top of the bow.
Attach the short chain to the jump ring.
Attach the keyring and lobster clasp to the chain.
Add the pink bead onto a separate small jump ring or head pin, then attach it near the top chain so it hangs above the bow.
Close all jump rings tightly.
Check that the bow hangs straight.
Finishing
Weave in all yarn ends.
Shape the bow loops with your fingers.
Straighten the two hanging tails.
Adjust the center wrap so it sits neatly in the middle.
Gently flatten the bow with your hands, but do not press it too much. The bow should stay soft and slightly puffy.
Optional Border for a Neater Edge
If you want a cleaner finished edge, you can add a simple sc border around the main bow rectangle and each tail before assembly.
Join yarn in any corner.
Work sc evenly around each piece.
Place 2 sc in each corner.
Join with sl st.
Fasten off and weave in ends.
This gives the bow a firmer outline, but the pattern also works beautifully without a border.
Tips & Variations
Use soft pink yarn for the same sweet style as the image.
Try cream, lavender, red, beige, black, or pastel blue for different bag charm styles.
Use cotton yarn for a firmer bow.
Use acrylic yarn for a softer, puffier bow.
For a luxury look, add a pearl bead instead of a pink bead.
For a cute market item, make sets in several colors and attach them to display cards.
If your bow feels floppy, use a smaller hook or add the optional sc border.
If the tails twist, sew them more firmly behind the center wrap.
For a smaller keychain, reduce the main bow chain to 28 and the tail chain to 10.
For a larger bag charm, increase the main bow chain to 40 and add 2 extra rows to the bow rectangle.
FAQ
Is this crochet bow keychain beginner-friendly?
Yes. This is a beginner-friendly crochet accessory because it uses simple rows, basic stitches, and easy assembly.
Can I sell finished bow keychains made from this pattern?
Yes. You can sell finished handmade bow keychains made from these original instructions.
What yarn is best for this crochet bow?
Medium weight cotton or acrylic yarn works well. Cotton gives a firm, neat bow, while acrylic gives a soft and fluffy look.
Can I make it without keychain hardware?
Yes. You can use the crochet bow as a hair clip, brooch, bag applique, headband decoration, gift topper, or clothing embellishment.
Conclusion
This easy crochet bow keychain is a lovely small project that looks cute, useful, and handmade in the best way. With a soft bow shape, two ribbon tails, a wrapped center, and pretty keychain hardware, it makes a charming accessory for bags, keys, gifts, or market displays.
Make it in soft pink like the image, or try a whole set in your favorite colors for a quick handmade crochet accessory collection.



