Easy Crochet Daisy Snail Amigurumi Crochet Pattern for Beginners
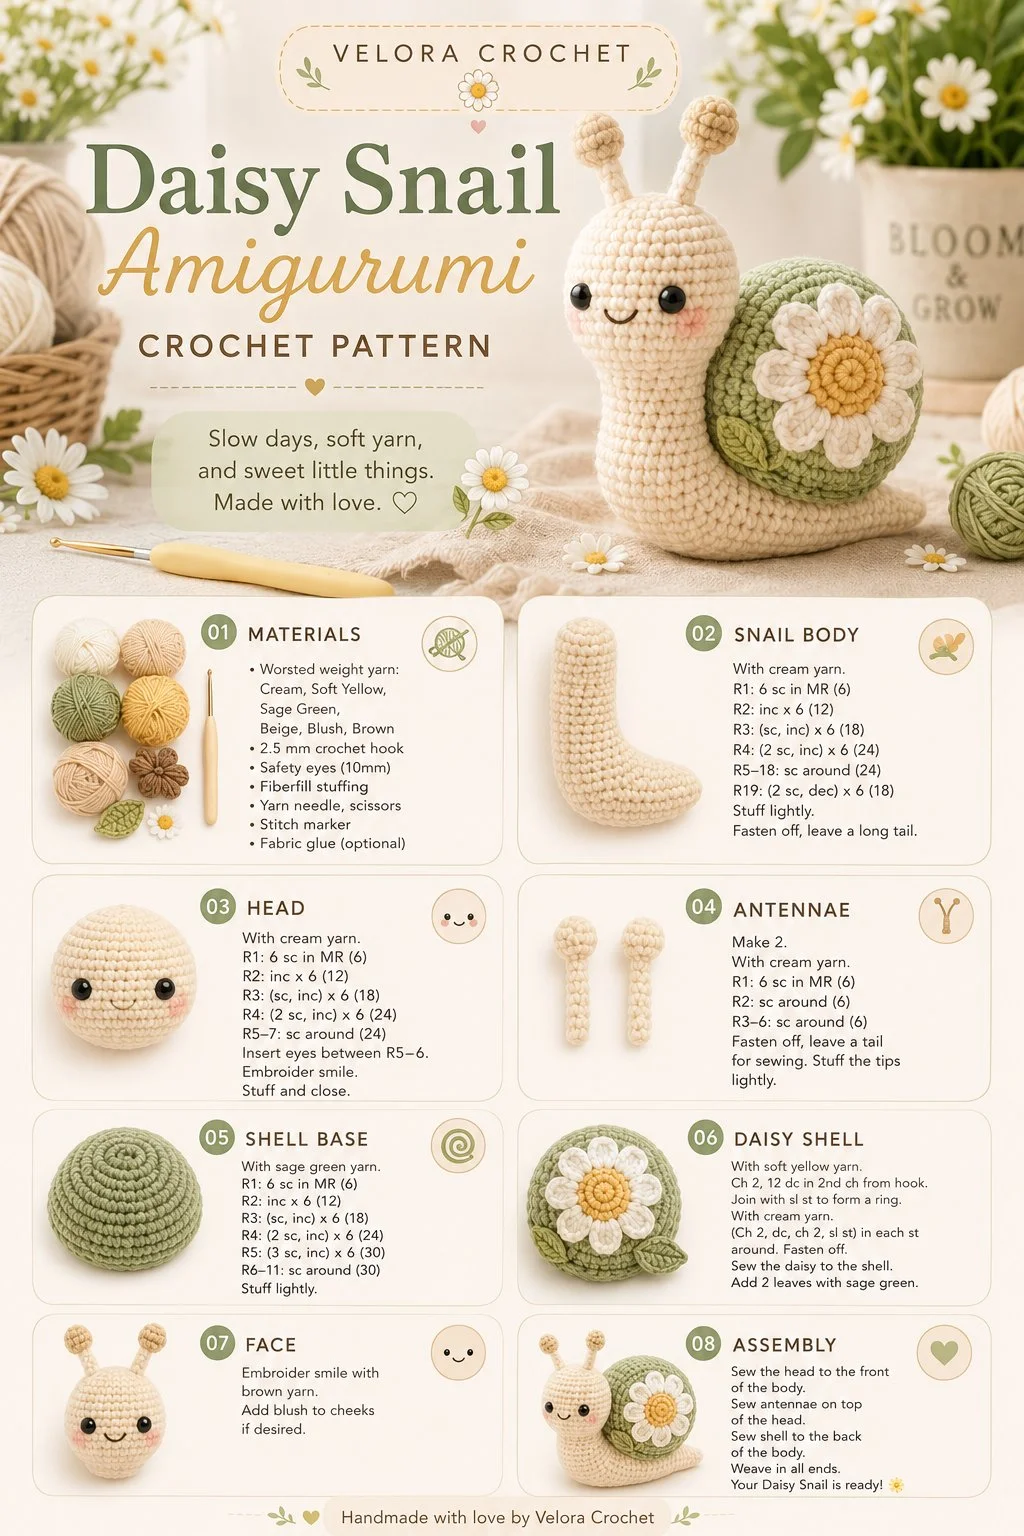
Create a whimsical addition to your crochet collection with this adorable snail featuring a charming daisy shell. Perfect as a decoration or gift, this little crochet snail is not only easy to make but also a delightful project for both beginners and experienced crafters alike. Let’s dive into the materials needed, the steps for crafting the snail, and a few tips to enhance your crochet experience.
Materials
- Worsted weight yarn in soft green, yellow, and white
- Crochet hook size G (4.0 mm)
- Polyester fiberfill stuffing
- Yarn needle for sewing
- Safety eyes or black embroidery thread for eyes
- Stitch marker (optional)
Abbreviations
- MR: magic ring
- ch: chain
- sc: single crochet
- inc: increase
- dec: decrease
- sl st: slip stitch
Snail Body
- Start with a soft green yarn.
- Round 1: Make a MR and work 6 sc into the ring (6).
- Round 2: Inc in each stitch around (12).
- Round 3: Sc in next stitch, inc in next stitch repeat around (18).
- Round 4-8: Sc in each stitch around (18).
- Round 9: Sc in next stitch, dec in next stitch repeat around (12).
- Round 10: Sc in each stitch around (12).
- Stuff the body firmly but not overstuffed, then continue.
- Round 11: Dec around (6).
- Finish off and weave in end.
Head
- Using the same yarn, create a new MR.
- Round 1: Work 6 sc into the ring (6).
- Round 2: Inc in each stitch around (12).
- Round 3: Sc in each stitch around (12).
- Stuff lightly and sew the head onto the body.
Antennae
- With green yarn, make 2 chains approximately 3 inches long.
- Fold and sew to the top of the head, using a small stitch to attach them securely.
Shell Base
- Switch to yellow yarn for the shell base.
- Round 1: Make a MR and work 6 sc into the ring (6).
- Round 2: Inc in each stitch around (12).
- Round 3: Sc in next stitch, inc in next stitch repeat around (18).
- Round 4: Sc in next 2 stitches, inc in next stitch repeat around (24).
- Round 5: Sc in each stitch around (24).
- Finish off, leaving a long tail for sewing.
Daisy Shell
- With white yarn, create a flower shape by making 5 petals.
- Petal: Ch 3, sl st in the 1st ch to create a loop, repeat for 5 petals.
- Attach the flower to the yellow shell base using the long tail.
- Use green yarn to make a small center for each flower petal to add detail.
Face Details
- Sew on safety eyes or embroider eyes using black thread.
- Use embroidery thread to stitch a small, smiling mouth.
Assembly
- Position the shell onto the back of the body and sew it in place securely.
- Make sure the shell is centered for balance and a charming appearance.
- Weave in all ends, ensuring everything is securely attached.
Tips for the Best Result
- Always check your tension to ensure your snail maintains its lovely shape.
- Feel free to experiment with yarn colors for a unique look – a pastel palette for spring or bright, vivid colors for a fun, vibrant design!
- Stuff the body firmly while remaining cautious not to overstuff, as this can distort the shape.
With these clear instructions, you’re well on your way to creating an enchanting snail that will surely brighten up any space. Handmade crochet projects like this one make perfect personalized gifts or delightful decorations in your home. Enjoy your crafting and let your creativity shine!