Intro
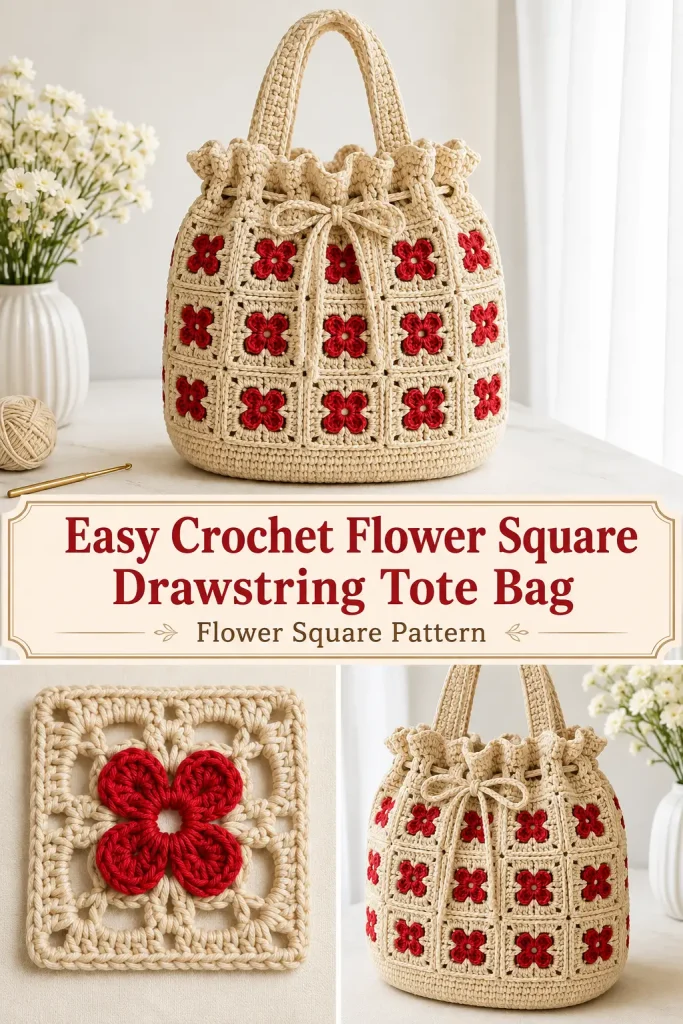
This crochet flower square bag combines a tiny four-petal flower motif with a warm neutral frame to create the beautiful tiled look shown in the reference design. The bright red flowers stand out against the creamy beige background, while the repeated squares give the finished bag a delicate vintage-granny-square feel.
The construction is also very versatile. Once you learn the small flower square, the same crochet motif can be joined into a tote bag, table runner, blanket, placemat, or individual coaster. For this bag version, the motifs form the body and are finished with a solid base, drawstring eyelet band, softly ruffled top, matching cords, and two handles.
Description
The finished bag is a compact bucket-style crochet tote made from repeated red four-petal flower squares framed in beige. Each motif has a small open center, four plump red petals, four beige corner sections, and small open spaces that preserve the airy flower-square appearance. The motifs are joined into a continuous rectangular grid that wraps around the bag. A solid beige crochet base supports the bottom, while a beige top band contains drawstring openings and a softly scalloped ruffle. A long beige cord is threaded through the eyelets and tied into a bow at the front, and two narrow matching crochet handles rise from the top edge.
Materials
- DK or light worsted cotton or cotton-blend yarn
- Red yarn for the flowers
- Warm beige or natural cream yarn for the square frames, base, top, handles, and drawstring
- 3 mm crochet hook
- Yarn needle
- Scissors
- Stitch markers
- Measuring tape
- Optional fabric lining
- Optional magnetic snap for additional security
Approximate Yarn Amounts
For the bag shown:
- Beige: 300–400 g
- Red: 80–120 g
Yarn requirements will vary with yarn thickness, tension, and bag size.
Abbreviations
- MR – magic ring
- ch – chain
- sc – single crochet
- hdc – half double crochet
- dc – double crochet
- sl st – slip stitch
- sp – space
- st – stitch
- sts – stitches
Pattern Notes
- US crochet terminology is used.
- The flower-square pattern below is an original construction inspired by the visible design.
- Each motif has exactly one red four-petal flower surrounded by a beige square frame.
- All motifs must be made with the same colors and proportions.
- The sample bag uses 40 motifs arranged 10 motifs around × 4 motifs high.
- Each blocked motif should measure approximately 5–5.5 cm square.
- Ten motifs create an approximate bag circumference of 50–55 cm.
- The motif section is approximately 20–22 cm high.
- The finished bag is approximately 24–27 cm tall before the handles, depending on gauge.
- Block all squares to the same size before joining.
- The motif can also be used individually as a coaster or repeated for blankets and table runners.
Step-by-Step Instructions
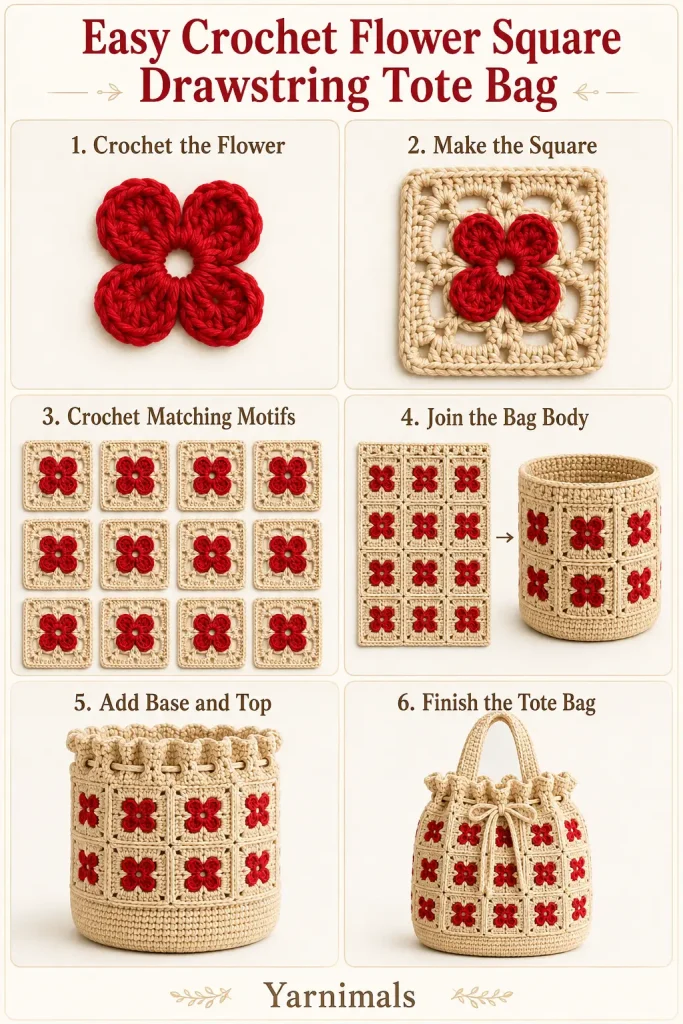
Part 1: Crochet the Red Four-Petal Flower
Use red yarn.
Round 1
Make an MR.
Work the following into the ring:
[ch 2, 5 dc, ch 2, sl st into MR] 4 times
You should now have:
- 4 rounded red petals
- 5 dc in each petal
- a small central opening
- 4 valleys between the petals
Pull the magic ring until the center opening is small but still slightly visible.
Fasten off.
Gently shape the four petals so they form a balanced cross-shaped flower.
The petals should point:
- up
- right
- down
- left
Do not make five or six petals. The visible design uses a four-petal flower.
Part 2: Add the Beige Square Frame
Join beige yarn in one of the spaces between two red petals.
Beige Frame Round
Ch 3. This counts as the first dc.
In the same space work:
3 dc, ch 2, 4 dc
This forms the first corner.
Ch 1.
In the next space between petals work:
4 dc, ch 2, 4 dc
Ch 1.
Repeat in each remaining space.
You should finish with four corner groups.
Complete pattern around:
[(4 dc, ch 2, 4 dc) in petal valley, ch 1] × 4
Sl st into the top of beginning ch 3.
The red petals should remain clearly visible in the center while the beige stitches create the four corners of the square.
Part 3: Neaten the Outside of the Square
Ch 1.
Sc in each dc across the first side.
Work:
3 sc in each ch-2 corner space
Continue with 1 sc in each stitch and chain space along every side.
Repeat around all four sides.
Sl st to the first sc.
Fasten off.
The completed square should have:
- one red four-petal flower
- beige corner fans
- small open areas surrounding the flower
- a neat square beige outer edge
Block gently to approximately 5–5.5 cm square.
Make the Motifs
For the pictured-style bag, make:
40 flower squares
Keep every square identical:
- red flower
- beige frame
- same yarn weight
- same hook size
- same finished dimensions
Arrange them as:
10 squares across × 4 rows high
The 10-square width will eventually wrap completely around the bag.
Part 4: Join the Flower Squares
Arrange the motifs into four horizontal rows of ten squares.
Place neighboring motifs with right sides facing you.
Using beige yarn and a yarn needle, whipstitch corresponding outside loops together.
For a more crocheted-looking join, you can instead use slip stitches.
Keep every join relaxed so the grid remains flat.
First join each horizontal row.
Then join the four long rows together.
You should now have one large rectangle measuring approximately:
50–55 cm wide × 20–22 cm high
Check that every flower faces the same direction.
Part 5: Form the Bag Body
Bring the two short ends of the large motif rectangle together.
Using beige yarn, join them with slip stitches or a neat whipstitch.
You now have a continuous tube of flower squares.
The seam should disappear naturally into one of the vertical joining lines.
Do not close the bottom yet.
Part 6: Crochet the Bottom Base
The photographed bag has a structured, rounded bucket shape rather than a completely flat envelope shape, so a separate beige base helps support the flower-square body.
Using beige yarn, make an MR.
Round 1
Ch 1.
Work:
8 sc into MR
Join with sl st.
8 sts
Round 2
Ch 1.
Work 2 sc in each stitch around.
16 sts
Round 3
[1 sc, 2 sc in next st] around
24 sts
Round 4
[2 sc, 2 sc in next st] around
32 sts
Round 5
[3 sc, 2 sc in next st] around
40 sts
Continue increasing evenly in the same manner:
- Round 6: [4 sc, increase] around
- Round 7: [5 sc, increase] around
- Round 8: [6 sc, increase] around
Continue only until the base circumference approximately matches the lower edge of your flower-square tube.
Depending on gauge, you may need additional increase rounds.
The base should remain flat.
If it begins to cup, add slightly more increases.
If it begins to ripple, work fewer increases.
Part 7: Join the Base to the Bag
Place the motif tube over the finished base.
Match the lower edge of the motif body evenly around the base.
Use stitch markers at four evenly spaced points.
Join with beige yarn.
Work sc through both the bottom edge of the motif body and the outer edge of the base.
Continue evenly around.
Make sure you do not pull the flower-square body inward.
Join with sl st.
The bag should now stand as a soft bucket shape.
Part 8: Crochet the Upper Beige Band
Join beige yarn anywhere along the top edge.
Band Round 1
Ch 1.
Work sc evenly around the entire upper edge.
Aim for a smooth round without gathering.
Join with sl st.
Band Round 2
Ch 1.
Sc in every stitch around.
Join.
Eyelet Round
Ch 3.
Work:
dc in next st, ch 1, skip 1 st
Repeat around:
[dc in next 2 sts, ch 1, skip 1 st]
Adjust slightly at the end if necessary so the eyelets remain evenly distributed.
Join with sl st.
These ch-1 spaces will hold the drawstring.
Next Round
Ch 1.
Sc in each dc and work 1 sc into every ch-1 space.
Join.
Part 9: Crochet the Ruffled Top
The finished reference has a soft decorative ruffle above the drawstring.
Work into the next round:
[sl st in next st, 5 dc in next st, sl st in next st]
Repeat around.
The 5-dc groups create small rounded ruffles around the opening.
If your yarn creates a ruffle that is too full, use 4 dc instead.
If you want slightly more fullness, use 6 dc.
Fasten off.
Shape the scallops evenly.
Part 10: Make the Drawstring
Using beige yarn, leave a long starting tail.
Ch until the cord measures approximately:
80–90 cm
Beginning in the second ch from the hook, sl st in every chain back to the beginning.
This creates a firmer rounded crochet cord.
Fasten off.
Weave the cord over and under through the eyelet round.
Bring both ends out at the center front.
Tie them into the soft bow visible on the finished bag.
The drawstring should close the top gently without crushing the flower motifs.
Part 11: Make Two Crochet Handles
The bag has two matching beige handles.
For each handle:
Ch until the chain measures approximately 35–40 cm.
Beginning in the second ch from the hook:
Sl st in every chain across.
For a stronger handle, turn and work a second row of sl sts or sc back across.
Fasten off, leaving long sewing tails.
Make a second identical handle.
Part 12: Attach the Handles
Flatten the bag gently and identify the front and back.
Position the first handle on the front approximately:
- 6–8 cm apart at the attachment points
- just below the ruffled upper edge
Sew both ends securely through the solid beige band.
Position the second handle in exactly the same way on the back.
Reinforce each attachment several times.
Do not attach the handles only to an open chain space. Sew through solid stitches so the weight of the bag is supported properly.
Optional Fabric Lining
A lining is recommended if the bag will carry keys, cosmetics, a phone, or other small objects.
Cut fabric slightly larger than the inside dimensions of the bag.
Sew the side and bottom seams.
Insert the lining with the wrong side against the crochet.
Fold the raw upper fabric edge inward.
Hand-sew it to the solid beige band below the drawstring eyelets.
Do not stitch through the ruffle.
Finishing
Weave in every yarn end securely.
Check all motif joins.
Reinforce:
- side seam
- base connection
- handle attachments
- drawstring opening
Lightly steam or wet block the flower-square body if necessary, taking care not to flatten the red petals.
Shape the ruffled top with your fingers.
Insert the drawstring and tie it into a centered bow.
The finished bag should now have the same key visual elements as the reference:
- repeated red four-petal flowers
- warm beige square frames
- continuous flower-square body
- rounded beige base
- gathered drawstring opening
- decorative ruffled top
- centered beige bow
- two beige crochet handles
Using the Flower Square for Other Projects
The same motif can easily be used beyond the bag.
Crochet Coaster
Use one flower square and add one or two extra beige sc border rounds until it reaches your preferred coaster size.
Table Runner
Join squares in a long grid such as:
3 squares wide × 10–14 squares long
Finish with a simple beige sc border.
Blanket
Make as many identical flower squares as needed and join them into a rectangular grid.
For example:
8 × 10 motifs for a small throw.
Add several beige border rounds afterward.
Cushion Cover
Join enough motifs to form two equal square panels.
Crochet or sew the panels together around three sides, insert the cushion, then close the final side.
Tips & Variations
Cotton yarn is particularly suitable for this crochet bag because it provides enough definition for the small flower petals while keeping the square frames structured.
For the closest visual result, use a saturated cherry or scarlet red for every flower and a warm oatmeal or natural beige for everything else.
Block the motifs before joining them. Even a difference of a few millimeters per square becomes noticeable after ten motifs are joined around the bag.
If you want a larger tote, increase the motif layout to 12 motifs around and five motifs high rather than enlarging individual squares.
For a smaller handbag, use eight motifs around and three motifs high.
Keep the flower color consistent throughout if you want the striking repeating pattern seen in the reference. For a more playful granny square pattern, you can use several flower colors while keeping every outer frame beige.
FAQ
Can beginners make this crochet flower bag?
Yes. The individual square uses basic chains, double crochet, single crochet, and slip stitches. The project takes some time because many motifs are required, but the construction itself is repetitive and beginner-friendly.
How many crochet flower squares are needed for this bag?
The sample construction uses 40 squares arranged 10 around and 4 high. You can increase or decrease that number depending on your motif size and desired bag dimensions.
Do I need to line the crochet tote?
A lining is optional, but it is useful for a frequently used bag. It prevents small objects from slipping through the spaces around the flowers and also reduces stretching.
Conclusion
This crochet flower square tote is a beautiful way to turn one small motif into a much larger handmade project. The combination of bold red four-petal flowers, soft beige framing, a gathered ruffled opening, bow drawstring, and matching handles gives the finished bag a distinctive handcrafted look. Once you have mastered the square, save the pattern and use it for bags, blankets, table runners, coasters, cushions, and other colorful crochet projects.



