Easy Crochet Lace Headband With Adjustable Ties
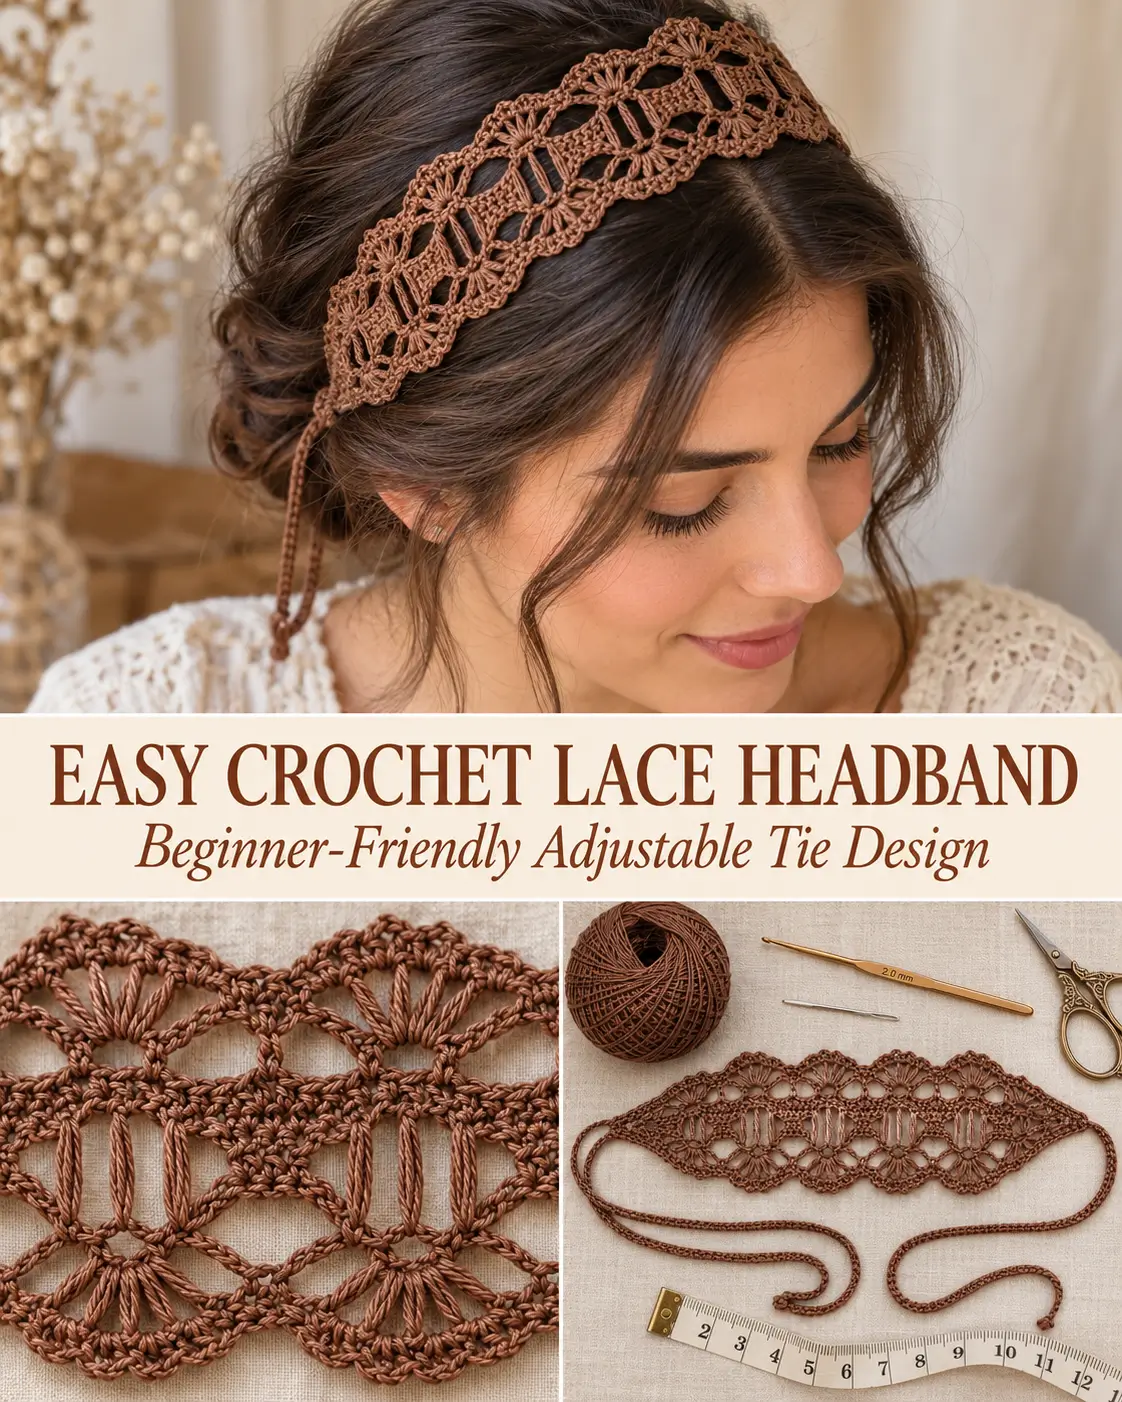
This delicate crochet headband is made as a wide lace center panel with tapered ends and long adjustable ties. The repeating openwork creates a beautiful floral-fan effect while keeping the accessory lightweight and comfortable.
The decorative center is worked back and forth in rows. Once it reaches the desired length, both ends are narrowed with simple double-crochet decreases. Long crochet ties are then added so the headband can be adjusted comfortably around the head.
The tutorial uses about 20 g of cotton yarn, a 2 mm crochet hook, and a foundation chain of 20 stitches. Pasted text
Materials
- Approximately 20 g cotton yarn
- 2 mm crochet hook
- Scissors
- Yarn needle
- Measuring tape
You can also use another lightweight yarn such as acrylic.
For the delicate lace appearance shown in the design, a smooth cotton thread or fine cotton yarn works especially well.
Skill Level
Beginner / confident beginner
You should know how to make:
- chain
- slip stitch
- single crochet
- double crochet
- double crochet decreases
- very tall crochet stitches
- working into chain spaces
Abbreviations
US crochet terminology:
ch — chain
sl st — slip stitch
sc — single crochet
dc — double crochet
dc2tog — double crochet 2 stitches together
dc3tog — double crochet 3 stitches together
sp — space
st / sts — stitch / stitches
Special Stitch — 4-Yarn-Over Tall Stitch
This extra-tall stitch creates the long open strands visible inside the lace motif.
Yarn over:
4 times
Insert the hook into the indicated stitch.
Yarn over and pull up a loop.
You should now have:
6 loops on the hook
Then repeat:
yarn over, pull through 2 loops
a total of:
5 times
One extra-tall stitch is complete.
Finished Measurements
The decorative center section is worked for approximately:
27 rows
which measures about:
27 cm / 10½ inches
Each adjustable tie begins with:
70 chains
which measures approximately:
26 cm / 10¼ inches
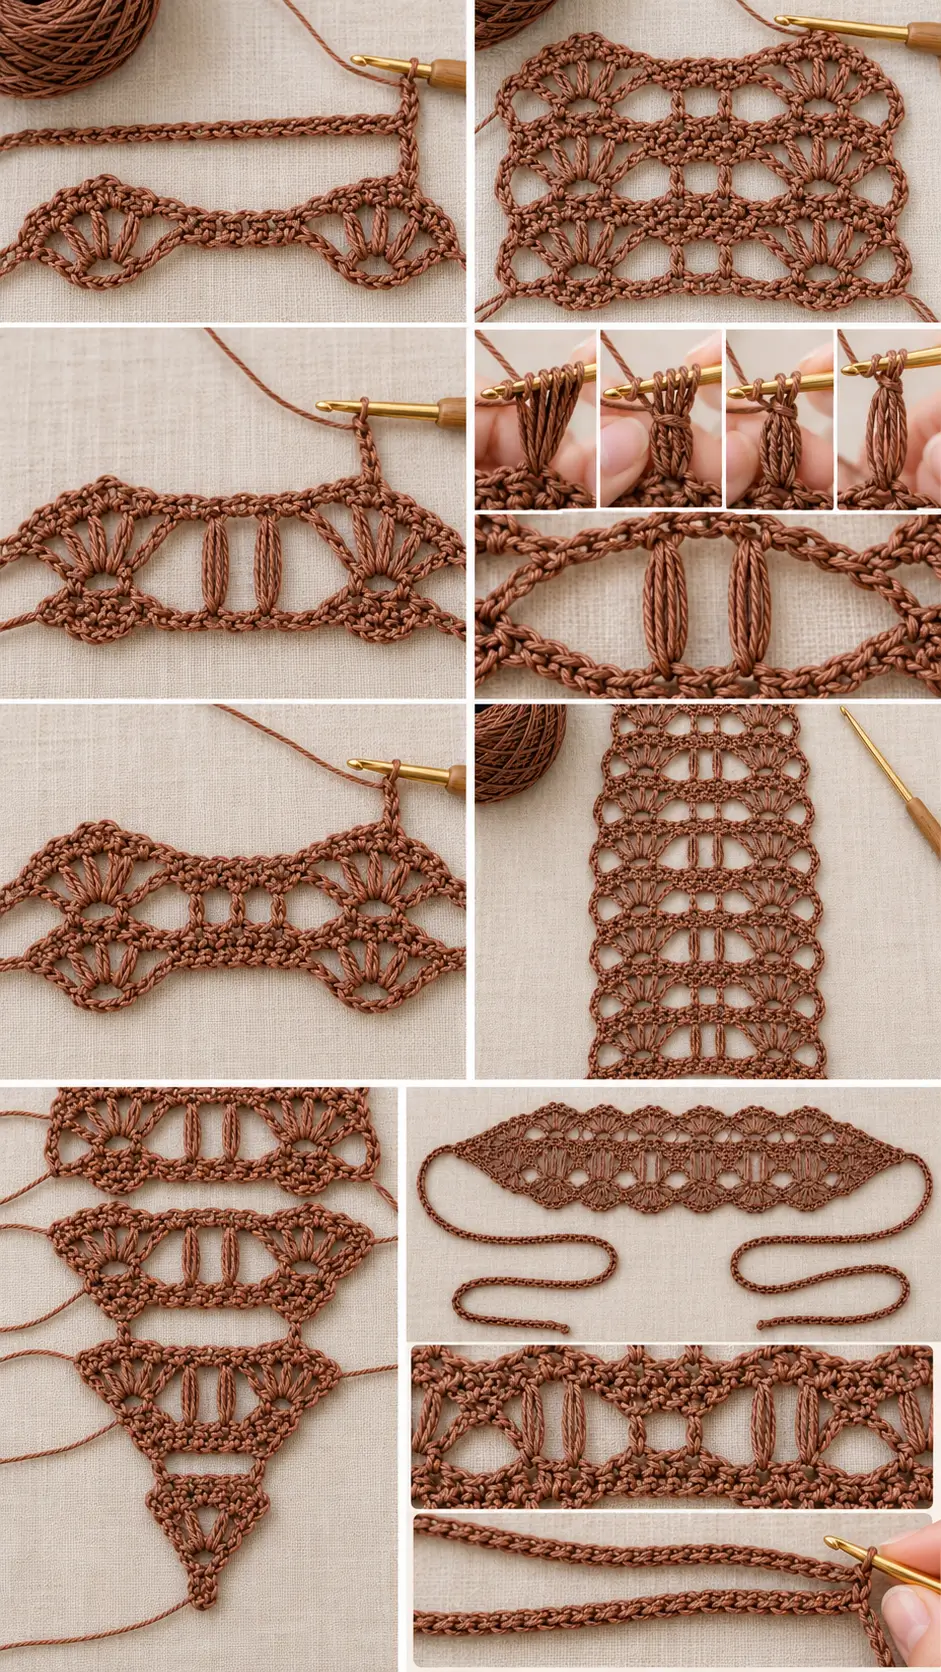
before the single crochet return row. Pasted text Pasted text
The finished headband is adjustable because the two ends are tied together.
PART 1 — FOUNDATION
Ch:
20
These 20 chains determine the width of the lace headband.
Row 1
Skip the first:
3 chains
The skipped chains form the height at the beginning edge.
In the:
4th chain from the hook
work:
1 dc, ch 2, 2 dc
Together with the beginning chains, this forms the first edge shell.
Ch:
4
Skip:
5 foundation chains
Work:
1 sc in each of the next 5 chains
Ch:
4
Skip the next:
5 chains
In the final chain work:
2 dc, ch 2, 2 dc
Turn.
You now have:
- one shell at each edge
- one group of 5 sc in the center
- a ch-4 arch on each side of the center section
Row 2
Ch:
3
Turn.
In the ch-2 space of the first shell work:
2 dc, ch 2, 2 dc
Ch:
4
Work:
1 sc in each of the 5 sc
Ch:
4
In the ch-2 space of the opposite shell work:
2 dc, ch 2, 2 dc
Turn.
Row 3
Repeat Row 2:
Ch 3.
Turn.
Work:
2 dc, ch 2, 2 dc
in the first shell center.
Ch 4.
Sc in each of the next:
5 sc
Ch 4.
Work:
2 dc, ch 2, 2 dc
in the final shell center.
Turn.
The edge shells remain the same throughout the lace panel. Pasted text
Row 4 — Open Tall-Stitch Row
Ch:
3
Turn.
Work:
2 dc, ch 2, 2 dc
in the first shell ch-2 space.
Ch:
5
Across the 5 center sc:
Skip the first sc.
In the next sc work:
1 4-Yarn-Over Tall Stitch
Ch:
1
Skip the next sc.
In the following sc work:
1 4-Yarn-Over Tall Stitch
Ch:
5
Work:
2 dc, ch 2, 2 dc
in the final shell ch-2 space.
Turn.
This row creates the large open lace section.
Row 5 — Rebuild the 5 Single Crochets
Ch:
3
Turn.
Work:
2 dc, ch 2, 2 dc
in the first shell center.
Ch:
4
Now work five single crochets across the tall-stitch section:
1 sc in the first ch-5 space
1 sc in the first tall stitch
1 sc in the ch-1 space
1 sc in the second tall stitch
1 sc in the final ch-5 space
You should have:
5 sc
Ch:
4
Work:
2 dc, ch 2, 2 dc
in the opposite shell center.
Turn.
This restores the same center structure used at the beginning of the repeat. Pasted text
Row 6
Ch 3.
Turn.
Shell in the first ch-2 space:
2 dc, ch 2, 2 dc
Ch 4.
Sc in each of the:
5 center sc
Ch 4.
Shell in the final ch-2 space.
Turn.
Row 7
Repeat Row 6.
Row 8
Repeat the open tall-stitch row:
Shell in first ch-2 space.
Ch 5.
Skip first center sc.
Work one:
4-Yarn-Over Tall Stitch
in the next sc.
Ch 1.
Skip one sc.
Work another:
4-Yarn-Over Tall Stitch
in the next sc.
Ch 5.
Shell in final ch-2 space.
Turn.
Main Lace Repeat
Continue repeating:
Rows 5–8
The sequence is:
- rebuild 5 sc
- ordinary 5-sc row
- another ordinary 5-sc row
- open tall-stitch row
Then repeat.
This produces the repeating decorative lace motifs seen along the headband.
Length of the Center Panel
Continue until you have approximately:
27 rows total
The sample measures about:
27 cm / 10½ inches
at this point. Pasted text
You can make the decorative center slightly longer or shorter if preferred.
For the closest match to the original proportions, use the 27-row measurement.
PART 2 — SHAPE THE FIRST END
The wide lace panel now needs to narrow into a small point before the tie is added.
Turn the work.
Use slip stitches to travel across the first edge shell until you reach its center ch-2 space.
Taper Foundation Row
Ch:
3
This counts as the first dc.
Work:
3 more dc
into the same shell center.
You now have:
4 dc
Ch:
3
Move across to the ch-2 center of the opposite shell.
Work:
4 dc
into that space.
Turn.
Your shaping row now contains:
4 dc — ch 3 — 4 dc
Decrease Row 1
Ch:
3
Turn.
The ch-3 counts as the first dc.
Work:
dc2tog over the next 2 stitches
Dc in the next stitch.
Across the central ch-3 space, work:
1 dc into each of the 3 chains
Dc in the next stitch.
Work:
dc2tog over the next 2 stitches
Dc in the top of the previous turning ch-3.
You have reduced the width evenly on both sides.
Decrease Row 2
Ch:
3
Turn.
Work:
dc2tog over the next 2 stitches
Dc in each of the next:
3 stitches
Work:
dc2tog over the next 2 stitches
Dc in the top of the turning ch-3.
Turn.
Decrease Row 3
Ch:
3
Turn.
Work:
dc2tog over the next 2 stitches
Dc in the next:
1 stitch
Work:
dc2tog over the next 2 stitches
Dc in the top of the turning ch-3.
Turn.
Final Decrease Row
Ch:
3
Turn.
Work:
dc3tog over the next 3 stitches
Dc in the top of the previous turning ch-3.
The wide lace section has now tapered into a narrow end.
The original shaping also uses successive decrease rows before the adjustable tie is added. Pasted text
PART 3 — FIRST ADJUSTABLE TIE
Do not fasten off.
Ch:
70
The sample 70-chain tie measures approximately:
26 cm / 10¼ inches
You can make this chain longer if you prefer longer ties.
Return Along the Tie
Beginning in the:
2nd chain from the hook
work:
1 sc in each chain back toward the headband
Continue until you reach the tapered section.
Sl st securely into the edge of the final decrease row.
Fasten off.
The first tie is complete.
PART 4 — SECOND TAPERED END
Turn the headband around.
Join yarn at the center ch-2 space of the shell at the opposite short edge.
Repeat the same shaping.
Second Taper Foundation Row
Ch:
3
Work:
3 dc
in the same space.
You now have:
4 dc
Ch:
3
Move to the center of the opposite shell.
Work:
4 dc
in that space.
Turn.
Second End Decreases
Repeat exactly:
Decrease Row 1
Decrease once near each edge.
Decrease Row 2
Decrease once near each edge.
Decrease Row 3
Decrease once near each edge.
Final Decrease Row
Work the final central dc3tog to create the narrow end.
Keep this side identical to the first.
The tutorial repeats the same tapering construction on the second end. Pasted text
Second Tie
Ch:
70
Beginning in the 2nd chain from the hook:
Sc in every chain back toward the headband.
Sl st securely into the tapered end.
Fasten off.
Finishing
Thread all yarn tails onto a yarn needle.
Weave the ends securely through the back of the stitches.
Trim the excess yarn.
Gently shape the lace with your fingers.
Cotton yarn benefits from light blocking.
Blocking
Lightly dampen the finished headband.
Lay it flat.
Straighten the center lace section.
Open the large lace spaces gently with your fingers.
Make sure:
- both long edges are straight
- the two tapered ends match
- both ties are approximately the same length
- the decorative motifs are evenly spaced
Allow the headband to dry completely.
How to Wear the Headband
Place the decorative lace section across the top of the head.
Bring the tapered ends down behind the ears.
Take both long ties toward the back of the head.
Tie them into:
- a small bow
- a simple knot
- a loose double knot
Because the ties are adjustable, one finished headband can accommodate several head sizes.
If You Want a Wider Headband
The original:
20-chain foundation
determines the width.
For the closest visual result, keep the 20-chain construction.
Changing the starting chain requires changing the central lace layout as well, so simply using a larger hook and slightly thicker yarn is the easiest way to make the headband wider.
If You Want a Narrower Headband
Use:
- finer yarn
- a slightly smaller crochet hook
Keep the same:
20-chain foundation
This preserves the lace structure while making the entire piece more delicate.
If the Center Pulls Too Tight
Check your:
ch-4
and:
ch-5
arches.
Do not make these chains too tightly.
The open arches need enough length for the lace motifs to lie flat.
If the Lace Ruffles
Your chain arches may be too loose.
Try making the:
ch-4 and ch-5 spaces
with slightly firmer tension.
Also check that the center always returns to exactly:
5 sc
after each tall-stitch row.
If the Pattern Starts Getting Crooked
Check all three structural areas.
Every normal lace row should have:
- shell at left
- ch-4 arch
- 5 center sc
- ch-4 arch
- shell at right
Every openwork row should have:
- shell at left
- ch-5 arch
- tall stitch
- ch-1
- tall stitch
- ch-5 arch
- shell at right
Maintaining this structure keeps the headband straight.
If the Taper Looks Uneven
Decrease on both sides of every decrease row.
Do not decrease only at one edge.
The shaping should narrow symmetrically toward the center.
If the Ties Are Too Short
Add more than:
70 chains
before working back with sc.
For example:
80–90 chains
will create noticeably longer ties.
If the Ties Are Too Long
Use:
55–60 chains
instead.
Make sure both ties contain exactly the same number of chains.
Color Ideas
This lace headband looks beautiful in:
Chocolate Brown
for a warm bohemian look.
Black
for a dramatic lace accessory.
Sage Green
for a botanical style.
Warm Beige
for an elegant neutral.
Cream
for a delicate romantic look.
Dusty Rose
for a soft feminine version.
Rust
for a fall-inspired accessory.
Final Pattern at a Glance
Foundation
Ch 20
Row 1
Edge shell.
Ch 4.
5 sc
Ch 4.
Edge shell.
Rows 2–3
Shell.
Ch 4.
5 sc
Ch 4.
Shell.
Row 4
Shell.
Ch 5.
Extra-tall stitch.
Ch 1.
Extra-tall stitch.
Ch 5.
Shell.
Row 5
Shell.
Ch 4.
Rebuild:
5 sc
across the open tall-stitch section.
Ch 4.
Shell.
Repeat
Repeat the lace sequence until:
27 rows
or approximately:
27 cm / 10½ inches
First Taper
Create:
4 dc, ch 3, 4 dc
Then work successive decreases on both sides until the end narrows to approximately 3 stitches.
First Tie
Ch 70
Sc back along the chain.
Fasten off.
Second End
Repeat the same taper.
Second Tie
Ch 70
Sc back along the chain.
Fasten off.
The finished accessory should have a wide openwork lace center with repeating fan-like motifs, symmetrical tapered ends, and two long narrow crochet ties, creating the same elegant bohemian headband silhouette shown in the reference image.