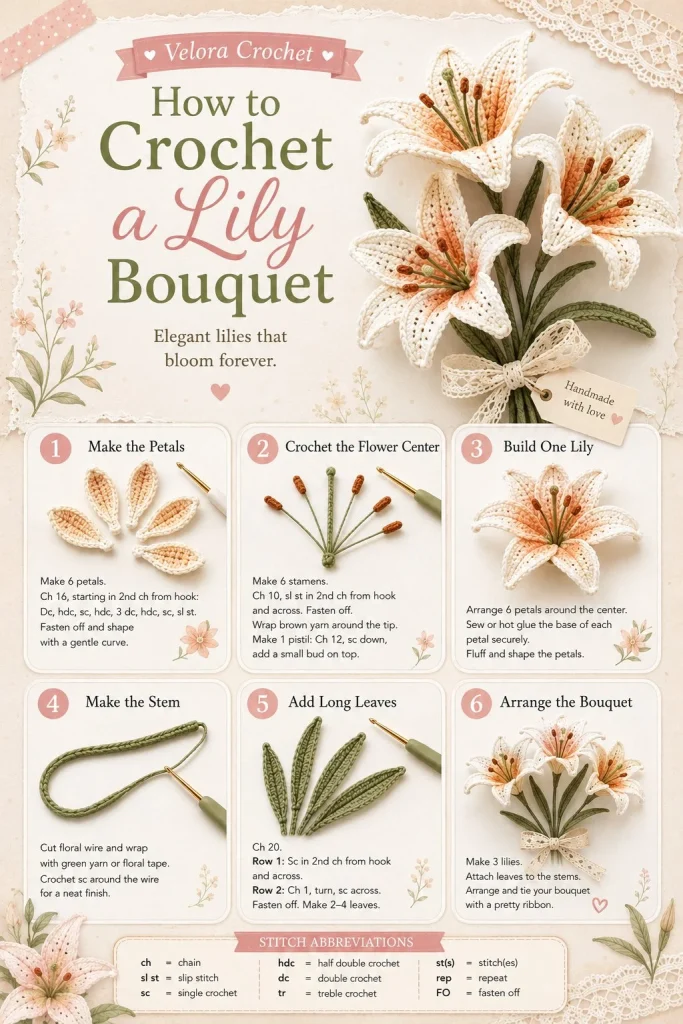
Creating a stunning lily bouquet can add a touch of elegance to any space, and with this crochet pattern, you can craft your own beautiful lilies. This project features three large, blooming lilies with curved petals, combined with lush green leaves and tall stems, ideal for displaying in a vase or gifting to a friend. The colors of ivory, blush, and pale orange give the flowers a soft and delicate appearance. If you enjoy handmade crochet projects, this pattern is a delightful way to showcase your skills and creativity.
Materials
- Crochet yarn in ivory, blush, and pale orange
- Green yarn for the leaves and stems
- Crochet hook (size recommended for your yarn)
- Scissors
- Yarn needle for weaving in ends
Abbreviations
- MR: magic ring
- ch: chain
- sc: single crochet
- hdc: half double crochet
- dc: double crochet
- inc: increase
- dec: decrease
- sl st: slip stitch
Instructions
Petals
Lily Petal: Start with a magic ring. Work 6 sc into the ring and pull tight. Join to the first sc to form a circle.
Shaping the Petals: For each petal, chain 2 and work (hdc, dc, hdc) into the same st for the first petal. Create a slight curve by adding more height with additional stitches: (2 dc in the next stitch); repeat around the ring for a total of six rounded petals. Finish with a sl st.
Flower Centers
For the centers, use the same yarn as your lily’s base to create a tight cluster. Make a small tight ball using sc, and secure it with a few rounds to ensure it stays puffy.
Stems
Using your green yarn, create a long chain to form the stem. I recommend about 12-15 chains, depending on how tall you’d like your stems. Secure it firmly and attach it to the base of your flower.
Leaves
For each leaf, crochet a simple leaf shape. Start with a foundation chain of 10. Then, for the first row, work (dc in the next 4 stitches, hdc in the next 2 stitches, sc in the last 4 stitches). For the second row, work the opposite: (sc in the next 4 stitches, hdc in the next 2 stitches, dc in the last 4 stitches). This pairs well with your flowers, giving them a realistic touch.
Assembly
After crocheting the flowers, stems, and leaves, it’s time for assembly. Attach the stems securely to the base of the flowers, ensuring each petal is nicely shaped. Distribute the leaves around the stems, either directly attached or slightly tucked in for a natural look.
To complement this project, consider adding a decorative touch such as a ribbon or vase. These flowers can also be adapted for a floral arrangement, perfect as a handmade gift or a stunning centerpiece.
Tips for the Best Result
- Check Your Tension: Ensure your tension is firm yet flexible to maintain the shape of the petals.
- Experiment with Colors: Don’t hesitate to try different colors or combinations to make your bouquet truly unique.
- Blocking: Consider blocking your flowers after finishing to help the petals lay perfectly.
- Sewing Petals: When attaching petals to flowers, be precise. Using a small amount of stuffing can give your petals more body and help with shaping.
Creating a lily bouquet with crochet is a rewarding project that can easily elevate the ambiance of your home. Enjoy the process, and don’t forget that every handmade piece has its unique flair!



