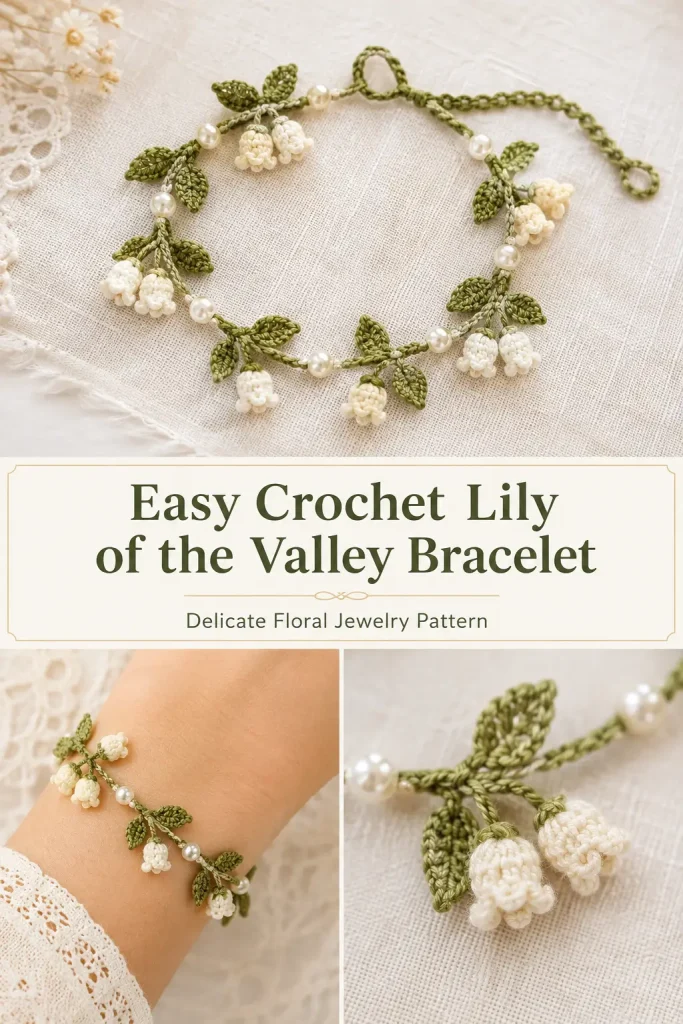
This delicate crochet flower bracelet combines a slim green vine, tiny leaves, pearl beads, and clusters of soft white bell-shaped flowers. The finished piece has a light botanical look that works beautifully as a handmade bracelet, bridal accessory, spring gift, or romantic crochet jewelry project.
The design is worked mainly with fine crochet thread so the flowers and leaves stay small and detailed. Each flower cluster is made separately and attached along a green crochet cord, with pearl beads placed between the leafy sections for the same elegant spacing seen in the inspiration.
Description
The finished bracelet features a narrow olive-green crochet vine that wraps comfortably around the wrist. Small pointed leaves grow from the vine at regular intervals, while pairs of creamy white bell flowers hang beneath selected leaf sections.
Small white pearl beads sit between the floral motifs and add a polished jewelry-style finish. One end of the bracelet has a small crochet loop, while the opposite end has an adjustable chain-style tail that can be slipped through the loop for fastening.
Materials
- Size 10 crochet cotton or fine lace-weight thread in olive green
- Size 10 crochet cotton or fine lace-weight thread in warm ivory
- 1.5–1.75 mm crochet hook
- 6–8 small white pearl beads, approximately 4–5 mm
- Yarn or embroidery needle
- Scissors
- Fine sewing needle if needed for beads
Abbreviations
- ch – chain
- sl st – slip stitch
- sc – single crochet
- hdc – half double crochet
- dc – double crochet
- st – stitch
- sp – space
Pattern Notes
US crochet terminology is used.
The bracelet is made from:
- one green foundation vine
- small paired leaves
- separate white bell flowers
- pearl beads
- one fastening loop
- one adjustable crochet tail
For an average adult wrist, make the main decorated section approximately 6.5–7 in / 16.5–18 cm before adding the fastening tail.
The sample layout uses approximately:
- 7 leafy sections
- 5 flower clusters
- 6 pearl beads
- 2 flowers per floral cluster
You can shorten or lengthen the bracelet by adding or removing complete motif sections.
Step-by-Step Instructions
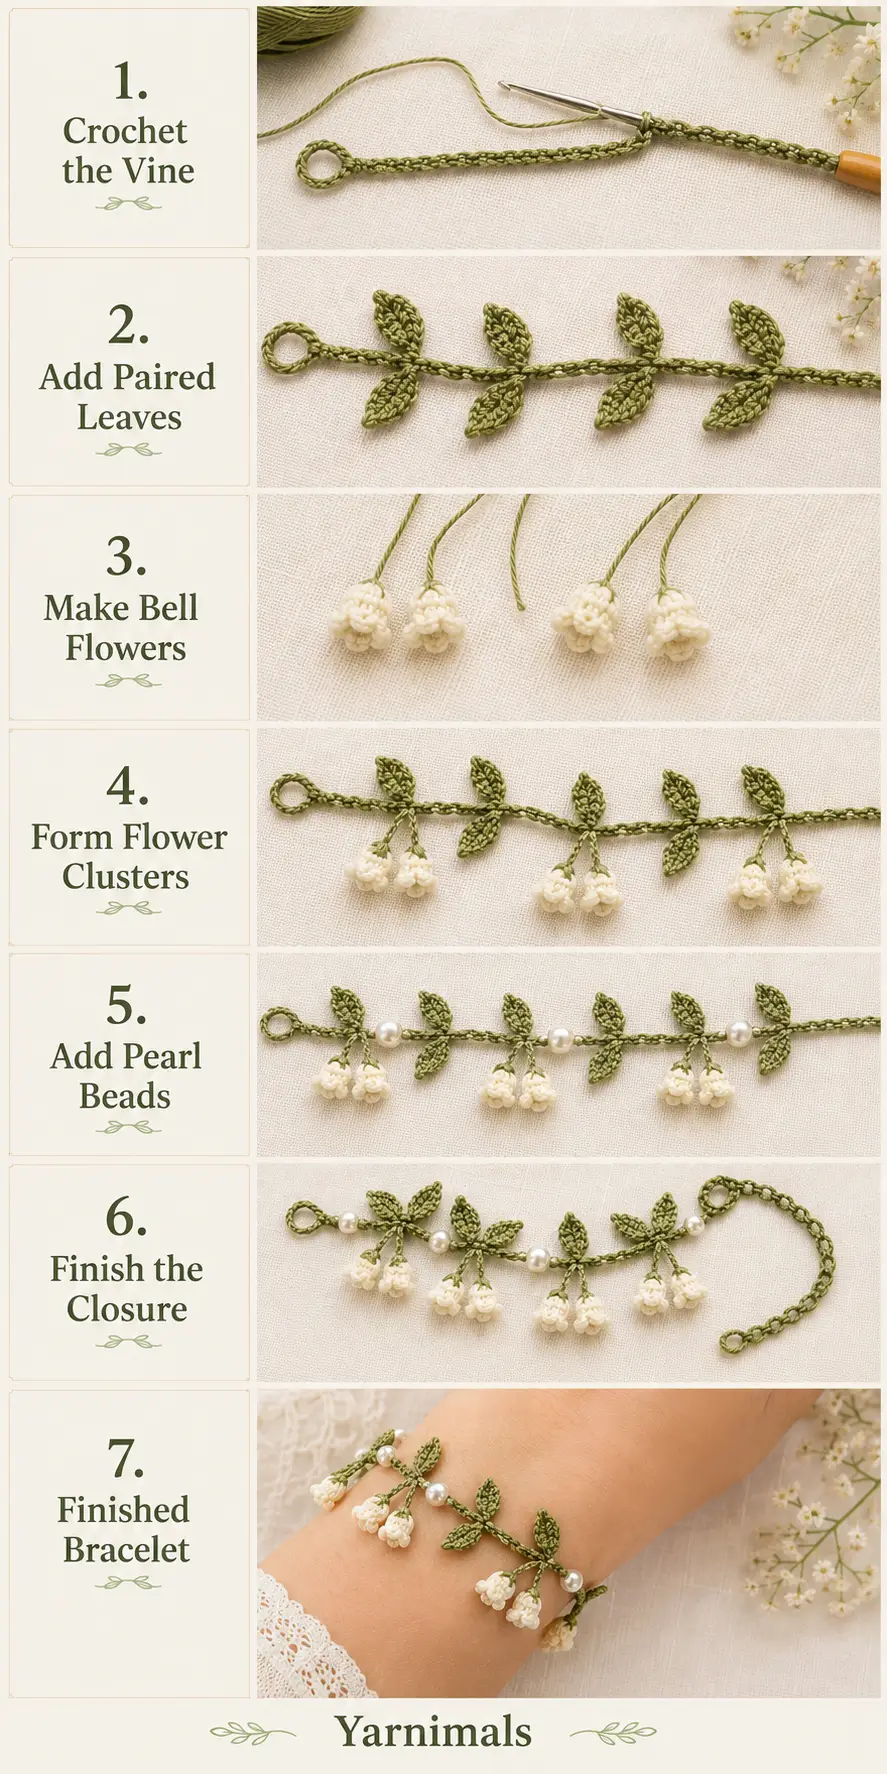
Part 1 – Crochet Foundation Vine
Using olive-green thread.
Ch 5.
Sl st into the first ch to form a small fastening loop.
Make sure the loop is large enough for the opposite end of the bracelet to pass through later.
Now ch 8.
This creates the beginning of the vine.
First Leaf Section
Ch 6.
Working back along those 6 chains:
Sl st in 2nd ch from hook.
Sc in next ch.
Hdc in next 2 ch.
Sc in next ch.
Sl st into the base of the leaf.
This creates one pointed leaf.
Second Leaf
Ch 6 again.
Repeat:
- sl st in 2nd ch
- sc in next
- hdc in next 2
- sc in next
- sl st at base
Position the second leaf so it points in the opposite direction.
You now have one paired-leaf section.
Continue the Vine
Ch 7.
This forms the spacing between motifs.
Repeat a paired-leaf section.
Continue alternating:
ch 7, paired leaves
until you have approximately 7 leafy sections.
Do not fasten off yet.
Part 2 – Pearl Placement
For the cleanest construction, add the pearl beads after crocheting the vine.
Thread a pearl onto matching fine sewing thread or green crochet thread.
Position one pearl approximately halfway between two leafy sections.
Sew securely through the crochet vine.
Repeat between selected motifs.
For the same balanced appearance, use approximately 6 pearls, with one bead between most floral sections.
Keep the pearls centered directly on the vine.
Part 3 – White Bell Flowers
Make approximately 10 flowers for 5 paired clusters.
Using ivory thread.
Flower Round 1
Make a magic ring.
Ch 1.
Work 6 sc into the ring.
Pull the ring closed.
Join with sl st.
6 sts.
Round 2
Ch 1.
Work 2 sc in each st around.
Join.
12 sts.
Round 3
Sc in every st around.
12 sts.
This begins forming the small cup shape.
Round 4 – Bell Shape
Repeat around:
sc in next st, 2 sc in next st
18 sts.
The lower edge now begins to flare.
Round 5 – Decorative Edge
Repeat:
sl st in next st, ch 2, sl st in next st
around.
This creates the softly scalloped flower opening.
Fasten off, leaving a long ivory tail for attaching.
Gently shape the flower with your fingers into a tiny downward-facing bell.
Make the remaining flowers identically.
Part 4 – Green Flower Stems
Using green thread.
Join yarn at the base of one white flower.
Ch 5.
Fasten off, leaving a tail.
This creates a short stem.
Repeat for every flower.
Part 5 – Flower Clusters
Each floral cluster uses 2 white bell flowers.
Place two flower stems together.
Using green thread, tie or stitch them together near the top.
Position the two flowers so:
- they hang downward
- one sits slightly higher than the other
- the flower openings face outward and down
Attach the joined flower stems directly beneath one paired-leaf section.
Secure firmly.
Repeat for approximately 5 leafy sections.
Leave one or two leaf sections without flowers to keep the bracelet airy.
Part 6 – Add Small Supporting Leaves
For the floral clusters, you can add one extra tiny leaf between the two stems.
Using green yarn:
Ch 5.
Sl st in 2nd ch.
Sc in next.
Hdc in next.
Sc in last.
Sl st at the base.
Secure beside the flower stems.
This gives each floral cluster the botanical look visible in the design.
Part 7 – Adjustable Tail
Return to the unfinished end of the green vine.
Ch approximately 12–16.
At the end:
Ch 5.
Sl st into the first of those 5 chains to form a tiny loop.
Continue sl st back along the adjustable chain if you want it slightly firmer.
Fasten off.
The small end loop can pass through the larger starting loop to secure the bracelet.
You can also use the chain tail itself as the fastening point to adjust the wrist size.
Optional End Flower
For an extra decorative finish, attach one tiny ivory flower bud to the end of the adjustable tail.
Make a miniature flower:
Magic ring.
Work 5 sc.
Join.
Work one round of sc.
Fasten off.
Shape gently into a small closed bud.
Attach securely at the tail end.
Assembly Check
Lay the finished bracelet flat.
Check that:
- the main vine is straight
- the pearl beads are evenly spaced
- paired leaves face slightly different directions
- flower clusters hang beneath the vine
- each flower cluster contains 2 white bells
- all flower stems are secure
- the fastening loop is usable
- the adjustable tail moves freely
Design Consistency Lock
Keep the finished bracelet consistent with this exact design:
- olive-green crochet vine
- small paired pointed leaves
- creamy-white bell flowers
- 2 flowers per cluster
- approximately 5 floral clusters
- small white pearl beads between motifs
- delicate thread-crochet construction
- small loop closure at one end
- adjustable green chain tail at the other
- no large rose
- no flat daisy
- no metal chain
- no colored flowers
- no tassels
- no bulky yarn
Tips & Variations
Use mercerized cotton crochet thread for crisp leaves and flowers.
Keep the foundation chain relatively firm so the bracelet does not stretch too much while being worn.
The flower cups should stay small. If they become too large, use a smaller hook rather than reducing the stitch count.
For an elegant bridal version, use ivory flowers with pale ivory pearls and muted eucalyptus green.
For a softer everyday version, use sage green instead of olive.
You can also make a matching anklet by adding more motif repeats before the adjustable tail.
FAQ
Can I make this crochet bracelet without beads?
Yes. Simply leave the spaces between the leaf motifs plain. The bracelet will have a more natural botanical look.
How many flowers do I need?
For an average bracelet, about 10 individual flowers arranged as 5 paired clusters gives a balanced result.
What yarn works best?
Fine crochet cotton or lace-weight thread works best. Standard DK yarn would make the flowers much larger and change the delicate jewelry-like proportions.
Conclusion
This crochet lily of the valley bracelet turns tiny flowers, leaves, and pearl accents into an elegant handmade accessory. The olive-green vine keeps the design delicate, while the ivory bell flowers and small pearls give it a soft romantic finish. Once the basic leaf and flower repeats are familiar, it is easy to adjust the length for bracelets, anklets, or other botanical crochet jewelry.




Nice design