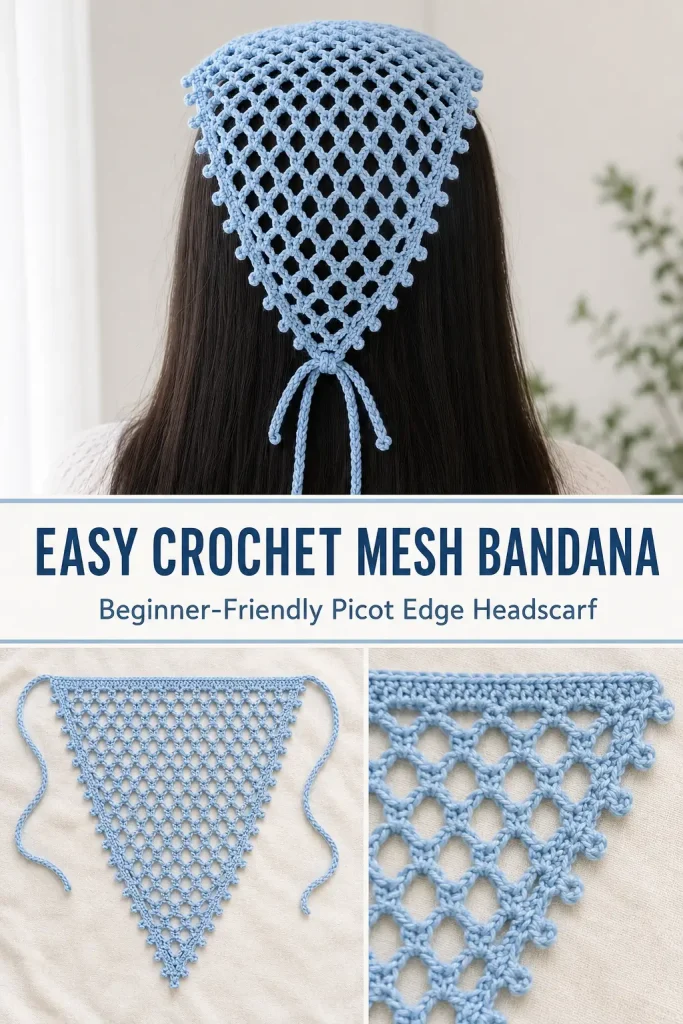
If you want a quick and stylish crochet accessory, this easy crochet mesh bandana is such a fun project to make. It works up into a light triangle shape with an airy open mesh, neat picot edging, and long crochet ties so you can adjust the fit comfortably.
This is a great beginner crochet project because the pattern repeats in a simple rhythm and can be made larger or smaller as needed. You can wear it as a headscarf, make a mini version for a child, or even turn the same idea into a cute crochet kerchief.
Description
The finished crochet bandana has a triangular shape with a pointed center back, open diamond-style mesh, and a decorative picot border along the two angled sides. The top edge is finished with simple single crochet, and both upper corners have narrow crocheted ties made from chains and slip stitches. The sample design uses soft light blue yarn, giving it a delicate airy look that works beautifully for spring and summer.
Materials
- Worsted weight yarn in your chosen color
- 3.5 mm crochet hook
- Scissors
- Yarn needle
Optional:
- Stitch markers
- Measuring tape
Abbreviations
- ch: chain
- dc: double crochet
- sc: single crochet
- sl st: slip stitch
- sp: space
- st: stitch
Pattern Notes
- This pattern uses US crochet terminology.
- The bandana is worked from the bottom point upward.
- The first section forms a growing triangle.
- Every new row begins with ch 8.
- The mesh pattern is made with chain spaces and single crochet stitches.
- Each row ends with a dc worked into the third chain of the turning chain from the previous row.
- The tie length is adjustable.
- The sample uses 40 chains for each tie.
- The border along the angled sides alternates picot sections and 2-sc sections.
- This is an easy crochet pattern and a good beginner crochet project.
Step-by-Step Instructions
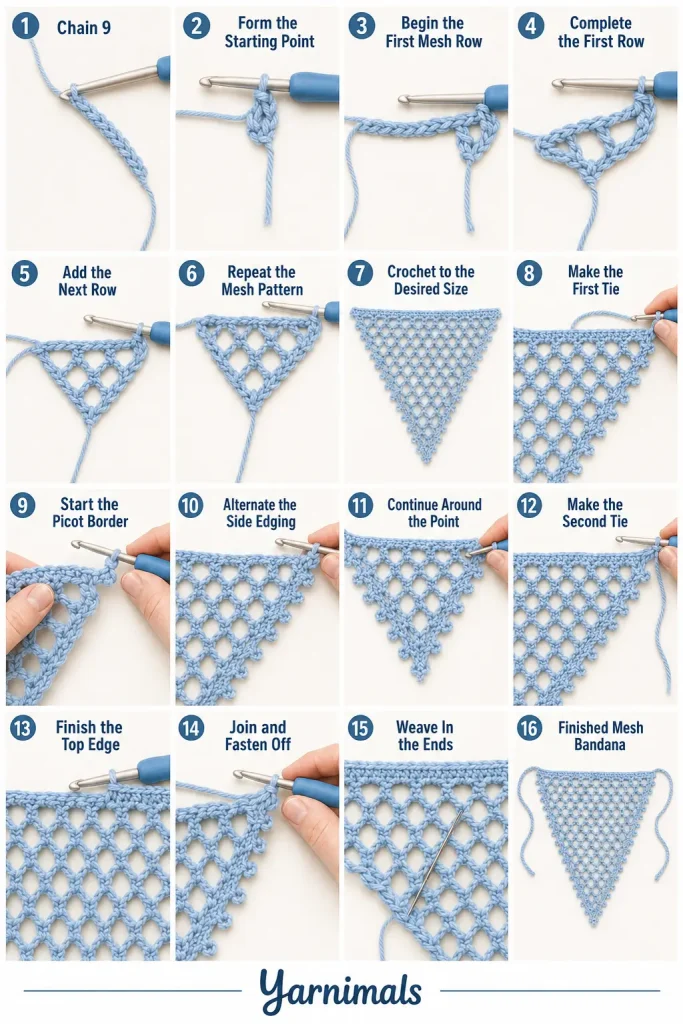
Start the Bandana
Make a slip knot and place it on your hook.
Ch 9.
Work 1 dc in the first chain you made.
This creates the starting point of the bandana.
The yarn tail marks the pointed bottom of the bandana, and the project will grow wider on the opposite side.
Bandana Body
Row 1
Ch 8.
Turn.
Work 1 sc into the space formed below the chain.
Ch 5.
Work 1 dc into the third chain up on the left side edge.
Turn.
Row 2
Ch 8.
Turn.
Work 1 sc into the first space.
Ch 5.
Work 1 sc into the next space.
Ch 5.
Work 1 dc into the third chain up on the left side edge.
Turn.
Row 3
Ch 8.
Turn.
Work 1 sc into the first space.
Ch 5.
Work 1 sc into the next space.
Ch 5.
Work 1 sc into the next space.
Ch 5.
Work 1 dc into the third chain up on the left side edge.
Turn.
Continue the Pattern
Repeat the same row pattern, always doing the following:
- Ch 8
- Turn
- Work 1 sc into the first space
- Ch 5
- Work 1 sc into each next space across
- Ch 5
- Finish with 1 dc into the third chain up on the side edge
Each new row adds one more mesh space and makes the bandana wider.
Keep repeating until the bandana is the size you want.
Sizing the Bandana
You can stop when the bandana feels wide enough for your preferred fit.
For a smaller bandana:
- Work fewer rows
For a larger bandana:
- Work more rows
A good stopping point is when the top edge is wide enough to sit comfortably across the head.
First Tie
When the bandana body is the size you want, do not fasten off.
At the end of your last row, ch 40 for the first tie.
If you want longer or shorter ties, adjust this chain length.
Starting in the second chain from the hook, work 1 sl st in each chain across until you reach the bandana again.
Picot Border Along the First Side
You will now work down the first angled side toward the point.
First Border Space
In the first space, work:
- 1 sc
- Picot
- 1 sc
Picot
To make a picot:
- Ch 3
- Work 1 sl st into the bottom of the first chain by inserting the hook under the two loops at the base of the ch-3
Next Border Space
In the next space, work:
- 2 sc
Following Border Space
In the next space, work:
- 1 sc
- Picot
- 1 sc
Next Space
In the next space, work:
- 2 sc
Repeat Along the Side
Continue repeating this border pattern down the side:
- In one space: 1 sc, picot, 1 sc
- In next space: 2 sc
Repeat all the way down to the point.
At the Point
In the last space at the point, work:
- 1 sc
- Picot
- 1 sc
Picot Border Up the Second Side
Turn your work so you can begin working up the other angled side.
Repeat the same border pattern on this side:
- In first space: 1 sc, picot, 1 sc
- In next space: 2 sc
Continue alternating:
- 1 sc, picot, 1 sc
- 2 sc
Repeat until you reach the top corner on the opposite side.
Second Tie
At the top corner, ch 40 for the second tie.
Starting in the second chain from the hook, work 1 sl st in each chain across until you return to the bandana.
Finish the Top Edge
Now work across the top, widest edge of the bandana.
Work 3 sc into each top space all the way across.
When you reach the end, join with a sl st to the first stitch.
Ch 1.
Fasten off.
Weave in the Ends
Cut the yarn and pull the tail through.
Use a yarn needle to weave in:
- The starting tail at the point
- The final tail
- Any other loose ends
Trim neatly.
Quick Pattern Summary
Bandana Body Repeat
Every row:
- Ch 8
- Turn
- Sc in first space
- Ch 5
- Sc in each space across, with ch 5 between
- End with dc in third chain up
Side Border Repeat
Alternate:
- Space A: sc, picot, sc
- Space B: 2 sc
Top Edge
- 3 sc in each top space across
Ties
- Ch 40
- Sl st back in each chain from second chain from hook
Tips & Variations
Cotton yarn will give the bandana a softer drape and a slightly more breathable finish.
Acrylic yarn works well too and helps the project hold its shape nicely.
If your bandana feels too stiff, try a slightly larger hook.
If your mesh looks loose and uneven, try keeping the chain tension more consistent.
You can make this bandana in neutral shades for everyday wear, or in pastel colors for a softer look.
Try longer ties if you want to wrap them around and tie at the front.
You can also skip the picot edging for a simpler finish, but the picots add a really pretty decorative touch.
FAQ
Is this crochet bandana beginner friendly?
Yes. This is a beginner-friendly crochet pattern using simple stitches like chain, single crochet, double crochet, and slip stitch.
How do I make the bandana bigger?
Keep repeating the mesh row pattern until the triangle is as wide as you want.
Can I use cotton yarn?
Yes. Cotton yarn works very well for this project and gives the bandana a nice soft drape.
Conclusion
This easy crochet mesh bandana is a simple and pretty project that works up into a lightweight accessory you can wear again and again. The open mesh body, picot edging, and long ties give it a delicate handmade look while keeping the pattern very beginner friendly. Try it in your favorite color, save it for later, and enjoy making your own stylish crochet bandana.



