Easy Crochet Mesh Tote Bag Pattern – Beautiful Everyday Shoulder Bag
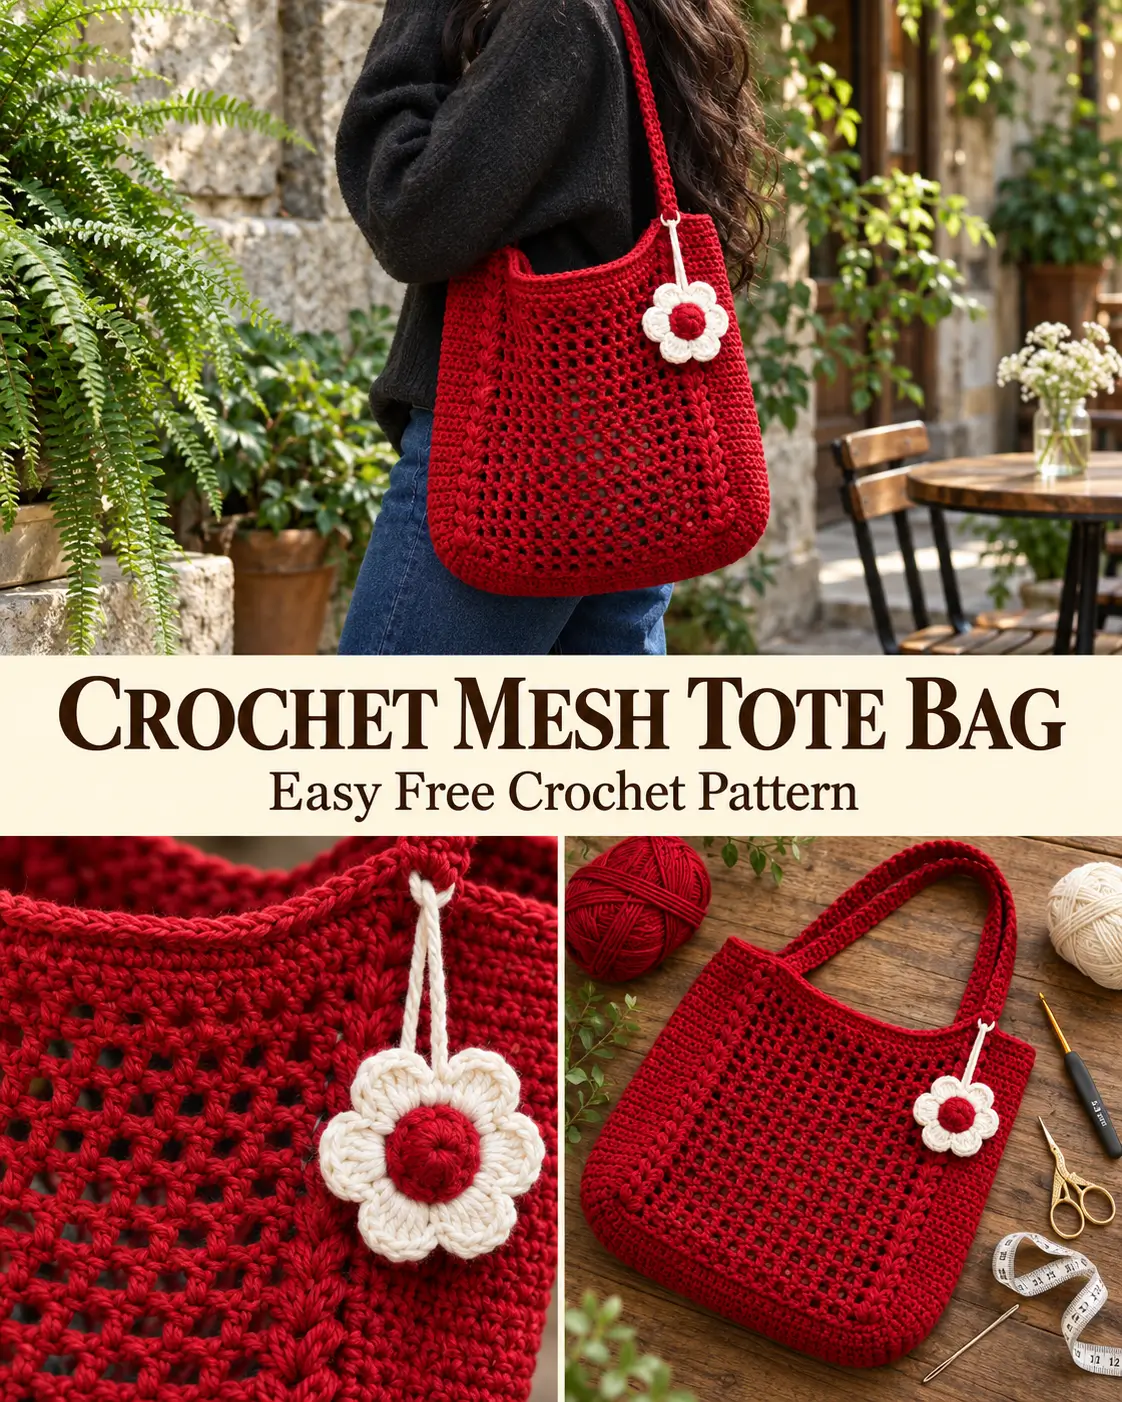
If you love crochet bags that are both stylish and practical, this beautiful crochet mesh tote bag is a wonderful project to try. With its rich cranberry-red color, airy mesh texture, comfortable shoulder strap, and adorable flower charm, this handmade bag has everything you need for a cute everyday accessory.
The design features a sturdy rectangular crochet base, decorative openwork panels, and denser side sections that help the bag maintain its shape. A single crocheted shoulder strap gives it a relaxed, casual appearance, while a sweet ivory flower with a red center adds the perfect finishing touch.
This crochet bag looks especially beautiful in deep cherry red or cranberry-colored cotton yarn. The rich color creates a lovely contrast with the delicate cream flower, making the finished tote stand out without needing complicated decorations.
Although the mesh texture looks detailed, the construction uses basic crochet stitches and simple repeating rounds.
In this step-by-step tutorial, you’ll learn how to crochet the rectangular base, build the mesh bag body, finish the upper edge, create a strong shoulder strap, and make the decorative flower charm.
Whether you’re making a bag for yourself, preparing a handmade gift, or looking for a fun crochet accessory project, this mesh tote is a lovely choice.
Why You’ll Love This Crochet Mesh Tote Bag
This project combines beautiful design with everyday usefulness.
- Pretty openwork texture: The repeating mesh pattern creates a lightweight, airy fabric.
- Sturdy rectangular base: A solid crochet bottom gives the bag a more structured shape.
- Beautiful cranberry-red color: Rich red cotton yarn makes the design eye-catching and versatile.
- Comfortable shoulder strap: One long crocheted strap allows the bag to hang naturally at your side.
- Adorable flower decoration: A small ivory flower with a matching red center adds personality.
- Customizable dimensions: Adjust the bag height and strap length to suit your preferences.
- Practical handmade accessory: Ideal for carrying lightweight daily essentials.
The best part is that the mesh pattern becomes easy to remember once you’ve completed the first few rounds.
Crochet Mesh Tote Bag Pattern Details
Skill level: Adventurous beginner to intermediate
Crochet terminology: US terms
Construction: Rectangular base with mesh body worked in joined rounds
Recommended yarn: Worsted-weight (#4) cotton
Main color: Deep cranberry red
Accent color: Soft ivory white
Crochet hook: 4.5 mm (US 7), or size needed for your preferred fabric density
Approximate finished width: 9.5–11 inches
Approximate finished body height: 10–12 inches
Approximate base depth: 3 inches
Shoulder strap length: Adjustable, approximately 28–34 inches before attachment
Foundation chain: 36
Foundation row stitches: 35
Base rows: 12
Base perimeter: 98 stitches
Main techniques: Single crochet, double crochet, chain spaces, and slip stitch
The dimensions are estimates rather than guaranteed measurements. The finished size will depend on your yarn, tension, and hook size.
Materials You’ll Need
Gather the following supplies before beginning:
- Approximately 450–650 yards of medium-weight cotton yarn in cranberry red
- A small amount of ivory cotton yarn for the flower petals and hanging cord
- Small additional amount of red yarn for the flower center
- 4.5 mm crochet hook
- Scissors
- Yarn needle
- Stitch markers
- Measuring tape
- Optional lightweight fabric lining
Choosing the Best Yarn
For a crochet tote bag, cotton yarn is an excellent choice because it offers stitch definition and a relatively sturdy fabric.
Choose a smooth, medium-weight cotton yarn that holds its shape without feeling overly stiff.
A deep cranberry red, cherry red, or burgundy shade creates a beautiful everyday handbag.
If you prefer a softer appearance, you can also use dusty rose, chocolate brown, warm cream, or muted olive green.
However, the cranberry-red version is particularly attractive with its contrasting ivory crochet flower.
For the decorative flower, choose cotton yarn of similar thickness.
This helps the flower retain its shape and gives the finished bag a coordinated appearance.
Crochet Abbreviations
| Abbreviation | Meaning |
|---|---|
| ch | Chain |
| sl st | Slip stitch |
| sc | Single crochet |
| dc | Double crochet |
| st / sts | Stitch / stitches |
| sp | Space |
| rep | Repeat |
| RS | Right side |
| WS | Wrong side |
Important Pattern Notes
Before starting, read these instructions carefully.
- The rectangular base is worked flat in turned rows.
- After completing the base, you will crochet around all four edges to create a 98-stitch perimeter.
- The bag body is worked in joined rounds without turning.
- The beginning chain 1 and chain 2 do not count as stitches.
- The mesh front and back sections use alternating double crochet and chain-one spaces.
- The narrower side sections use solid double crochet stitches for additional structure.
- Each completed mesh round maintains 98 stitch positions, counting both double crochet stitches and chain-one spaces.
- The shoulder strap is crocheted separately and sewn securely to opposite sides of the bag.
- The decorative flower is made separately and attached near one strap connection.
Step-by-Step Instructions
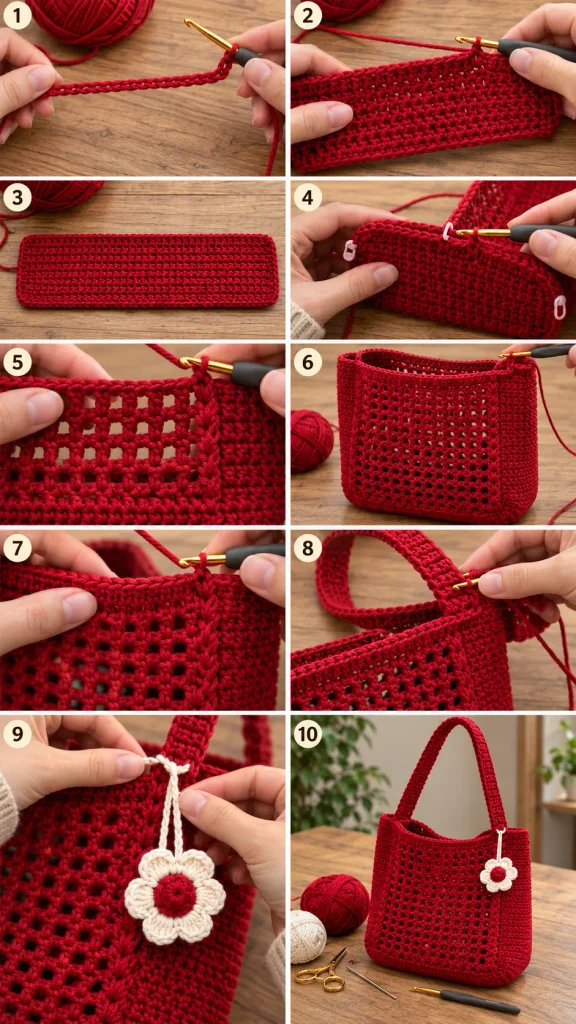
Part 1: Crochet the Rectangular Bag Base
The bottom of the bag is a flat rectangle made entirely with single crochet stitches.
This creates a sturdy foundation before the open mesh begins.
Step 1 – Make the Foundation Chain
Using your cranberry-red yarn and 4.5 mm crochet hook:
Chain 36.
Make the chain with comfortable, even tension.
Avoid pulling the stitches too tightly, as this can cause the base to curve inward.
Row 1 – First Single Crochet Row
Insert your hook into the second chain from the hook.
Work 1 single crochet.
Continue working 1 sc into every remaining chain.
When you reach the end, chain 1 and turn.
Stitch count: 35 sc.
You should now have a narrow rectangular strip.
Row 2 – Continue the Base
Work 1 sc into each of the 35 stitches across.
Chain 1 and turn.
Stitch count: 35 sc.
Rows 3–11 – Build the Rectangle
Repeat Row 2.
Work 1 single crochet into every stitch across.
Chain 1 and turn after each row.
Maintain 35 stitches throughout.
Row 12 – Complete the Base
Work 1 sc into every stitch across.
Stitch count: 35 sc.
Do not chain 1 or turn after this row.
Do not fasten off.
You have now completed 12 rows of single crochet.
The finished rectangle may measure approximately 9.5 inches long and 3 inches wide, although your measurements will vary with gauge.
This rectangle forms the bottom of the tote bag.
Part 2: Crochet Around the Base
The next step transforms the flat rectangle into the foundation for a three-dimensional bag.
You’ll work around all four edges without turning the fabric.
Step 2 – Crochet the Perimeter
With the working yarn still attached at the end of Row 12, rotate the rectangle clockwise so you can begin working down the first short edge.
Perimeter Round 1:
First short side:
Work 2 sc into the end of Row 12 at the first corner.
Work 1 sc into the end of each of the remaining 11 rows.
You now have 13 stitches along this short side.
First long side:
At the next corner, work 2 sc into the first available unused foundation-chain loop.
Work 1 sc into each of the remaining 34 foundation-chain positions.
You now have 36 stitches along this long side.
Second short side:
Work 2 sc into the end of the first row encountered at the next corner.
Work 1 sc into each of the remaining 11 row ends.
You now have 13 stitches along this short side.
Second long side:
Work 2 sc into the first stitch of Row 12 at the next corner.
Work 1 sc into each of the remaining 34 stitches along the top of Row 12.
You now have 36 stitches along this long side.
Join with a slip stitch into the first single crochet of the round.
Total stitch count: 98 sc.
The perimeter is divided into four sections:
| Section | Stitches |
|---|---|
| First short side | 13 |
| First long side | 36 |
| Second short side | 13 |
| Second long side | 36 |
| Total | 98 |
Place stitch markers at the beginning of each section.
These markers will help you locate the solid side panels and open mesh sections.
Step 3 – Stabilize the Bottom Edge
Perimeter Round 2:
Chain 1.
Work 1 sc in each of the 98 stitches around.
Join with a slip stitch.
Stitch count: 98 sc.
Your bag should now begin forming a shallow oval-cornered rectangular base with a firm outside edge.
Do not turn your work.
The next section begins the vertical walls.
Part 3: Crochet the Mesh Tote Bag Body
The body combines open mesh panels with solid side strips.
The two long sides of the base become the front and back of the bag, while the two shorter sides become denser side panels.
This construction creates the airy appearance of a mesh tote while keeping the edges more structured.
Step 4 – Make the First Mesh Round
Body Round 1
Chain 2. The beginning chain does not count as a stitch.
First solid side panel:
Work 1 dc in each of the next 13 stitches.
First mesh panel:
Repeat the following sequence 18 times:
Work 1 dc in the next stitch, chain 1, skip the following stitch.
The first mesh panel now contains 18 double crochet stitches and 18 chain-one spaces.
Second solid side panel:
Work 1 dc in each of the next 13 stitches.
Second mesh panel:
Repeat:
1 dc in the next stitch, ch 1, skip the next stitch.
Repeat 18 times.
Join with a slip stitch into the first double crochet of the round.
Stitch Count Check
You should have:
- 13 dc along the first side
- 18 dc and 18 ch-1 spaces across the front
- 13 dc along the opposite side
- 18 dc and 18 ch-1 spaces across the back
Total: 62 double crochet stitches and 36 chain-one spaces, giving 98 stitch positions.
The mesh openings should be small and evenly spaced.
Step 5 – Continue the Mesh Pattern
Body Round 2
Chain 2.
Work 1 dc into each of the 13 double crochet stitches along the first solid side panel.
Across the first mesh panel:
Work 1 dc into the next double crochet, chain 1, and skip the following chain-one space.
Repeat across all 18 mesh units.
Work 1 dc into each of the next 13 double crochet stitches along the second solid side panel.
Across the remaining mesh panel:
Work 1 dc into the next double crochet, chain 1, and skip the following chain-one space.
Repeat across all 18 mesh units.
Join with a slip stitch into the first double crochet.
Stitch count: 62 dc and 36 ch-1 spaces.
Why This Creates Mesh Texture
Each new double crochet sits directly above a double crochet from the previous round.
The chain-one stitches create the open spaces between them.
As the rounds accumulate, these small openings form a repeating mesh grid.
The solid side panels remain denser because they contain ordinary double crochet stitches rather than chain spaces.
Step 6 – Build the Bag Walls
Body Rounds 3 and Onward
Repeat Body Round 2.
Continue maintaining:
13 solid dc – 18 mesh units – 13 solid dc – 18 mesh units.
Join each round neatly.
Use stitch markers to identify where the solid sections begin and end.
Continue until the bag reaches your preferred body height.
For a medium-sized shoulder tote, a useful target is approximately 10–11 inches from the bottom edge to the beginning of the upper rim.
This may take approximately 25–30 mesh rounds, depending on gauge.
Do not fasten off when the bag reaches the desired height.
Check the Shape
Lay the bag flat.
The front and back should contain evenly spaced mesh openings.
The narrower side panels should be more solid.
The bottom corners should remain gently rounded.
If the mesh openings appear unusually large, your tension may be too loose.
If the fabric feels stiff, try a slightly larger hook.
Part 4: Crochet the Upper Bag Edging
A firm upper edging gives the opening a neater appearance and helps support the shoulder strap.
This section is worked with single crochet stitches.
Step 7 – First Upper Border Round
Upper Border Round 1
Chain 1.
Work 1 sc into each of the 13 double crochet stitches along the first solid side panel.
Across the first mesh panel, work:
1 sc into the next double crochet, 1 sc into the next chain-one space.
Repeat 18 times.
Work 1 sc into each of the 13 double crochet stitches along the opposite side panel.
Across the second mesh panel, repeat:
1 sc into the next double crochet, 1 sc into the next chain-one space.
Repeat 18 times.
Join with a slip stitch into the first sc.
Stitch count: 98 sc.
This round fills the open chain spaces and creates a solid foundation for the top border.
Step 8 – Strengthen the Opening
Upper Border Round 2
Chain 1.
Work 1 sc into each stitch around.
Join with a slip stitch.
Stitch count: 98 sc.
Upper Border Round 3
Chain 1.
Work 1 sc into every stitch around.
Join with a slip stitch.
Stitch count: 98 sc.
Upper Border Round 4
Chain 1.
Work 1 sc into each stitch around.
Join with a slip stitch.
Stitch count: 98 sc.
Fasten off and weave in the yarn tail.
You should now have a neat, sturdy upper rim.
This edging also provides a stronger surface for attaching the shoulder strap.
Part 5: Crochet the Shoulder Strap
The bag uses one long shoulder strap connected to opposite sides of the upper opening.
A dense single crochet strap is more suitable for supporting a bag than a loose mesh strap.
Step 9 – Make the Strap
Using cranberry-red yarn:
Chain 6.
Strap Row 1
Work 1 sc in the second chain from the hook.
Continue working 1 sc into each remaining chain.
Chain 1 and turn.
Stitch count: 5 sc.
Strap Row 2
Work 1 sc into every stitch across.
Chain 1 and turn.
Stitch count: 5 sc.
Strap Rows 3 and Onward
Repeat Row 2 until the strap reaches your desired length.
For a shoulder bag, approximately 28–34 inches is a useful starting range.
Try the strap against your shoulder before fastening off to decide the most comfortable finished length.
Keep the stitches firm and even.
Cotton yarn can stretch under weight, so avoid making the strap unnecessarily long.
Finishing the Strap
When the strap reaches your preferred length, fasten off, leaving a long tail at each end for sewing.
For a more structured finish, you can work a row of slip stitches along both long edges of the strap using additional yarn.
Keep these slip stitches relaxed enough that they do not shorten or distort the strap.
Step 10 – Attach the Shoulder Strap
Lay the bag flat with the front facing you.
Locate the center of each narrow solid side panel.
Place one short end of the strap against the inside of the first side panel, approximately 1–1.5 inches below the upper rim.
The strap should overlap several rows of the solid crochet fabric.
Using a yarn needle and matching yarn, sew the strap securely into position with multiple passes.
Stitch across its width and along both sides of the overlapping section.
Next, attach the opposite end to the center of the other narrow side panel.
Make sure the strap is not twisted before sewing.
Important Strap Tips
The strap needs to be attached securely because it will carry the weight of the bag’s contents.
Reinforce both attachment points with additional stitching.
Check that the strap hangs evenly.
Gently pull on the handle to check the connections before using the bag.
For heavier use, consider reinforcing the strap with nonstretch fabric tape or a suitable lining.
Part 6: Crochet the Decorative Flower Charm
One of the prettiest details of this tote bag is the small ivory crochet flower with a matching cranberry-red center.
The flower hangs near the upper side of the bag, adding a sweet handmade accent.
We’ll make a simple five-petal flower.
Step 11 – Make the Flower Center
Using cranberry-red yarn:
Create a magic ring.
Chain 1.
Work 10 sc into the ring.
Pull the yarn tail to close the center.
Join with a slip stitch into the first sc.
Stitch count: 10 sc.
Fasten off the red yarn.
The small circle will become the center of the flower.
Step 12 – Crochet the Ivory Flower Petals
Join ivory yarn into any stitch of the red center.
The flower has five petals, and each petal uses two stitches from the red center.
Repeat the following sequence five times:
- Work 1 sl st into the first stitch of the next two-stitch pair.
- Chain 2.
- Work 3 dc into the second stitch of the pair.
- Chain 2.
- Work 1 sl st into that same second stitch.
Move directly to the next unused pair of stitches and repeat.
After completing five petals, fasten off.
Weave in the ends, leaving one secure tail if needed for attaching the flower.
You should now have a small ivory flower with five rounded petals surrounding the red center.
Shape the Flower
Lay the flower flat.
Gently spread each petal with your fingers.
Make sure the red center remains visible between the cream petals.
The petals may curl slightly depending on your tension.
This is normal for a dimensional crochet flower.
Part 7: Make the Hanging Flower Cord
Step 13 – Crochet the Cord
Using ivory yarn:
Chain 18.
Check the cord length against the upper side of the bag.
If you prefer the flower to hang lower, add several more chains.
For a shorter charm, use fewer chains.
Fasten off, leaving a yarn tail at each end.
This simple chain becomes the hanging cord.
Step 14 – Attach the Flower to the Cord
Using one yarn tail, securely sew one end of the ivory chain to the back of the flower near its upper petal.
Reinforce the attachment with several small stitches.
Then place the flower near one upper corner of the tote bag, close to where the shoulder strap is attached.
Use the remaining cord tail to sew the cord securely to the bag’s upper rim.
The flower should hang naturally outside the bag.
Avoid attaching it where it could interfere with the bag opening or shoulder strap.
Part 8: Finish the Crochet Mesh Tote Bag
Step 15 – Weave in All Yarn Ends
Turn the bag inside out.
Use a yarn needle to weave any remaining yarn tails securely into nearby stitches.
Pay special attention to the strap attachment points.
Trim any excess yarn only after the ends are securely woven in.
Turn the bag right side out again.
Step 16 – Check the Finished Bag
Place the bag upright on a flat surface.
Gently straighten the mesh panels with your fingers.
Check that the upper rim lies evenly.
Confirm that the shoulder strap is attached securely and is not twisted.
Arrange the ivory flower so it hangs naturally near the upper side.
Your crochet mesh tote bag is now complete.
How to Customize Your Crochet Mesh Tote Bag
One of the best things about this pattern is how easily it can be adjusted.
Make the Bag Taller
To create a deeper tote, continue the mesh body rounds for additional height before adding the top border.
Keep the same solid side panels and repeating mesh sections.
Make the Bag Shorter
For a smaller shoulder bag, stop the mesh body earlier.
Add the upper border once the bag reaches your preferred height.
Change the Strap Length
A shorter strap creates a compact shoulder bag.
A longer strap creates a more relaxed fit, although the attachment points should still be checked carefully.
For a true crossbody bag, measure the required strap drop against your body before finishing.
Add a Fabric Lining
A lightweight fabric lining is useful if you plan to carry smaller belongings such as keys, makeup, or a phone.
Because the bag contains open mesh panels, small items may otherwise slip through the holes.
A lining also helps reduce stretching and gives the bag a more finished interior.
Use a lining that fits the dimensions of the crocheted body without pulling the mesh out of shape.
Beautiful Color Ideas for This Crochet Bag
Although cranberry red is a striking choice, the same bag looks lovely in several other colors.
1. Deep Cranberry Red
A rich red body paired with an ivory flower creates a charming, slightly vintage appearance.
This is especially pretty with denim jeans and neutral outfits.
2. Chocolate Brown
A warm chocolate-brown crochet bag with a cream flower has a cozy, earthy look.
3. Dusty Rose
Soft dusty rose creates a delicate, feminine bag that’s attractive for spring and summer.
4. Natural Cotton Cream
A cream-colored mesh bag with a small red flower has a clean, minimalist appearance.
5. Muted Olive Green
A muted olive-green tote with an ivory flower pairs beautifully with casual everyday clothing.
Tips for Making a Beautiful Crochet Mesh Tote
Keep Your Base Stitches Tight and Even
The base carries the weight of the bag’s contents.
A firm, evenly crocheted rectangle creates a stronger foundation.
Use Stitch Markers
Mark the transitions between the solid side panels and the mesh sections.
This makes it easier to maintain the correct stitch arrangement.
Count the Mesh Units
Each long mesh panel contains 18 repeated units.
Checking the repeats regularly prevents the mesh pattern from shifting.
Avoid Pulling the Chain Spaces Too Tight
The chain-one spaces create the decorative openings.
If you make them too tight, the fabric may feel stiff and the holes may become uneven.
Reinforce the Shoulder Strap
A bag strap experiences more tension than most decorative crochet elements.
Sew each end firmly into the solid side panels and check the attachment before use.
Consider the Bag’s Intended Use
Open mesh is attractive and lightweight, but it is not ideal for holding very small objects without a lining.
If you want to carry heavier items, reinforce the base and handles or choose a denser bag pattern.
Common Crochet Mesh Bag Problems and Solutions
Why Is My Mesh Pattern Uneven?
You may have skipped an extra stitch or worked into a chain space rather than the double crochet stitch beneath it.
Count the 18 mesh units in each front and back panel.
Why Are My Side Panels Crooked?
Check that you’re working 13 double crochet stitches into each solid side section in every round.
Use stitch markers to locate the panel boundaries.
Why Is My Bag Stretching Too Much?
Cotton crochet fabric can stretch under weight, particularly when it contains open mesh.
Try using a smaller hook for a denser fabric, reinforcing the strap, or adding a lining.
Why Is My Upper Edge Wavy?
You may have added extra stitches while working the top border.
The first border round should contain 98 single crochet stitches.
Why Is My Shoulder Strap Curling?
The stitches may be too tight, or the strap edges may have been reinforced unevenly.
Maintain even tension and check that both long edges are the same length.
Why Is My Flower Not Hanging Correctly?
The hanging cord may be attached too tightly or positioned too close to the strap.
Allow a little room for the flower to hang freely.
Frequently Asked Questions
Is This Crochet Mesh Tote Bag Beginner-Friendly?
This pattern is suitable for adventurous beginners who understand single crochet, double crochet, chains, and slip stitches.
The rectangular base is straightforward, while the mesh sections require careful counting.
How Much Yarn Do I Need?
Approximately 450–650 yards of worsted-weight cotton is a planning allowance for the suggested size.
Actual yarn consumption depends on your gauge, bag height, and shoulder strap length.
Can I Use Acrylic Yarn?
Yes, but cotton is generally preferable for a structured everyday tote.
Acrylic yarn may stretch or change shape differently under weight.
Can I Make This Bag Without the Flower?
Absolutely.
The flower is decorative and does not affect the main bag construction.
You can leave it off for a minimalist look.
Can I Make This Bag Larger?
Yes.
Increase the base dimensions, then adjust the perimeter and mesh panel counts accordingly.
Maintain an even number of stitches across each mesh panel so the double crochet and chain-one sequence fits correctly.
Can I Machine-Wash the Bag?
Follow your yarn’s care instructions.
If machine-washing is permitted, use a gentle cycle and consider placing the bag inside a laundry bag to protect the mesh and flower charm.
Reshape and dry as recommended by the yarn manufacturer.
Is This Bag Suitable for Shopping?
It can carry lightweight shopping items, but the openwork design and crocheted strap make it better suited to smaller everyday belongings unless additional reinforcement is added.
For carrying heavy groceries, use a bag designed specifically for that purpose.
Can I Add a Zipper?
Yes, although adding a zipper usually requires a more structured top edge or a fabric lining.
For a beginner-friendly alternative, you could add a simple button-and-loop closure, keeping the bag opening easy to access.
More Crochet Bag Projects to Try
If you enjoy this mesh tote bag, there are plenty of other handmade bag ideas worth exploring.
Try a classic granny-square shoulder bag, a textured market tote, a small crochet crossbody pouch, or a summer mesh beach bag.
You can also experiment with different straps, crochet flowers, and decorative edging techniques to give simple bag patterns a more personalized appearance.
Making several bags in different colors is a fun way to practice bag construction while creating useful handmade accessories.
Final Thoughts
This beautiful crochet mesh tote bag is a lovely combination of practical design and decorative crochet details.
The sturdy rectangular base gives the bag structure, while the open mesh panels create a lightweight, textured appearance.
Solid side sections and a neatly finished upper rim help define the shape, and the single shoulder strap makes it easy to carry.
The little ivory flower with its cranberry-red center adds a charming finishing touch that makes the bag feel extra special.
Whether you choose rich cranberry red, soft cream, dusty rose, or earthy brown, the same simple design can be customized to suit your personal style.
Once you’ve learned the basic construction, you can experiment with different bag heights, strap lengths, and decorative accents.
Grab your favorite cotton yarn and crochet hook, and enjoy making a stylish mesh tote bag that’s as fun to crochet as it is to carry!