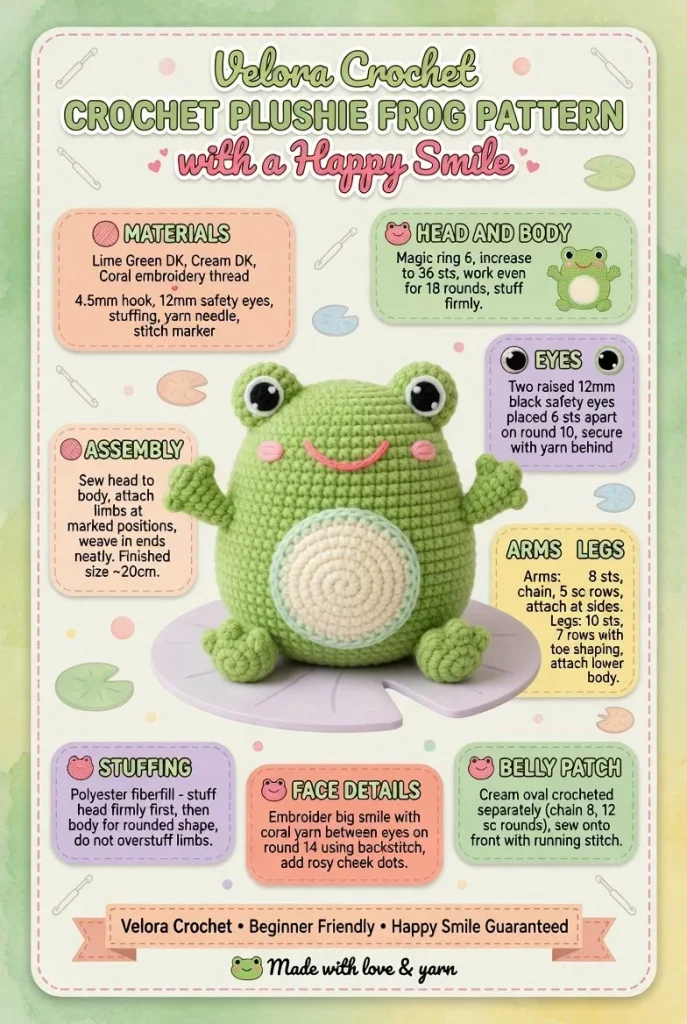
Creating a delightful plushie frog is a wonderful way to express your creativity with crochet. This project is not only beginner-friendly but also provides a chance to craft a cute, huggable toy that’s perfect for handmade gifts or playful room décor. Let’s hop into this delightful crochet pattern!
Materials
- Soft plush yarn in green and white
- Worsted weight yarn (optional for belly patch)
- Crochet hook (size G/4.0 mm)
- Yarn needle for weaving ends
- Stitch marker (optional)
- Polyester stuffing
Abbreviations
- MR: magic ring
- ch: chain
- sc: single crochet
- inc: increase
- dec: decrease
- sl st: slip stitch
Instructions
Head and Body
- Begin with a magic ring (MR) and make 6 sc in the ring. (6)
- Increase in each stitch around. (12)
- Sc in next stitch, inc in next stitch – repeat around. (18)
- Sc in next 2 stitches, inc in next stitch – repeat around. (24)
- Continue working in sc until the body measures 8 inches from the base.
- Sc in next 2 stitches, dec in next stitch – repeat around. (18)
- Stuff the head and body tightly with polyester stuffing.
- Sc in next stitch, dec in next stitch – repeat around. (12)
- Lastly, close the opening with a few more decreases and weave in the end.
Eyes
- Make 2 MR, then follow with 6 sc in each MR. (6)
- Next, increase in each stitch round to form the base of the eye. (12)
- Flatten the eye and sl st across the top to close, leaving a tail to sew to the head.
Arms
- Start with a MR and make 4 sc in it. (4)
- Work in the round for 3 rows.
- Finish off and leave a long tail for sewing to the body.
Legs
- Make 2 MR with 6 sc each. (6)
- Work in the round for 5 rows.
- Finish off and leave tails for sewing.
Belly Patch
- With white yarn, make a small MR and work 6 sc into it. (6)
- Increase to 12 stitches and work flat for about 2 inches wide before finishing off.
Face Details
To give your frog personality, embroider a happy mouth and add more details to the eyes using contrasting colors. This is a perfect chance to let your creative flair shine!
Stuffing
As you work on each piece, be sure to gently stuff them with polyester filling. A little extra ensures they maintain their shape but don’t overstuff, as it can distort the features.
Assembly
- Attach the eyes securely to the head, ensuring they’re evenly spaced.
- Sew on the arms and legs, adjusting their position for a playful stance.
- Add the belly patch to give your frog a soft contrast.
- Finally, embroider a delightful smile to complete your frog’s cheerful expression.
Tips for the Best Result
- Ensure you’re consistent with your stitch tension to keep your plushie uniform and well-shaped.
- When assembling, take your time to position the limbs and eyes symmetrically for a balanced look.
- Use stitch markers to keep track of rounds on the body, as it helps maintain accuracy.
Once you’ve completed your frog plushie, you’ll have a charming creation that’s just right for snuggles or as a whimsical decoration. Experiment with different colors and features to make each frog unique. If you’re looking for more fun projects, check out this crochet tutorial for additional inspiration. Happy crocheting!



