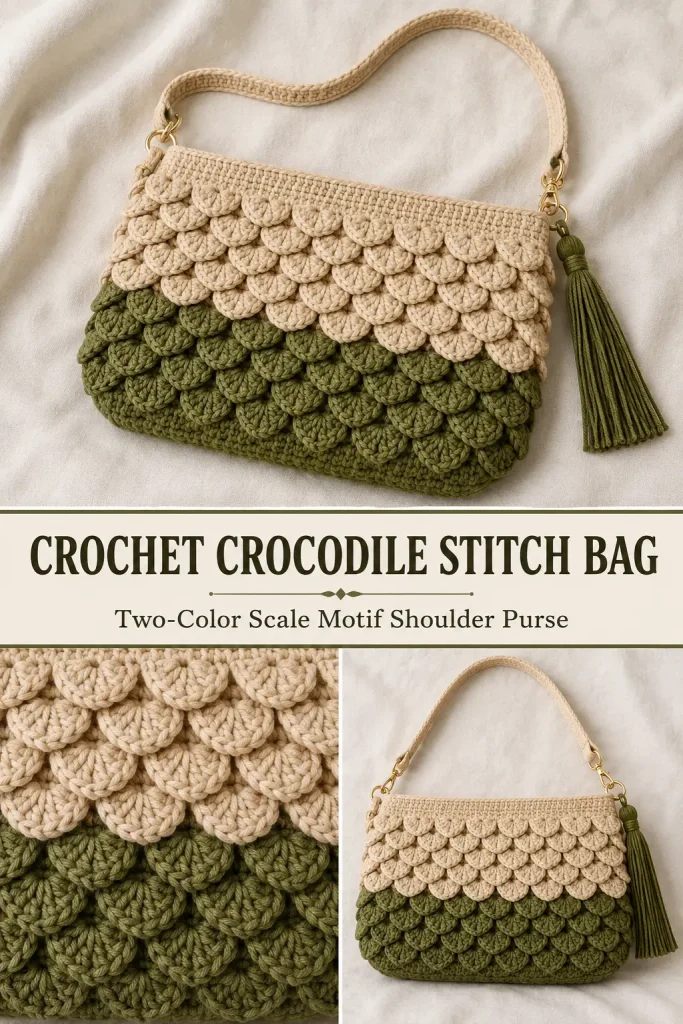
This textured crochet shoulder bag combines rows of overlapping crocodile scales with a simple oval base and a smooth upper band. The olive-green and warm beige color blocking gives the purse a natural, modern look, while the layered stitches create plenty of dimension without requiring separate decorative pieces.
The bag can be carried as a small shoulder purse, clutch, or wrist bag. A slim crochet strap attaches to metal rings at the upper corners, and a matching olive tassel adds the final decorative detail.
Description
The finished bag has a wide rectangular shape with a gently rounded base and softly structured sides. Eight rows of overlapping crocodile scales cover the main body: four olive-green scale rows along the bottom and four beige scale rows above them. A plain beige single-crochet band finishes the opening without hiding the texture. The purse includes two reinforced side tabs, removable metal hardware, a narrow crochet strap, and a long olive tassel. A hidden zipper and fabric lining may be added for a more secure everyday bag.
Materials
- Bulky Polythick-style yarn or firm cotton-blend yarn in olive green
- Bulky Polythick-style yarn or firm cotton-blend yarn in warm beige
- Approximately one ball of each color
- 5 mm crochet hook
- 4 mm crochet hook for the strap, optional
- Yarn needle
- Scissors
- Stitch markers
- Two small D-rings
- Two swivel lobster clasps for a removable strap
- One small lobster clasp for the tassel, optional
- 9-inch zipper, optional
- Cotton lining fabric, optional
- Matching sewing thread
- Hand-sewing needle
- Small magnetic snap instead of a zipper, optional
Abbreviations
- ch: chain
- dc: double crochet
- inc: work 2 stitches in the same stitch
- Rnd: round
- sc: single crochet
- sl st: slip stitch
- sp: space
- st: stitch
- sts: stitches
Special Stitch
Crocodile Scale
Each scale is worked around the two vertical posts of one double-crochet pair.
- Rotate the work so the first dc post lies horizontally.
- Work 5 dc around the first dc post, moving from the top of the post toward its base.
- Ch 1.
- Rotate the work in the opposite direction.
- Work 5 dc around the second dc post, moving from its base toward the top.
- Turn the scale toward the outside of the bag.
One completed scale contains two groups of 5 dc separated by ch 1.
Pattern Notes
- This pattern uses US crochet terminology.
- The bag is worked from the oval base upward in joined rounds.
- Do not turn unless instructed while forming the crocodile scales.
- The base finishes with 90 stitches, a number divisible by three for the mesh pattern.
- Each mesh round contains 30 double-crochet pairs.
- Each scale round contains 15 crocodile scales.
- The first four scale rows are olive green.
- The final four scale rows are warm beige.
- Ch 3 counts as the first dc.
- Ch 1 does not count as a stitch.
- Place a marker at the beginning of each round.
- The supplied project details use two yarn colors, a 5 mm hook, five-double-crochet scales, four scale rows in each color, a short strap measuring approximately 40 cm, and a tassel.
- This is an original, image-inspired construction organized into a complete count-checked pattern.
Finished Size
Using bulky yarn and a 5 mm hook:
- Width: approximately 9½–10 inches
- Height: approximately 6½–7 inches
- Base depth: approximately 2½ inches
- Short strap: approximately 16 inches or 40 cm
The finished dimensions may vary with yarn thickness and tension.
Step-by-Step Instructions
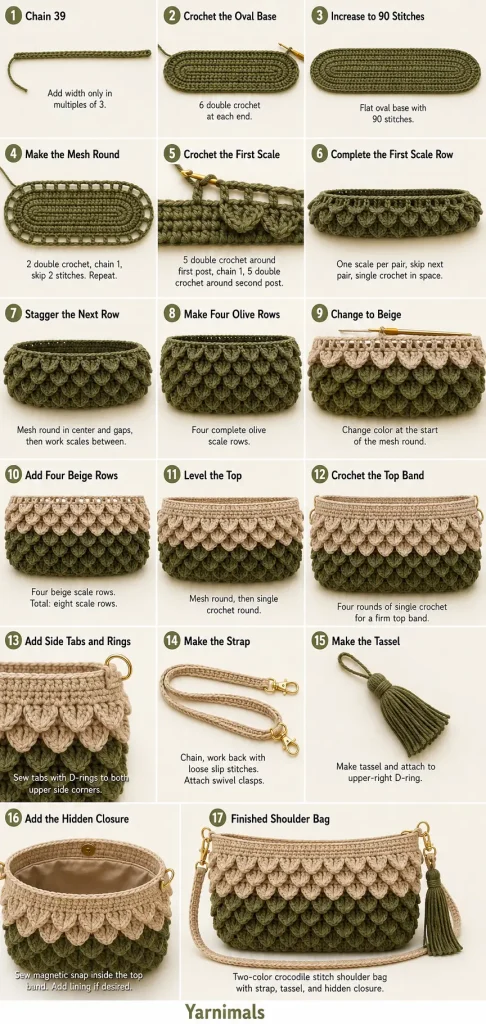
Oval Bag Base
Begin with olive-green yarn.
Foundation
Ch 39.
Round 1
The skipped ch 3 counts as the first dc.
Work 5 dc in the fourth ch from the hook. Together with the beginning ch 3, this creates 6 dc around the first rounded end.
Work 1 dc in each of the next 34 ch.
Work 6 dc in the final ch.
Rotate the foundation chain.
Working along the unused loops on the opposite side, work 1 dc in each of the next 34 ch.
Join with a sl st to the top of the beginning ch 3.
80 sts
The base should resemble a narrow oval.
Round 2
This round adds five increases around each curved end, bringing the total to 90 stitches.
Ch 3.
Work 1 additional dc in the same st.
Work 2 dc in the next st.
Work 1 dc in the next st.
Work 2 dc in each of the next 3 sts.
You have worked 11 stitches across the first six-stitch curve.
Work 1 dc in each of the next 34 sts.
Across the second curved end, work:
- 2 dc in the next st
- 2 dc in the next st
- 1 dc in the next st
- 2 dc in each of the next 3 sts
Work 1 dc in each of the final 34 sts.
Join with a sl st to the top of the beginning ch 3.
90 sts
Lay the base flat. It should remain smooth without cupping or rippling.
First Crocodile Stitch Section
Continue with olive-green yarn.
Mesh Round 1
Ch 3.
Work 1 dc in the same st.
Ch 1 and skip the next 2 sts.
Repeat around:
- Work 2 dc in the next st.
- Ch 1.
- Skip the next 2 sts.
Join with a sl st to the top of the beginning ch 3.
30 dc pairs and 30 ch-1 spaces
These paired stitches create the posts around which the scales will be worked.
Scale Round 1
Do not work into the tops of the stitches during this round.
Work the first crocodile scale around the two posts of the first dc pair:
- 5 dc around the first post
- Ch 1
- 5 dc around the second post
Skip the next dc pair.
Work 1 sc into the ch-1 space immediately after the skipped pair.
Work the next scale around the following dc pair.
Continue around, alternating:
- One crocodile scale around a dc pair
- Skip the next dc pair
- Sc in the ch-1 space after the skipped pair
Join neatly at the end of the round.
15 scales
Gently pull every scale toward the outside of the bag.
Mesh Round 2
This mesh round places the next scales between the scales from the previous row.
Sl st carefully to the ch-1 center at the top of the first scale.
Ch 3 and work 1 dc in the same space.
Ch 1.
Work 2 dc in the space between the first and second scales.
Ch 1.
Repeat around:
- 2 dc in the ch-1 center of the next scale
- Ch 1
- 2 dc in the space between that scale and the next scale
- Ch 1
Join with a sl st.
30 dc pairs
Scale Round 2
The new scales must sit between the scales from the previous row.
Move to the first dc pair positioned in the gap between two existing scales.
Work one crocodile scale around that pair.
Skip the following pair positioned in the center of an old scale.
Sc in the ch-1 space after the skipped pair.
Continue around in the same way.
15 scales
The second row should overlap the spaces between the first-row scales.
Mesh Round 3
Repeat Mesh Round 2, placing one dc pair in the center of every scale and one dc pair between every two scales.
Scale Round 3
Work the scales over the dc pairs positioned between the previous scales.
Skip the pairs positioned directly above the scale centers.
15 scales
Mesh Round 4
Repeat Mesh Round 2.
Scale Round 4
Repeat Scale Round 3.
15 olive-green scales
At this stage, the lower half of the bag should have four overlapping olive-green scale rows.
Change to Beige Yarn
After finishing Scale Round 4, fasten off the olive yarn.
Join the beige yarn in the space where the next mesh round begins.
Leave both yarn tails long enough to weave in securely.
Beige Crocodile Stitch Section
Mesh Round 5
Using beige, repeat Mesh Round 2.
Keep all 30 dc pairs aligned with the centers and spaces of the olive scales.
Scale Round 5
Work 15 beige scales in the gaps between the olive scales below.
Mesh Round 6
Repeat Mesh Round 2.
Scale Round 6
Work 15 scales.
Mesh Round 7
Repeat Mesh Round 2.
Scale Round 7
Work 15 scales.
Mesh Round 8
Repeat Mesh Round 2.
Scale Round 8
Work the final 15 beige scales.
The finished body now has:
- Four olive scale rows
- Four beige scale rows
- Fifteen scales in every row
- Alternating placement from one row to the next
Level the Top Edge
The crocodile stitch body needs a straight foundation before the plain upper band is added.
Final Mesh Round
Using beige, work one more mesh round:
- 2 dc in the center of each scale
- Ch 1
- 2 dc in each space between scales
- Ch 1
Join with a sl st.
30 dc pairs
Leveling Round
Ch 1.
Work:
- 1 sc in the first dc
- 1 sc in the second dc
- 1 sc in the following ch-1 sp
Repeat around.
Join with a sl st.
90 sc
Check that the scales face downward and remain outside the bag.
Plain Upper Band
Rounds 1–4
Ch 1.
Sc in each st around.
Join with a sl st.
90 sc
Repeat for four rounds total.
Fasten off after the fourth round.
The plain band should measure approximately ¾–1 inch high. This smooth section supports the strap tabs and optional zipper.
Side Attachment Tabs
Make two using beige yarn.
Row 1
Ch 8.
Beginning in the second ch from the hook, sc across.
Turn.
7 sc
Rows 2–4
Ch 1.
Sc in each st across.
Turn.
7 sc
Fasten off, leaving a long sewing tail.
Attach the D-Rings
Pass one tab through a D-ring.
Fold the tab in half so its short ends meet.
Position it over one upper side seam of the bag.
Sew through:
- Both tab layers
- Several stitches of the upper band
Repeat the stitching several times.
Secure the tab firmly without sewing through the scales.
Repeat on the opposite side.
Both D-rings must sit at the same height.
Crochet the Short Strap
Use beige yarn and the 4 mm hook for a slightly firmer cord.
Foundation
Ch until the chain measures approximately 40 cm or 16 inches.
Depending on tension, this may require approximately 75–90 chains.
Cord Row
Beginning in the second ch from the hook, sl st loosely in every chain.
Fasten off, leaving a long tail at both ends.
The slip-stitch row creates a slim, firm strap similar to the one shown in the finished design.
Attach the Clasps
Pass one end of the strap through a swivel clasp.
Fold approximately 1 inch of the strap back on itself.
Sew the folded section securely with the yarn tail.
Repeat at the other end.
Clip the finished strap onto the two D-rings.
For a longer shoulder or crossbody strap, make the starting chain 90–120 cm long instead of 40 cm.
Make the Tassel
Use olive-green yarn.
Cut a piece of sturdy cardboard approximately 4 inches long.
Wrap the yarn around the cardboard 35–45 times.
Cut a separate 10-inch strand of yarn.
Slide it beneath the wrapped strands along the top edge and tie a tight knot.
Remove the yarn bundle from the cardboard.
Cut through all loops at the opposite end.
Cut another strand approximately 12 inches long.
Wrap it firmly around the tassel approximately ½ inch below the top knot.
Tie securely and hide the ends inside the tassel.
Trim the lower strands evenly.
Attach the tassel to:
- One D-ring
- A small lobster clasp
- One end of the strap
The completed tassel should hang beside one upper corner of the bag.
Optional Hidden Zipper
A zipper is useful when the bag will hold a phone, keys, or other small belongings.
Choose a zipper slightly shorter than the finished opening.
Open the zipper halfway.
Turn the bag inside out.
Center one side of the zipper tape against the inner edge of the front upper band.
The zipper teeth should sit just below the top crochet edge.
Pin or clip the zipper in position.
Using matching sewing thread, sew the zipper tape to the crochet with small backstitches.
Repeat along the back edge.
Close the zipper and check that:
- Both top edges meet evenly
- The zipper is centered
- The bag does not twist
- The slider moves without catching the yarn
Secure the sewing thread firmly.
Optional Magnetic Snap
For a simpler closure, sew one half of a magnetic snap inside the center front of the upper band.
Sew the matching half directly opposite it on the back band.
Reinforce the area with a small felt or fabric patch inside the bag.
Optional Fabric Lining
Measure and Cut
Measure the inside width and height of the finished bag.
Cut two fabric rectangles using those measurements, adding ½ inch around every edge for seam allowances.
Sew the Lining
Place the fabric pieces with their right sides together.
Sew down both sides and across the bottom.
To create a small gusset, flatten one lower corner so the side seam rests directly over the bottom seam.
Mark a line approximately 1¼ inches from the point.
Sew across the marked line.
Trim the corner beyond the seam.
Repeat at the other lower corner.
Insert the Lining
Turn the lining right side out.
Place it inside the crochet bag.
Fold the raw upper fabric edge inward.
Pin it just below the top crochet band or zipper tape.
Hand-sew the lining in place with small hidden stitches.
Make sure the lining does not cover the D-ring tabs or catch in the zipper.
Final Finishing
Weave in every yarn end securely.
Check that:
- The oval base lies flat.
- Every scale points downward.
- The scale rows alternate correctly.
- The olive and beige sections contain four scale rows each.
- The upper band is level.
- Both D-rings sit at the same height.
- The strap attachments are secure.
- The tassel is trimmed evenly.
- The zipper or magnetic snap opens smoothly.
- The lining fits without pulling the crochet inward.
Lightly steam or damp-block the plain band and base.
Do not press directly on the crocodile scales, as this may flatten their raised texture.
Tips and Variations
Use firm yarn with clear stitch definition. Soft fuzzy yarn can hide the layered scale pattern.
When crocheting around a dc post, rotate the project instead of twisting your wrist. This makes the five stitches easier to position.
Count the 30 dc pairs after every mesh round. A missing pair will change the number and alignment of the scales.
Push every completed scale toward the right side immediately. This prevents the scales from becoming trapped behind later rows.
For a smaller clutch, begin with a shorter foundation chain and adjust the base to a final stitch count divisible by six.
For a wider bag, add foundation chains in multiples of three and maintain an even number of mesh pairs.
Use three scale rows in each color for a shorter purse.
Reverse the colors to create a beige lower section and olive upper section.
A single-color version highlights the crocodile stitch texture without the strong horizontal color change.
Add a small leather or fabric label to the center of the plain upper band for a polished handmade finish.
Frequently Asked Questions
Why are the scales twisting or facing inward?
The project must be rotated while working around each dc post. After completing a scale, push it toward the outside before continuing.
Why does the scale placement alternate?
The dc pairs are repositioned in the spaces between the previous scales. Working the next scales around those gap pairs creates the overlapping, tiled appearance.
Can I make the bag without metal hardware?
Yes. Crochet a longer strap and sew each end directly to the upper side seams. Sew through several rows of the plain band for a secure attachment.
Conclusion
This crocodile stitch crochet shoulder bag combines an olive oval base, eight rows of overlapping two-color scales, a smooth beige upper band, reinforced strap tabs, a narrow crochet handle, and a matching tassel. The layered texture makes the finished purse look detailed and decorative, while the count-checked construction keeps every row aligned. Make it in the olive and beige combination shown here or choose two favorite colors for a personalized handmade crochet accessory.




I love your design