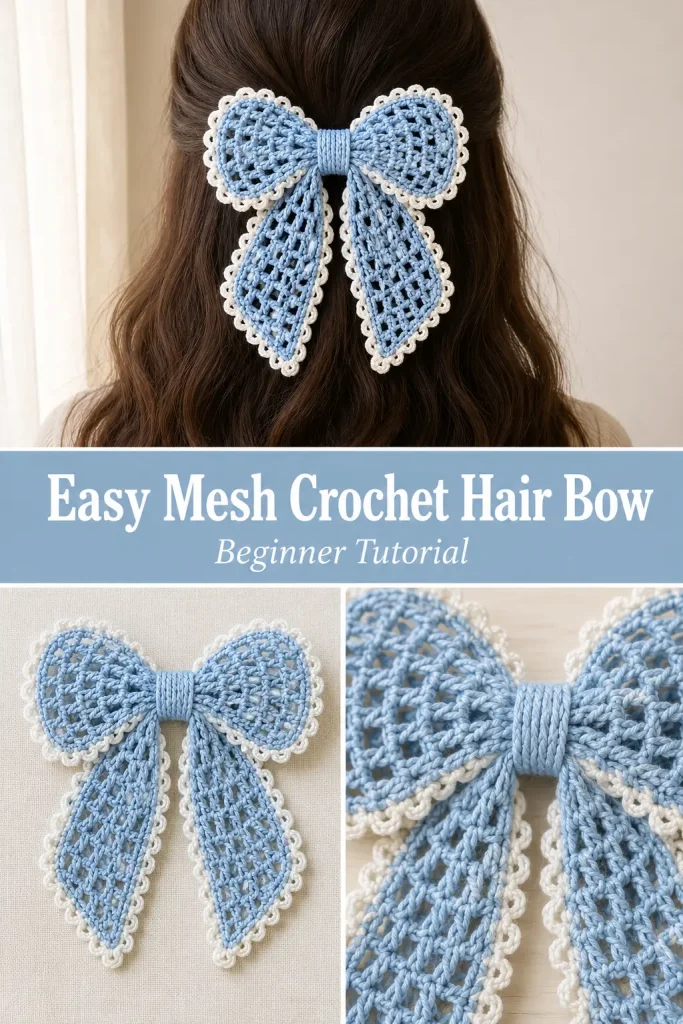
This beautiful mesh crochet hair bow is light, feminine, and surprisingly simple to make. The open crochet texture gives the bow a delicate lace-like look, while the white edging makes every loop and tail stand out clearly.
For this version, the finished bow uses the same colors shown in the reference design: soft baby blue for the main mesh and creamy white for the decorative edging and center details. Once attached to a hair clip, it becomes a pretty handmade crochet accessory for ponytails, half-up hairstyles, buns, or gifting.
Description
The finished crochet hair bow has two full rounded upper loops with two long mesh tails hanging underneath. The main pieces are crocheted in baby blue using an open double crochet mesh made from double crochet stitches separated by chain spaces. A creamy white chain-loop border outlines the entire bow and gives it the slightly frilled appearance visible in the design.
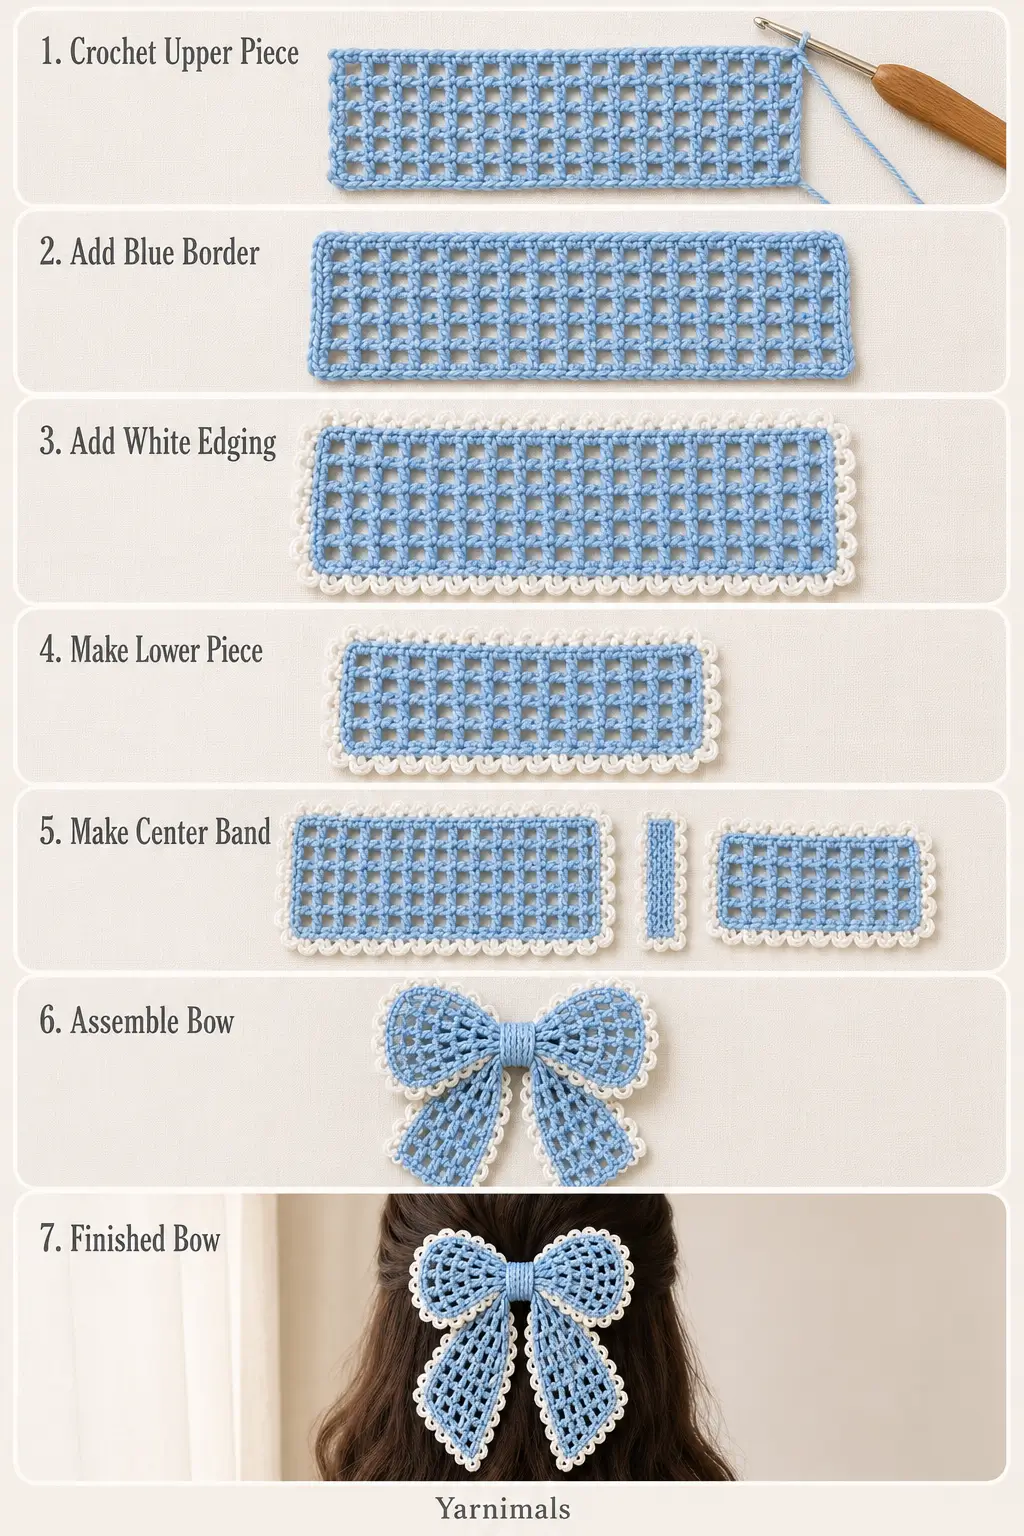
The bow is assembled from three crochet pieces: one large upper bow rectangle, one slightly shorter lower-tail rectangle, and one narrow center band. The upper rectangle is joined and gathered in the middle, the lower rectangle is folded to form two matching tails, and the narrow center strip wraps around both pieces to hold the finished bow securely.
Materials
- 4-ply or DK acrylic yarn in baby blue
- 3-ply or 4-ply yarn in creamy white
- 3 mm crochet hook
- Yarn needle
- Scissors
- Alligator hair clip or tic-tac style hair clip
- Suitable fabric/craft adhesive if attaching the clip with glue
Abbreviations
- ch – chain
- sc – single crochet
- dc – double crochet
- sl st – slip stitch
- st – stitch
- sp – space
Pattern Notes
US crochet terminology is used.
The finished bow uses baby blue as the main color and creamy white as the edging color.
The design is made from three separate pieces:
- large upper bow piece
- slightly shorter lower tail piece
- narrow center band
Both large pieces use the same mesh construction. Only the starting-chain length changes.
The mesh consists of:
dc, ch 2, skip 2
repeated across the row.
Four mesh rows are worked for each large section.
For a wider bow or thinner yarn, the foundation chain can be increased by an even amount while keeping the mesh repeat consistent.
Step-by-Step Instructions
Part 1 – Upper Bow Piece
Using baby blue yarn and the 3 mm crochet hook.
Foundation
Make a slip knot.
Ch 51.
After completing the 51 chains, ch 5 more.
You now have the foundation plus the turning chains.
Mesh Row 1
Skip the 5 turning chains and the next 2 foundation chains.
Dc into the third foundation chain.
Ch 2.
Skip 2 chains.
Dc into the next chain.
Continue repeating:
ch 2, skip 2, dc in next ch
across the foundation chain.
This completes the first mesh row.
Mesh Row 2
Ch 5.
Turn.
Dc into the top of the previous dc.
Ch 2.
Dc into the top of the next dc.
Continue repeating:
ch 2, dc into next dc
across.
At the end, work the final dc into the appropriate turning chain from the previous row.
Mesh Rows 3–4
Repeat Mesh Row 2 until you have completed 4 mesh rows total.
Do not fasten off.
Blue Border
Ch 1.
You will now work single crochet around the entire rectangle.
In each ordinary mesh box:
2 sc
In each corner mesh box:
5 sc
Continue around all four edges.
When you reach the final corner box, work only the remaining stitches needed to complete the 5-sc corner because part of the corner was already worked when beginning the border.
Join with sl st to the first sc.
Ch 1.
Fasten off the blue yarn.
White Decorative Edging
Join creamy white yarn into any border stitch.
Ch 1.
Sc into the same stitch.
Now repeat around the entire outer edge:
ch 3, skip 1 st, sc in next st
Continue the same sequence around all sides and corners.
At the end, join with sl st to the first stitch.
Ch 1.
Fasten off, leaving a long white yarn tail for assembling the bow later.
Set the upper bow piece aside.
Part 2 – Lower Bow Tails
Using baby blue yarn.
Foundation
Make a slip knot.
Ch 46.
Then ch 5 additional chains.
Mesh Row 1
Skip the 5 turning chains and the next 2 foundation chains.
Dc into the third foundation chain.
Repeat across:
ch 2, skip 2, dc in next ch
Mesh Rows 2–4
Ch 5 and turn.
Dc into the top of the previous dc.
Continue:
ch 2, dc into next dc
across.
Repeat until you have 4 mesh rows total.
Blue Border for Lower Piece
Ch 1.
Work:
2 sc in each ordinary mesh box
and:
5 sc in each corner mesh box
around the entire rectangle.
Join with sl st.
Fasten off.
White Edging for Lower Piece
Join creamy white yarn.
Ch 1.
Sc into the same stitch.
Repeat:
ch 3, skip 1 st, sc in next st
around the entire piece.
Join with sl st.
Fasten off.
Unlike the upper bow piece, you do not need to leave an especially long yarn tail here.
Part 3 – Center Band
Using baby blue yarn.
Make a slip knot.
Foundation
Ch 17.
Skip the first 2 chains.
Sc in each of the remaining 15 chains.
You will have:
15 sc
Ch 1.
Fasten off the blue yarn.
White Edging for Center Band
Join creamy white yarn.
Ch 1.
Sc into the first available stitch.
Repeat along the edge:
ch 3, skip next stitch, sc in following stitch
Continue to the end.
Join as needed to finish the decorative edging.
Ch 1.
Fasten off, leaving a long white yarn tail for assembly.
Assemble the Upper Bow
Take the large upper bow rectangle.
Thread the long white yarn tail onto your yarn needle.
Bring the two short ends of the rectangle together so the piece forms a loop.
Sew the two ends securely together.
Once joined, position the seam in the center back.
Flatten the loop.
Pinch the exact center together to create two equal bow loops.
Wrap the remaining white yarn around the pinched center several times.
Pull firmly enough to create a defined bow shape without crushing the mesh.
Secure the yarn at the back.
The upper bow should now have two approximately equal rounded blue mesh loops outlined in white.
Shape the Lower Tails
Take the slightly shorter rectangular mesh piece.
Stretch and straighten it gently.
Find the center.
Fold and pinch the middle so the rectangle creates two equal hanging sections.
Position this piece directly behind the upper bow.
The two ends should hang downward and slightly outward, creating the long double-tail appearance shown in the finished design.
Use the remaining yarn from the upper bow assembly to wrap around both layers several times.
Secure firmly at the back.
Arrange both tails until their lengths and angles are balanced.
Add the Center Band
Take the narrow blue-and-white center strip.
Place its center over the gathered middle of the bow.
Wrap the strip around the entire center section, covering the yarn used to gather the upper bow and tails.
Bring the ends to the back.
Using the long yarn tail and yarn needle, sew the two ends securely together.
Pass the yarn through several nearby stitches to secure it.
Fasten off and weave in the remaining end.
The center should look narrow and structured while the upper loops and lower tails remain full and open.
Shape the Finished Bow
Gently stretch each upper mesh loop outward.
Make sure both sides are approximately equal.
Open the mesh spaces with your fingers so the lace pattern is clearly visible.
Pull each lower tail downward and slightly outward.
Arrange the white edging so the little chain loops remain visible around the entire bow.
The finished shape should have:
- two rounded upper loops
- a narrow gathered center
- two long lower tails
- blue mesh throughout
- white decorative edging around every visible section
Attach the Hair Clip
Turn the finished bow over.
Position an alligator clip horizontally across the center back.
Leave the opening mechanism accessible so the clip can still open normally.
Secure the clip using a method appropriate for your intended use.
If using adhesive, apply it only along the stable portion of the clip and press it firmly against the crochet center until fully secured according to the adhesive instructions.
For a more permanent attachment, the clip can instead be secured carefully with strong thread.
Check that the clip sits straight before finishing.
Finished Design
Your completed hair bow should have a soft baby-blue mesh body with creamy-white decorative edging, matching the color combination of the reference bow.
The upper bow should look full but airy rather than dense.
The two lower mesh tails should hang below the bow and remain separate.
The narrow center band should hide the gathering stitches and create a polished finished appearance.
Tips & Variations
If your mesh looks too tight, gently stretch and shape the finished pieces before assembly.
Keep the chain spaces consistent. Uneven chain tension can make one section of the bow wider than another.
Acrylic DK yarn works well because it creates enough structure to hold the shape while remaining soft.
For an especially delicate border, use slightly thinner white yarn than the blue body yarn.
If your bow is twisting after assembly, lay it flat and gently reshape the mesh before attaching the clip.
When gathering the upper bow, check that both loops are equal before wrapping the center tightly.
The lower tails can be positioned almost straight downward or angled outward slightly depending on the hairstyle.
FAQ
Can I make the crochet hair bow larger?
Yes. Increase the starting chain by an even amount while maintaining the ch 2, skip 2, dc mesh repeat. Additional mesh rows can also make the sections taller.
Why are there two large crochet rectangles?
The longer rectangle forms the two upper bow loops. The slightly shorter rectangle creates the two decorative tails hanging underneath.
Can I make this without the white edging?
Yes, but the white chain-loop edging is an important part of this particular finished design. It emphasizes the mesh shape and gives the blue bow its soft lace-trim appearance.
Conclusion
This easy mesh crochet hair bow turns a few simple rectangles into a delicate-looking handmade accessory. The baby-blue openwork mesh, creamy-white edging, full upper loops, and long matching tails create the same soft two-tone style as the reference design. Once you understand the basic mesh repeat, it is also easy to adjust the bow to different sizes while keeping the same beautiful shape.



