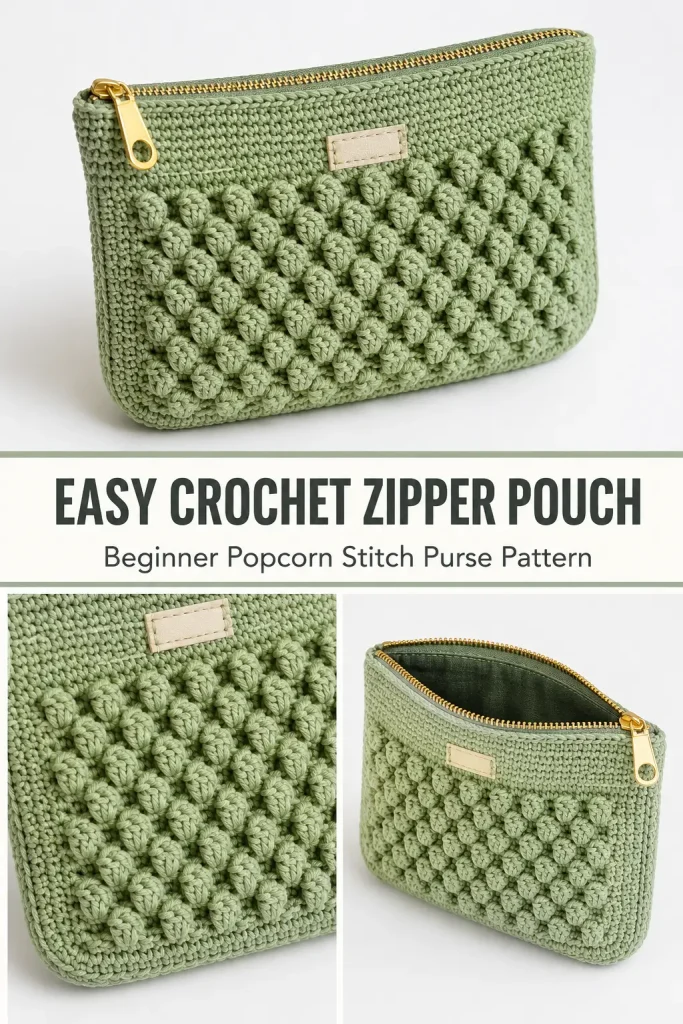
This textured crochet zipper pouch is a practical beginner-friendly project with a polished handmade finish. The raised popcorn stitches create a soft geometric pattern across the front, while the plain single crochet back, structured gusset, and metal zipper help the pouch hold its shape.
Made with 2 mm cotton macramé cord and a 3.5 mm hook, the finished purse is sturdy enough for cosmetics, crochet tools, pens, small accessories, or everyday essentials. The construction below is original and inspired by the visible design, with every piece included so the finished pouch matches the same shape and texture.
Description
The finished crochet purse has a wide rectangular shape with softly rounded lower corners and a flat gusseted base. The front panel features staggered rows of raised popcorn stitches, framed by plain single crochet at the bottom, sides, and top. The back panel is worked entirely in dense single crochet. A narrow gusset joins the two panels around the sides and base, creating enough depth for the pouch to stand and open comfortably. A gold-toned zipper is hand-sewn along the upper edges, with small crocheted tabs covering the zipper ends. The sample is shown in soft sage green, although warm mustard is another beautiful option.
Materials
- 2 mm cotton macramé cord or firm cotton yarn
- Approximately 180–220 yards
- 3.5 mm crochet hook
- 8-inch or 20 cm zipper
- Yarn needle
- Sewing needle
- Strong matching sewing thread
- Scissors
- Stitch markers
- Measuring tape
- Straight pins or sewing clips
- Fabric for the optional lining
- Small handmade label, optional
Abbreviations
- ch: chain
- dc: double crochet
- PC: popcorn stitch
- rep: repeat
- RS: right side
- sc: single crochet
- sl st: slip stitch
- st: stitch
- sts: stitches
- WS: wrong side
Special Stitch
Five-Double-Crochet Popcorn
Work 5 dc in the indicated stitch.
Remove the hook from the working loop.
Insert the hook from front to back through the top of the first dc.
Place the dropped loop back on the hook.
Pull the loop through the first dc.
Ch 1 to close and secure the popcorn.
Push the popcorn toward the right side of the fabric.
The popcorn uses one stitch from the previous row and counts as one stitch.
Pattern Notes
- This pattern uses US crochet terminology.
- Ch 1 at the beginning of a row does not count as a stitch.
- Turn at the end of every row.
- Both main panels begin with 28 single crochet stitches.
- The front texture is worked over a 12-row section.
- Plain single crochet rows above the texture create the zipper band visible in the design.
- The front and back panels must have the same width and height before assembly.
- Keep the macramé cord tension firm but not tight.
- The gusset creates the base and side depth.
- The pouch is assembled with visible crochet joins for a neat structured edge.
- Approximate finished size: 8 inches wide, 4½ inches high, and 2 inches deep.
- Difficulty level: confident beginner.
Gauge
Approximately 14 sc and 15 rows measure 4 inches.
Gauge is less important than making both panels identical and ensuring the zipper fits the upper opening.
Step-by-Step Instructions
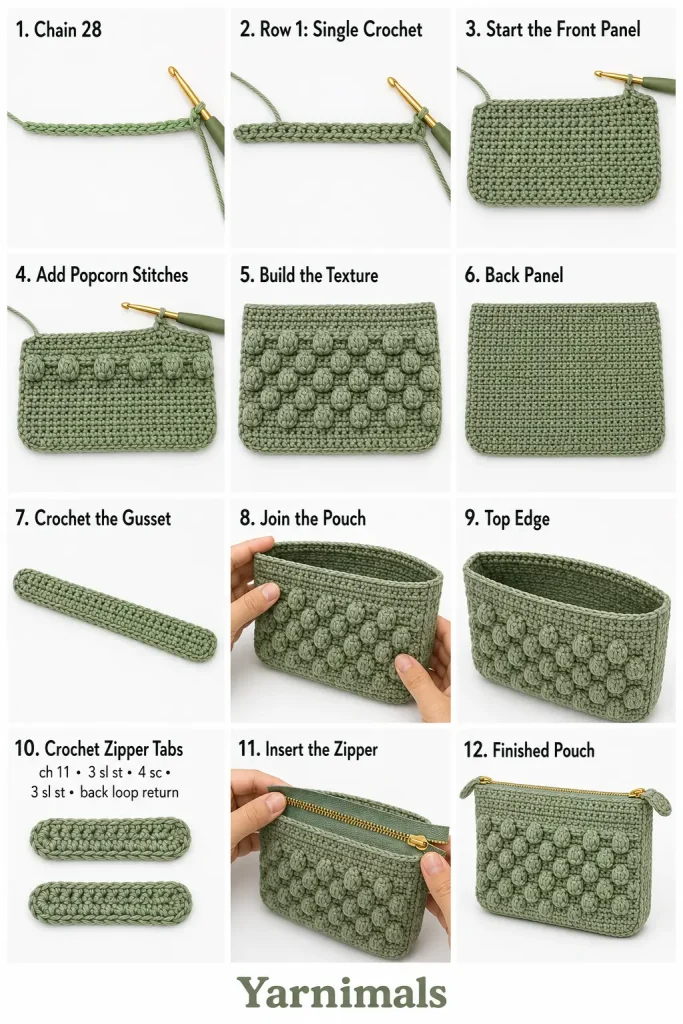
Front Textured Panel
Using the sage-green cotton cord:
Foundation
Ch 29.
Row 1
Beginning in the second ch from the hook, sc across.
Turn.
28 sc
Row 2
Ch 1.
Sc in each st across.
Turn.
28 sc
The following 12 rows create the popcorn texture.
Row 3: Popcorn Row A
Ch 1.
Sc in the first 2 sts.
Repeat the following 8 times:
- PC in the next st
- Sc in each of the next 2 sts
Sc in the final 2 sts.
Turn.
28 sts, including 8 popcorns
Row 4
Ch 1.
Sc in each st across.
When working into a popcorn, insert the hook under the top loops of the closed popcorn stitch.
Turn.
28 sc
Row 5: Popcorn Row B
Ch 1.
Sc in the first 3 sts.
Repeat the following 7 times:
- PC in the next st
- Sc in each of the next 2 sts
Sc in the final 4 sts.
Turn.
28 sts, including 7 popcorns
Row 6
Ch 1.
Sc in each st across.
Turn.
28 sc
Rows 7–14
Repeat Rows 3–6 twice more.
At the end of Row 14, the panel should have six staggered popcorn rows separated by plain single crochet rows.
The raised popcorn stitches must all face the same side.
Upper Zipper Band
Rows 15–18
Ch 1.
Sc in each st across.
Turn.
28 sc
Fasten off after Row 18.
The upper plain section keeps the zipper area smooth and prevents the popcorns from interfering with the opening.
Back Panel
The back panel is worked entirely in single crochet.
Foundation
Ch 29.
Row 1
Beginning in the second ch from the hook, sc across.
Turn.
28 sc
Rows 2–18
Ch 1.
Sc in each st across.
Turn.
28 sc
Fasten off.
Compare the two panels.
They should have:
- The same width
- The same height
- The same number of rows
- Straight upper edges
Lightly stretch or block them before assembly if one panel is slightly smaller.
Edge the Main Panels
Work around the two side edges and bottom of each panel. Leave the top edge unworked for the zipper.
Front Panel Edging
Place the front panel with the popcorn side facing you.
Join yarn at the upper-left corner.
Ch 1.
Work 1 sc into the end of each row down the first side.
18 sc
Work 1 sc in each foundation stitch across the bottom.
28 sc
Work 1 sc into the end of each row up the second side.
18 sc
Fasten off.
You should have approximately 64 edging stitches around the sides and bottom.
Repeat around the back panel.
Use the same number of stitches on both panels so the pieces align correctly.
Crochet the Gusset
The gusset forms both sides and the flat bottom.
Foundation
Ch 7.
Row 1
Beginning in the second ch from the hook, sc across.
Turn.
6 sc
Rows 2–64
Ch 1.
Sc in each st across.
Turn.
6 sc
Do not fasten off.
The strip should fit from one upper corner of a panel, down the first side, across the bottom, and up the opposite side.
Check the fit before joining. Add or remove rows if your gauge differs.
The finished gusset should measure approximately 2 inches wide.
Attach the Gusset to the Front Panel
Place the front panel with the popcorn side facing outward.
Position one short end of the gusset at the upper-left corner.
Align one gusset row with each edging stitch around the first side, bottom, and second side.
Use stitch markers to secure:
- Both upper corners
- Both lower corners
- The center of the bottom
With the working yarn still attached to the gusset:
Ch 1.
Sc through one edge stitch of the front panel and the corresponding row end of the gusset.
Continue joining evenly down the first side.
At the lower corner, keep the stitches firm but do not pull tightly.
Continue across the bottom and up the opposite side.
Fasten off at the upper-right corner.
Check that:
- The popcorn side faces outward
- The gusset lies evenly
- The lower corners curve smoothly
- The top edge remains open
Attach the Back Panel
Place the back panel against the free edge of the gusset with its right side facing outward.
Align the corners and mark the same five reference points used for the front.
Join yarn at one upper corner.
Sc through the back-panel edging and the corresponding gusset row ends.
Continue down the side, across the bottom, and up the opposite side.
Fasten off.
Turn the pouch right side out if it was joined from the inside.
Shape the bottom corners with your fingers.
The pouch should now have:
- One popcorn-textured front
- One plain back
- Two narrow side panels
- One flat bottom
- One open top
Firm the Upper Edges
Join yarn to the first stitch of the front top edge.
Front Top Row 1
Ch 1.
Sc in each of the 28 sts across.
Fasten off.
Repeat along the back top edge.
Front Top Row 2
Join yarn again and work 1 sl st loosely in each stitch across.
Fasten off.
Repeat along the back.
The slip-stitch row creates the narrow, firm ridge visible beside the zipper.
Do not pull the slip stitches tightly or the opening may become too short for the zipper.
Crochet the Zipper End Tabs
Make two.
These narrow shaped pieces cover the raw ends of the zipper and help create a neat finish.
Foundation
Ch 11.
First Side
Beginning in the second ch from the hook:
- Sl st in each of the next 3 ch
- Sc in each of the next 4 ch
- Sl st in each of the final 3 ch
Do not turn.
Rotate the foundation chain and work along the unused loops on the opposite side.
Second Side
- Sl st in the back loop of each of the next 3 ch
- Sc in the back loop of each of the next 4 ch
- Sl st in the back loop of each of the final 3 ch
Join with a sl st.
Fasten off, leaving a long sewing tail.
The finished piece should resemble a small narrow oval with slightly pointed ends.
Prepare the Zipper
Open the zipper halfway before attaching it.
Center it above the pouch opening.
The zipper teeth should sit just above the crocheted upper edges.
If the zipper is longer than the opening:
- Mark the correct length
- Sew several firm stitches across the zipper teeth at the marked point
- Trim the excess tape beyond the new stop
- Cover the trimmed end with one crochet tab
Fold the zipper tape inward at both ends.
Place one crochet tab over each folded end and stitch it securely through the tape.
Do not sew through the zipper teeth.
Sew the Zipper to the Front
Turn the pouch inside out.
Position one side of the zipper tape against the inside of the front upper edge.
The zipper teeth should remain visible just above the crochet.
Pin or clip the zipper in place.
Thread a sewing needle with strong matching thread.
Beginning at one end, sew through:
- The zipper tape
- The upper crochet edge
Use small backstitches or evenly spaced running stitches.
Keep the stitches close to the zipper teeth without touching them.
Check the outside frequently to ensure the stitches remain hidden between the crochet rows.
Secure the thread firmly at both ends.
Sew the Zipper to the Back
Align the second zipper tape with the back upper edge.
Before sewing, close the zipper and check that:
- The front and back edges meet evenly
- The zipper is centered
- The ends sit at the same height
- The pouch does not twist
Open the zipper halfway again.
Sew the second tape to the back edge using the same method.
Test the zipper several times before securing the final thread.
Optional Crochet Attachment Around the Zipper
For a more decorative finish, blanket-stitch evenly along both zipper tapes before installation.
Use a sharp needle and matching crochet cord or strong thread.
After making the blanket stitches, join the yarn with the crochet hook and work one row of sc into the blanket-stitch loops.
Sew or crochet this edge to the purse opening.
This option produces a more visible crochet border beside the zipper but requires carefully spaced holes.
Optional Fabric Lining
A fabric lining keeps small objects from catching in the popcorn stitches and gives the pouch a professional finish.
Cut the Fabric
Place the finished pouch flat on the lining fabric.
Cut two rectangles approximately ½ inch wider and ½ inch taller than the front and back panels.
Cut one long gusset strip matching the crochet gusset, adding a ½-inch seam allowance around every edge.
Sew the Lining
Place the lining front and gusset with right sides together.
Pin the gusset around the two sides and bottom.
Sew with a ¼-inch seam allowance.
Repeat with the lining back.
Trim excess fabric at the corners.
Clip the seam allowances carefully without cutting the stitches.
Turn the lining right side out.
Insert the Lining
Place the lining inside the crochet pouch with the wrong sides together.
Fold the lining’s top raw edge inward by approximately ¼ inch.
Pin it just below the zipper teeth.
Hand-sew the folded lining edge to the zipper tape.
Do not sew through the outer crochet fabric or close to the moving zipper slider.
Add the Optional Label
Position a small handmade label near the upper center of the front panel, above the popcorn texture.
Use matching sewing thread.
Sew through the label holes or around its edges.
Keep all stitches small and even.
Do not pull tightly enough to distort the pouch.
Final Finishing
Weave in every crochet end securely.
Open and close the zipper several times.
Check that:
- The popcorn stitches all face outward
- The front and back panels are level
- The zipper moves smoothly
- The side gussets are equal
- The base lies flat
- The lower corners are rounded
- The zipper tabs cover both ends
- The lining does not catch in the zipper
- All sewing stitches are secure
Lightly steam or damp-block the pouch if needed.
Avoid pressing directly on the popcorn stitches because this may flatten their raised texture.
Allow the purse to dry fully while lightly stuffed with tissue paper to preserve its shape.
Tips and Variations
Use firm cotton macramé cord for the structured appearance shown in the design. Very soft acrylic yarn may make the pouch collapse.
For smaller popcorns, use four double crochet stitches instead of five. Use the same popcorn method throughout the entire panel.
Make a wider pouch by adding stitches in multiples of three. This keeps the popcorn repeats easy to adjust.
To increase the height, add more paired popcorn and plain rows before working the upper zipper band.
For a deeper pouch, begin the gusset with more chains. A chain of 9 produces an approximately 2½-inch gusset.
For a flatter pencil case, make the gusset only 3–4 stitches wide.
Use mustard, rust, cream, dusty rose, or charcoal for a different look while keeping the entire pouch in one consistent color.
A contrasting zipper can create a playful finish, while a matching zipper keeps the design understated.
The front panel may be used on both sides for an all-over textured purse, but the plain back makes the pouch easier to place flat on a table.
Frequently Asked Questions
Can I make the pouch without a gusset?
Yes, but it will become a flat envelope-style purse. Sew the front and back panels directly together around the sides and bottom, then add the zipper across the top.
Why are my popcorn stitches appearing on the wrong side?
After closing each popcorn, push it toward the right side before continuing. Work every popcorn row while the intended front of the purse is facing you.
Can the zipper be attached without sewing?
A zipper can be crocheted in after holes are added to the tape, but hand-sewing is easier for beginners and gives more control over its position.
Conclusion
This easy popcorn stitch crochet zipper pouch combines a simple rectangular panel construction with raised texture, structured sides, a flat base, and a secure zipper closure. The staggered popcorn pattern creates the same decorative front shown in the reference, while the plain back and firm gusset keep the purse practical for everyday use. Make it in soft sage green, warm mustard, or your favorite cotton cord color for a useful handmade crochet accessory.



