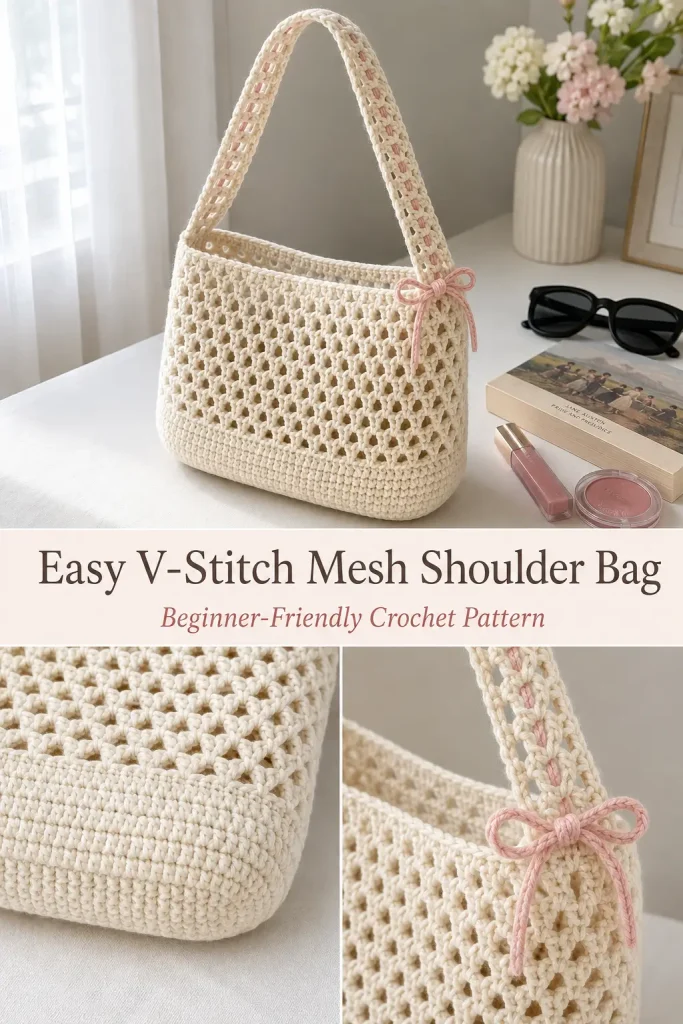
This easy crochet mesh bag is the kind of project that looks stylish without requiring complicated construction. A sturdy oval base supports an airy V-stitch body, while the matching crochet strap grows directly from the bag for a clean, seamless look.
The sample uses a creamy white yarn with a soft pink strand woven through the strap and tied into a bow at the side. The pattern is also easy to resize: change the foundation chain for a wider bag, add more mesh rounds for extra height, or adjust the strap length to suit how you want to wear it. The source sample uses 36 foundation chains, 12 V-stitch body rounds, and 39 strap rows.
Description
The finished crochet shoulder bag has a softly rounded rectangular shape with a solid oval base and an open V-stitch mesh body. The body and strap are worked as one coordinated design, so the same airy stitch pattern continues upward into the handle.
The sample is designed to hold everyday essentials such as a book, sunglasses, lip products, a small wallet, or other lightweight items. The optional pink ribbon or yarn threaded through the strap adds a sweet contrast and can be finished with a small bow near the side of the bag.
Materials
- DK or medium-weight cotton or acrylic yarn
- 4.5 mm crochet hook, or a hook suited to your chosen yarn
- 2 stitch markers
- Scissors
- Yarn needle
- Optional ribbon, wool strand, or thicker contrasting yarn for the bow detail
The original tutorial notes that cotton or acrylic can both work and recommends DK or medium-weight yarn for a sturdier bag.
Abbreviations
- ch – chain
- dc – double crochet
- sl st – slip stitch
- sp – space
- st – stitch
- sts – stitches
- V-st – V-stitch
Special Stitch
V-Stitch
Work:
1 dc, ch 1, 1 dc
into the same stitch or chain-1 space.
From the second mesh round onward, the V-stitches are worked into the ch-1 spaces of the V-stitches below.
Pattern Notes
- This pattern uses US crochet terminology.
- The bag is worked from the oval base upward.
- The sample begins with 36 chains for the width.
- Add or remove foundation chains to customize the bag width.
- The first two base rounds are solid double crochet.
- The body uses joined V-stitch rounds.
- Ch 3 at the beginning of the mesh rounds counts as the first dc.
- The sample body has 12 V-stitch rounds.
- The visible join line can be positioned at the back of the finished bag.
- The strap is worked directly from the final body round.
- The sample strap has 39 rows.
- The optional contrasting strand is woven through the openings in the strap after assembly.
Step-by-Step Instructions
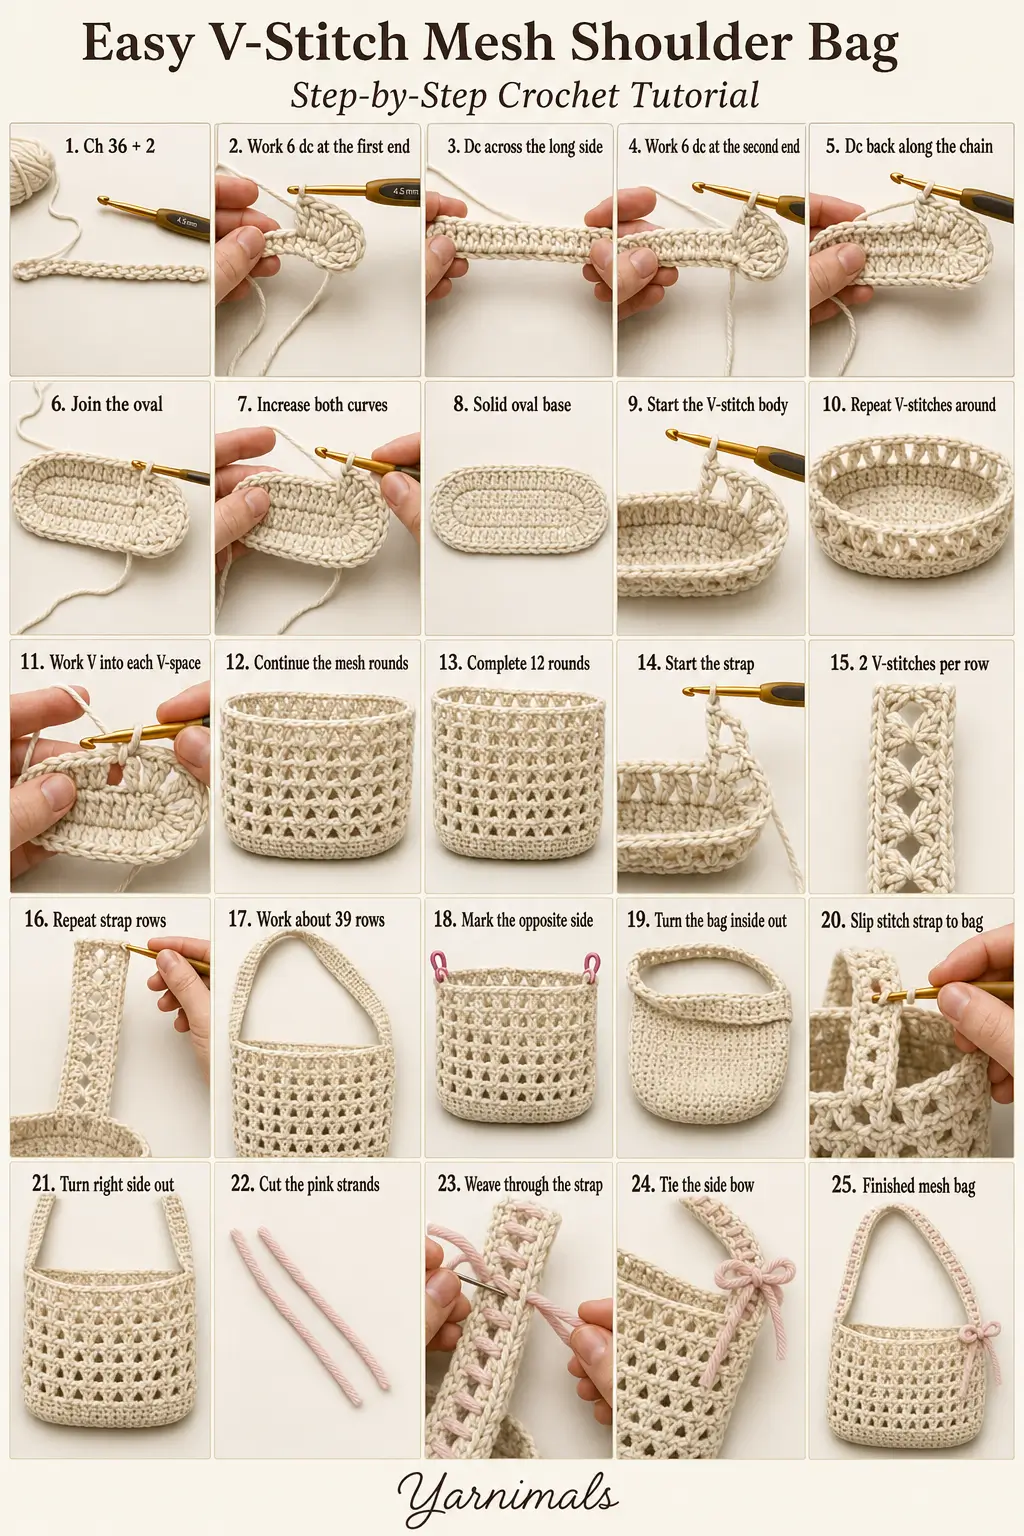
Part 1: Crochet the Oval Base
Using the main bag color, make a slip knot.
Foundation
Ch 36.
The 36 chains determine the width of the sample bag.
Ch 2 more for turning.
Keep the foundation chain fairly firm rather than very loose. Large gaps in the chain will remain visible in the finished base.
Base Round 1
Working into the third ch from the hook, work 6 dc into the same chain.
If the center of these stitches leaves a large hole, place the sixth dc slightly deeper between the chain and the previous stitches to help close the opening.
Place a stitch marker in the first dc if desired.
Continue along the foundation chain:
Work 1 dc in each chain until you reach the opposite end.
Shape the Second End
Work 6 dc into the final foundation chain.
The transcript briefly calls these “single crochets” once, but the demonstrated stitch and the surrounding instructions use double crochet; matching the first end with 6 dc keeps the oval symmetrical.
Rotate the foundation chain so you can work along its opposite side.
Work 1 dc into the unused back portion of each foundation chain across.
Stop before the two additional turning chains from the beginning.
Do not crochet into those two turning chains.
Join with a sl st in the first dc.
You should now have a long oval base.
Base Round 2
Ch 2.
These chains do not count as a stitch.
Work 2 dc in the same first st.
Work 2 dc in each of the next 5 sts.
You have now increased across the first rounded end.
Continue along the long side with:
1 dc in each st until you reach the six stitches around the opposite curve.
Work 2 dc in each of those next 6 sts.
Continue along the remaining long side with:
1 dc in each st.
Join with a sl st in the first dc.
The base should now lie flatter and have clearly rounded ends.
Part 2: Crochet the V-Stitch Mesh Body
Body Round 1
Ch 3.
This ch 3 counts as the first dc.
Ch 1.
Work 1 dc into the same starting st.
The ch 3, ch 1, and dc create the first V-stitch.
Now repeat around:
- Skip 2 sts.
- Work 1 V-st in the next st.
Continue:
Skip 2 sts, V-st in next st.
Repeat around the base.
Depending on your customized foundation count, you may not have exactly two stitches remaining before the beginning of the round. The source tutorial notes that this is acceptable; place the final V-stitch where it fits naturally before joining.
Join with a sl st in the third chain of the beginning ch 3.
The body should begin turning upward from the oval base.
Body Round 2
Ch 3.
Ch 1.
Work 1 dc into the first ch-1 space to complete the first V.
From now on, work into the open ch-1 spaces located between the two dc posts of each V-stitch below.
In each V-stitch ch-1 space around, work:
1 dc, ch 1, 1 dc
Continue around.
Join with a sl st in the third chain of the beginning ch 3.
Body Rounds 3–12
Repeat Body Round 2.
For every round:
- Ch 3.
- Ch 1.
- Complete the first V-stitch.
- Work 1 V-st into every ch-1 V-space around.
- Join with a sl st in the third beginning chain.
The sample uses 12 mesh rounds total.
If you want a taller bag, continue repeating the same round before starting the strap.
Position the Seam
You will notice a subtle vertical line where the joined rounds begin and end.
Position this line at the back of the bag when you wear it.
Part 3: Crochet the Shoulder Strap
Do not fasten off after the final body round.
The strap continues directly from the top edge.
Strap Row 1
Ch 4.
Work 1 dc into the first available V-stitch space.
Work a V-stitch in the next V-space:
1 dc, ch 1, 1 dc.
Work another V-stitch in the following V-space:
1 dc, ch 1, 1 dc.
At the opposite edge of this strap section, work 1 dc only rather than completing another V-stitch.
This creates a strap section with:
- 1 dc at one edge
- 2 V-stitches through the center
- 1 dc at the opposite edge
The strap will curve slightly where it leaves the bag. This is normal.
Strap Row 2
Ch 2.
Turn.
Work 1 dc in the same first edge stitch.
Work 1 V-st in each of the two V-spaces across.
At the far edge, locate the beginning ch 4 from Strap Row 1.
Work 1 dc into the third chain.
Strap Row 3 and Remaining Rows
Ch 2 and turn.
Work 1 dc into the same first st.
Work 1 V-st into each of the 2 V-spaces.
At the opposite edge, work 1 dc into the final dc.
Do not work into the turning ch 2.
Repeat this row until the strap reaches your preferred length.
The sample uses 39 strap rows.
For a shorter shoulder bag, stop earlier.
For a longer drop, continue adding rows.
Attach the Strap to the Opposite Side
Before joining, lay the bag flat.
Position two stitch markers at the top edge where the free strap end should attach.
Check that the strap is centered and is not twisted.
Turn the bag inside out so the joining seam will be hidden inside.
Do not fasten off the strap yarn.
Bring the free strap end to the marked section.
Insert the hook through:
- one stitch along the strap end
- the corresponding marked stitch on the bag body
Work a sl st through both layers.
Continue matching the strap stitches to the bag stitches and sl stitching them together across the attachment area.
At the final marked stitch, work the final sl st through both layers.
Ch 1.
For extra security, ch 1 once more if desired.
Cut the yarn.
Pull the yarn through and tighten.
Turn the bag right side out again.
The strap should now run continuously from one side of the mesh bag to the other.
Part 4: Optional Woven Bow Detail
The contrasting pink detail in the inspiration image is optional.
Use ribbon, wool, or a thick strand of contrasting yarn.
Cut two equal long strands.
Each strand should be long enough to travel through the strap with extra length remaining for the bow.
Thread the Decorative Strand
Begin near one end of the strap.
Leave enough yarn or ribbon hanging free to form the bow later.
Using your crochet hook or fingers, pull the strand through the open center spaces in the strap.
Alternate direction:
- Pull through from front to back.
- At the next opening, pull from back to front.
- Continue weaving through the V-stitch openings.
Work your way along the strap.
Keep the decorative strand flat and relaxed. Do not pull it tightly enough to gather the crochet.
Repeat with the second strand as needed to create the paired decorative detail.
Tie the loose ends into a neat bow near the side of the bag.
The source tutorial describes this woven ribbon or yarn detail as optional.
Finishing
Weave in all remaining yarn ends securely.
Shape the oval base with your fingers.
Straighten the V-stitches around the body.
Check the strap attachment on both sides.
Adjust the decorative ribbon so it sits evenly through the strap openings.
The finished bag should have:
- A solid oval double-crochet base
- An open V-stitch mesh body
- Approximately 12 body rounds in the sample
- One continuous matching mesh shoulder strap
- Approximately 39 strap rows in the sample
- An optional pink woven strand and bow
- No zipper
- No lining in the original construction
- No separate handles
Tips & Variations
Cotton yarn will create a slightly firmer mesh bag, while acrylic generally produces a softer fabric.
If you want the bag to carry books or heavier belongings, choose a yarn with limited stretch and keep your stitches firm.
To make a wider bag, increase the initial foundation chain beyond 36 chains.
To make a narrower mini bag, use fewer foundation chains.
Use an object as a sizing guide while making the foundation. For example, chain until the foundation reaches the width of a favorite book or tablet.
Add more than 12 V-stitch rounds for a deeper tote.
Shorten the 39-row strap for a snug shoulder bag or add rows for a longer drop.
For a cleaner minimalist version, omit the contrasting ribbon completely.
For the soft look shown in the reference image, use:
- Cream or vanilla for the entire bag
- Pale blush pink for the woven strap detail
You can also try cream with sage, lavender, sky blue, or burgundy ribbon.
If you plan to carry very small items, consider adding a separate fabric lining because the V-stitch body intentionally contains open spaces.
FAQ
Is this crochet mesh bag beginner-friendly?
Yes. Once you understand the V-stitch, most of the bag repeats the same simple pattern of double crochet, chain 1, double crochet.
How do I make the bag a different size?
Change the length of the foundation chain to adjust the width, add or remove body rounds for the height, and adjust the number of strap rows for the handle length.
How many body rounds are in the sample?
The source sample uses 12 rounds of V-stitch mesh for the body.
How long is the sample strap?
The sample uses 39 rows for the strap.
Why does the base start curling?
Some curling during the first base round is normal, especially with acrylic yarn. The second increase round and the later body construction help the shape settle.
Do I have to add the pink bow?
No. The woven ribbon or yarn detail is optional. The cream V-stitch bag works perfectly well without it.
Conclusion
This easy V-stitch crochet mesh bag is a practical beginner crochet project that can be customized for almost any size. The solid oval base gives the bag structure, the open mesh body keeps it light, and the strap continues the same pretty V-stitch texture for a coordinated finish. Make the original creamy version with a soft pink bow, or choose your favorite colors for an everyday handmade shoulder bag.



