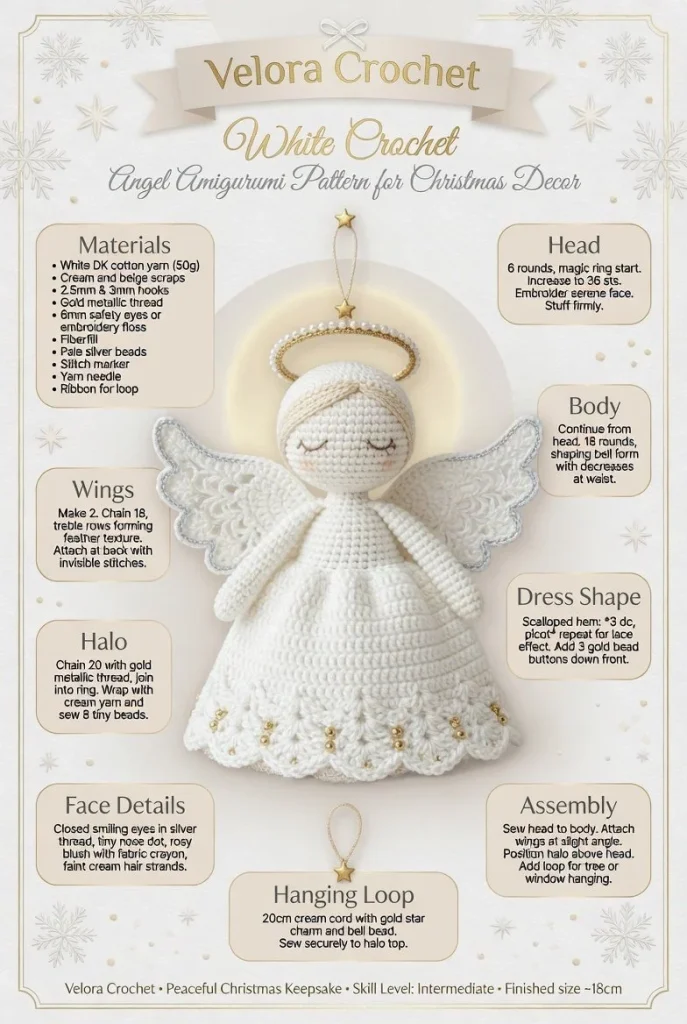
Creating a white crochet angel is a delightful craft project, perfect for adding a touch of handmade charm to your holiday décor or gifting as a keepsake. This elegant angel features a gentle face, soft wings, and a simple halo, making it a beautiful symbol of peace and faith. Let’s dive into the details of this lovely crochet pattern, ensuring you have all the information you need to create your own stunning angel.
Materials
- Worsted weight yarn in white
- Small amount of skin-toned yarn
- Crochet hook (size G/4.0 mm)
- Polyester fiberfill stuffing
- Safety or embroidered eyes (optional)
- Yarn needle
- Stitch marker
- Scissors
Abbreviations
- MR: magic ring
- ch: chain
- sc: single crochet
- hdc: half double crochet
- dc: double crochet
- inc: increase
- dec: decrease
- sl st: slip stitch
Instructions
Head
- Start with a magic ring (MR).
- Round 1: 6 sc in MR. (6)
- Round 2: Inc in each stitch around. (12)
- Round 3: Sc in next stitch, inc in next; repeat around. (18)
- Rounds 4-6: Sc in each stitch around. (18)
- Round 7: Sc in next stitch, dec; repeat around. (12)
- Finish off, leaving a long tail for sewing.
Body
- Attach yarn to the bottom of the head.
- Round 1: 12 sc in the first stitch. (12)
- Round 2: Sc in next stitch, inc; repeat around. (18)
- Rounds 3-5: Sc in each stitch around. (18)
- Round 6: Sc in next stitch, dec; repeat around. (12)
- Round 7: Dec around. (6)
- Stuff the body lightly before closing.
- Tighten and finish off, leaving a long tail for sewing.
Wings
- Start with a MR.
- Round 1: 6 sc in MR. (6)
- Round 2: Inc in each stitch around. (12)
- Round 3: Sc in next stitch, inc; repeat around. (18)
- Round 4: Sc in each stitch around. (18)
- Round 5: Sc in next 6 stitches, dec; repeat around, leaving a small opening for stuffing. (15)
- Stuff wings lightly and close with a slip stitch.
- Finish off, leaving a long tail for sewing.
Halo
- Create a slip knot, ch 6.
- Join to first ch with a sl st to form a ring.
- Round 1: Ch 3 (counts as dc), 11 dc in the ring. Join with sl st. (12)
- Finish off and leave a tail for attaching.
Dress Shape
- Use white yarn to create an open bell shape.
- Ch 26, turn.
- Row 1: Sc in 2nd ch from hook and across. (25)
- Row 2: Ch 1, turn. Sc in each stitch across. (25)
- Repeat Row 2 until the desired length is achieved (about 10 rows for a mini dress).
- Finish off and sew or slip stitch to the bottom of the body.
Face Details
- If using safety eyes, attach them now. If embroidering, use the skin-toned yarn to create a simple smile.
- Add blush by lightly brushing some yarn or fabric paint for a soft touch.
Hanging Loop
- Cut a piece of yarn about 12 inches long.
- Attach it to the top of the head or halo securely, ensuring it can hold the angel when hung.
Assembly
- Sew the wings onto the back of the body securely.
- Attach the halo to the top of the head.
- Position the dress over the body, making any adjustments for a natural fit.
- Weave in any loose ends for a clean finish.
Tips for the Best Result
- Keep your stitches tight enough to avoid gaps, but not so tight that your work becomes stiff.
- Lightly stuff each piece; overstuffing can distort the shape, especially in the wings.
- Use stitch markers to help keep track of rounds, particularly in the head and body.
Creating your own crochet angel can be a fulfilling experience. This simple yet meaningful project offers a cozy, handmade decoration or a heartfelt gift. Enjoy making this lovely angel, and consider trying out different yarn colors or embellishments for unique variations!




Hola! El ángel navideño es precioso. Pero la explicación está incompleta. Donde dice “alas” están explicados los brazos (que se rellenan), pero faltan las alas y el borde del vestido con la puntilla. Gracias!!!