Intro
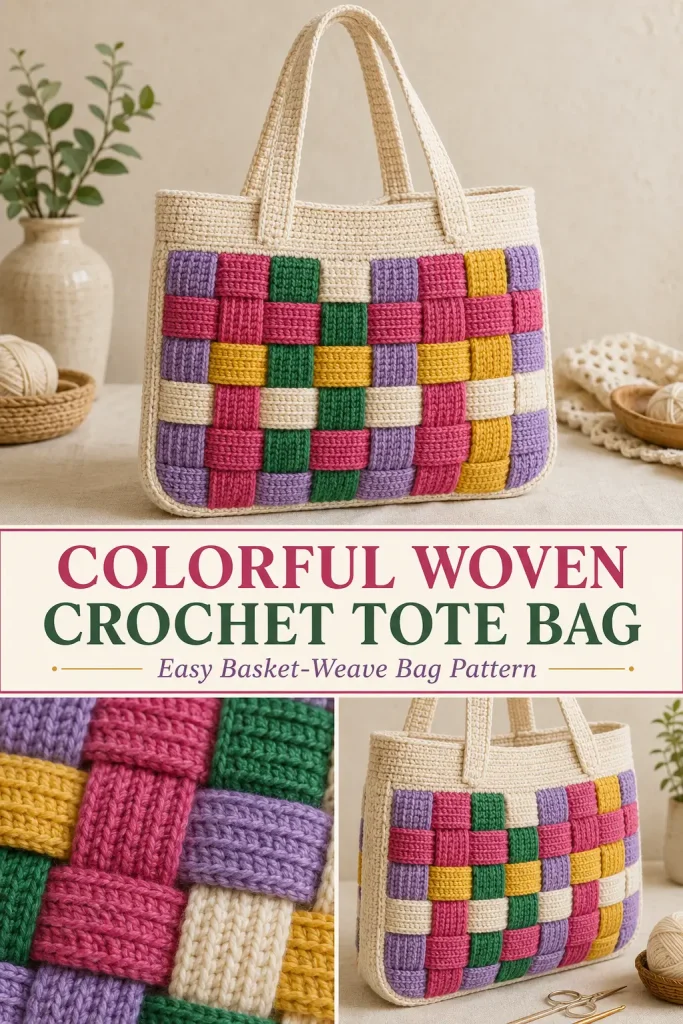
This colorful woven crochet bag combines simple crochet strips with an over-under weaving technique to create the chunky basket-weave effect visible in the design. Berry pink, lavender, emerald green, golden yellow, and natural cream cross over one another to form a bold checkerboard pattern without complicated color changes inside individual rows.
The bag is constructed from two woven crochet panels, then finished with a cream border, a sturdy upper band, and two long matching crochet handles. Because the individual strips are made separately, this is also a fun scrap-yarn crochet project and an easy way to experiment with your favorite color combinations.
This is an original construction inspired by the visible woven-crochet idea, with the strip dimensions, weaving sequence, panel stabilization, joining, top band, handles, and finishing worked out as one complete bag pattern.
Description
The finished crochet tote has a softly rounded rectangular shape with a colorful woven body and a structured natural-cream top. Each front and back panel is created by weaving narrow ribbed crochet strips at right angles, alternating over and under to produce a true basket-weave appearance.
The colorful woven section includes berry pink, lavender purple, emerald green, golden yellow, and natural cream. A cream crochet border locks the woven ends securely in place. The two panels are joined around the sides and bottom, then several solid cream rounds reinforce the opening. Two long cream crochet straps rise from the top band to create a practical shoulder bag.
Approximate Finished Size
Using worsted weight cotton yarn and a 4 mm hook:
- Width: approximately 27–29 cm
- Body height: approximately 24–26 cm
- Woven section height: approximately 18–20 cm
- Top cream band: approximately 5–6 cm
- Handle length: approximately 48–52 cm each
- Handle width: approximately 2.5–3 cm
Exact measurements will vary with yarn and tension.
Materials
- Worsted weight #4 cotton or cotton-blend yarn
- Approximately 180–220 g natural cream
- Approximately 70–90 g berry or raspberry pink
- Approximately 60–80 g lavender purple
- Approximately 60–80 g emerald or forest green
- Approximately 40–60 g golden yellow
- 4 mm crochet hook
- Yarn needle
- Scissors
- Measuring tape
- Stitch markers
- Pins or locking stitch markers for assembling the woven panels
- Optional fabric lining
Abbreviations
- ch – chain
- sc – single crochet
- hdc – half double crochet
- BLO – back loop only
- sl st – slip stitch
- st – stitch
- sts – stitches
Pattern Notes
- US crochet terminology is used.
- Difficulty: confident beginner to intermediate.
- The colorful woven body is not crocheted as one checkerboard fabric.
- Separate horizontal and vertical crochet strips are physically woven over and under one another.
- Make two identical woven panels: one front and one back.
- Each strip is worked in ribbed half double crochet for the raised woven texture.
- Try to keep every strip approximately the same width.
- Measurements are more important than exact chain counts because yarn thickness can vary.
- The sample strips are approximately 3 cm wide.
- Block the strips lightly before weaving if they curl.
- Every crossing should be discreetly secured before the bag is assembled. This prevents the weave from shifting during use.
- The cream perimeter border traps and reinforces all strip ends.
- The bag is left open at the top; there is no zipper or drawstring.
Color Layout
For each panel, use the following color arrangement.
Vertical Strips – Left to Right
- Lavender
- Berry pink
- Emerald green
- Natural cream
- Lavender
- Berry pink
- Golden yellow
- Emerald green
- Lavender
Horizontal Strips – Top to Bottom
- Berry pink
- Golden yellow
- Emerald green
- Natural cream
- Berry pink
- Lavender
Use the same sequence for the front and back so both sides of the bag coordinate.
Step-by-Step Instructions
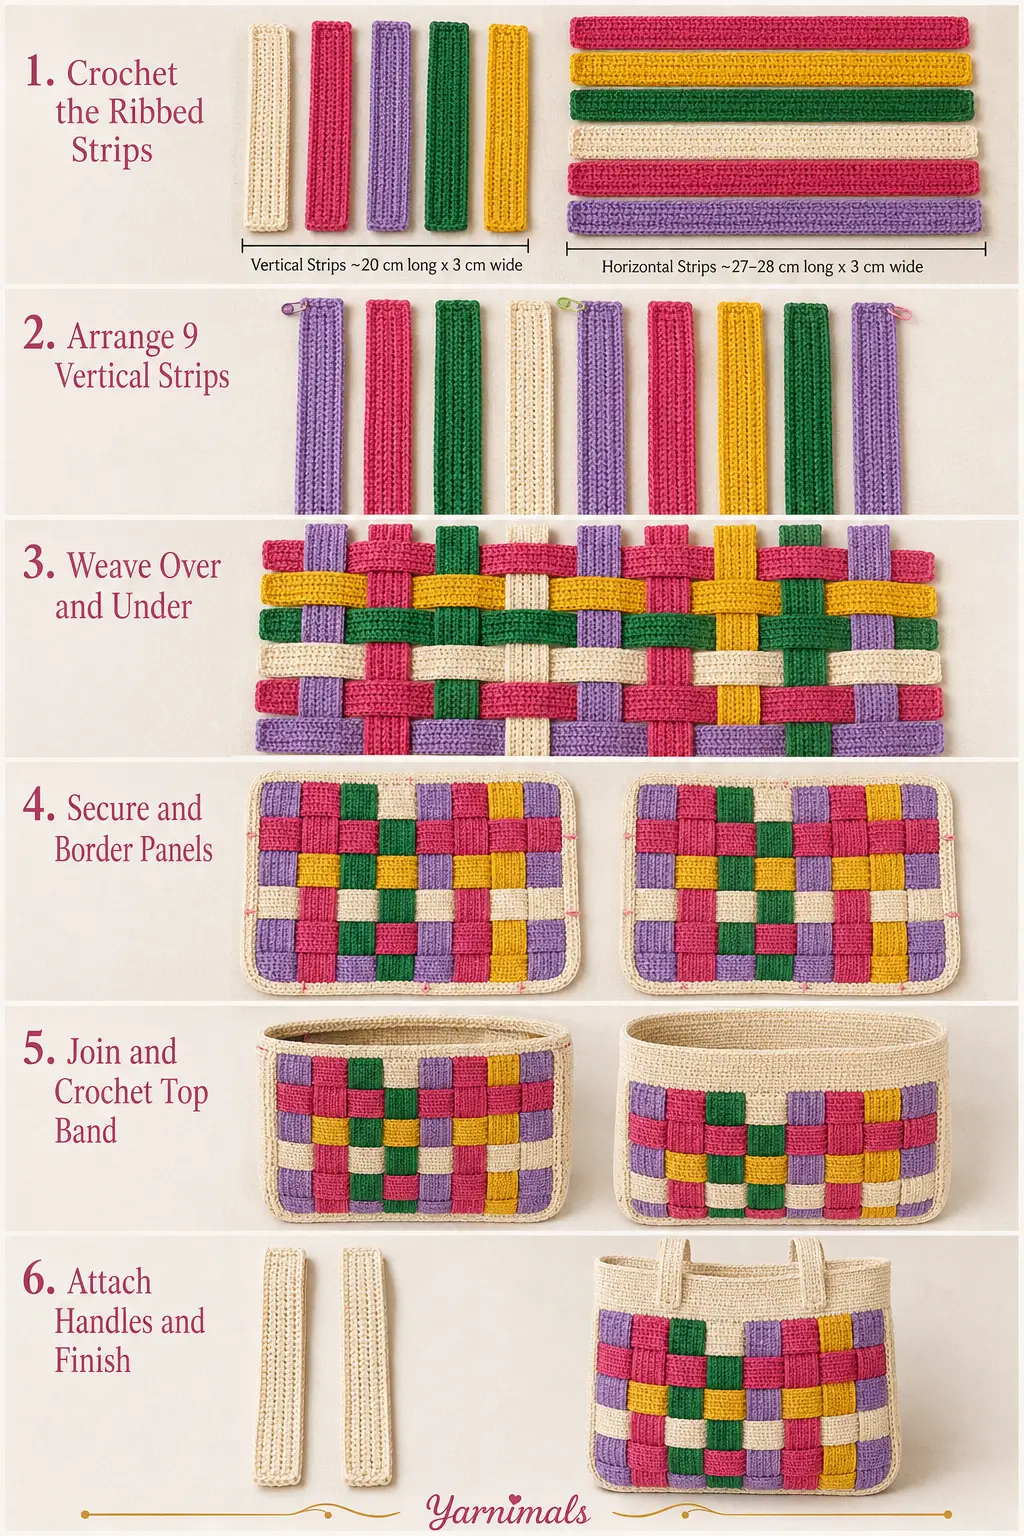
Part 1: Crochet the Vertical Strips
Make 9 vertical strips for each panel.
You will need:
18 vertical strips total
Each finished strip should measure approximately:
20 cm long × 3 cm wide
Using the required color:
Foundation
Ch approximately 38–40, or until the chain measures about 20 cm without stretching.
Row 1
Hdc in the third ch from the hook.
Hdc across.
Ch 2 and turn.
Row 2
Working in BLO:
Hdc in every st across.
Ch 2 and turn.
Row 3
Hdc BLO across.
Fasten off.
The strip should be approximately 3 cm wide.
If your yarn produces a noticeably narrower strip, add one additional BLO hdc row to every strip.
The important point is that all strips remain the same width.
Make the first set of 9 following the color sequence above.
Make another identical set of 9 for the second bag panel.
Part 2: Crochet the Horizontal Strips
Make 6 horizontal strips per panel.
You will need:
12 horizontal strips total
Each horizontal strip should measure approximately:
27–28 cm long × 3 cm wide
Using the required color:
Ch approximately 50–52, or until the chain measures about 27–28 cm.
Row 1
Hdc in the third ch from the hook.
Hdc across.
Ch 2 and turn.
Row 2
Hdc BLO across.
Ch 2 and turn.
Row 3
Hdc BLO across.
Fasten off.
Again, add the same additional row to every strip if necessary to reach approximately 3 cm in width.
Make the first set of 6 following the horizontal color sequence.
Make a second identical set.
Part 3: Prepare the First Woven Panel
Lay the 9 vertical strips side by side on a flat surface.
Arrange them in this order:
lavender – berry – green – cream – lavender – berry – yellow – green – lavender
Make sure:
- all upper ends align
- all lower ends align
- the strips touch without large gaps
- no strips are twisted
Temporarily pin the strips at the top.
Part 4: Weave Horizontal Strip 1
Take the first berry pink horizontal strip.
Starting at the left side, weave it:
over Vertical 1
under Vertical 2
over Vertical 3
under Vertical 4
Continue alternating over and under across all 9 strips.
Straighten the horizontal strip.
Push it gently toward the top.
Do not pull so tightly that the vertical strips distort.
Part 5: Weave Horizontal Strip 2
Take the golden yellow strip.
This row must use the opposite weaving sequence.
Begin:
under Vertical 1
over Vertical 2
under Vertical 3
over Vertical 4
Continue across.
Push the second strip snugly against the first.
You should now see the basket-weave checkerboard beginning to form.
Part 6: Continue the Woven Pattern
Add the remaining horizontal strips in this order:
- Emerald green
- Natural cream
- Berry pink
- Lavender
Alternate the weaving direction every row.
Therefore:
Odd Horizontal Rows
Over, under, over, under.
Even Horizontal Rows
Under, over, under, over.
When all 6 strips are inserted, adjust the panel until:
- strips are straight
- crossings are square
- there are no large gaps
- edges are approximately even
- panel measures roughly 27–28 cm wide × 18–20 cm high
Part 7: Secure Every Woven Crossing
This step is important for a functional bag.
Thread a yarn needle with matching yarn.
From the back of the panel, make one or two small stitches at every point where a horizontal strip crosses a vertical strip.
Catch only the back loops or underside of the crochet whenever possible.
Do not sew through the entire thickness in a way that creates obvious stitches on the front.
Secure all:
9 vertical × 6 horizontal = 54 intersections
This prevents the strips from sliding when the bag is filled.
Weave the sewing ends into the backs of the strips.
Part 8: Make the Second Woven Panel
Repeat Parts 3–7 using the second set of strips.
Make the same:
- color order
- strip spacing
- over-under sequence
- measurements
You should now have 2 matching rectangular woven panels.
Part 9: Crochet a Cream Border Around Each Panel
Using natural cream yarn, join at one corner.
Ch 1.
Work sc evenly around the entire panel.
The purpose of this round is to catch and secure every strip end.
Along the top and bottom, insert the hook firmly through the ends of the vertical strips.
Along the sides, crochet through the ends of the horizontal strips.
At each corner work:
3 sc in the corner
Continue around.
Join with sl st.
Border Round 2
Ch 1.
Sc in every stitch around.
At each corner work:
3 sc in the center corner stitch
Join and fasten off.
Repeat on the second panel.
Important: both finished panels should have the same border stitch count.
If necessary, adjust a few stitches during the first border round so the two panels match.
Part 10: Join the Bag
Place the front and back panels together with the wrong sides facing each other.
The right sides should face outward.
Align:
- top corners
- side edges
- bottom corners
Use stitch markers to hold the pieces together.
Join natural cream yarn at the upper left corner.
Working through both panel borders:
Sc down the first side.
Work 3 sc through both layers at the bottom corner.
Sc across the entire bottom.
Work 3 sc at the opposite bottom corner.
Sc upward along the second side.
Stop at the upper corner.
Fasten off.
Leave the top completely open.
The visible cream joining seam creates the neat outlined edge seen around the colorful woven body.
Part 11: Shape the Bottom Corners
Place the empty bag flat.
Gently push the two lower corners outward with your fingers.
Because the panels are flexible, the joined bottom will naturally round slightly when the bag contains something.
For more defined rounded corners, lightly steam or wet block the lower edge according to the yarn care instructions.
Do not overstretch the woven strips.
Part 12: Crochet the Cream Top Band
Join natural cream yarn at one side seam along the open top.
Top Round 1
Ch 1.
Sc evenly around the entire opening.
Make sure the front and back contain the same number of stitches.
Join with sl st.
Top Round 2
Ch 1.
Sc in every st around.
Join.
Top Rounds 3–7
Repeat:
1 sc in every stitch around
Join after each round.
The band should measure approximately:
5–6 cm high
Do not decrease.
The upper band should remain straight and structured.
Fasten off after the final round.
Part 13: Make the Crochet Handles
Make 2 identical handles in natural cream.
Each finished handle should measure approximately:
48–52 cm long × 2.5–3 cm wide
Foundation
Ch approximately 85–90, or until the relaxed chain reaches your desired handle length.
Row 1
Hdc in third ch from hook.
Hdc across.
Ch 2 and turn.
Row 2
Hdc BLO across.
Ch 2 and turn.
Row 3
Hdc BLO across.
Fasten off, leaving a long sewing tail at both ends.
For wider or firmer handles, add a fourth BLO hdc row to both handles.
Part 14: Position the Handles
Lay the bag flat.
On the front top band, mark two handle positions approximately:
6–7 cm inward from each side edge
The handle ends should be evenly spaced.
Position the first handle so:
- both ends sit against the inside of the cream top band
- approximately 3–4 cm of each handle end overlaps the band
- the handle is not twisted
Repeat with the second handle on the back.
The front and back attachment points should line up.
Part 15: Sew the Handles Securely
Thread the cream yarn tail onto a yarn needle.
Sew each handle end firmly to the top band.
Use a box-style reinforcement:
- sew across the bottom of the overlapping handle
- sew upward along one side
- sew across the upper section
- sew downward along the opposite side
- add a diagonal reinforcement if desired
Repeat several times.
Do this for all 4 handle attachment points.
Do not attach the handles only through the topmost row. Sew through several rows of the solid cream band.
Part 16: Optional Top Edge Reinforcement
If you want a firmer opening, join cream yarn after the handles are attached.
Work one final round of:
sl st loosely in each st around
Keep the slip stitches relaxed.
This creates a defined upper edge without narrowing the opening.
Fasten off.
Part 17: Optional Fabric Lining
Because the bag uses a woven construction, a lining is useful if you intend to carry small or heavy objects.
Cut two pieces of cotton fabric slightly larger than the inside of the bag.
Sew the fabric pieces together along:
- both sides
- bottom
Leave the top open.
Turn the upper raw edge inward.
Insert the lining into the crochet bag.
Hand-sew the lining to the inside of the cream top band.
Keep the stitches hidden from the outside.
Do not sew through the colorful woven body.
Finishing
Weave in all remaining yarn ends.
Check every woven intersection.
Reinforce any crossing that moves excessively.
Straighten each strip with your fingers.
Check that:
- the colored strips remain perpendicular
- the panel edges are even
- both handles are the same length
- the top band sits straight
- the lower corners curve evenly
Your colorful woven crochet tote bag is complete.
Design Consistency Lock
To achieve the same finished look as the reference design, keep these features consistent.
Woven Body
The body must look like genuine overlapping crochet strips.
Do not imitate the effect using ordinary colorwork squares.
Use:
- narrow ribbed strips
- true over-under weaving
- alternating crossings
- tightly packed rows
- visible raised strip edges
Colors
Use:
- natural cream
- berry pink
- lavender purple
- emerald green
- golden yellow
Keep the solid top band, panel edging, joining seam, and handles natural cream.
Bag Shape
The finished bag should have:
- rectangular woven front
- matching woven back
- softly rounded bottom corners
- open top
- thick cream upper band
- 2 long cream handles
- no closure
Do not add:
- zipper
- drawstring
- flap
- buttons
- flowers
- tassels
- fringe
- wooden handles
- leather straps
- granny squares
Tips & Variations
Keep the Woven Pattern Straight
The most important part of this crochet bag pattern is securing the crossings. If the strips are not tacked together, the beautiful checkerboard pattern can shift during use.
Arrange the whole panel first, measure it, and only then sew the intersections.
Use Cotton for Better Structure
Cotton or a firm cotton blend works especially well because it keeps the strips flat and allows the woven pattern to remain crisp.
Very stretchy acrylic can produce a softer, less structured bag.
Change the Color Palette
For a softer version, try:
- dusty rose
- sage
- cream
- pale lavender
- butter yellow
For a neutral version, use:
- ivory
- camel
- mocha
- warm gray
- black
Keep the same strip arrangement so the construction stays unchanged.
Make a Matching Woven Coaster
The same technique can be used for a smaller square project.
Make several short strips of equal width, weave them into a square, secure all crossings, and finish with a cream single crochet border.
This is a useful way to practice the weaving technique before beginning the bag.
FAQ
Is the basket-weave effect crocheted directly into the fabric?
No. The most distinctive feature of this design comes from separate crochet strips physically woven over and under one another. This gives the bag much more dimension than a flat basket-weave stitch.
Do I have to sew every intersection?
For a decorative swatch you might not need to, but for a functional bag it is strongly recommended. Tack stitching the intersections stops the strips from sliding, bunching, or opening when the bag carries weight.
Can I make the bag larger?
Yes. Add more vertical strips for width and more horizontal strips for height. Every additional strip adds approximately the width of one strip, around 3 cm in this sample.
Conclusion
This colorful woven crochet tote turns simple ribbed strips into a bold, dimensional basket-weave bag. The true over-under construction creates the checkerboard effect, while the cream edging, solid upper band, and sturdy matching handles give the finished project enough structure for everyday use.
Once you understand the strip-weaving method, it is easy to customize the bag with your favorite colors or use the same crochet technique for coasters, pouches, cushions, and other handmade accessories.




I got excited whenI saw this bag. But you say not to add a zipper. Why is this? If I make this bag it would need a fasteners of some kind. A zipper seems like the obvious solution.