Elegant 3D Puff Stitch Crochet Beanie
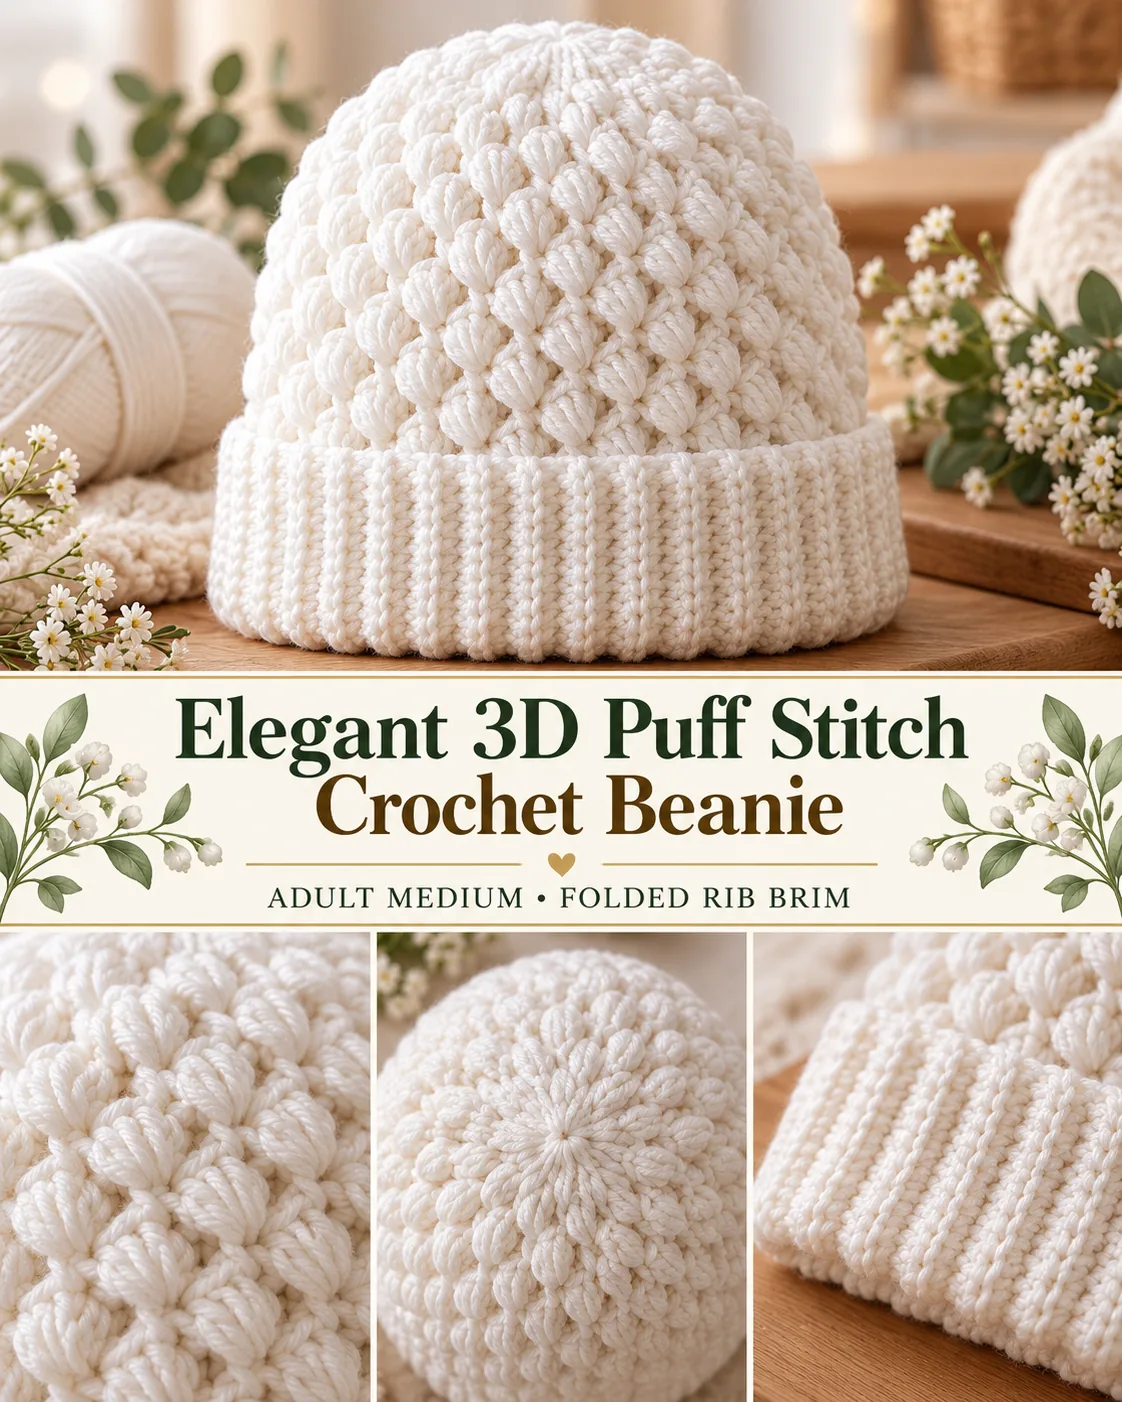
The Elegant 3D Puff Stitch Crochet Beanie is a warm adult-size hat with a deep folded ribbed brim and a plush staggered puff texture that continues into a softly gathered crown. This Yarnimals version is locked to one adult-woman medium size so every measurement, stitch count, repeat, and decrease round works together as one complete pattern.
The beanie begins with a flat strip of back-loop single-crochet ribbing. The strip is joined into a ring, then 84 single crochets are worked evenly around one long edge. The body uses a three-round puff-placement sequence over those 84 stitches. The crown then decreases in six controlled rounds, carrying the puff texture upward before the final seven stitches are drawn closed.
Finished Size and Project Lock
- Size: adult woman medium
- Fits head circumference: approximately 21-22 inches / 53-56 cm
- Finished brim circumference before stretching: approximately 20.5-21 inches / 52-53 cm
- Finished beanie height: approximately 8.5-9 inches / 21.5-23 cm with brim folded
- Visible folded brim depth: approximately 2.5 inches / 6.5 cm
- Brim rows: exactly 84
- Body stitch count: exactly 84 stitches
- Texture: staggered 3D puff stitches over a three-round placement cycle
- Yarn: #4 worsted-weight
- Color: warm ivory
- Hook: 4.0 mm G-6
- Construction: ribbed strip joined into a ring, body worked in joined rounds, crown decreased from 84 to 7 stitches
- Closure: gathered yarn-tail crown; no pom-pom or hardware
Materials
- Approximately 220-260 yards / 200-238 m of #4 worsted-weight yarn in warm ivory
- 4.0 mm crochet hook
- 1 locking stitch marker
- Tapestry needle
- Scissors
- Flexible measuring tape
Yarn Choice
Choose a smooth worsted-weight yarn with enough body to hold the puff stitches. A soft acrylic, wool blend, or smooth washable wool works well. Very fuzzy yarn can hide the puff definition, while very stiff cotton can make the hat feel heavy. The sample is designed around a soft ivory yarn so the ribbing and raised texture remain easy to see.
Gauge
Because the hat starts with a ribbed band, check both ribbing and body gauge.
- Ribbing gauge: approximately 16 rows = 4 inches / 10 cm when the strip is relaxed
- Body gauge: approximately 16 stitches and 9 rounds = 4 inches / 10 cm in the established puff pattern
The 84-row brim should measure about 20.5-21 inches before seaming. It must stretch comfortably to at least 22 inches. If your 84-row strip is much shorter, loosen your tension or move up a hook size. If it is much longer, use a smaller hook.
Abbreviations — US Terms
- ch = chain
- sc = single crochet
- sl st = slip stitch
- sc2tog = single crochet 2 stitches together
- st(s) = stitch(es)
- BLO = back loop only
- rnd = round
Special Stitch: 3D Puff
Yarn over, insert the hook into the indicated stitch, yarn over and pull up a loop to about the height of a double crochet. Repeat this yarn-over, insert, yarn-over, pull-up sequence four times total in the same stitch. You will have 9 loops on the hook. Yarn over and pull through all 9 loops, then ch 1 to lock the puff. The locking ch 1 does not count as a separate stitch. The completed puff counts as one stitch position.
Keep every pulled-up loop the same height. If one loop is noticeably shorter, the puff will twist rather than sit upright.
Special Stitch: sc2tog
Insert the hook in the next stitch, yarn over and pull up a loop. Insert the hook in the following stitch, yarn over and pull up a loop. Yarn over and pull through all 3 loops on the hook. One sc2tog consumes 2 stitches and produces 1 stitch.
How the Puff Pattern Works
The body always remains at 84 stitch positions until the crown shaping begins. The 84 stitches divide evenly into 28 groups of 3.
- Texture Round A: puff, sc, sc
- Texture Round B: sc, puff, sc
- Texture Round C: sc, sc, puff
Repeating A, B, C moves the puff one stitch sideways on each round, creating the dense diagonal 3D texture while keeping the stitch count unchanged.
Construction Overview
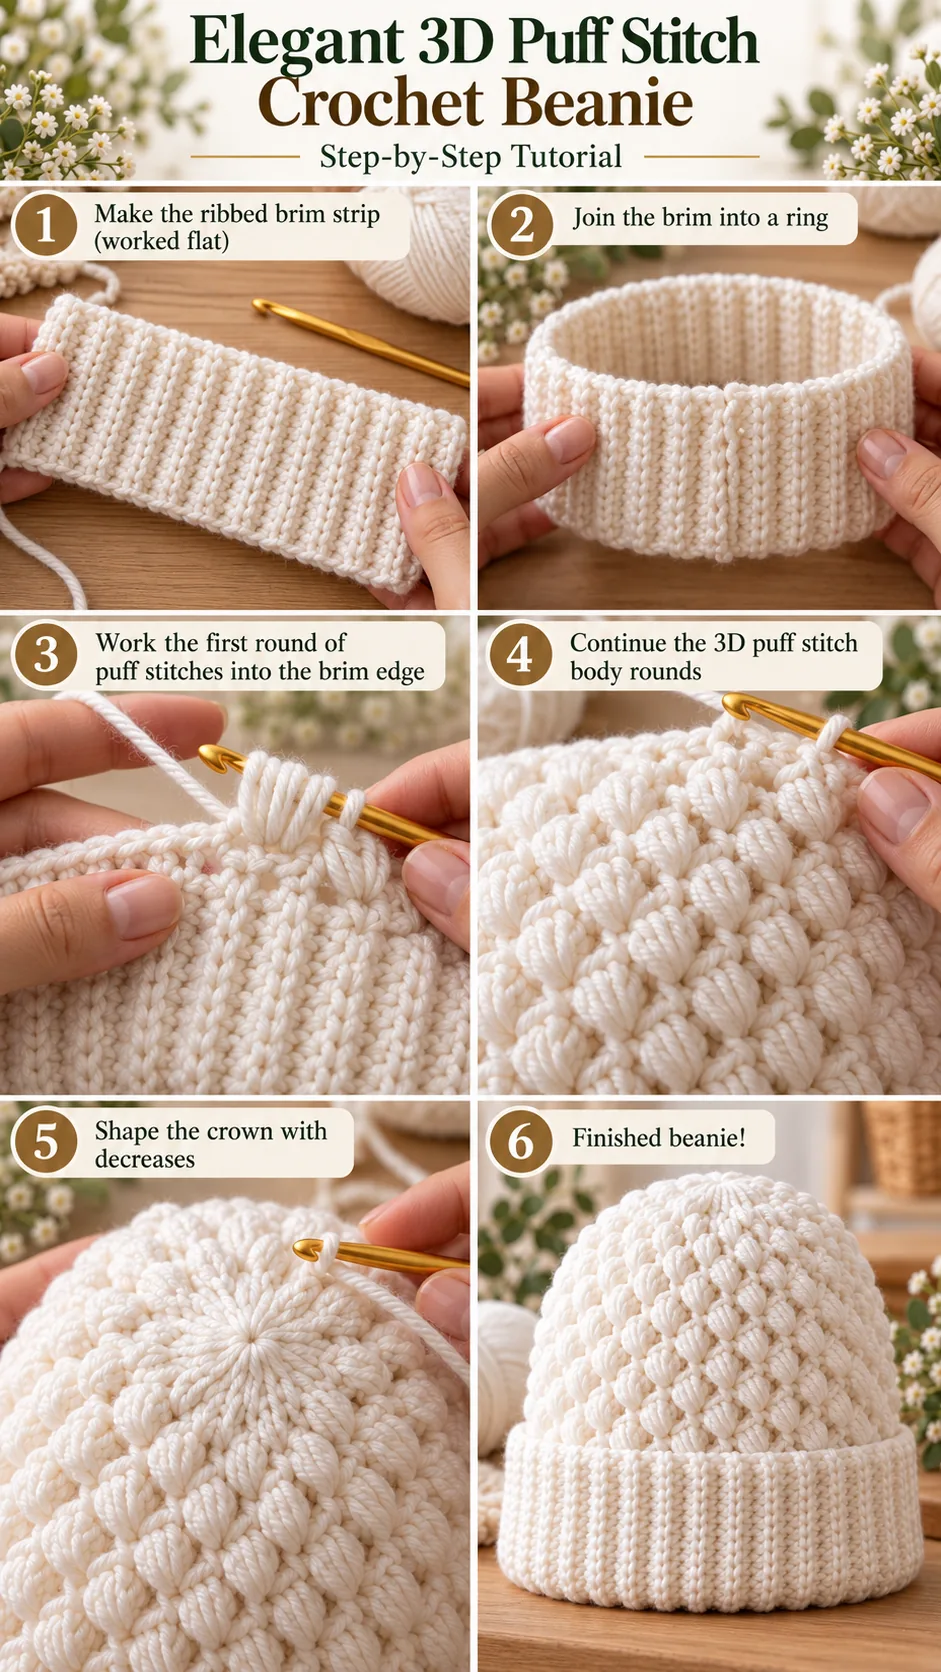
First crochet an 84-row ribbed strip that is 10 stitches wide. Join the short ends to make a ring. Work 84 sc evenly around one long edge of the ring, one stitch into every ribbing row end. Then work exactly 9 puff-texture rounds. With the brim folded outward, the hat should measure close to 6.25 inches / 16 cm from the lower folded edge to the working round. Six decrease rounds shape the crown from 84 stitches to 7 stitches. The remaining opening is gathered securely with the yarn tail.
Detailed Pattern
Ribbed Brim
Ch 11.
Row 1: Sc in 2nd ch from hook and in each remaining ch. Turn. 10 sc.
Row 2: Ch 1; this does not count as a stitch. Sc in BLO of the first stitch and in BLO of each stitch across. Turn. 10 sc.
Rows 3-84: Repeat Row 2. Keep the first and last stitch firm enough that the strip edges remain straight. 10 sc in every row.
Brim Check Before Joining
Lay the ribbing flat without stretching it. It should measure approximately 20.5-21 inches long and about 2.5 inches deep. Count the raised rib columns or row ends and confirm you have exactly 84 rows.
Wrap the strip around the intended head or around a 21-22 inch head form. The ends should meet comfortably without the strip becoming overstretched.
Join the Brim into a Ring
Bring Row 84 to the foundation edge with the ribbing untwisted. Hold the two short ends together.
Working through one loop of the foundation edge and the corresponding stitch of Row 84, slip stitch the two edges together across all 10 stitch positions. Keep this seam relaxed so it stretches with the rest of the brim.
Turn the ring so the joining seam sits on the inside. The ribbing should now form a continuous vertical-rib tube.
Foundation Round Around the Brim — 84 sc
With the brim ring lying flat, choose one long edge as the upper edge. The opposite edge will become the lower edge that folds upward when worn.
Ch 1. Work 1 sc into the end of each ribbing row around the upper edge. Because the brim has 84 rows, you must finish with exactly 84 sc. Join with sl st to the first sc.
Place a marker in the first stitch. Do not add extra stitches at the ribbing seam.
Body Texture
Texture Round 1 — Round A
Ch 1. *Work 1 puff in the next stitch, sc in each of the next 2 stitches.* Repeat from * to * around. Join with sl st to the top of the first puff. 84 stitch positions: 28 puffs + 56 sc.
Texture Round 2 — Round B
Ch 1. *Sc in the next stitch, puff in the next stitch, sc in the next stitch.* Repeat around. Join. 84 stitch positions: 28 puffs + 56 sc.
Texture Round 3 — Round C
Ch 1. *Sc in each of the next 2 stitches, puff in the next stitch.* Repeat around. Join. 84 stitch positions: 28 puffs + 56 sc.
Texture Rounds 4-9
Repeat Texture Rounds 1-3 two more times:
- Round 4 = A
- Round 5 = B
- Round 6 = C
- Round 7 = A
- Round 8 = B
- Round 9 = C
At the end of Round 9, the body still contains 84 stitch positions.
Height Check Before Crown Shaping
Fold the ribbed brim outward along its natural midpoint so the full ribbing depth shows as the finished cuff. Measure from the lower folded edge of the brim to the top of Texture Round 9. The measurement should be close to 6.25 inches / 16 cm.
If your measurement is within about 1/4 inch, continue to the crown. If it is significantly different, recheck gauge. Do not add random extra rounds unless you intentionally want a taller hat, because this pattern is locked to the adult-medium proportions shown here.
Crown Shaping
The crown uses 14 repeated decrease sections. Keep the puffs relaxed and slightly shorter than the body puffs so the top closes smoothly.
Decrease Round 1 — 70 stitches
Ch 1. *Puff in the next stitch, sc2tog over the next 2 stitches, sc in each of the next 3 stitches.* Repeat 14 times around. Join. 70 stitches.
Decrease Round 2 — 56 stitches
Ch 1. *Puff in the next stitch, sc2tog over the next 2 stitches, sc in each of the next 2 stitches.* Repeat 14 times. Join. 56 stitches.
Decrease Round 3 — 42 stitches
Ch 1. *Puff in the next stitch, sc2tog over the next 2 stitches, sc in the next stitch.* Repeat 14 times. Join. 42 stitches.
Decrease Round 4 — 28 stitches
Ch 1. *Puff in the next stitch, sc2tog over the next 2 stitches.* Repeat 14 times. Join. 28 stitches.
Decrease Round 5 — 14 stitches
Ch 1. Sc2tog around 14 times. Join. 14 stitches.
Decrease Round 6 — 7 stitches
Ch 1. Sc2tog around 7 times. Join. 7 stitches.
Fasten off, leaving a tail at least 10 inches / 25 cm long.
Close the Crown
Thread the long tail onto a tapestry needle. Pass the needle through the front loop of each of the 7 remaining stitches. Pull the tail firmly so the opening closes.
Pass the needle through the gathered circle a second time in the same direction. Pull snugly, then take the yarn to the inside of the hat. Make two small securing passes through nearby stitches and weave the remaining tail through the inside of the crown for several inches.
Fold and Set the Brim
Fold the ribbed brim outward so approximately the full 2.5-inch ribbing depth is visible. Align the brim seam with the back of the hat. The folded brim should sit flat against the lower body without pulling the puff fabric inward.
If you want the fold to stay permanently in place, you may tack it lightly at the back seam with two or three hidden stitches. Do not sew the entire brim down; leaving it mostly free preserves stretch.
Final Measurements
- Brim: 10 stitches wide x 84 rows long
- Brim circumference before stretching: approximately 20.5-21 inches
- Foundation round: 84 sc
- Texture rounds: 9 total
- Body count before crown: 84 stitches
- Decrease counts: 70, 56, 42, 28, 14, 7
- Finished folded-brim height: approximately 8.5-9 inches
Visual Checkpoints
After 20 brim rows: the strip should have clear vertical ribs and straight side edges. If the strip curves strongly, your first or last stitch is being missed.
After Row 84: the ribbing should wrap comfortably around a 21-22 inch head with gentle stretch.
After the 84-sc foundation round: the body edge should sit flat without ruffling or pulling the ribbing inward.
After Texture Round 3: the puffs should be visibly staggered rather than stacked directly over one another.
After Texture Round 9: the fabric should feel plush but still flexible. The crown should not have started tapering yet.
After Decrease Round 3: the top should begin forming a smooth dome. There should be no sharp pleats between decrease sections.
Before gathering: count exactly 7 stitches.
Troubleshooting
The brim is too loose
Check the relaxed measurement before seaming. The 84-row strip should be around 20.5-21 inches, not the full head measurement. Ribbing needs a small amount of negative ease so it stays in place.
The 84-sc foundation round ruffles
You probably added more than one stitch to some row ends. Work exactly one sc into each of the 84 ribbing rows.
The puff stitches look flat
Pull each of the four elongated loops to the same height before closing all 9 loops together. Short loops make a dense knot instead of a rounded 3D puff.
The body stitch count changes
The locking ch 1 after a puff does not count as an extra stitch. Work the next sc into the next actual stitch from the previous round.
The crown forms ridges instead of a dome
Check the decrease counts after every round. The sequence must be 84 to 70 to 56 to 42 to 28 to 14 to 7. Missing or adding a decrease changes the crown geometry quickly.
The crown opening will not close neatly
Do not stop at 14 stitches. Work the final sc2tog round to 7 stitches, then gather those seven front loops with the yarn tail.
Finishing
Weave in the starting tail, brim-seam tail, body-join tail, and crown tail on the inside of the hat. If the yarn is washable, lightly damp block the finished beanie over a rounded bowl or hat form close to the intended head size. Do not stretch the brim. Shape the crown with your hands and allow it to dry completely.
Avoid aggressive steam directly on the puff stitches, especially with acrylic yarn, because too much heat can flatten the raised texture.
Pattern at a Glance
- Ch 11; work 10 BLO sc for 84 rows.
- Join short ends to make the ribbed ring.
- Work exactly 84 sc around one long edge.
- Work 9 staggered puff-texture rounds in A-B-C sequence.
- Begin crown shaping at approximately 6.25 inches / 16 cm measured from the lower folded brim edge.
- Decrease counts: 70, 56, 42, 28, 14, 7.
- Gather the final 7 stitches securely.
- Fold the ribbed brim outward.
The finished Elegant 3D Puff Stitch Crochet Beanie combines a stretchy 84-row ribbed brim with an exact 84-stitch textured body and a six-round crown decrease. Keeping those counts consistent gives the hat its fitted adult-medium shape and lets the raised ivory puffs remain evenly distributed from brim to crown.