Elegant Raised-Rib Crochet Baby Blanket With a Soft Woven Texture
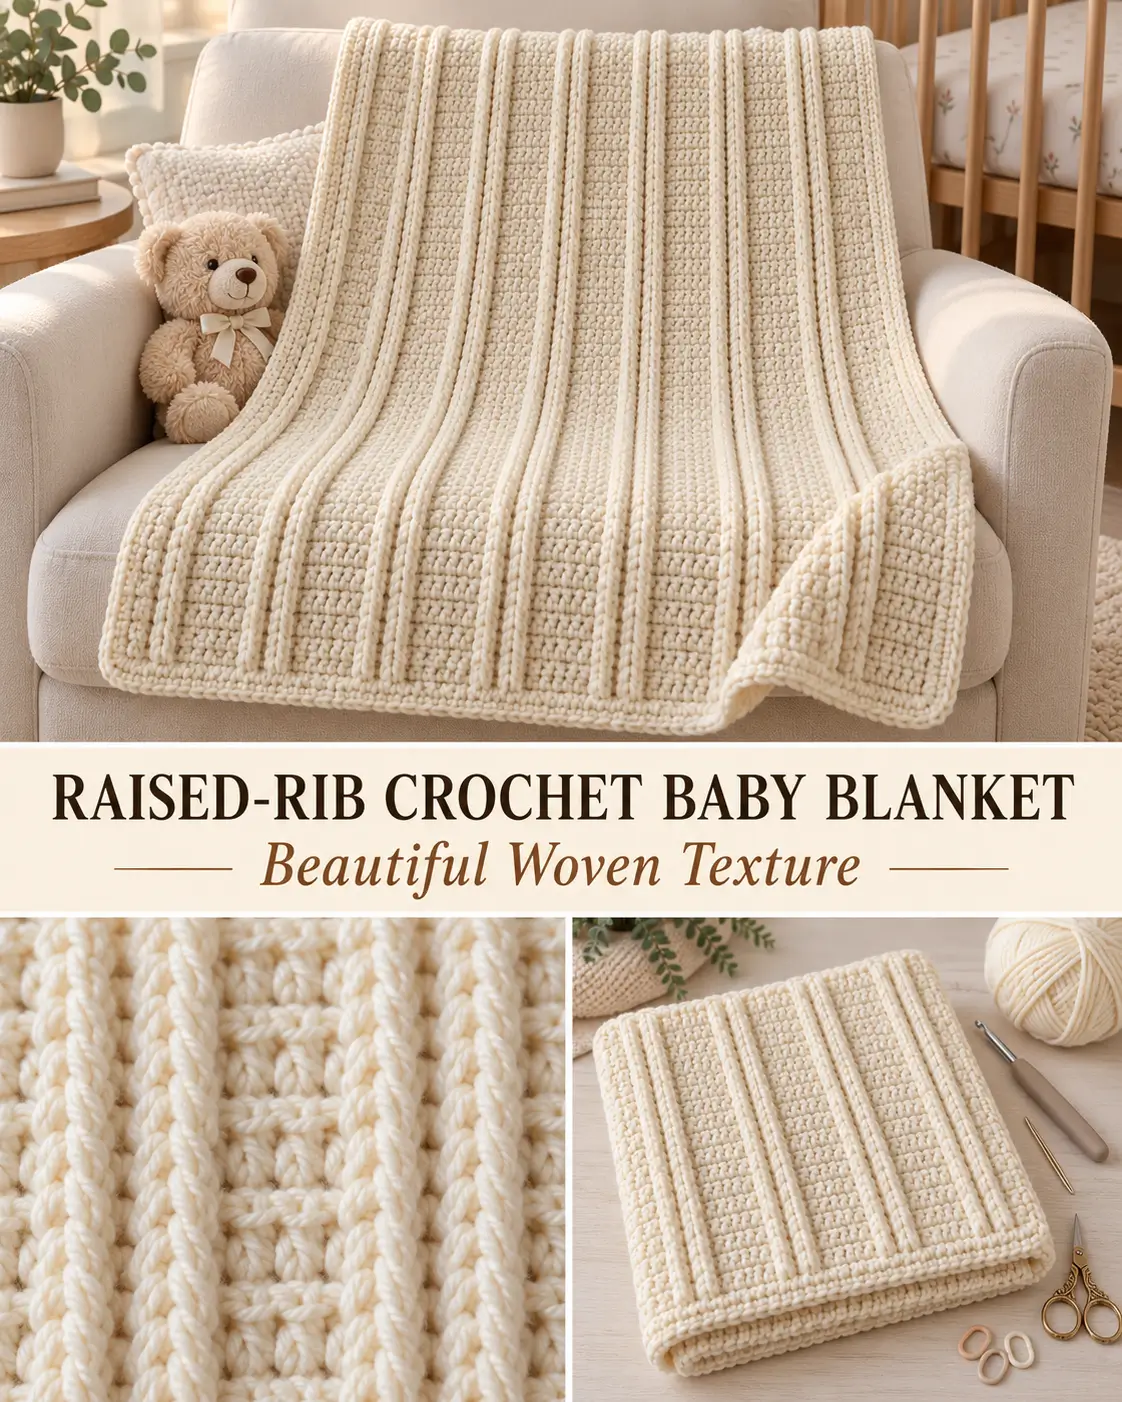
This cream crochet baby blanket uses paired raised post stitches separated by narrow flat sections to create the clean vertical ribbing shown in the finished design.
The blanket is worked flat from the bottom upward in one piece. There are no motifs to join, no color changes, and no cables. The dimensional effect comes from ordinary double crochet combined with front-post and back-post double crochet stitches.
The finished fabric has three important features:
- pairs of raised vertical ribs
- narrow flatter valleys between the ribs
- a simple border that frames the texture without covering it
A smooth solid yarn lets the shadows around the raised columns do most of the visual work. Pasted markdown
Finished Size
Suggested baby blanket:
Approximately 35 × 40 inches / 89 × 102 cm
The pattern is easy to resize.
Because yarn thickness, hook size, and personal tension can significantly change the width, this pattern uses a swatch-first sizing method instead of pretending that one foundation-chain count will produce 35 inches for everyone. Pasted markdown
Materials
- Medium / worsted weight #4 yarn
- Approximately 900–1,200 yards / 825–1,100 meters
- 5 mm / H-8 crochet hook
- Yarn needle
- Scissors
- Stitch markers
- Measuring tape
The yarn amount is an estimate for a baby blanket around 35 × 40 inches. Raised post stitches generally use more yarn than a flat double-crochet fabric, so having an extra skein available is useful. Pasted markdown
Recommended Yarn Color
For the clean textured appearance shown here, use:
warm natural ivory / soft cream
Other good solid colors include:
- oatmeal
- soft sage
- dusty blue
- muted clay
- pale gray
A smooth yarn works better than a fuzzy yarn because it keeps the raised ribs clearly visible.
Skill Level
Confident beginner to intermediate
You should know:
- chain
- double crochet
- single crochet
- slip stitch
- front post double crochet
- back post double crochet
If you already know ordinary double crochet, the main new skill is learning to work around the post of a stitch instead of through the top loops.
Abbreviations
This pattern uses US crochet terminology.
ch — chain
sc — single crochet
dc — double crochet
FPdc — front post double crochet
BPdc — back post double crochet
sl st — slip stitch
st / sts — stitch / stitches
RS — right side
WS — wrong side
rep — repeat
Important Pattern Structure
The blanket uses:
2 raised stitches + 2 flat stitches
across the center.
There is also:
1 ordinary edge stitch at each side
Therefore, your total number of working stitches must be:
a multiple of 4 + 2
Examples:
- 26 stitches
- 30 stitches
- 34 stitches
- 38 stitches
- 42 stitches
- 46 stitches
and so on.
The two extra stitches are the stable edge stitches.
Foundation Chain Formula
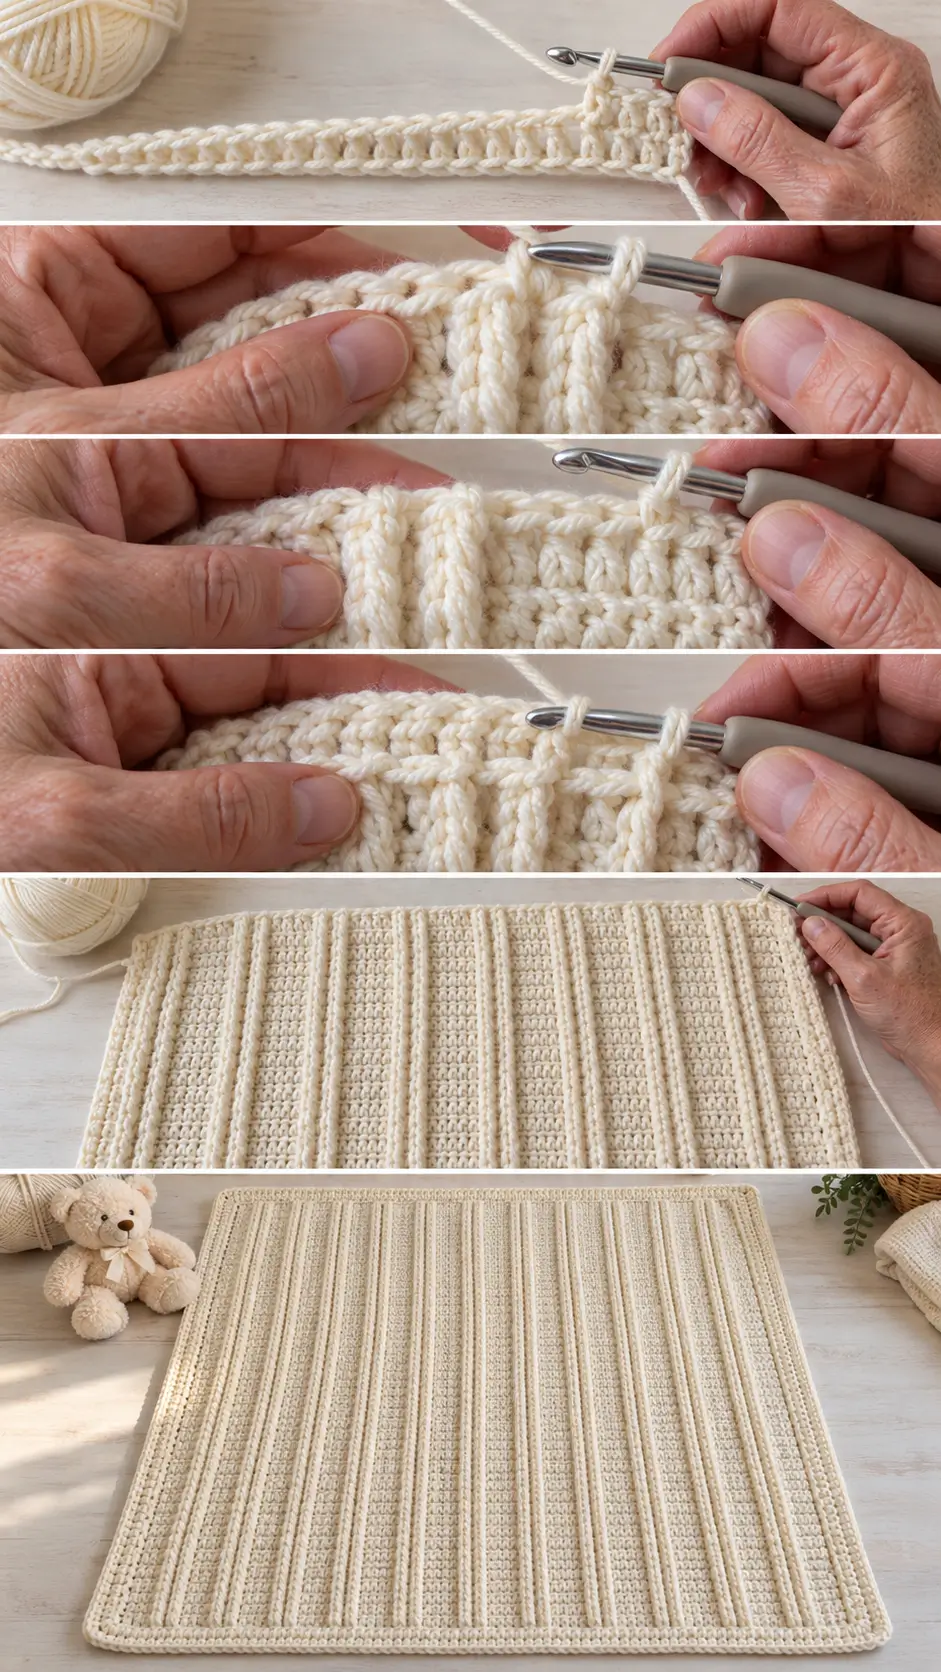
Once you know how many working stitches you need:
Foundation chain = working stitch count + 2
The extra 2 chains are used for turning into the first double-crochet row.
For example:
If you want:
26 working stitches
make:
ch 28
Then work your first dc into the third chain from the hook.
You will finish with:
26 dc
Turning Chain Rule
Throughout this pattern:
ch 2 at the beginning of a row does NOT count as a stitch.
This keeps the side edges much easier to track.
Your first actual stitch is always worked into the first stitch.
Special Stitch — Front Post Double Crochet
Yarn over.
Instead of inserting the hook through the top loops of the next stitch, insert the hook:
from front to back
around the post of the stitch,
then bring the hook:
back to the front
on the other side of the post.
Yarn over.
Pull up a loop.
You now have:
3 loops on the hook
Yarn over.
Pull through 2 loops.
Yarn over.
Pull through the final 2 loops.
One:
FPdc
is complete.
The stitch projects toward the front of the fabric.
Special Stitch — Back Post Double Crochet
Yarn over.
Insert the hook:
from back to front
around the post of the stitch,
then bring it:
back to the wrong side
on the other side of the post.
Yarn over.
Pull up a loop.
Yarn over and pull through 2 loops.
Yarn over and pull through the remaining 2 loops.
One:
BPdc
is complete.
When BPdc is worked from the wrong side around the correct previous post stitch, it keeps that same physical rib projecting toward the front of the blanket.
Why the Wrong-Side Row Is Different
This detail is important.
On the right-side row, the repeat begins:
2 FPdc, 2 dc
When you turn the blanket, the stitch order is reversed from your point of view.
To keep the raised stitches stacked in the same vertical columns, the wrong-side repeat must therefore be:
2 dc, 2 BPdc
—not 2 BPdc followed by 2 dc.
This keeps the ribs vertical rather than shifting them sideways.
Make a Gauge Swatch First
Before beginning the blanket, make a swatch.
A convenient test swatch uses:
26 working stitches
so:
ch 28
Work the pattern for at least:
6 inches / 15 cm
in height.
Lay it flat without stretching.
Measure the width.
Calculate Your Blanket Width
Use:
working stitches ÷ swatch width = stitches per inch
Then:
desired blanket width × stitches per inch = approximate working stitch count
Round that number to the nearest number that equals:
multiple of 4 + 2
Then add:
2 foundation chains
Example Only
Suppose your 26-stitch swatch measures exactly:
6 inches
Then:
26 ÷ 6 = approximately 4.33 stitches per inch
For approximately:
35 inches
you would calculate:
35 × 4.33 = approximately 152 stitches
Now choose the nearest valid stitch count using:
multiple of 4 + 2
A valid nearby count would be:
150 or 154 stitches
Make whichever width you prefer.
Then add:
2 chains
for the foundation.
This is only an example. Use your own swatch measurement.
BLANKET PATTERN
Foundation
Chain the number required for your chosen width.
Remember:
Your intended working stitch count must be:
multiple of 4 + 2
and your foundation chain should contain:
working count + 2 chains
Foundation Row
Beginning in the:
third chain from the hook
work:
1 dc in every chain across
Count your stitches.
You should have your planned:
multiple of 4 + 2
working stitches.
Ch 2.
Turn.
This first row is a plain double-crochet foundation.
Row 1 — Right Side Raised-Rib Row
Dc in the first stitch.
This is your first edge stitch.
Now repeat across the center:
FPdc around each of the next 2 dc posts
then:
dc in each of the next 2 stitches
Repeat:
2 FPdc, 2 dc
until:
1 stitch remains
Dc in the final stitch.
Ch 2.
Turn.
What Row 1 Should Look Like
The front should now show:
edge dc | 2 raised posts | 2 flat dc | 2 raised posts | 2 flat dc… | edge dc
The raised stitches occur in pairs.
These paired posts become the permanent vertical ribs.
Row 2 — Wrong Side Alignment Row
You are now looking at the wrong side.
Dc in the first stitch.
Now work:
dc in each of the next 2 stitches
Then work:
BPdc around each of the next 2 post stitches
Repeat:
2 dc, 2 BPdc
across the center.
Continue until:
1 stitch remains
Dc in the final stitch.
Ch 2.
Turn.
Why Row 2 Works
Although the sequence looks reversed while you are working from the back, once you turn to the front again, those BPdc stitches line up exactly with the FPdc stitches from Row 1.
This creates continuous vertical ribs rather than a staggered texture.
Row 3 — Right Side
Dc in first stitch.
Repeat:
FPdc around next 2 post stitches
dc in next 2 stitches
across.
Dc in final stitch.
Ch 2.
Turn.
Row 4 — Wrong Side
Dc in first stitch.
Repeat:
dc in next 2 stitches
BPdc around next 2 post stitches
across.
Dc in final stitch.
Ch 2.
Turn.
Main Repeat
Continue repeating:
Row 3
then:
Row 4
for the entire blanket body.
The visual rhythm will remain:
raised pair | flat pair | raised pair | flat pair
running vertically from the foundation toward the top edge. Pasted markdown
How the Correct Fabric Should Look
After several repeats, the right side should show:
- two raised vertical stitches together
- two flatter dc stitches
- another raised pair
- another flat pair
- evenly spaced narrow valleys
- straight continuous columns
The ribs should look pronounced but not excessively thick.
The blanket should look structured and softly woven rather than cabled.
How to Recognize the Right Side
The right side is the side where the paired ribs project outward most clearly.
The flatter valleys should sit slightly behind them.
If the post stitches appear to alternate front and back instead of remaining on the same face, check your wrong-side BPdc placement.
Keep the Post Stitches Relaxed
Do not pull the FPdc or BPdc tightly around the post.
The loop you pull up should reach the height of the current row comfortably.
If the post stitches are too short:
- the fabric may pull vertically
- the ribs may curl
- the blanket may become shorter than expected
Relax the post stitches slightly while keeping the ordinary dc stitches even. Pasted markdown
Continue to the Desired Length
For a finished blanket around:
40 inches / 102 cm long
continue the body until it measures approximately:
38–38½ inches / 96.5–98 cm
before the border.
Finish after a wrong-side row if possible so the border begins with the right side facing you.
Do not fasten off.
Check the Blanket Before the Border
Lay the blanket completely flat.
Check that:
- both side edges are straight
- the stitch count has remained unchanged
- all raised ribs run vertically
- no rib suddenly shifts sideways
- both edges are the same length
- the blanket lies reasonably flat
Fix any major counting errors before adding the border.
BORDER
The texture is already strong, so the border should remain simple.
Border Round 1
With the right side facing you:
Ch 1.
Work:
sc evenly around the entire blanket
Across the top:
Work:
1 sc in each stitch
At the first corner:
Work:
3 sc
Down the side:
Work sc evenly into the row ends.
Do not automatically force two stitches into every row end.
Instead, distribute them so the border lies flat.
At the next corner:
3 sc
Across the foundation edge:
Work sc evenly across.
At the next corner:
3 sc
Work evenly up the second side.
At the final corner:
3 sc
Join with a sl st to the first sc.
Check Border Round 1
Lay the blanket flat.
If the border:
ruffles, there are too many side stitches.
Remove a few.
If the border:
pulls inward, you need a few more stitches along the sides.
The correct number depends on your row gauge.
Border Round 2
Ch 1.
Sc in every stitch around.
At each corner, find the middle stitch of the previous:
3-sc corner
Work:
3 sc into that stitch
Continue around.
Join with a sl st.
Optional Border Round 3
For a slightly more polished edge, choose one of these finishes:
Option 1 — Plain Single Crochet
Work another sc round with:
3 sc in every corner
Option 2 — Slip-Stitch Edge
Work loose sl sts around the entire blanket.
Option 3 — Reverse Single Crochet
Work reverse sc around for a subtle corded finish.
For a baby blanket, a simple smooth border is usually the most practical choice because it avoids large decorative loops. Pasted markdown
Fasten Off
Cut the yarn leaving approximately:
8 inches / 20 cm
Pull the tail through.
Thread onto a yarn needle.
Weave through several stitches on the wrong side.
Change direction.
Weave through several more stitches.
Trim the excess.
Repeat for every yarn join.
Blocking
Follow the care instructions for your yarn.
If wet blocking:
Dampen or wash the blanket gently.
Remove excess water without wringing.
Lay flat.
Smooth the edges.
Square the corners.
Arrange the ribs with your fingers.
Allow the blanket to dry completely.
Do not aggressively stretch the fabric.
Over-blocking can flatten the raised ribs. Pasted markdown
If the Ribs Start Shifting Sideways
The most likely problem is the wrong-side row.
Remember:
Right Side
2 FPdc, 2 dc
Wrong Side
2 dc, 2 BPdc
The order changes because the work has been turned.
If the Blanket Is Getting Wider
Count your stitches.
Every row must maintain exactly the same number.
A post stitch replaces the normal stitch at that position.
Do not work a post stitch and then also work a dc into the top of that same stitch.
If the Blanket Is Getting Narrower
Make sure you have not accidentally skipped a stitch after a post stitch.
After working around the post, move directly to the next stitch position required by the repeat.
If the Raised Ribs Look Flat
Check that your hook is actually traveling:
around the post
rather than through the top loops.
The post must sit in front of the hook for FPdc.
On the wrong side, use BPdc around the corresponding raised columns.
If the Blanket Feels Too Stiff
Try one of these adjustments:
- use a slightly larger hook
- relax your post stitches
- choose a softer worsted yarn
The blanket should remain structured but still drape comfortably.
If the Blanket Has Large Gaps
Try:
- a slightly smaller hook
- a denser worsted yarn
- firmer ordinary dc tension
Do not tighten the post stitches excessively just to remove gaps.
If the Side Edges Look Uneven
Use stitch markers in:
the first stitch
and:
the last stitch
of every row.
Always work one ordinary dc into those two edge stitches.
Do not include them in the post-stitch repeat.
Smaller Stroller Blanket
For approximately:
28 × 32 inches / 71 × 81 cm
make your swatch.
Calculate the working stitch count required for approximately 28 inches.
Round to:
multiple of 4 + 2
Add:
2 foundation chains
Work until the body is approximately:
30 inches
before the border.
Standard Baby Blanket
Target:
35 × 40 inches / 89 × 102 cm
Calculate the starting stitch count from your swatch.
Use:
multiple of 4 + 2
Work the body to approximately:
38–38½ inches
Then add the border.
Larger Crib Blanket
For approximately:
40 × 45 inches / 102 × 114 cm
calculate the required foundation using your swatch.
Maintain the same:
2 raised + 2 flat
repeat.
Work until approximately:
43 inches
before adding the border.
Throw Blanket
For approximately:
50 × 60 inches / 127 × 152 cm
use the same stitch repeat.
Simply increase the number of four-stitch pattern groups.
The larger the blanket becomes, the more important it is to count your stitches periodically.
Using DK Yarn
You can use DK / #3 yarn.
The blanket will be:
- lighter
- softer
- less bulky
- more delicate in texture
Use a hook appropriate for your yarn and make a fresh swatch.
Do not reuse a worsted-weight chain count.
Using Bulky Yarn
Bulky yarn can also work, but the paired ribs will become much more pronounced.
Use fewer repeats to reach the same width.
Make a swatch before committing to a full blanket.
Two-Color Version
For a subtle variation:
Work the body in:
cream
and the border in:
oatmeal or beige
Alternatively use:
sage body + darker sage border
The texture is already strong, so closely related colors usually look more polished than busy striping.
Final Pattern at a Glance
Stitch Multiple
Multiple of 4 + 2 working stitches
Add:
2 chains
for the foundation.
Foundation Row
Dc across.
Right-Side Texture Row
Dc in first stitch.
Repeat:
2 FPdc, 2 dc
across the center.
Dc in final stitch.
Wrong-Side Texture Row
Dc in first stitch.
Repeat:
2 dc, 2 BPdc
across the center.
Dc in final stitch.
Repeat
Continue alternating the right-side and wrong-side rows until the blanket reaches the required length.
Border
Round 1
Sc evenly around.
3 sc in each corner
Round 2
Sc around.
3 sc in the center stitch of each corner
Optional final simple edging.
Fasten off.
Weave in all ends.
Lightly block.
The completed blanket should show clean paired vertical crochet ribs separated by narrow flat valleys, all framed by a restrained border, giving the cream fabric the tailored woven appearance shown in the design. Pasted markdown