Fast Raised Woven Crochet Baby Blanket
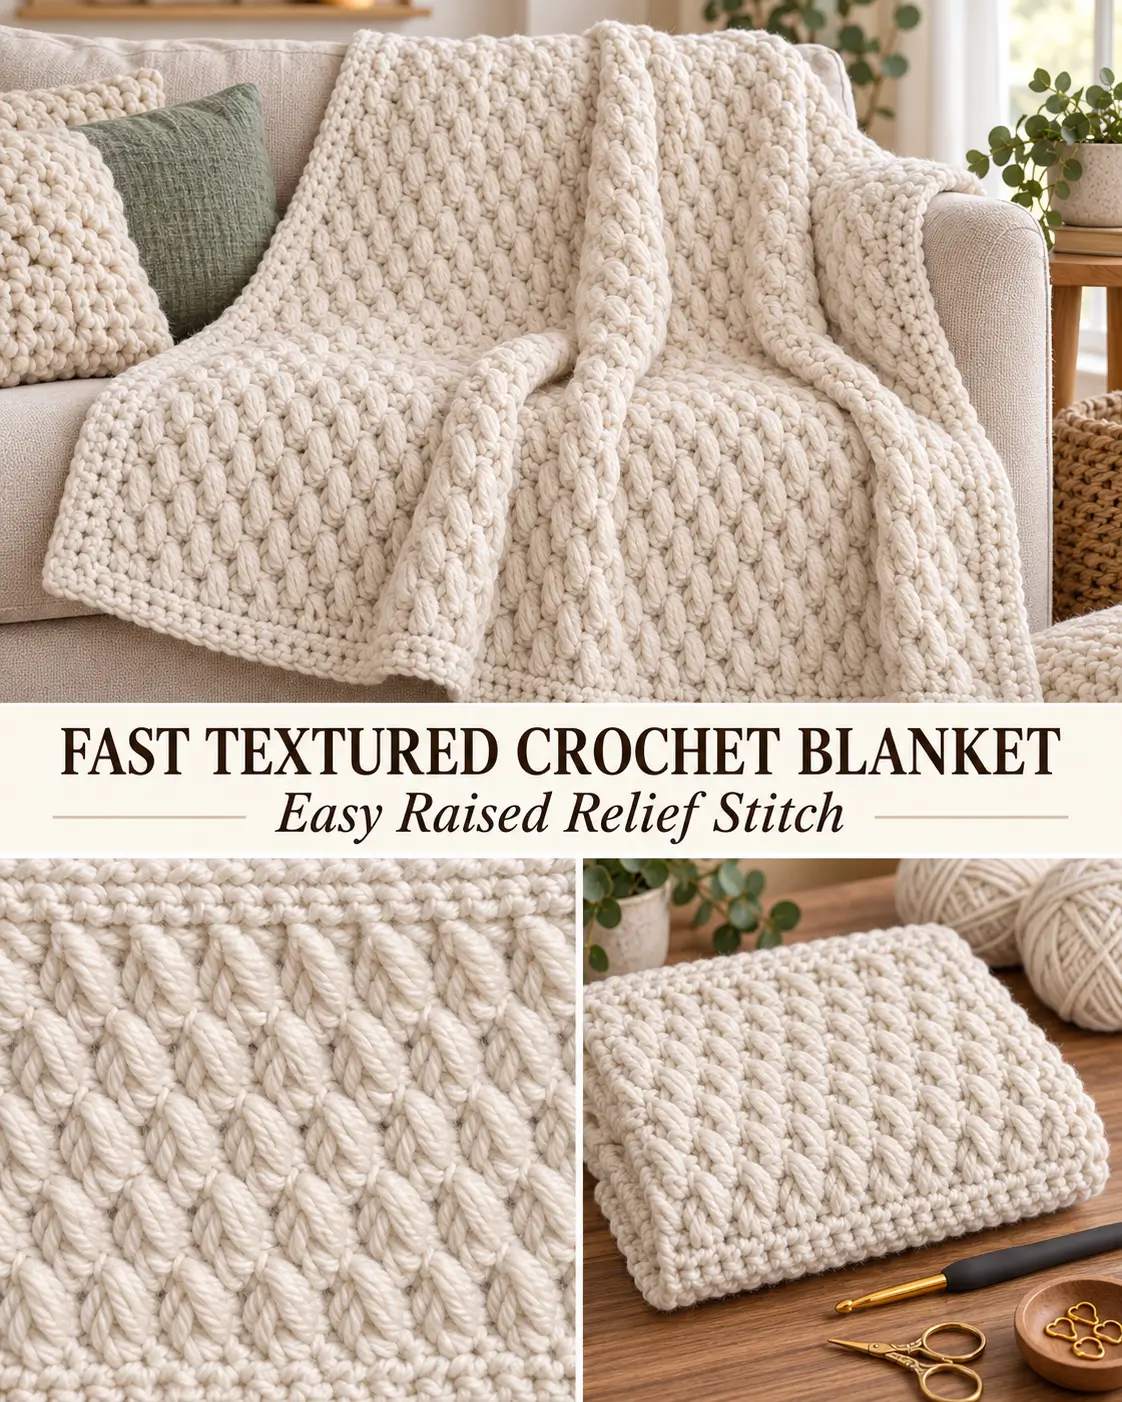
This textured crochet blanket uses a simple combination of single crochet, double crochet, and a raised relief motif worked around a double-crochet post from two rows below.
The front develops compact raised stitches that sit closely against the fabric, creating the dense woven-looking texture. The back stays much flatter.
The raised motifs alternate position from one textured row to the next. This staggered placement is the key to reproducing the pattern correctly.
Once the setup rows are complete, the pattern repeats with:
one textured row → one single-crochet row → offset textured row → one single-crochet row
Materials
- Yarn of your choice
- 4.5 mm crochet hook, or a hook suitable for your yarn
- Yarn needle
- Scissors
- Stitch markers, optional
- Measuring tape
For a look similar to the sample, choose a smooth cream, ivory, oatmeal, or other solid-color yarn with good stitch definition.
Skill Level
Confident beginner
You should know how to make:
- chain
- single crochet
- double crochet
- yarn over
- work around the post of a stitch
- work into a stitch two rows below
Abbreviations
This pattern uses US crochet terminology.
ch — chain
sc — single crochet
dc — double crochet
st / sts — stitch / stitches
RS — right side
WS — wrong side
RRC — raised relief cluster
Pattern Multiple
Begin with:
any even number of chains
For the tutorial-size swatch:
Ch 32
After Row 1, this gives:
31 working stitches
The working stitch count is therefore odd.
For a blanket, simply continue chaining until the foundation reaches the width you want, making sure the final chain count is even.
Special Stitch — Raised Relief Cluster
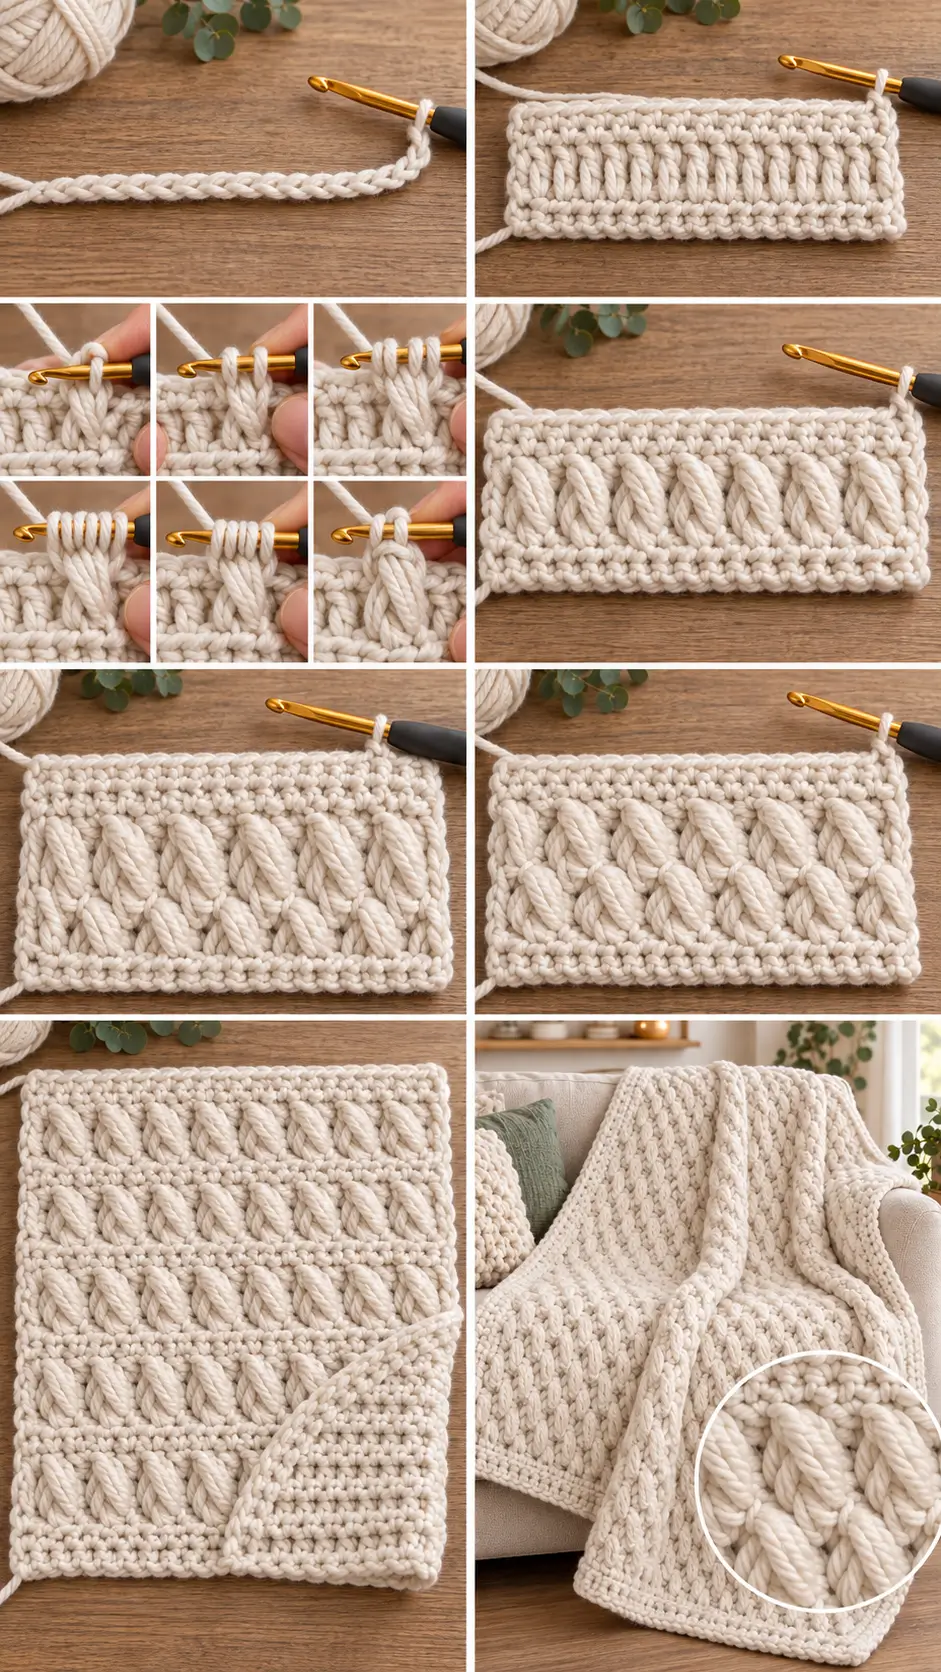
This is the stitch that creates the narrow raised motif visible on the front of the fabric.
The cluster is worked around the same ordinary double-crochet post two rows below.
RRC
Yarn over.
Locate the ordinary dc two rows below that corresponds with the next stitch position.
Insert the hook from front to back and back to front around that dc post.
Yarn over and pull up a long loop until it reaches the height of the current row.
You now have:
3 loops on the hook
Yarn over again.
Insert the hook around the same dc post a second time.
Yarn over and pull up another long loop to the current-row height.
You now have:
5 loops on the hook
Yarn over.
Pull through the first:
4 loops
Two loops remain.
Yarn over.
Pull through the final:
2 loops
One RRC is complete.
The finished motif should be slim and elongated, with two closely paired raised strands.
Do not pull the long loops excessively high. They should reach the current row comfortably without becoming loose.
Important Stitch-Count Rule
After every RRC:
skip the current-row stitch directly behind the raised motif.
The RRC replaces that stitch.
Do not work into both the RRC position and the stitch behind it or you will accidentally increase.
Your stitch count must remain exactly the same on every row.
Foundation
Chain any:
even number
For the practice swatch:
Ch 32
Row 1 — Single Crochet
Beginning in the:
2nd chain from the hook
work:
1 sc in every chain across
For the 32-chain sample:
31 sc
Ch 1.
Turn.
The turning chain does not count as a stitch.
Row 2 — Double Crochet
Work:
1 dc in every stitch across
For the sample:
31 dc
Ch 1.
Turn.
Row 3 — Single Crochet
Work:
1 sc in every stitch across
For the sample:
31 sc
Ch 1.
Turn.
These three rows create the foundation for the textured repeat.
Row 4 — Textured Row A
Work:
1 dc in the first stitch
The first raised motif belongs in the second stitch position.
Work:
1 RRC around the corresponding ordinary dc from Row 2
Skip the current-row stitch directly behind the RRC.
Work:
1 dc in the next stitch
Continue across, alternating:
RRC, skip stitch behind RRC, dc in next stitch
The stitch positions should look like:
dc | RRC | dc | RRC | dc | RRC | dc
Continue until the row is complete.
For an odd working stitch count such as 31 stitches, the row begins and ends with an ordinary dc.
Ch 1.
Turn.
Row 5 — Single Crochet
Work:
1 sc in every stitch across
Work into the top of each RRC just as you would work into an ordinary stitch.
Maintain the same stitch count.
Ch 1.
Turn.
Row 6 — Textured Row B
This textured row shifts the raised motifs by one stitch.
That offset creates the staggered woven appearance.
Work:
1 dc in the first stitch
Work:
1 dc in the second stitch
The first RRC now belongs in the:
third stitch position
Work one RRC around the corresponding ordinary dc from Row 4 two rows below.
Do not work the new RRC around an old raised motif.
Skip the current-row stitch directly behind the RRC.
Work:
1 dc in the next stitch
Continue alternating:
RRC, skip stitch behind RRC, dc in next stitch
until only:
1 stitch remains
Work:
1 dc in the final stitch
This gives two ordinary dc stitches at both ends of the row.
For the 31-stitch sample, the positions are:
dc | dc | RRC | dc | RRC | dc … RRC | dc | dc
Ch 1.
Turn.
Row 7 — Single Crochet
Work:
1 sc in every stitch across
Maintain the original stitch count.
Ch 1.
Turn.
Main Pattern Repeat
Repeat:
Rows 4–7
for the entire project.
The complete repeat is:
Textured Row A
Raised motifs begin in the second stitch position.
Single Crochet Row
Sc across.
Textured Row B
Raised motifs begin in the third stitch position.
Single Crochet Row
Sc across.
Then return to Textured Row A.
How the Pattern Should Look
The front of the fabric should show:
- narrow raised relief motifs
- two elongated strands in each motif
- motifs sitting close to the background
- compact spacing
- staggered placement
- dense surrounding fabric
- very small gaps
- no large loops
- no bobble shapes
The reverse should remain considerably flatter.
The raised motifs should not form large isolated bars.
They should look integrated into the surrounding crochet fabric, just like short relief marks woven into the surface.
Where to Work Each Raised Motif
This is the most important part of the pattern.
Every RRC is worked around an ordinary dc from the previous textured row, which is located two rows below the hook.
For example:
Row 4
Work the RRC around ordinary dc stitches from:
Row 2
Row 6
Work the RRC around ordinary dc stitches from:
Row 4
Next Row 4 repeat
Work the RRC around ordinary dc stitches from:
Row 6
The motifs therefore alternate positions automatically.
Never work an RRC around the post of a previous RRC.
Why the Motifs Stagger
On Textured Row A:
The first motif occupies:
stitch position 2
Then:
4, 6, 8, 10…
On Textured Row B:
The first motif occupies:
stitch position 3
Then:
5, 7, 9, 11…
That one-stitch shift produces the pattern seen in the sample.
Keeping the Edges Straight
Always maintain the same stitch count.
Place a marker in the first and last stitch if necessary.
The three most important rules are:
- Do not count the turning ch-1 as a stitch.
- Skip exactly one current-row stitch behind every RRC.
- Do not skip another stitch before working the following dc.
Following those rules keeps both side edges straight.
If the Fabric Starts Getting Wider
You are probably working into the stitch directly behind the RRC.
Remember:
RRC = one current-row stitch position
After completing it:
skip the stitch behind it
Then work the next dc.
If the Fabric Starts Getting Narrower
You may be skipping too many stitches.
After an RRC, skip only:
the one stitch directly behind the motif
The following stitch receives the normal dc.
If the Raised Motifs Pull the Fabric
Your elongated loops are too short.
When working around the post two rows below:
pull each long loop upward until it comfortably reaches the current working row.
Do not force the lower row upward.
The raised motif should lie on the surface without puckering the fabric.
If the Motifs Look Too Loose
The long loops are being pulled too high.
Raise them only to the height of the current row.
They should look compact and slim rather than hanging away from the fabric.
If the Motifs Stack in Straight Columns
You have probably repeated the same textured row twice.
Remember:
Row A starts with 1 dc before the first RRC.
Row B starts with 2 dc before the first RRC.
Alternating these two placements creates the stagger.
Finishing the Blanket Body
Continue repeating Rows 4–7 until the blanket reaches the length you want.
For the cleanest top edge, finish after a textured row and work:
Finishing Row 1
Sc in every stitch across.
Ch 1.
Turn.
Finishing Row 2
Sc in every stitch across.
This creates the same solid appearance along the final edge as shown in the finished stitch sample.
Simple Blanket Border
A plain border works well because the body already contains plenty of texture.
Border Round 1
Do not turn after the final row.
Ch 1.
Work sc evenly around all four sides.
Across the top and bottom:
work approximately:
1 sc in each stitch
Along the side edges:
distribute sc evenly so the edge lies flat.
At each corner work:
3 sc
Join with a sl st to the first sc.
Border Round 2
Ch 1.
Sc in every stitch around.
At each corner:
work 3 sc in the center stitch of the previous corner
Join.
Fasten off.
Optional Final Border Ridge
For a slightly more defined edge, add one final round.
Ch 1.
Work:
sc in the back loop only
around.
At each corner work:
3 sc BLO
in the center corner stitch.
Join and fasten off.
Blanket Sizing
The stitch does not require a fixed foundation count.
The only requirement is:
begin with an even number of chains
For a baby blanket:
Make the foundation chain to approximately your preferred baby-blanket width.
For a stroller blanket:
Use a shorter even-numbered foundation.
For a throw:
Continue chaining until the foundation reaches the width you want.
Because yarn thickness, hook size, and tension change the measurement considerably, measuring the actual chain is more reliable than forcing a universal starting-chain number.
Practice Swatch
Before starting a large project, make the original tutorial-size swatch.
Foundation
Ch 32.
Row 1
31 sc.
Row 2
31 dc.
Row 3
31 sc.
Row 4
Textured Row A.
Row 5
31 sc.
Row 6
Textured Row B.
Row 7
31 sc.
Repeat Rows 4–7 several times.
Once the staggered relief texture is clearly visible, begin the full blanket.
Final Pattern at a Glance
Foundation
Chain any even number.
Row 1
Sc in second chain from hook and across.
Row 2
Dc in every stitch.
Row 3
Sc in every stitch.
Row 4 — Textured A
Dc in first stitch.
Then alternate:
RRC around corresponding ordinary dc 2 rows below
skip the current stitch behind the RRC
dc in next stitch
across.
Row 5
Sc across.
Row 6 — Textured B
Dc in first 2 stitches.
Then alternate:
RRC around corresponding ordinary dc 2 rows below
skip the current stitch behind the RRC
dc in next stitch
until 1 stitch remains.
Dc in final stitch.
Row 7
Sc across.
Repeat
Repeat:
Rows 4–7
until the project reaches the desired length.
Finish with:
2 rows of single crochet
and add the simple border if desired.
The finished fabric has a dense, flat background with compact staggered raised relief motifs on the front and a much flatter reverse, matching the stitch construction and visual arrangement of the original design.