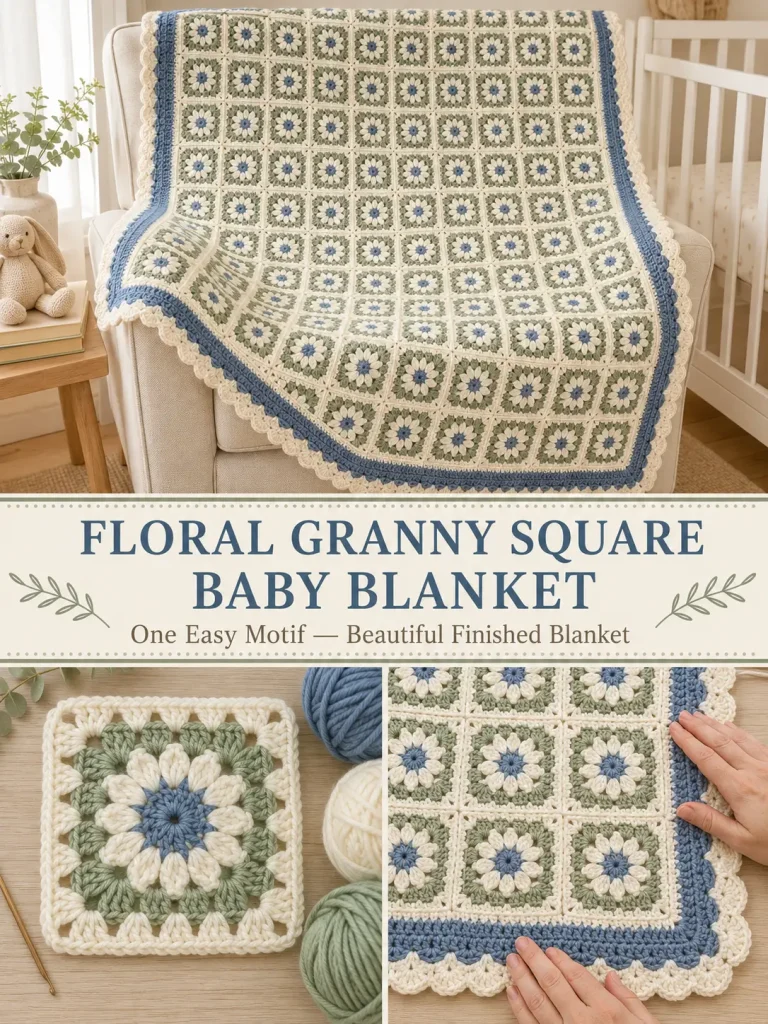
This soft baby blanket is made from small floral granny squares joined into one cozy rectangular throw.
Each square starts with a simple round center, followed by a ring of small crochet clusters that create a flower-like texture. The next round turns that flower into a square, and a final ivory granny round gives every motif a clean edge for joining.
For this version, I’m using a softer three-color palette:
- dusty denim blue
- warm ivory
- muted sage
The finished blanket looks detailed, but every motif uses the same four-round repeat.
There are no complicated charts and no large pieces to manage while crocheting.
You simply make one little square at a time.
Pattern at a Glance
Skill level: Confident beginner / intermediate
Terminology: US crochet terms
Construction: Individual four-round motifs joined after blocking
Finished size: Approximately 29 × 36 inches including border
Motif size: Approximately 3½ inches square after blocking
Layout: 8 motifs across × 10 motifs down
Total motifs: 80
Suggested yarn: DK / Category 3
Hook: 3.5 mm crochet hook
The linked Cozy Times Baby Blanket is also a DK-weight floral-motif baby blanket assembled from small squares, but the pattern below uses a new motif construction, new three-color sequence, different grid, joining method, border, counts, and finished proportions. (Ravelry)
Materials
You will need:
- DK / Category 3 yarn in dusty denim blue
- DK yarn in warm ivory
- DK yarn in muted sage
- 3.5 mm crochet hook
- Yarn needle
- Scissors
- Stitch markers, optional
- Measuring tape
- Blocking mats and rust-resistant pins, optional
For a washable baby blanket, choose soft yarn with care instructions suitable for frequent washing.
Approximate Yarn Amounts
For the 8 × 10 sample blanket, have approximately:
Dusty Denim Blue
550–650 yards
Warm Ivory
800–900 yards
Muted Sage
350–450 yards
These are planning amounts rather than exact guarantees.
Actual yarn use depends on:
- gauge
- yarn brand
- motif size
- joining tension
- border width
Make one complete motif first if you want a more accurate yarn estimate.
Abbreviations
- ch = chain
- sc = single crochet
- dc = double crochet
- sl st = slip stitch
- sp = space
- st = stitch
- sts = stitches
- cl = cluster
Special Stitch: 2-Double-Crochet Cluster
This small cluster creates the petal texture around the center.
2-dc cluster
Yarn over.
Insert hook into the indicated stitch.
Yarn over and pull up a loop.
Yarn over and pull through 2 loops.
Leave the remaining loops on the hook.
Yarn over again.
Insert the hook into the same stitch.
Yarn over and pull up a loop.
Yarn over and pull through 2 loops.
You should now have 3 loops on the hook.
Yarn over and pull through all 3 loops.
One cluster is complete.
Color Sequence for Every Motif
Every square follows the same four-round color sequence:
Round 1
Dusty denim blue
Round 2
Warm ivory
Round 3
Muted sage
Round 4
Warm ivory
This keeps the blanket light while giving the flower center enough contrast to remain visible.
PART 1 — CROCHET THE FLORAL GRANNY SQUARE
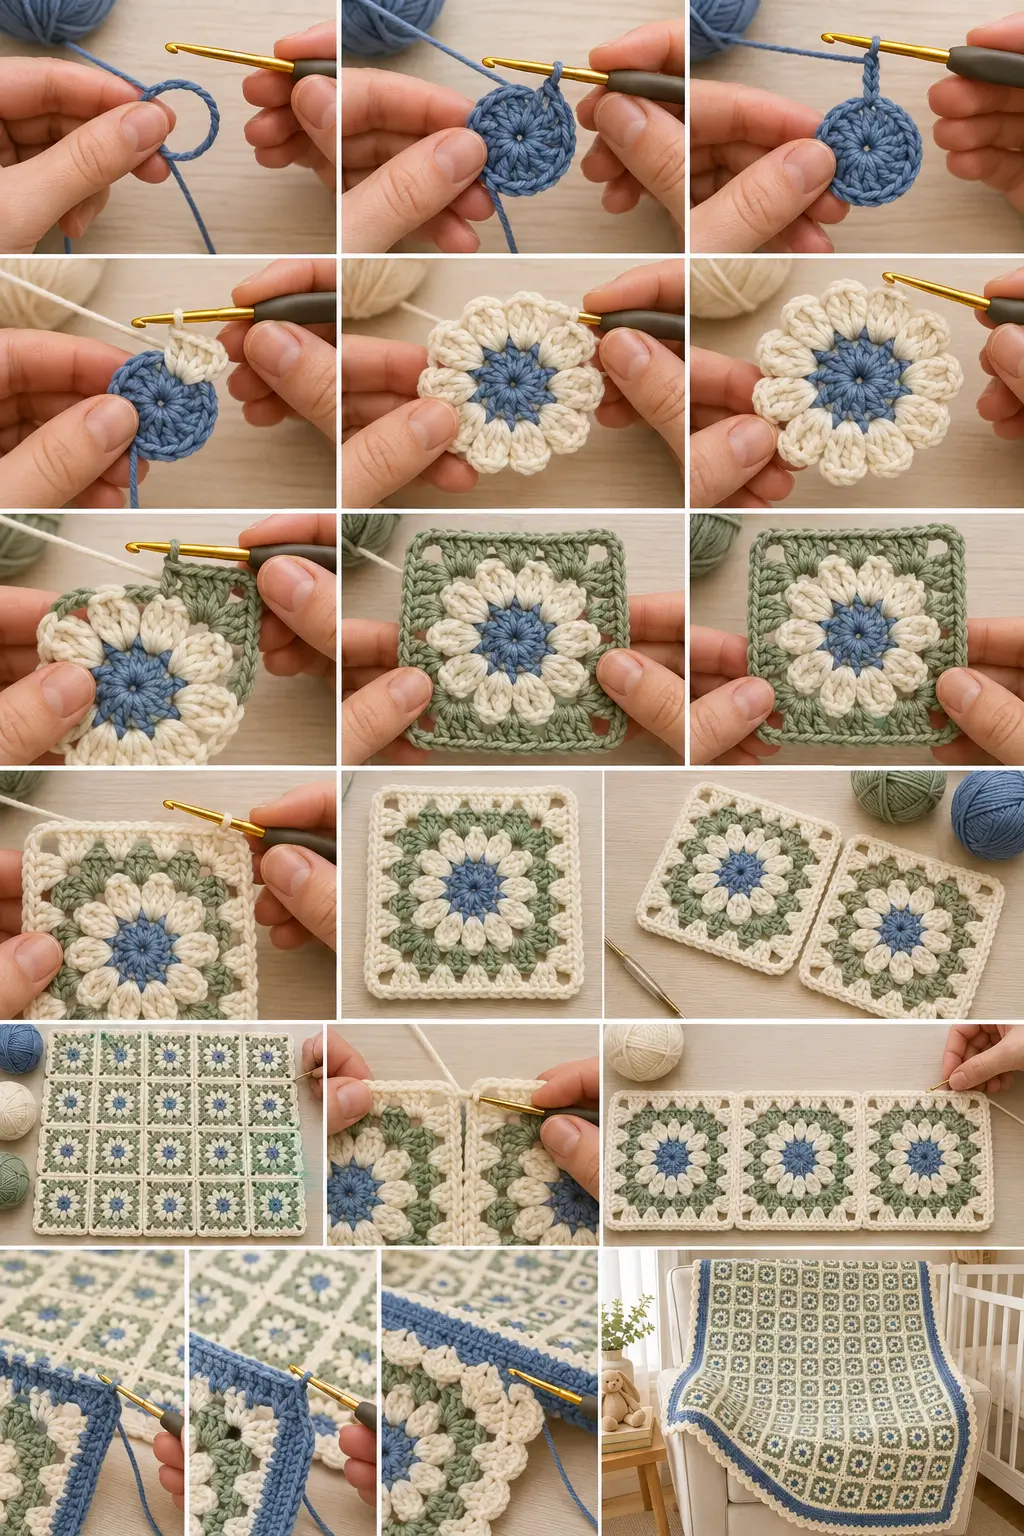
Round 1 — Blue Center
Using dusty denim blue, make a magic ring.
Ch 3.
The beginning ch 3 counts as the first dc.
Work:
11 dc into the ring
Join with a sl st to the top of the beginning ch 3.
You should have:
12 dc
Pull the center closed.
Fasten off blue.
Round 2 — Ivory Petals
Join warm ivory yarn in any stitch.
Ch 2.
The ch 2 does not count as a stitch.
Work:
1 2-dc cluster in the same stitch, ch 1
Now repeat around:
2-dc cluster in next st, ch 1
Work one cluster in every stitch from Round 1.
You should finish with:
- 12 clusters
- 12 ch-1 spaces
Join with a sl st to the top of the first cluster.
Fasten off ivory.
What Round 2 Should Look Like
You should now see:
- blue circular center
- 12 small ivory petal-like clusters
- one small open space between each cluster
The motif is still round.
The next round creates the square shape.
Round 3 — Sage Squaring Round
Join muted sage in any ch-1 space.
This first space will become Corner 1.
In the same space work:
Ch 3, 2 dc, ch 2, 3 dc
Ch 1.
In the next ch-1 space work:
3 dc
Ch 1.
In the next ch-1 space work:
3 dc
Ch 1.
In the next ch-1 space work:
3 dc, ch 2, 3 dc
This is Corner 2.
Continue the same sequence around:
At every corner space
3 dc, ch 2, 3 dc
In each of the two spaces between corners
3 dc
Between all granny groups
ch 1
You will use every third Round-2 ch-1 space as a corner.
At the end you should have:
- 4 corner ch-2 spaces
- 2 side granny groups between each pair of corners
Join with a sl st.
Fasten off sage.
Round 4 — Ivory Granny Frame
Join warm ivory yarn in any corner ch-2 space.
In the same corner work:
Ch 3, 2 dc, ch 2, 3 dc
Ch 1.
Now work across the first side.
In each ch-1 space along the side work:
3 dc
Ch 1 between each granny group.
There should be:
3 side ch-1 spaces
between the corners.
At the next corner work:
3 dc, ch 2, 3 dc
Continue around.
Work:
- 3 dc in every side ch-1 space
- ch 1 between groups
- 3 dc, ch 2, 3 dc in every corner
Join with a sl st to the beginning ch 3.
Fasten off.
Finished Motif
After Round 4, the square should show:
Center
Dusty denim-blue circle
Flower
12 small warm-ivory cluster petals
First square frame
Muted sage
Outer frame
Warm ivory
The motif should lie fairly flat.
Make a Test Square First
Before making all 80 motifs:
- Weave in the ends.
- Block one square.
- Allow it to dry.
- Measure it.
Aim for approximately:
3½ × 3½ inches
A slightly different size is fine.
What matters is that all of your motifs are consistent.
What If the Square Ruffles?
Possible causes include:
- hook too large
- loose chain spaces
- very relaxed double crochet
Try a slightly smaller hook.
Also make sure you have not accidentally worked extra granny groups into one of the Round-3 spaces.
What If the Square Cups?
Possible causes:
- hook too small
- tight chains
- tight cluster stitches
Try relaxing your ch-1 and corner ch-2 spaces.
A light blocking can fix mild cupping.
Make 80 Squares
For the sample blanket, make:
80 identical motifs
Arrange them:
8 squares across × 10 squares down
This creates a naturally rectangular baby blanket.
Batch Crocheting Method
If you want to work faster, make the motifs assembly-line style.
For example:
First
Make 20 blue centers.
Then
Add the ivory petal round to all 20.
Then
Add the sage squaring round.
Finally
Finish them all with ivory.
This can be faster than completing each square individually.
Weave In Ends as You Go
Each motif contains multiple color changes.
That means 80 motifs can create a lot of yarn tails.
Do not leave all of them until the end.
A good routine is:
make 5 motifs → weave in ends → continue
PART 2 — BLOCK THE SQUARES
Blocking makes joining much easier.
Shape every motif to approximately the same dimensions.
Make sure:
- corners are square
- sides are straight
- flower centers remain round
- outer granny rounds are not overstretched
Allow all motifs to dry completely.
PART 3 — ARRANGE THE BLANKET
Lay all 80 motifs on a clean flat surface.
Arrange:
8 across × 10 down
Because all motifs use the same colors, the layout itself is simple.
However, rotate or rearrange any square that looks slightly different so the blanket remains visually balanced.
Take a photo of the arrangement before joining.
PART 4 — JOIN THE MOTIFS
Use warm ivory yarn.
For this version, I recommend a flat slip-stitch join worked through the inner loops.
This creates a neat seam without adding a heavy raised ridge.
Flat Slip-Stitch Join
Place two squares side by side with:
right sides facing upward
Align the edges.
Insert the hook through:
- back loop of the edge stitch on the first square
- front loop of the corresponding edge stitch on the second square
Yarn over with ivory.
Pull through both loops and the loop already on the hook.
That creates one slip stitch.
Continue across the entire edge.
Keep the Join Loose
Do not tighten the slip stitches aggressively.
A tight seam can make the blanket:
- pucker
- pull inward
- lose drape
If necessary, use a hook 0.5 mm larger for joining.
Best Joining Order
First create the horizontal rows.
Join:
8 motifs together
to make one strip.
Repeat until you have:
10 strips
Then join those 10 strips together along their long edges.
This is easier to control than attaching squares randomly.
Check the Blanket During Joining
After every few rows:
lay the blanket flat.
Check that:
- seams remain straight
- corners align
- motifs have not twisted
- the blanket is not pulling inward
Fix problems before continuing.
PART 5 — FIRST BORDER ROUND
Use dusty denim blue.
Join yarn in any outer corner.
Ch 1.
Work sc evenly around the entire blanket.
Along motif edges
Work approximately:
1 sc in each available stitch or space
Keep the spacing even.
At each outer blanket corner
Work:
3 sc
Continue around.
Join with sl st.
Border Round 2 — Blue Half Double Crochet
Ch 2.
The ch 2 does not count as a stitch.
Work:
1 hdc in every stitch around
At each corner work:
3 hdc in the center corner stitch
Join.
Fasten off blue.
Border Round 3 — Ivory Shell Edge
Join warm ivory in any stitch near a corner.
Sc in the first stitch.
Skip 1 stitch.
In the next stitch work:
5 dc
Skip 1 stitch.
Sc in the next stitch.
Repeat:
skip 1, 5 dc in next st, skip 1, sc in next st
around.
Adjusting the Shells at Corners
The exact number of border stitches may vary slightly depending on your joining and tension.
Do not force the shell repeat if it makes a corner pull.
Near each corner, adjust by skipping:
- 0 stitches
- 1 stitch
- or occasionally 2 stitches
so one shell sits naturally around the corner.
The finished border should lie flat.
Fasten off.
Finished Border
The blanket now has:
- blue structural border
- blue hdc reinforcement
- soft ivory scalloped edge
This gives the floral squares a finished frame without making the baby blanket excessively decorative.
What If the Border Ruffles?
You probably added too many stitches in Border Round 1.
Undo the affected section.
Redistribute the sc more evenly.
The first border round controls all later rounds, so it is worth getting it right.
What If the Border Pulls In?
Add slightly more sc along the motif edges.
Also check that the slip-stitch joins are not overly tight.
PART 6 — FINAL FINISHING
Weave in every remaining tail.
Inspect the entire blanket for:
- loose ends
- missed seams
- stretched stitches
- uneven corners
Block the completed blanket lightly if needed.
Do not aggressively stretch the shell border.
Finished Measurements
With approximately 3½-inch motifs arranged 8 × 10:
The joined motif field measures roughly:
28 × 35 inches
The border adds approximately:
½–1 inch per side
depending on tension.
Final size should be around:
29 × 36 inches
How to Make a Smaller Blanket
Use:
7 motifs across × 8 motifs down
Total:
56 motifs
At approximately 3½ inches per motif, the joined field will measure around:
24½ × 28 inches
before the border.
This makes a good stroller-size blanket.
How to Make a Larger Baby Blanket
Use:
9 motifs across × 11 motifs down
Total:
99 motifs
The joined motif field will measure approximately:
31½ × 38½ inches
before the border.
How to Calculate Any Size
Measure one finished blocked square.
Then use:
desired blanket width ÷ square width
to estimate motifs across.
And:
desired blanket length ÷ square height
to estimate motifs down.
Round to whole motifs.
Multiply:
motifs across × motifs down
to calculate the total number required.
Alternative Color Palette: Soft Girl Nursery
Try:
Center
Dusty rose
Petals
Warm cream
Squaring round
Muted lavender
Outer round
Warm cream
Border
Dusty rose + cream
Alternative Color Palette: Woodland Nursery
Try:
Center
Soft camel
Petals
Oatmeal
Squaring round
Muted sage
Outer round
Cream
Border
Sage + cream
Alternative Color Palette: Neutral Baby Blanket
Try:
Center
Mushroom beige
Petals
Ivory
Squaring round
Warm taupe
Outer round
Ivory
Border
Taupe + ivory
Can I Use Only Two Colors?
Yes.
For a simpler version:
Rounds 1 and 3
Dusty blue
Rounds 2 and 4
Warm ivory
Then use blue and ivory again for the border.
This gives a stronger traditional floral granny-square look.
Can I Use Cotton?
Yes.
DK cotton gives excellent stitch definition and works particularly well for granny motifs.
Keep in mind that a cotton blanket may feel heavier than an acrylic version.
Can I Use Acrylic?
Yes.
A soft washable acrylic is practical for baby blankets and usually creates a lighter finished piece.
Always follow the manufacturer’s laundering instructions.
Can I Use Worsted Weight?
Yes, but your motifs will be considerably larger.
Use a suitable hook.
You will probably need fewer motifs to reach the same finished blanket dimensions.
Always measure one completed square before planning the grid.
Baby Blanket Safety
Keep the blanket free from loose decorative pieces.
Do not add:
- buttons
- beads
- pom-poms
- long tassels
- hanging cords
The floral texture in this pattern is completely crocheted into the motif.
Inspect handmade baby items periodically for damaged stitches or loose yarn.
Why the Floral Center Works
The first round creates a simple 12-stitch circle.
Then every one of those stitches receives a small ivory cluster.
That means the flower automatically contains:
12 petals
without requiring any separate pieces.
The next round uses the 12 spaces around the flower.
Every third space becomes a corner.
Because:
12 ÷ 4 = 3
the circle divides naturally into four equal square sections.
That is what makes the transition from flower to granny square work cleanly.
Frequently Asked Questions
How many rounds are in each motif?
Four.
How many motifs are in the sample?
80 motifs
arranged:
8 × 10
How many flower petals are in each square?
12 small cluster petals
Are the flowers sewn onto the square?
No.
The flower is crocheted directly into the motif.
What creates the flower texture?
Each ivory petal is a:
2-double-crochet cluster
worked into one stitch of the blue center.
Is this a traditional granny square?
It combines a floral cluster center with traditional granny-style squaring rounds.
Do I need to block the squares?
I strongly recommend it.
Consistent motif dimensions make assembly much easier.
Can beginners make this?
If you already know:
- chain
- double crochet
- slip stitch
- simple clusters
- working in the round
yes.
Make one practice motif before beginning the full blanket.
Why use a flat join?
A flat join keeps the blanket comfortable and avoids adding thick ridges between the small motifs.
Final Thoughts
This is the kind of blanket that looks like a huge crochet project until you stop thinking about the finished blanket and focus on one square.
One blue center.
Twelve little ivory petals.
A sage round.
One ivory granny frame.
Done.
Then make another.
And another.
Eventually those little floral squares start covering the table.
Then they become rows.
And once the rows are joined together, suddenly you have an entire baby blanket filled with tiny crochet flowers.
That repeatable construction is what makes motif blankets so satisfying: the finished piece looks detailed, but you never have to crochet more than one small square at a time.



