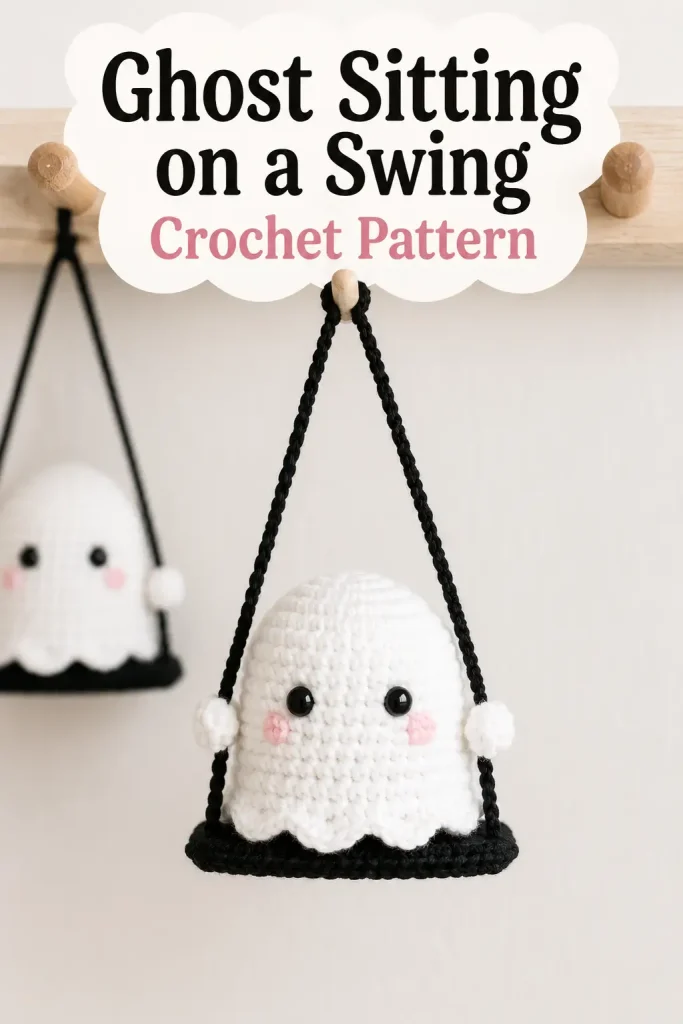
This tiny crochet ghost looks perfectly content sitting on its own miniature black swing. With a softly rounded body, wavy ghost hem, rosy cheeks, little arms wrapped around the ropes, and a simple hanging loop, it makes a charming Halloween decoration without feeling too spooky.
This original, image-inspired amigurumi pattern uses a separate stuffed ghost, a double-layer crochet seat, and one continuous hanging cord. The finished swing can be displayed from a peg, shelf knob, wall hook, Halloween tree, or seasonal garland.
Description
The finished project features a small white crochet ghost with a rounded amigurumi body and six softly scalloped points around the bottom. Two black safety eyes and pale pink embroidered cheeks create the sweet expression, while tiny white arms curve around the black swing ropes. The ghost is secured to a thick rectangular black seat, and the ropes meet above it to form a long hanging loop. Made with sport or lightweight DK yarn, the complete decoration measures approximately 3½ inches wide, with an adjustable hanging length.
Materials
- White sport or lightweight DK yarn
- Black sport or lightweight DK yarn
- Small amount of pale pink yarn
- 2.25 mm crochet hook
- 1.75–2 mm hook for a thinner swing cord, optional
- Two 6 mm black safety eyes
- Polyester fiberfill
- Yarn needle
- Stitch marker
- Scissors
- Sewing pins
- Small piece of plastic canvas, optional
- Black and white sewing thread, optional
- Embroidery floss for the eyes if making this for a young child
Abbreviations
- ch: chain
- dc: double crochet
- hdc: half double crochet
- inc: two single crochet stitches in the same stitch
- MR: magic ring
- Rnd: round
- sc: single crochet
- sl st: slip stitch
- st: stitch
- sts: stitches
- BLO: back loop only
- FLO: front loop only
Pattern Notes
- This pattern uses US crochet terminology.
- The ghost body is worked in continuous rounds. Do not join unless instructed.
- Use a stitch marker to mark the first stitch of each round.
- The scalloped hem is worked into the front loops of the final straight body round.
- A separate white circle closes the underside of the ghost and keeps the stuffing away from the swing seat.
- Keep the stuffing light enough that the ghost remains soft and slightly flattened underneath.
- The finished size will change depending on your yarn, hook, and tension.
- This is an original construction inspired by the visible idea of a miniature ghost sitting on a swing, rather than a reproduction of another designer’s written pattern.
Step-by-Step Instructions
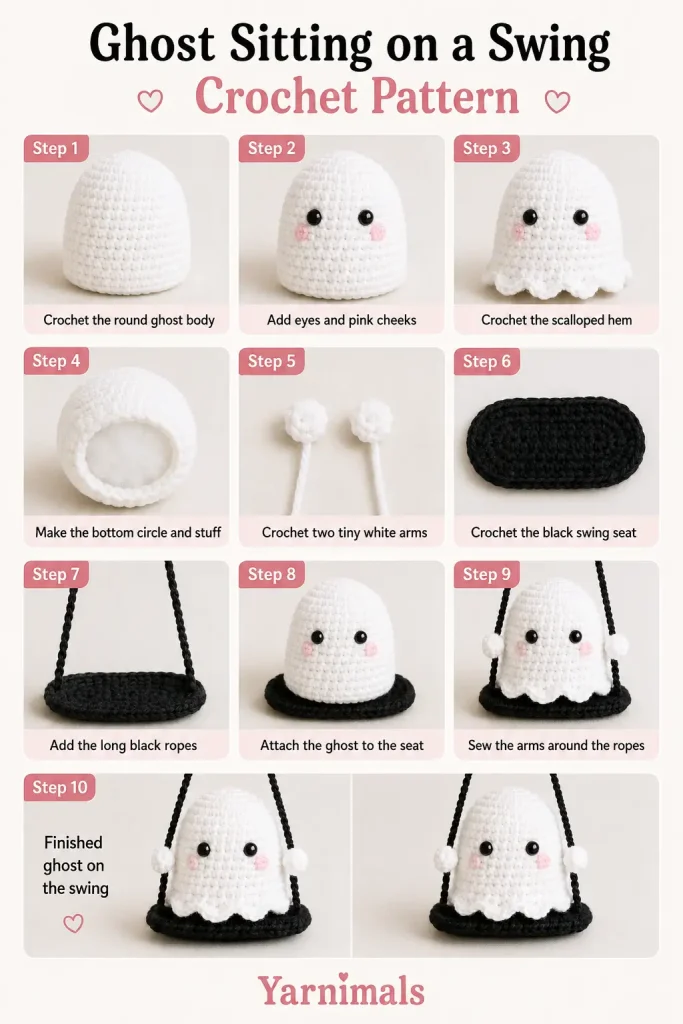
Ghost Body
Using white yarn and the 2.25 mm hook:
Rnd 1: Make 6 sc in a MR. (6)
Rnd 2: Inc in each st around. (12)
Rnd 3: Work 1 sc, inc; repeat around. (18)
Rnd 4: Work 2 sc, inc; repeat around. (24)
Rnd 5: Work 3 sc, inc; repeat around. (30)
Rnd 6: Work 4 sc, inc; repeat around. (36)
Rnds 7–13: Sc in each st around. (36)
Do not fasten off yet.
Add the Eyes
Insert the safety eyes between Rnds 8 and 9, approximately 7 stitches apart.
Check that the eyes appear centered on the front of the ghost before attaching the washers.
For a decoration intended for a baby or young child, embroider the eyes with black yarn instead of using safety eyes.
Scalloped Ghost Hem
The hem is worked into the front loops of Rnd 13. The unused back loops will be used later to attach the bottom circle.
Rnd 14, FLO: Repeat the following sequence 6 times:
- Sl st in the next st.
- Skip the next st.
- Work 5 hdc in the next st.
- Skip the next st.
- Sl st in the next st.
- Sc in the next st.
You should have six rounded scallops around the bottom of the ghost.
Sl st into the first stitch and fasten off. Weave the yarn tail into the inside of the body.
Gently pull each group of 5 hdc downward to help define the wavy ghost shape.
Pink Cheeks
Thread a yarn needle with pale pink yarn.
Make two or three small horizontal stitches just below and slightly outside each eye. Keep both cheeks the same width.
Secure the yarn ends inside the body.
The pictured design does not have a mouth, so leaving the face without one will keep the same sweet, simple expression.
Bottom Closing Circle
Using white yarn:
Rnd 1: Make 6 sc in a MR. (6)
Rnd 2: Inc in each st around. (12)
Rnd 3: Work 1 sc, inc; repeat around. (18)
Rnd 4: Work 2 sc, inc; repeat around. (24)
Rnd 5: Work 3 sc, inc; repeat around. (30)
Rnd 6: Work 4 sc, inc; repeat around. (36)
Sl st into the next stitch and fasten off, leaving a long sewing tail.
Stuff and Close the Ghost
Place a small amount of fiberfill inside the ghost.
Add enough stuffing to round the top and sides, but do not overstuff the bottom. The underside should remain relatively flat so the ghost can sit neatly on the swing.
Position the bottom circle inside the scalloped edge.
Sew the final round of the circle to the unused back loops of Rnd 13. Work slowly around the body, matching one stitch from the circle to one back loop from the body.
Before closing the final section, adjust the stuffing and add a little more if necessary.
Finish sewing, secure the yarn, and hide the tail inside.
The six scallops should remain loose and visible around the closed underside.
Small Ghost Arms
Make two.
Using white yarn:
Rnd 1: Make 6 sc in a MR. (6)
Rnds 2–4: Sc in each st around. (6)
Sl st into the next stitch and fasten off, leaving a long sewing tail.
Do not stuff the arms. Flatten each piece gently.
Leave the arms unattached until the ghost and swing ropes have been assembled. This makes it easier to position the hands around the cords.
Black Swing Seat
The swing seat is made from two matching rectangles so it remains thick and sturdy.
First Seat Panel
Using black yarn and the 2.25 mm hook:
Row 1: Ch 17. Starting in the second ch from the hook, sc across. (16)
Rows 2–6: Ch 1 and turn. Sc in each st across. (16)
Fasten off and weave in the ends.
Second Seat Panel
Repeat Rows 1–6 to make a second identical rectangle.
Join the Seat
Place the two panels together with their edges aligned.
For a firmer swing, cut a small piece of plastic canvas slightly smaller than the crochet rectangles and place it between the two layers. Keep the insert away from the outer stitches so the hook can pass through both panels easily.
Join black yarn at one corner.
Sc evenly through both layers around the entire seat. Work 3 sc into each corner to help the rectangle lie flat.
Join with a sl st and fasten off. Weave the ends securely into the seat.
The finished seat should measure approximately 3–3½ inches long and 1½ inches deep.
Swing Ropes and Hanging Loop
Using black yarn and the smaller hook, if desired:
Ch approximately 85–100.
A shorter chain creates a compact ornament, while a longer chain creates a more dramatic hanging swing. The sample-style proportions work well with each side measuring approximately 7–8 inches from the seat to the top fold.
Fasten off, leaving a 6-inch tail at both ends.
Fold the chain in half and mark the center. This center point will become the top of the hanging loop.
Thread one chain tail through the left outer corner of the seat. Sew through both seat layers several times and knot securely underneath.
Attach the opposite chain tail to the matching right corner.
Before tightening the second side completely, hold the swing up by the center of the chain. Adjust the ropes until the seat hangs level.
Secure the second end and hide both yarn tails inside the black seat.
Attach the Ghost to the Swing
Place the ghost in the center of the black seat.
The face should look straight ahead, and the scalloped hem should rest over the seat edges without completely covering them.
Pin the ghost temporarily in place.
Using white sewing thread or a strand of white yarn, sew through the black seat and into the white bottom circle. Make several small attachment stitches near the front, back, and both sides.
Do not sew through the visible upper body. Keep the stitches underneath the scalloped hem so the attachment remains hidden.
Lift the swing by the hanging loop to check the balance. Add another hidden stitch if the ghost tilts forward or backward.
Attach the Arms Around the Ropes
Bring one rope upward along each side of the ghost.
Position the arms between Rnds 10 and 12, with one arm on each side of the body.
Wrap the flattened end of each arm slightly around the nearby black rope. The arm should look as though the ghost is holding the swing cord.
Sew the base and inner edge of the arm securely to the ghost. Add one small stitch around the rope to keep it inside the hand.
Do not pull this stitch too tightly. The rope should remain straight rather than being dragged into the body.
Repeat for the second arm, checking that both arms sit at the same height.
Final Shaping
Hold the swing from the top loop and check the following details:
- The seat hangs level.
- The ghost remains centered.
- The face points forward.
- Both ropes are the same length.
- Each arm appears to hold a rope.
- All six scallops are visible.
- The yarn ends and attachment stitches are hidden.
Gently shape the top of the ghost with your fingers and smooth the stuffing away from the bottom.
Tips and Variations
Use cotton yarn for crisp stitches and a well-defined scalloped hem. Acrylic yarn creates a softer, fluffier ghost.
A smaller hook will make the amigurumi fabric tighter and prevent the stuffing from showing between the stitches.
For a larger decoration, use worsted-weight yarn with a 3–3.5 mm hook. Increase the length and width of the seat if the ghost becomes too large for the original dimensions.
Make the ropes with a simple crochet chain for the closest match to the pictured style. An i-cord can also be used when you want thicker, more structured ropes.
Try light gray, lavender, pale mint, or glow-in-the-dark yarn for different ghost variations while keeping the seat and ropes black.
For a freestanding display, shorten the ropes and hang the swing from a small wooden frame. For an ornament, make the cords shorter and add a small loop at the center.
A tiny amount of fabric-safe pink blush can replace the embroidered cheeks, although yarn cheeks are more permanent.
Make several ghosts with different cheek colors and hanging lengths for a playful Halloween wall display.
Frequently Asked Questions
Why does the ghost need a separate bottom circle?
The circle closes the stuffed body while allowing the scalloped hem to remain loose. It also creates a flat surface that can be sewn securely to the swing seat.
How do I stop the swing from tilting?
Fold the chain exactly in half before attaching it, then temporarily secure both ends and test the swing. Adjust one side before making the final knots. Sewing the ghost to the seat at four balanced points also helps.
Can I make this without safety eyes?
Yes. Embroider each eye with several short vertical or satin stitches using black yarn or embroidery floss. This is the safer option when the finished ghost may be handled by a young child.
Conclusion
This ghost sitting on a swing crochet pattern combines a simple amigurumi shape with a clever miniature display. The rounded body, rosy cheeks, tiny gripping arms, scalloped hem, black seat, and long hanging ropes all work together to create the complete design. Make one for a small Halloween accent, or crochet several in your favorite colors to create a sweet handmade ghost collection.



