Green and White Puff Flower Crochet Blanket
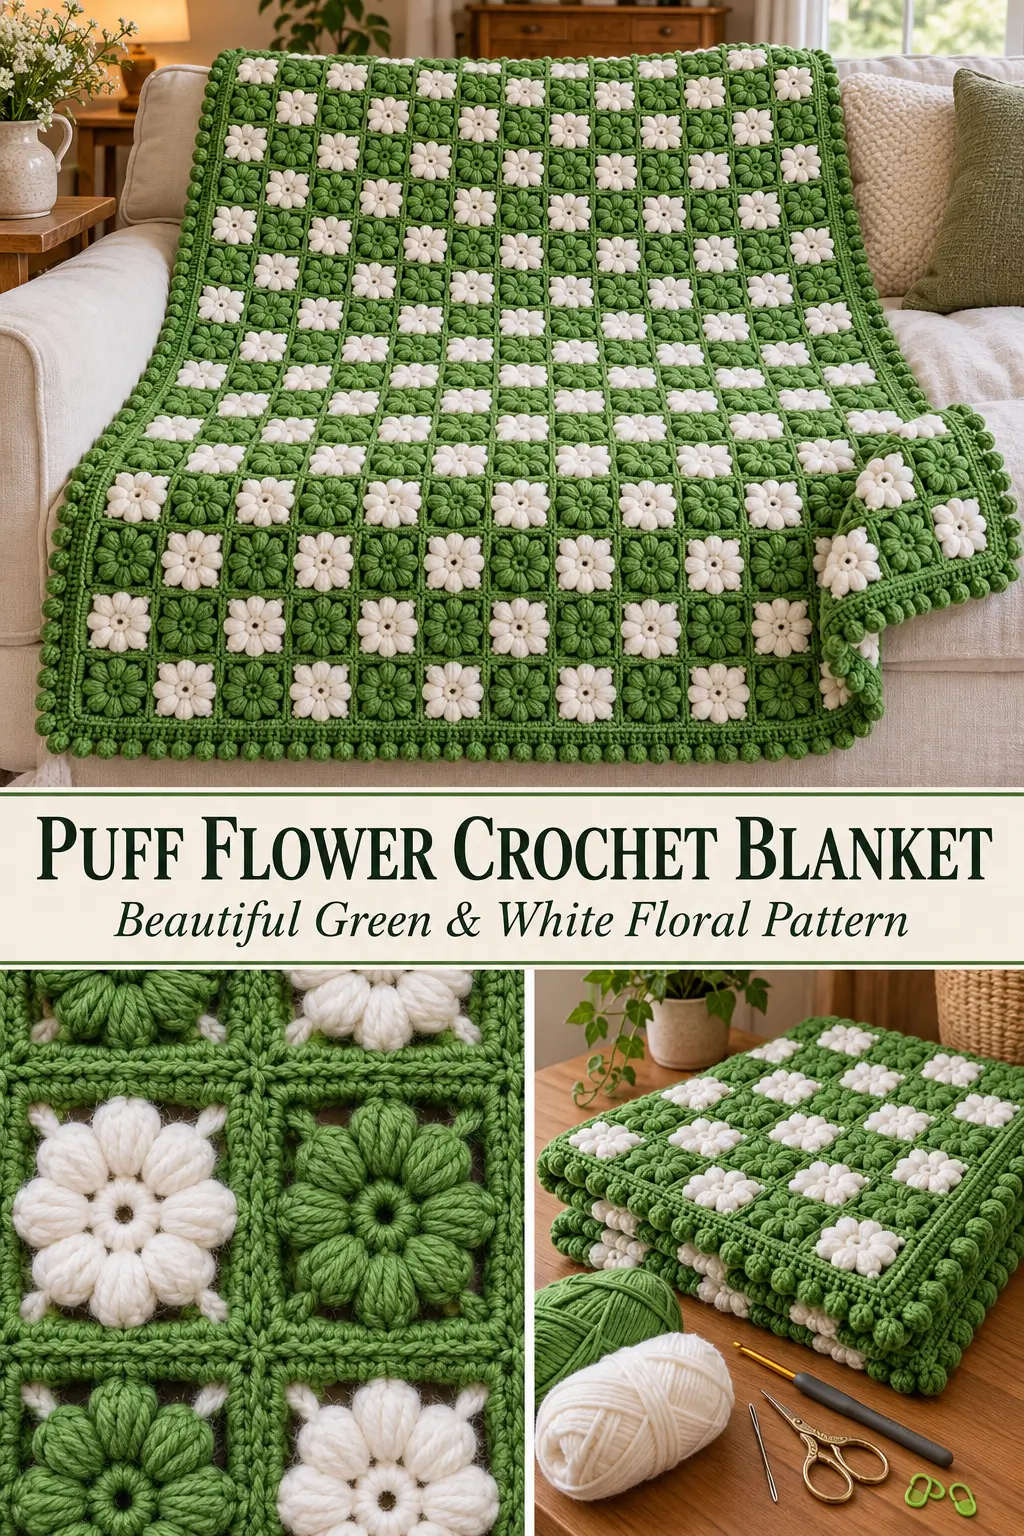
This green-and-white crochet blanket is covered with small raised flowers that create a thick, almost woven surface.
The flower effect may resemble Tunisian crochet at first glance, but this version is worked with a regular crochet hook using compact puff-flower squares. Each square contains an eight-petal flower, and every motif is finished with the same green outer frame so the squares blend together after joining.
Alternating white and green flowers creates the fresh checkerboard floral pattern across the entire blanket.
The finished fabric is soft, highly textured, warm, and sturdy enough for a baby blanket, lap blanket, nursery throw, or decorative bed blanket.
Finished Size
Approximately:
39 inches / 99 cm wide
by:
48–49 inches / 122–124 cm long
including the border.
The blanket uses:
12 motifs across
and:
15 motifs high
for a total of:
180 flower squares
You will make:
90 white-flower squares
and:
90 green-flower squares
Each blocked square should measure approximately:
3–3¼ inches / 7.5–8 cm
Materials
- Medium weight #4 yarn
- Color A: fresh grass green
- Color B: clean soft white
- 5 mm crochet hook
- Yarn needle
- Scissors
- Stitch markers
- Blocking mats and pins, optional
Approximate yarn:
Green: 1,600–1,900 yards / 1,465–1,740 meters
White: 650–800 yards / 595–730 meters
Puff stitches use more yarn than ordinary single or double crochet, so keep extra yarn available.
Skill Level
Confident beginner to intermediate
You should know how to make:
- magic ring
- chain
- single crochet
- half double crochet
- slip stitch
- yarn over
- joining crochet motifs
- working several loops together
Abbreviations
This pattern uses US crochet terminology.
MR — magic ring
ch — chain
sc — single crochet
hdc — half double crochet
sl st — slip stitch
st / sts — stitch / stitches
sp / sps — space / spaces
Special Stitch — 3-Yarn-Over Puff
Yarn over.
Insert the hook into the indicated stitch.
Yarn over and pull up a loop to approximately the height of an hdc.
You now have 3 loops on the hook.
Repeat:
yarn over, insert into the same stitch, yarn over and pull up a loop
two more times.
You should have:
7 loops on the hook
Yarn over.
Pull through all 7 loops.
Ch 1 to close the puff.
Do not pull the closing chain extremely tight.
The finished puff should look plump and rounded.
Understanding the Flower Square
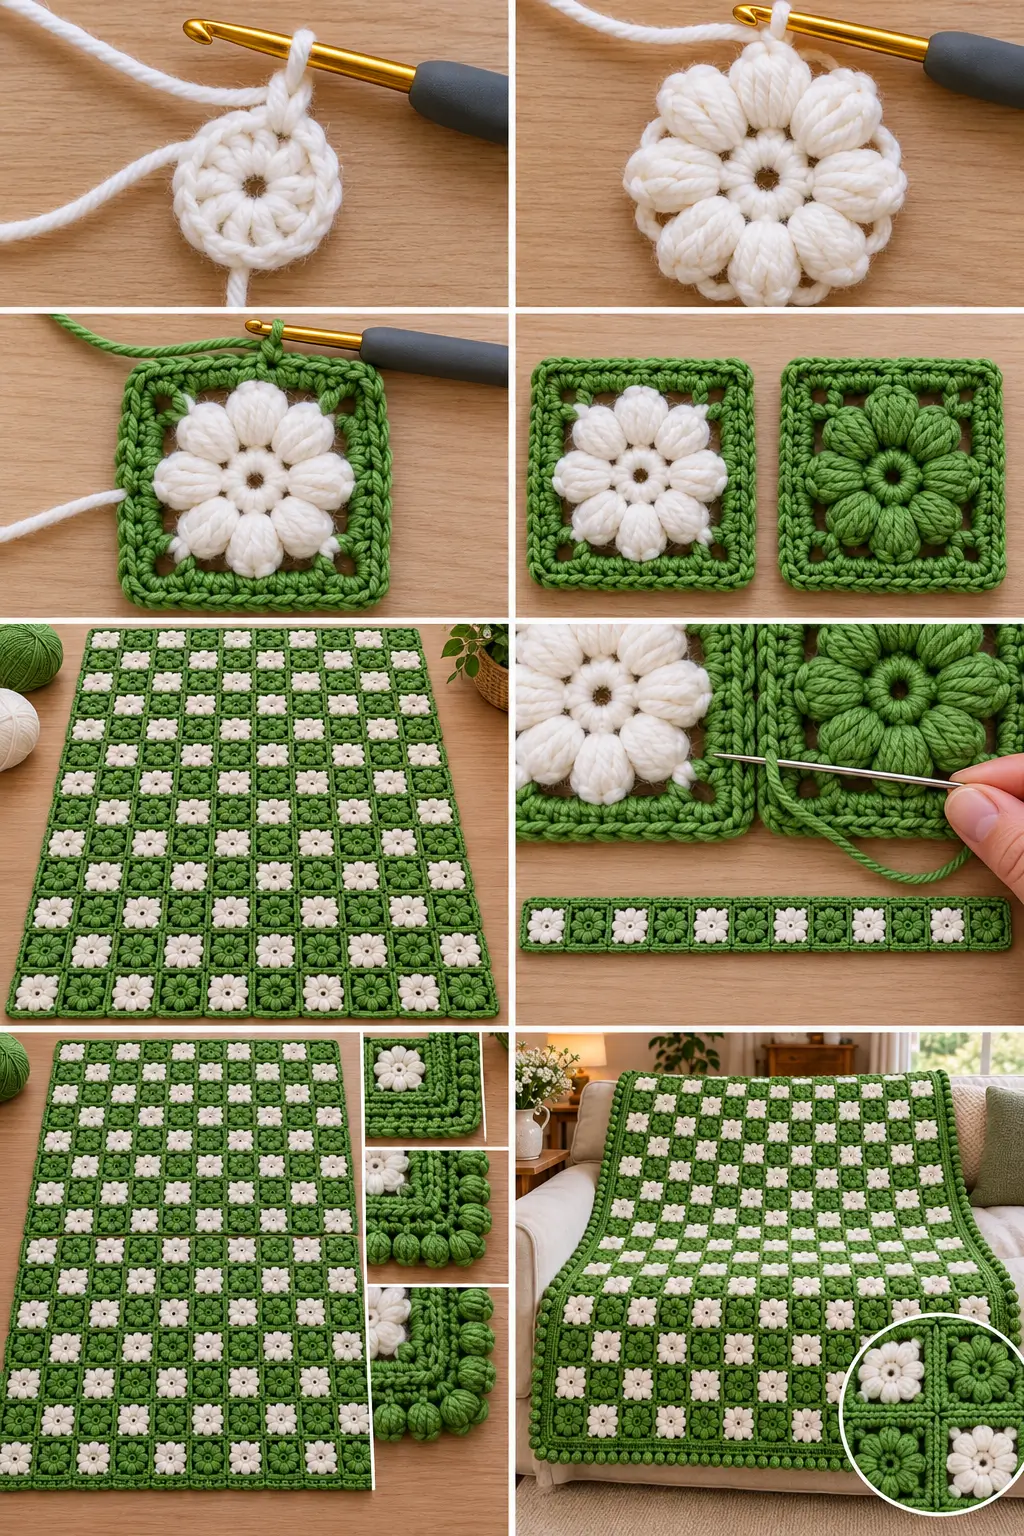
Every square has four rounds.
Round 1
Creates the small center.
Round 2
Creates exactly 8 raised puff petals.
Round 3
Changes the circle into a square.
Round 4
Creates a straight green joining edge.
Both motif versions use the same green yarn for Rounds 3 and 4.
Only the flower color changes.
This gives the finished blanket a continuous green lattice with alternating white and green flowers.
White Flower Square
Make:
90
Round 1 — White Center
With white yarn, make a magic ring.
Ch 1.
Work:
8 sc into the MR
Pull the ring closed.
Join with a sl st to the first sc.
8 sc
Round 2 — Eight White Puff Petals
Ch 1.
Work one 3-yarn-over puff into the first stitch.
Ch 1.
Work one puff into the next stitch.
Ch 1.
Continue:
puff in next sc, ch 1
around.
Join with a sl st to the closing chain of the first puff.
You should have:
8 puff petals
and:
8 ch-1 spaces
Fasten off white.
The motif should now resemble a small eight-petal flower.
Round 3 — Square the Flower
Join green yarn in any ch-1 space.
Ch 1.
In the same space work:
sc, ch 2, sc
This is the first corner.
In the next ch-1 space work:
2 hdc
In the next ch-1 space work:
sc, ch 2, sc
In the next ch-1 space work:
2 hdc
Continue this sequence around.
You should finish with:
- 4 corner ch-2 spaces
- 4 groups of 2 hdc
- 4 clearly defined sides
Join with a sl st to the first sc.
Round 4 — Green Outer Frame
Sl st into the first corner ch-2 space.
Ch 1.
In the same corner work:
sc, ch 2, sc
Now work:
1 sc in each of the next 4 stitches
In the next corner ch-2 space work:
sc, ch 2, sc
Repeat around all four sides.
Join with a sl st to the first sc.
Fasten off.
Each side should contain:
6 sc between corner openings when the corner stitches are included along that side
The square should lie flat.
Green Flower Square
Make:
90
The green flower square is constructed exactly the same way, but all four rounds are worked in green.
Round 1
With green:
8 sc in MR.
Join.
8 sc
Round 2
Work:
1 puff in each sc, ch 1 after each puff
Join.
You should have:
8 green puff petals
and:
8 ch-1 spaces
Do not fasten off.
Round 3
Continue in green.
In alternating ch-1 spaces work:
(sc, ch 2, sc)
for each corner,
and:
2 hdc
in the spaces between corners.
Repeat around.
Join.
Round 4
Sl st into the first corner.
Work:
(sc, ch 2, sc)
in each corner.
Work:
1 sc in every stitch along each side
Join and fasten off.
Check the Motif Size
Block one white-flower square and one green-flower square before making the entire blanket.
Each should measure approximately:
3–3¼ inches / 7.5–8 cm
from side to side.
Both colors must produce the same size.
If the white flower motif is larger, your puff loops may be too tall.
If the green motif is smaller, loosen your tension slightly.
Consistency matters more than an exact measurement.
Blanket Color Layout
Lay the motifs in a checkerboard pattern.
Use:
W = white flower
G = green flower
Every motif still has a green outer frame.
Row 1
W – G – W – G – W – G – W – G – W – G – W – G
Row 2
G – W – G – W – G – W – G – W – G – W – G – W
Continue alternating these two rows until you have:
15 motif rows
Because there are 12 motifs in every row, each row contains:
6 white flowers
and:
6 green flowers
The full blanket contains:
90 white flowers
and:
90 green flowers
Arrange Everything Before Joining
Lay all 180 squares on a large flat surface.
Check the checkerboard carefully before sewing.
Every white flower should touch only green flowers on its:
- left
- right
- top
- bottom
Every green flower should touch white flowers in those same directions.
Diagonal motifs will match colors.
Take a photo of the layout before moving the squares.
This makes it much easier to correct the arrangement if pieces get mixed up during joining.
Joining the Squares
Use green yarn for all joining.
Because every motif has a green outer round, the joining yarn will blend into the fabric.
Join the motifs with a flat mattress seam.
Join the First Two Squares
Place two motifs side by side with the right sides facing upward.
Thread green yarn onto a yarn needle.
Beginning at one corner, insert the needle under the back loop of the first edge stitch on Square 1.
Then insert under the corresponding back loop of Square 2.
Pull gently.
Continue matching:
one stitch from Square 1 to one stitch from Square 2
along the entire side.
Do not pull the seam tightly.
The edges should meet without overlapping.
Secure at the opposite corner.
Make Horizontal Strips
Join:
12 motifs
side by side to make one long strip.
Make:
15 strips total
Check the alternating flower colors after completing every strip.
Join the Strips
Place Strip 1 and Strip 2 together.
Match every motif corner.
Using green yarn and the same mattress seam, join the full length.
Continue adding strips one at a time.
The seams should form a continuous green grid between the flowers.
Keep the Blanket Flat While Joining
After joining every 3–4 strips, lay the blanket flat.
Check that:
- motif corners line up
- seams are not pulling
- squares remain approximately the same size
- flower rows remain straight
- the checkerboard pattern has not shifted
If one seam puckers, remove it and rejoin it more loosely before continuing.
Outer Border
Once all motifs are joined, add a simple green border.
The border strengthens the outside edge and makes the blanket look like one continuous piece.
Border Round 1
Join green yarn in any corner ch-2 space.
Ch 1.
In the corner work:
3 sc
Now work:
1 sc in each stitch along the motif edges
When crossing a seam between two squares, work:
1 sc into the seam junction
Continue along the entire side.
At each blanket corner:
3 sc
Continue around all four sides.
Join with a sl st.
Border Round 2
Ch 1.
Sc in every stitch around.
At each corner work:
3 sc in the center stitch of the previous 3-sc corner
Join.
Border Round 3 — Puff Accent Edge
This final round echoes the flower texture.
Ch 1.
Sc in the first stitch.
Skip:
1 stitch
Work one 3-yarn-over puff in the next stitch.
Ch 1.
Skip:
1 stitch
Sc in the next stitch.
Repeat:
skip 1, puff in next st, ch 1, skip 1, sc in next st
around.
Border Corners
At each corner, work:
sc, ch 2, sc
in the center corner stitch.
Then resume the puff edging along the next side.
Do not place a large puff directly in the corner.
This keeps the corners flatter and stronger.
Join and fasten off.
Finished Blanket Measurements
After joining and edging, the blanket should measure approximately:
39 inches / 99 cm wide
by:
48–49 inches / 122–124 cm long
Exact size depends on your finished motif measurement.
Blocking
Blocking helps the green grid become straighter and makes all flowers sit evenly.
Lay the finished blanket flat.
Gently straighten every outer edge.
Arrange each puff flower with your fingers.
Do not crush the puffs.
If using washable acrylic or cotton yarn, follow the yarn manufacturer’s care instructions.
Allow the blanket to dry completely while flat.
How to Keep the Puff Flowers Even
The most important part is the height of the loops.
Every time you pull up a loop for a puff, bring it to approximately the same height.
If one loop is very tall and the others are short, the petal will twist.
After several motifs, your hands will naturally settle into a consistent puff height.
If the Puff Will Not Close
You should have:
7 loops on the hook
before the final yarn over.
Keep the loops relaxed.
Yarn over and pull slowly through all seven at once.
If the hook catches the yarn, rotate the hook tip slightly downward while pulling through.
A smooth hook makes this stitch much easier.
If the Flower Has the Wrong Number of Petals
Round 1 contains:
8 sc
Round 2 places:
1 puff into every sc
So every flower must have:
exactly 8 petals
If you have seven petals, one Round 1 stitch was skipped.
If you have nine, one stitch was worked twice.
Correct the motif before beginning the green frame.
If the Square Curls
Check Round 3.
There must be:
4 corners
with:
(sc, ch 2, sc)
and:
4 side groups
of:
2 hdc
If the motif still curls slightly, block it before joining.
Strong curling usually means the puff stitches are too tight.
If the Motifs Are Different Sizes
Check:
- yarn weight
- hook size
- puff-loop height
- Round 3 tension
- Round 4 tension
Do not try to correct a small motif by stretching it aggressively during seaming.
It is better to remake noticeably different squares.
If the Blanket Feels Too Heavy
Puff-flower fabric is naturally thick.
For a lighter blanket:
- use DK / light #3 yarn
- use a 4.5 mm hook
- make fewer motifs
- omit the puff border round
The flower structure remains the same.
Baby Blanket Version
For a smaller blanket, make:
9 motifs across
by:
11 motifs high
for:
99 motifs total
Because both dimensions are odd, you will use slightly more of one flower color.
Begin Row 1 with a white flower.
Alternate every position.
Continue the checkerboard through all 11 rows.
With 3-inch motifs, the finished blanket will measure approximately:
29 × 35 inches
after edging.
Lap Blanket Version
Make:
12 motifs across
by:
15 motifs high
This is the main pattern.
Total:
180 motifs
Finished size:
approximately:
39 × 48–49 inches
Larger Throw Version
Make:
15 motifs across
by:
19 motifs high
Total:
285 motifs
Continue the checkerboard throughout.
At approximately 3–3¼ inches per motif, the blanket will finish around:
49 × 61 inches
after edging.
Expect a substantial increase in yarn because puff stitches are yarn-heavy.
Making a Matching Cushion
Make two panels of:
6 motifs across × 6 motifs high
Use the same checkerboard arrangement.
Join the panels on three sides with green single crochet.
Insert a cushion form.
Join the final side.
Add the same puff border if desired.
Making a Matching Bag
The same flower-square fabric works beautifully for a handbag.
For a medium tote, make two panels:
6 motifs across
by:
5 motifs high
Join the sides and bottom in green.
Add several rounds of firm single crochet around the opening.
Crochet or attach sturdy green handles.
A green-and-white tassel can be added to one handle for a decorative finish.
Final Pattern at a Glance
White Flower Motif
Round 1
8 sc in MR.
Round 2
White:
puff in each sc, ch 1
8 puff petals.
Fasten off.
Round 3
Green:
Alternate:
(sc, ch 2, sc)
and:
2 hdc
around the 8 spaces.
Round 4
Green:
Sc around.
Work:
(sc, ch 2, sc)
in every corner.
Fasten off.
Green Flower Motif
Work all four rounds in green using the same stitch counts.
Blanket
Arrange:
12 motifs across × 15 motifs high
in an alternating checkerboard.
Make:
90 white-flower squares
and:
90 green-flower squares
Join all motifs with green mattress stitch.
Add:
2 rounds of green sc
followed by:
1 green puff accent round
around the entire blanket.
The finished blanket measures approximately 39 × 48–49 inches / 99 × 122–124 cm and features a dense green lattice filled with alternating raised white and green eight-petal flowers.