Herbarium Filet Crochet Table Runner With Diamond Lace
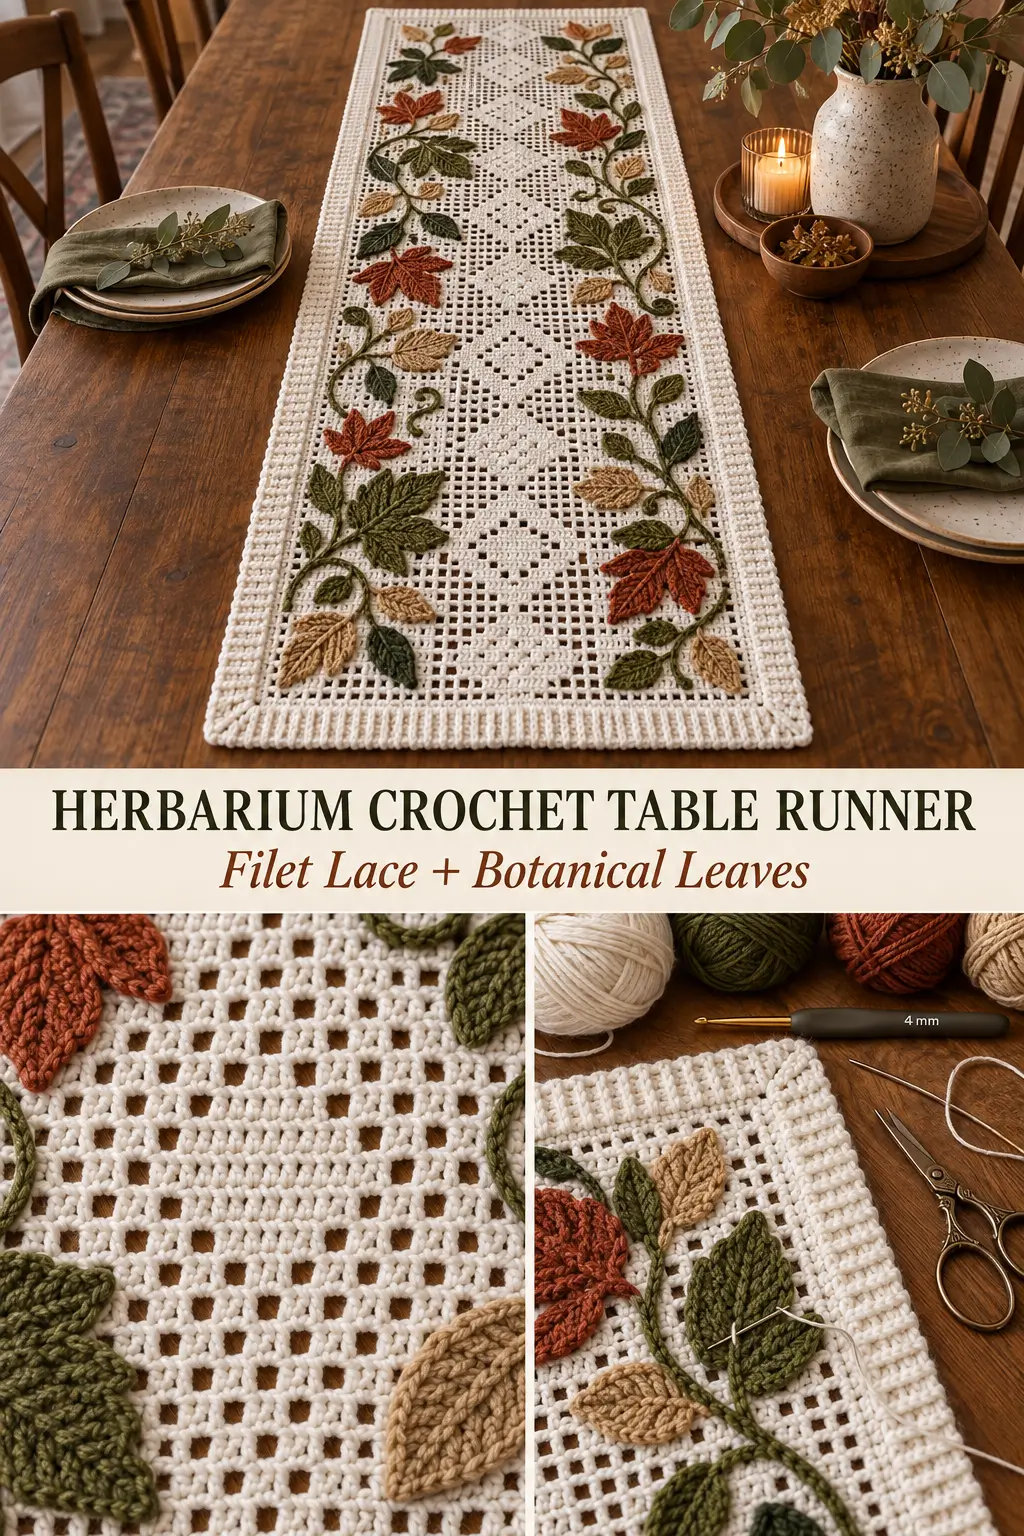
This elegant crochet table runner combines a geometric filet-crochet diamond pattern with a structured ribbed border. The open and filled filet cells form alternating diamonds across the center, giving the runner a clean lattice effect that works beautifully beneath separately crocheted botanical appliqués.
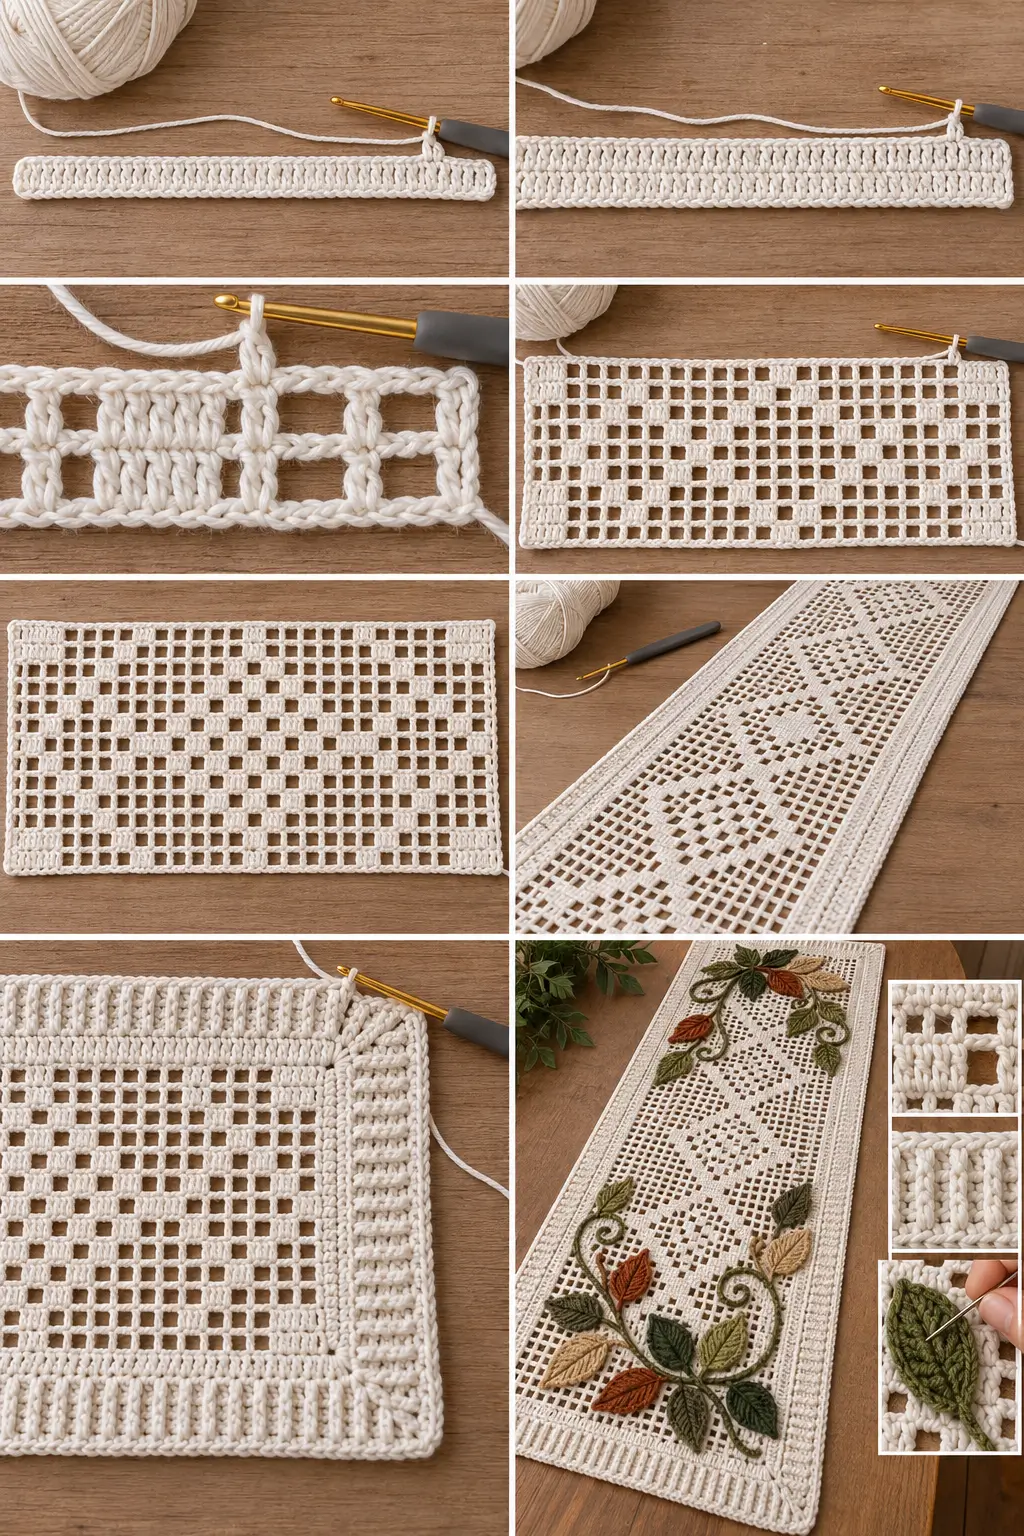
The runner is worked lengthwise in back-and-forth rows using cotton yarn and a 4 mm crochet hook. The center pattern is built from only two kinds of filet cells—filled and open—so once you understand the cell construction, the long diamond repeat becomes much easier to follow.
The botanical leaves shown on the finished runner are made separately and sewn onto the completed runner after blocking.
Finished Size
The foundation width is approximately:
18½ inches / 47 cm
before the outer border.
The finished length is adjustable.
Continue repeating the diamond section until the runner reaches the length you need for your table, then complete the symmetrical ending rows and border.
Materials
- Cotton yarn suitable for a 4 mm crochet hook
- 4 mm crochet hook
- Yarn needle
- Scissors
- Measuring tape
- Blocking pins, optional
- Matching sewing thread and sewing needle for attaching separate leaf appliqués
For the classic Herbarium look, use:
White or warm ivory for the runner.
The botanical decorations can be made separately in shades such as:
- olive green
- moss green
- rust
- terracotta
- tan
- wheat
- beige
Skill Level
Intermediate
You should know how to make:
- chain
- double crochet
- slip stitch
- front post double crochet
- back post double crochet
- working into chain spaces
- filet crochet
Abbreviations
This pattern uses US crochet terminology.
ch — chain
dc — double crochet
sl st — slip stitch
FPdc — front post double crochet
BPdc — back post double crochet
st / sts — stitch / stitches
sp — space
F — filled filet cell
E — empty filet cell
Understanding the Filet Cells
The main runner is built on:
23 filet cells across
Each cell is effectively:
3 stitch positions wide
with neighboring cells sharing their side walls.
That gives:
23 × 3 + 1 = 70 stitch positions
across the runner.
Filled Filet Cell — F
A filled cell consists of:
dc wall + 2 dc filling stitches + next dc wall
Because neighboring cells share their walls, when working continuously you usually make:
2 dc to fill the cell
then:
1 dc for the next wall
If the cell below is open, work the 2 filling dc into its ch-2 space.
Empty Filet Cell — E
An empty cell is:
dc wall, ch 2, skip 2 stitch positions, dc in next wall
When the space below is already open, simply ch 2 across that space and dc into the next wall stitch.
Important Edge Rule
The pattern always begins and ends with a filled cell.
This gives both long edges enough structure for the border.
Foundation
Ch:
69
Then ch 3 more for the first turning dc.
The turning ch-3 counts as the first dc.
Work:
1 dc into each of the 69 foundation chains
You should have:
70 dc total, including the turning chain.
The foundation width should measure approximately:
47 cm / 18½ inches
Row 2 — Solid Setup Row
Ch 3.
Turn.
The ch-3 counts as the first dc.
Dc in every remaining stitch across.
70 dc
You now have two solid rows.
Begin the Diamond Filet Pattern
From this point onward, work the runner using the cell chart below.
Each pattern row contains:
23 cells
Use:
F = filled cell
E = empty cell
Pattern Row 1
Work:
F, F
then:
9 E
then:
1 F
then:
9 E
then:
F, F
In compact form:
FF – 9E – F – 9E – FF
This creates two solid cells at each edge and one filled cell in the center.
Pattern Row 2
Work:
F, E, F
then:
7 E
then:
F, E, F
then:
7 E
then:
F, E, F
Compact form:
FEF – 7E – FEF – 7E – FEF
The central filled cell from the previous row begins opening outward diagonally.
Pattern Row 3
Work:
F, F, E, F
then:
5 E
then:
F, E, F, E, F
then:
5 E
then:
F, E, F, F
Compact form:
FFEF – 5E – FEFEF – 5E – FEFF
Pattern Row 4
Work:
F, E, F, E, F
then:
3 E
then:
F, E, F, E, F, E, F
then:
3 E
then:
F, E, F, E, F
Compact form:
FEFEF – 3E – FEFEFEF – 3E – FEFEF
Pattern Row 5
Work:
F, F, E, F, E, F
then:
1 E
then:
F, E, F, E, F, E, F, E, F
then:
1 E
then:
F, E, F, E, F, F
Compact form:
FFEFEF – E – FEFEFEFEF – E – FEFEFF
The diamond openings are now almost completely closed.
Pattern Row 6 — Full Checkerboard Row
Alternate filled and empty cells across the entire row.
Begin with:
F
then:
E
Continue:
F, E, F, E
across.
Because there are 23 cells, the row ends with:
F
Compact form:
F E F E F E F E F E F E F E F E F E F E F E F
This is the center of the diamond repeat.
Pattern Row 7
Repeat:
Pattern Row 5
Pattern Row 8
Repeat:
Pattern Row 4
Pattern Row 9
Repeat:
Pattern Row 3
Pattern Row 10
Repeat:
Pattern Row 2
The next row would return to:
Pattern Row 1
and the entire diamond sequence begins again.
Main Repeat
Repeat:
Pattern Rows 1–10
for the length of the runner.
The design will form alternating open and filled diamonds.
As the pattern grows, you should see:
- open mesh diamonds
- filled checkerboard diamonds
- half diamonds along the edges
- diagonal movement of filled cells
- diagonal movement of open cells
The pattern is symmetrical from side to side.
How to Work Pattern Row 1 in Actual Stitches
If this is your first filet-crochet project, use the first pattern row as a guide.
Begin with the first wall dc.
To make the first two filled cells, work enough dc to create:
7 dc total
This represents:
2 filled cells
because the cells share their walls.
Then begin the first open section.
For each empty cell:
ch 2
skip the next 2 stitch positions.
Dc in the next wall stitch.
Repeat this for:
9 empty cells
Now make the center filled cell.
If you are above an open space:
Work:
2 dc into the ch-2 space
then:
dc in the next wall stitch
Then work:
9 empty cells
Finish with:
7 dc
for the final two filled cells.
Working a Filled Cell Above an Empty Cell
When the row below contains:
ch 2
and the current chart says:
F
work:
2 dc directly into the ch-2 space
then:
1 dc into the next wall dc
This fills the previously open square.
Working an Empty Cell Above a Filled Cell
When the row below is solid and the current chart says:
E
work:
ch 2
skip the next:
2 dc
and work:
1 dc in the next dc
This opens the square.
Working Filled Over Filled
Work:
1 dc in each stitch
across that cell.
Working Empty Over Empty
Work:
ch 2
across the open space.
Dc into the next wall stitch.
Continue to the Desired Length
Continue repeating the 10-row sequence until the runner is close to your preferred finished length.
For the cleanest symmetrical finish, stop after completing:
Pattern Row 10
Then work:
Pattern Row 1
one final time.
This mirrors the beginning of the filet section.
Final Solid Row 1
Ch 3.
Turn.
Work dc across the entire row.
When you reach a ch-2 space:
Work:
2 dc into the ch-2 space
Then continue with dc in the wall stitches.
You should return to:
70 dc
Final Solid Row 2
Ch 3.
Turn.
Dc in every stitch across.
70 dc
The runner now begins and ends with two solid dc rows.
Check the Runner Before Adding the Border
Lay the runner completely flat.
Check that:
- both long edges are straight
- both short ends have matching solid sections
- the diamond pattern is centered
- the final pattern mirrors the beginning
- the runner is not noticeably wider at one end
Do not worry about minor unevenness along the long row-end edges.
The border will straighten them.
Border Round 1 — Double Crochet Foundation
Work around all four sides.
Join yarn at a corner.
Ch 3.
This counts as the first dc.
Along the Long Side
Work approximately:
2 dc around the end of each row
Continue down the entire long edge.
Different yarn and tension can require slight adjustment.
If the edge begins to ripple, use fewer stitches.
If it pulls inward, occasionally work:
3 dc around one row end
instead of 2.
The important goal is a flat edge.
First Corner
At the next corner work:
dc, ch 3, dc
in the corner area.
Across the Short End
Work:
1 dc in each stitch
across the 70-stitch end.
At the next corner work:
dc, ch 3, dc
Second Long Side
Work approximately:
2 dc around each row end
adjusting as needed so the border remains flat.
Final Corner and Join
At the final corner work the remaining:
dc, ch 3
needed to complete the corner.
Join with a sl st to the top of the beginning ch-3.
Border Round 2 — Ribbed Post-Stitch Border
The next round creates the structured elastic-looking frame visible around the runner.
Ch 1.
Around the first dc post work:
FPdc
Around the next dc post work:
BPdc
Continue alternating:
FPdc, BPdc
along the side.
Border Corners
In every ch-3 corner space work:
2 dc, ch 2, 2 dc
Then continue the alternating:
FPdc, BPdc
pattern along the next side.
If the post-stitch sequence does not land perfectly at a corner, adjust by repeating whichever post stitch keeps the ribbing visually balanced.
Border Round 3
Continue the ribbing.
Work:
FPdc around every FPdc
and:
BPdc around every BPdc
This keeps the raised ribs stacked vertically.
At every corner work:
2 dc, ch 2, 2 dc
Join at the end.
Two rounds of post-stitch ribbing give the runner a clean structured finish.
Wider Border Option
For a wider frame, repeat the post-stitch border round as many times as desired.
Continue:
FPdc over FPdc
BPdc over BPdc
At every corner:
2 dc, ch 2, 2 dc
The more rounds you add, the wider and more substantial the outer frame becomes.
Fasten Off
After the final border round:
Sl st to join.
Cut the yarn.
Pull the tail through.
Weave all ends securely into the back of the border.
Blocking
Blocking is important for this runner because it opens the filet cells and straightens the diamonds.
Wet block or steam according to your yarn’s care instructions.
Lay the runner flat.
Straighten:
- all four edges
- every corner
- the center line
- each diamond
Make sure the cells look square rather than stretched into long rectangles.
Allow the runner to dry completely.
Adding the Herbarium Leaves
The botanical leaves are made as separate crochet appliqués.
Finish and block the runner before attaching them.
Arrange the leaves on the runner until you are happy with the composition.
The botanical design can include:
- large olive-green leaves
- smaller green leaves
- rust-colored leaves
- wheat or beige leaves
Keep the center diamond lace visible rather than covering the entire runner.
Once the arrangement looks balanced, pin the appliqués temporarily in place.
Sewing the Leaves to the Runner
Use an ordinary sewing needle and matching sewing thread.
Take small stitches through:
- the underside of the leaf
- a nearby solid crochet bar in the runner
Avoid pulling the thread tightly.
The leaf should remain flat without puckering the filet background.
Secure:
- the leaf base
- several points along the outer edge
- the leaf tip
Larger leaves may need a few additional hidden stitches through the center.
Keep the sewing thread as invisible as possible from the front.
Important Note About the Leaf Pattern
The crochet instructions for the individual botanical leaves are a separate pattern from the table-runner construction.
The runner itself consists of:
- the 70-stitch filet base
- repeating diamond cell pattern
- solid beginning and ending rows
- double-crochet foundation border
- raised post-stitch outer border
Make the leaf appliqués separately before sewing them onto the completed runner.
Making the Runner Wider
The original center uses:
23 filet cells
for:
70 stitch positions
and an approximately:
47 cm / 18½ inch
foundation width.
To change the width, remember:
Each extra filet cell adds:
3 stitch positions
Increase the solid foundation accordingly.
However, changing the number of cells also changes the diamond-chart layout.
For the exact diamond arrangement given here, keep:
23 cells / 70 stitches
Making the Runner Longer
Length is much easier to change.
Simply repeat:
Pattern Rows 1–10
as many times as necessary.
When the runner is long enough:
- finish Pattern Row 10
- work Pattern Row 1 once more
- work 2 solid dc rows
- add the border
This preserves the symmetry.
Filet Pattern at a Glance
Use:
F = filled
E = empty
Row 1
FF – 9E – F – 9E – FF
Row 2
FEF – 7E – FEF – 7E – FEF
Row 3
FFEF – 5E – FEFEF – 5E – FEFF
Row 4
FEFEF – 3E – FEFEFEF – 3E – FEFEF
Row 5
FFEFEF – E – FEFEFEFEF – E – FEFEFF
Row 6
FEFEFEFEFEFEFEFEFEFEFEF
Row 7
Repeat Row 5.
Row 8
Repeat Row 4.
Row 9
Repeat Row 3.
Row 10
Repeat Row 2.
Repeat Rows 1–10 for length.
Finish with:
Row 1 once more
then:
2 solid dc rows
Final Pattern Summary
Foundation
Ch 69.
Add a ch-3 turning chain.
Work across for:
70 dc including the turning chain
Row 2
Dc across.
70 dc
Filet Section
Work the:
23-cell diamond chart
using the 10-row repeat.
Ending
After the final complete repeat:
Work Pattern Row 1.
Then work:
2 solid dc rows
Border Round 1
Dc around the entire runner.
Along long sides:
approximately 2 dc per row end
At corners:
dc, ch 3, dc
Border Round 2
Alternate:
FPdc, BPdc
around.
Corners:
2 dc, ch 2, 2 dc
Border Round 3
Work:
FPdc over FPdc
and:
BPdc over BPdc
Corners:
2 dc, ch 2, 2 dc
Fasten off, weave in the ends, and block thoroughly.
The finished runner has a white geometric filet-crochet center filled with alternating open and solid diamonds, a substantial ribbed rectangular border, and separately crocheted botanical leaf appliqués sewn across the lace after finishing. Pasted text Pasted text Pasted text