How to Crochet the Elastic Stitch – Easy Stretchy Crochet Ribbing Pattern
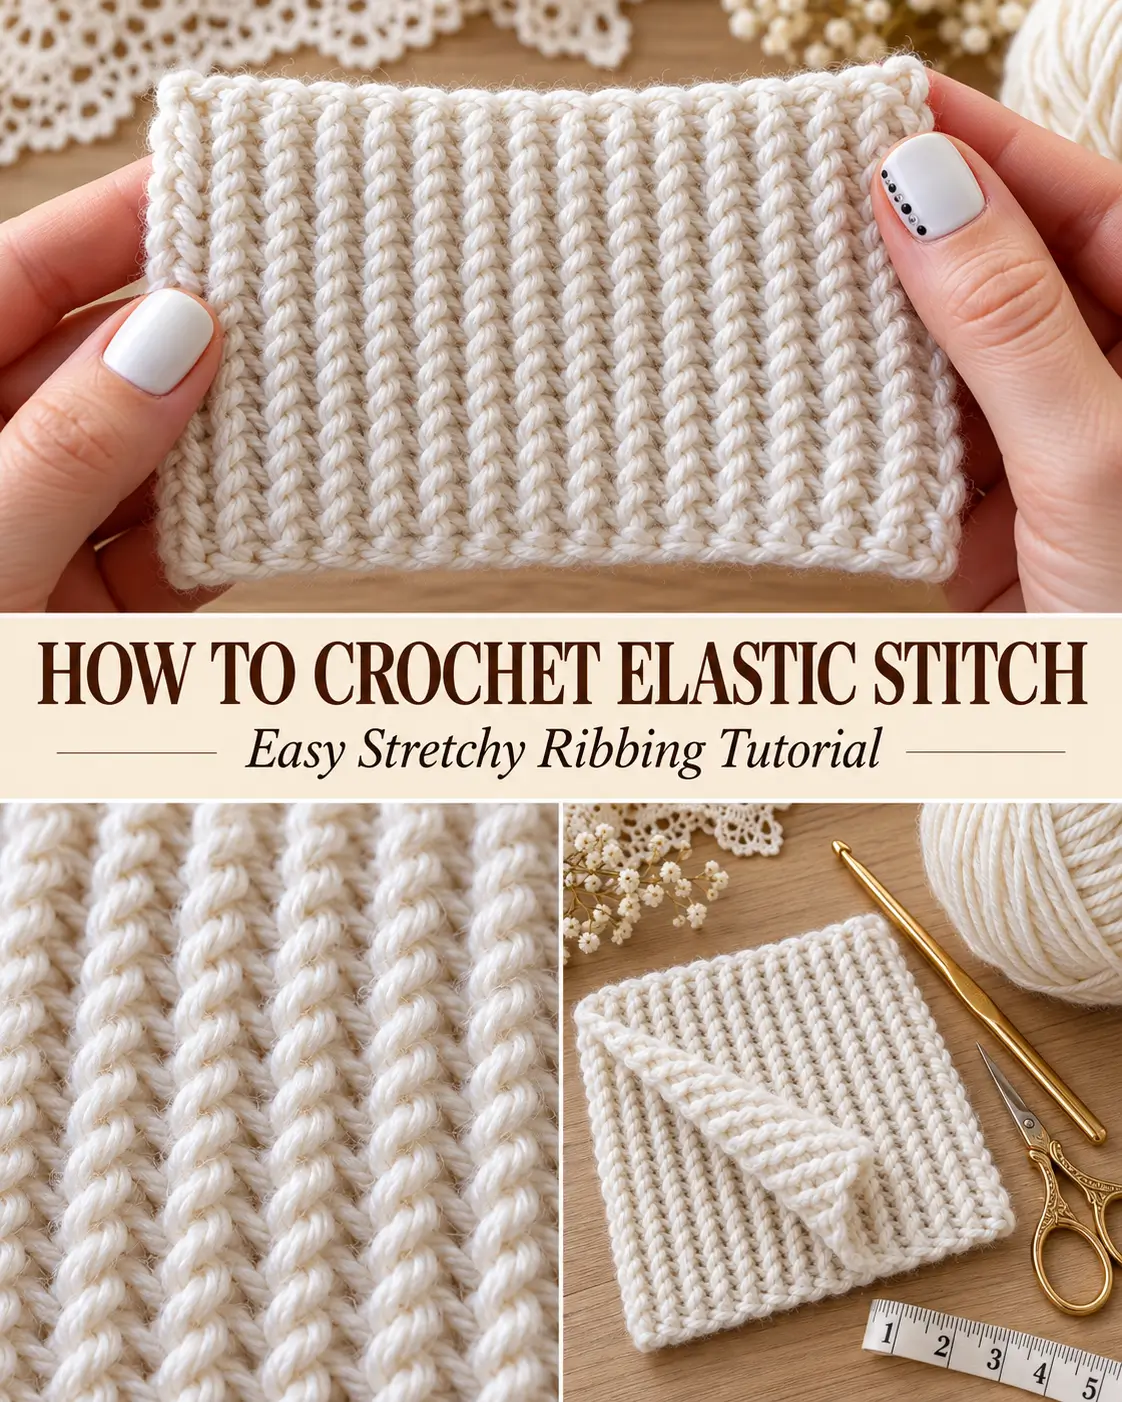
If you’ve ever wanted to create beautiful, stretchy crochet ribbing that looks neat on both sides, this easy elastic crochet stitch is worth learning.
This textured crochet technique creates closely spaced, raised vertical ridges that resemble knitted ribbing. The finished fabric is soft, flexible, and particularly useful for sweater cuffs, necklines, hat brims, and the bottom edges of handmade garments.
What makes this pattern especially interesting is its simplicity. You don’t need complicated crochet stitches or advanced techniques to achieve the ribbed appearance.
In fact, this elastic crochet stitch is made almost entirely with slip stitches worked through the back loops.
Once you understand where to insert your hook and how to maintain relaxed tension, you can create a beautifully textured strip of ribbing in almost any length.
This step-by-step tutorial explains how to crochet the elastic stitch, how to keep the edges straight, and how to use the finished ribbing for different crochet projects.
What Is the Crochet Elastic Stitch?
The crochet elastic stitch is a ribbing technique that uses slip stitches worked through the back loop of each stitch.
Unlike ordinary slip stitches worked through both loops, back-loop slip stitches leave one loop of each previous stitch unworked.
These unworked loops create subtle ridges that run along the fabric.
As you continue crocheting back and forth, the repeated ridges develop into a flexible, ribbed texture.
The finished fabric resembles knitted ribbing, with narrow raised columns separated by recessed areas.
Because the stitches are short and closely packed, the fabric has a dense appearance while retaining flexibility.
The amount of stretch depends on your yarn, hook size, stitch tension, and fiber content. Wool and some acrylic blends generally have better recovery than ordinary cotton.
Why You’ll Love This Elastic Crochet Stitch
There are several reasons to add this technique to your collection of crochet stitches.
- Easy stitch technique: The pattern uses chains and slip stitches, making it accessible to beginners.
- Beautiful ribbed texture: Raised ridges give the fabric an attractive knitted appearance.
- Flexible fabric: The back-loop construction allows the ribbing to stretch across the raised columns.
- Attractive on both sides: Both sides have a similar textured appearance.
- Customizable size: You can adjust the foundation chain and number of rows to fit different projects.
- Versatile applications: Use the stitch for cuffs, hat bands, sweater hems, neckbands, and decorative garment edges.
The stitch is also a useful option when you want ribbing without switching from crochet to knitting.
Elastic Crochet Stitch Pattern Details
Skill level: Beginner
Crochet terminology: US terms
Stitch technique: Back-loop-only slip stitch
Construction: Worked flat in turned rows
Sample foundation chain: 15 chains
Sample stitch count: 14 stitches per row
Pattern repeat: One repeating row after the foundation row
Fabric appearance: Dense, vertically ridged, knit-like crochet ribbing
Finished size: Adjustable
The sample begins with 15 chain stitches, but you can use a different foundation chain length depending on the depth of ribbing required.
There is no special stitch multiple for this pattern.
Materials You’ll Need
To crochet a small elastic stitch sample, gather the following supplies:
- Smooth DK or worsted-weight yarn
- Crochet hook suitable for your chosen yarn
- Scissors
- Yarn needle
- Measuring tape
- Optional stitch marker
Choosing the Right Crochet Hook
Choose a hook that allows you to work slip stitches comfortably without tightening the fabric.
For a medium-weight yarn, a 4.5 mm or 5.0 mm crochet hook may be a suitable starting point.
However, always consider the yarn manufacturer’s recommendations.
If your stitches are difficult to enter or the fabric feels stiff, try using a slightly larger hook.
The goal is to create relaxed, even slip stitches that can stretch without forming large, loose gaps.
Best Yarn for Elastic Crochet Ribbing
The stitch works with several yarn fibers, but the finished fabric will behave differently depending on the yarn.
Wool: A good choice for garments because many wool yarns provide natural elasticity and recovery.
Acrylic: Convenient for everyday projects, with flexibility varying by yarn construction and quality.
Wool-acrylic blends: Often provide a useful combination of softness, structure, and stretch.
Cotton: Creates defined ribbing but usually offers less spring and recovery than wool.
For garment cuffs and neckbands, choose yarn that can stretch and return close to its original shape.
For practicing the technique, a smooth, light-colored yarn is helpful because the stitch loops are easier to see.
Crochet Abbreviations
This pattern uses US crochet terminology.
| Abbreviation | Meaning |
|---|---|
| ch | Chain |
| sl st | Slip stitch |
| st | Stitch |
| sts | Stitches |
| BLO | Back loop only |
| rep | Repeat |
Special Stitch: Back-Loop-Only Slip Stitch
A back-loop-only slip stitch is worked as follows:
- Locate the two loops forming the V shape at the top of the next stitch.
- Identify the back loop, which is the loop farthest from you.
- Insert your crochet hook under that back loop only.
- Yarn over.
- Pull the yarn through the back loop and directly through the loop already on your hook.
You have completed one BLO slip stitch.
Only one loop should remain on your hook.
This technique is the foundation of the entire elastic crochet pattern.
Important Notes Before You Begin
To achieve neat, flexible ribbing, pay attention to the following details.
Keep your stitches loose. Slip stitches naturally tend to become tight. Avoid pulling the working yarn too firmly after completing each stitch.
The turning chain does not count as a stitch. Every row begins with chain 1, which provides enough height to turn the work.
Work through the back loops. After the first row, all slip stitches are worked through the back loops unless otherwise specified.
Do not skip the final stitch. The last stitch may hide slightly along the edge, so count carefully.
Do not crochet into the turning chain. The turning chain is not an additional stitch.
Turn your work after each row. This allows the raised ridges to develop consistently.
Following these simple rules will help you produce even ribbing with straight edges.
How to Crochet the Elastic Stitch – Step-by-Step Instructions
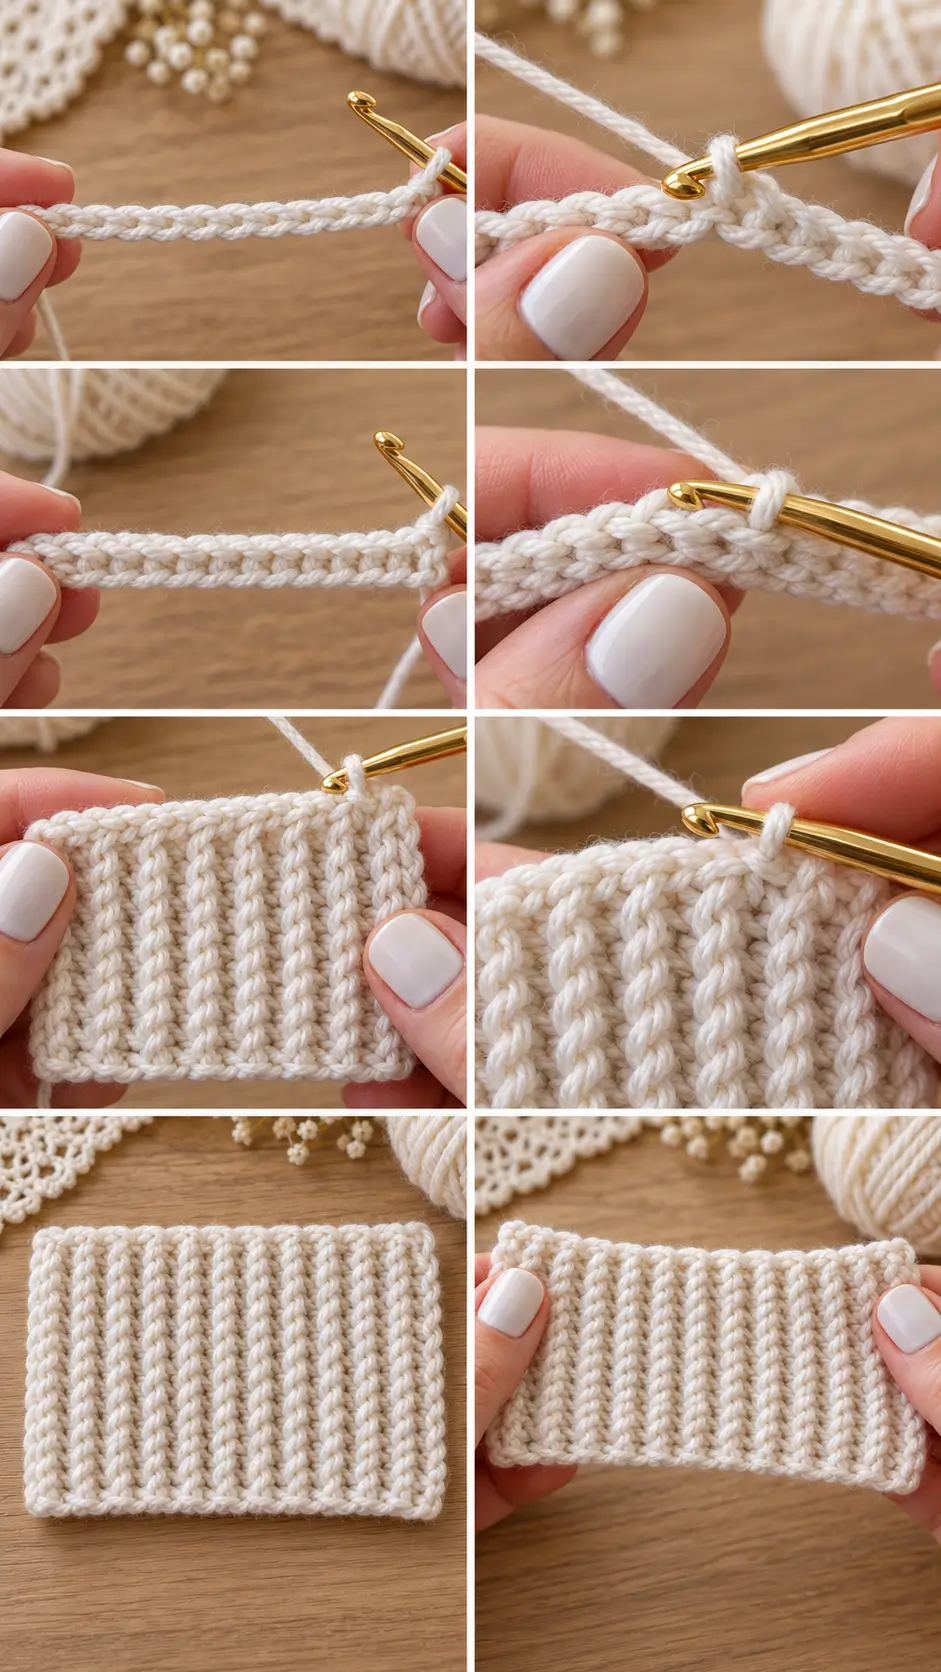
Let’s make a small sample using 15 foundation chains.
This sample will demonstrate the technique before you adapt it for a hat, sweater, or another crochet project.
Step 1: Make the Foundation Chain
Begin by making a slip knot and placing it on your crochet hook.
Chain 15.
To make a chain stitch:
- Hold the working yarn with your preferred tension.
- Yarn over your crochet hook.
- Pull the yarn through the loop already on the hook.
- Repeat until you have 15 chain stitches.
Try to keep your chains evenly sized.
Do not pull the working yarn tightly after each chain.
Your starting chain determines the depth of the finished ribbing.
For example, if you want a wider sweater waistband, you can begin with more chains.
If you need a narrow cuff or decorative band, use fewer chains.
For this tutorial, continue with 15 chains.
Step 2: Crochet the First Slip Stitch Row
Row 1 – Foundation Slip Stitches
Insert your crochet hook into the second chain from the hook.
Yarn over and pull through the chain stitch and the loop on your hook in one movement.
You have completed your first slip stitch.
Now continue:
- Insert your hook into the next chain.
- Yarn over.
- Pull the yarn through the chain and the loop already on your hook.
Repeat this process in every remaining chain across the foundation.
When you reach the end, you should have:
14 slip stitches.
What Your First Row Should Look Like
Your work should resemble a narrow, flat strip with a neat row of closely packed stitches.
Because slip stitches are shorter than single crochet stitches, the first row will not be very tall.
The fabric may appear slightly compact at this stage.
This is normal.
The ribbed texture will become more visible after additional rows.
Important Tip
Avoid tightening each completed slip stitch.
If you pull the loop too tightly, the following row will be difficult to work.
Try to keep the loop on your hook approximately the same size as the hook shaft.
Step 3: Make the First Back-Loop Row
Row 2 – Back-Loop Slip Stitches
After completing Row 1:
Chain 1 and turn your work.
Look closely at the top edge of the stitches.
You should see a row of small V-shaped loops.
Each stitch has a front loop and a back loop.
For this row, you will work into the back loop only.
Detailed Instructions
- Identify the first actual slip stitch immediately below the turning chain.
- Insert your hook beneath its back loop.
- Yarn over.
- Pull the yarn through the back loop and the loop on your hook.
- Move to the next stitch.
- Work another slip stitch through its back loop.
Continue working BLO slip stitches across the entire row.
When you reach the final stitch, make sure to work into its back loop.
Do not work an additional stitch into the turning chain from the previous row.
Stitch count: 14 BLO slip stitches.
Why the Back Loop Matters
Working through only one loop creates the raised lines that make this elastic stitch special.
The unused front loops remain visible and contribute to the ridged texture.
If you work through both loops instead, the fabric will not develop the same pronounced ribbing.
Step 4: Continue Building the Ribbing
Row 3 – Repeat the Back-Loop Slip Stitches
Chain 1 and turn.
Locate the first actual stitch of the new row.
Insert your hook into the back loop.
Work one slip stitch.
Continue working one BLO slip stitch in every stitch across the row.
Remember to include the last stitch, which may sit close to the turning chain from the previous row.
Stitch count: 14 BLO slip stitches.
At the end of Row 3, chain 1 and turn.
You may now begin noticing small raised ridges forming across the strip.
These ridges become increasingly defined as you add more rows.
Step 5: Repeat the Elastic Stitch Pattern
Row 4 and All Following Rows
Repeat the same instructions:
Chain 1, turn, and work 1 BLO slip stitch in each of the 14 stitches across.
Continue repeating this row until your ribbing reaches the desired length.
There are no complicated stitch changes or increases.
The entire repeating pattern uses the same technique.
Simple Pattern Summary
Foundation: Ch 15.
Row 1: Sl st in 2nd ch from hook and in each remaining ch. (14 sts)
Row 2: Ch 1, turn. Sl st BLO in each st across. (14 sts)
Row 3 onward: Rep Row 2 until the ribbing reaches the desired length.
Fasten off and weave in the ends, or leave a yarn tail if you plan to sew the ribbing into a ring.
That’s the complete elastic crochet stitch pattern.
Step 6: Check Your Stitch Count
One of the most important details in this technique is maintaining the correct number of stitches.
For our sample, every row should contain:
14 slip stitches.
The turning chain is not included in this number.
If you accidentally crochet into the turning chain, your ribbing may gradually become wider.
If you skip the final stitch, your work may begin to narrow.
How to Find the Last Stitch
When you’re approaching the end of a row, slow down and examine the edge.
The last slip stitch can look smaller than the others because of the turning chain beside it.
Gently spread the stitches with your fingers until you can identify the final V-shaped stitch.
Work into its back loop as usual.
Then chain 1 and turn.
Counting regularly is especially helpful during your first few rows.
Step 7: Continue Until the Ribbing Is Long Enough
The length of the ribbing depends on your intended project.
For a practice swatch, continue until the strip is long enough to show several clearly defined ridges.
For a sweater cuff, continue until the strip can wrap around the wrist with an appropriate amount of stretch.
For a hat brim, crochet until the strip reaches the desired head circumference when comfortably stretched.
For a sweater hem, continue until it fits the lower edge of the garment.
Remember that the foundation chain controls the depth of the ribbing, while the number of rows controls its length.
This is one of the most useful things to understand when adapting the pattern.
Step 8: Examine Both Sides of the Fabric
After you’ve completed several rows, gently stretch your sample sideways, across the raised ridges.
You should notice that the ribbed fabric expands and then contracts to an extent when released.
The amount of recovery depends largely on the yarn.
Turn the fabric over and examine the opposite side.
Both surfaces should display a similar ribbed appearance.
This makes the stitch useful for accessories that may show on either side, such as folded cuffs or hat brims.
If one side appears noticeably uneven, check that you’ve consistently worked through the back loops and maintained the correct stitch count.
Step 9: Join the Ribbing Into a Circle (Optional)
If you’re making a cuff, hat brim, or sweater waistband, you may need to join the two short ends of the strip.
First, check the fit and make sure the ribbing is long enough.
Lay the strip flat with the two short ends aligned.
For a neat, flexible seam, you can use a yarn needle and matching yarn to sew the ends together.
Joining Instructions
- Fold the ribbing so the two short ends meet.
- Check that the strip is not twisted.
- Thread a yarn needle with the matching yarn tail.
- Sew the two short ends together using a loose whipstitch or mattress-style seam.
- Match the stitches carefully to avoid pulling one side shorter.
- Do not tighten the seam excessively.
- Secure the yarn and weave in the tail.
Your ribbing should now form a continuous band.
Check that the seam stretches comfortably before attaching it to a garment.
A tight seam can reduce the flexibility of an otherwise stretchy ribbing pattern.
You may also use slip stitches to join the ends, but keep them relaxed so the seam does not become stiff.
Step 10: Fasten Off and Finish
If you’re creating a standalone ribbing sample, you can finish without joining the ends.
After completing your final row:
- Cut the yarn, leaving a tail approximately 6 inches long.
- Pull the tail completely through the remaining loop.
- Thread the yarn tail onto a yarn needle.
- Weave the tail through several stitches on the wrong side.
- Change direction while weaving to secure the yarn.
- Trim the remaining excess.
Gently stretch the sample across the ridges and allow it to relax.
You now have a completed elastic crochet stitch sample.
How to Customize the Elastic Crochet Stitch
This ribbing pattern is easy to adapt because it doesn’t require a fixed stitch multiple.
You can begin with almost any number of chains.
The main consideration is how wide you want the ribbed section to be.
Adjusting the Ribbing Depth
The foundation chain determines how deep the ribbing will be.
Here are a few sample options:
| Foundation chain | Stitches per row |
|---|---|
| Chain 8 | 7 |
| Chain 10 | 9 |
| Chain 12 | 11 |
| Chain 15 | 14 |
| Chain 20 | 19 |
| Chain 25 | 24 |
These are stitch counts, not fixed measurements.
Actual ribbing depth depends on the yarn, hook size, and tension.
For accurate garment sizing, crochet a small sample and measure it before making the full band.
Adjusting the Ribbing Length
To make the ribbing longer, simply continue repeating the back-loop slip stitch row.
To make it shorter, stop after fewer rows.
The number of rows required will depend on your stitch gauge.
Because crochet ribbing stretches, measure it both relaxed and gently stretched when planning a garment.
Beautiful Projects You Can Make With Elastic Crochet Ribbing
Once you understand this simple stitch, you can use it for several handmade crochet projects.
1. Crochet Sweater Cuffs
Elastic crochet ribbing is an attractive choice for sweater cuffs.
The narrow ridges create a polished edge that contrasts nicely with the texture of the main sweater fabric.
Make a strip deep enough for your preferred cuff style, then continue adding rows until it comfortably fits around the wrist.
Join the short ends and attach the ribbing to the sleeve opening.
2. Crochet Hat Brims
A ribbed brim adds definition to handmade crochet hats.
You can create a separate ribbing band and join it into a circle before working the main hat.
Alternatively, depending on the hat pattern, you may attach the ribbing after the hat is completed.
Always make sure the brim can stretch comfortably around the head.
3. Crochet Sweater Waistbands
A textured ribbed waistband gives sweaters and cardigans a more finished appearance.
Use a foundation chain long enough to create the desired depth.
Continue crocheting until the strip is the appropriate length for the garment’s lower edge.
The ribbed band can then be sewn or crocheted to the main sweater, distributing the attachment stitches evenly.
4. Crochet Necklines
This stitch can also create decorative ribbing around a sweater or cardigan neckline.
A narrower foundation chain works well when you want a subtle finishing band.
Carefully measure the neckline before making the ribbing.
For pullovers, ensure the finished neckband stretches enough to pass comfortably over the head.
5. Crochet Headbands
A wider elastic stitch strip can be used to create a simple textured headband.
Work the ribbing until it comfortably fits around the head, then join the short ends.
Choose a soft yarn that feels comfortable against the skin.
For colder weather, wool or a soft acrylic blend can provide warmth.
Tips for Making Perfect Crochet Elastic Stitch
1. Never Pull the Slip Stitches Too Tight
This is the most important tip for this pattern.
Slip stitches are naturally compact.
If you tighten each stitch excessively, your fabric can become stiff and difficult to work.
Instead, allow the working loop to remain relaxed.
The completed ribbing should bend and stretch without feeling rigid.
2. Always Work Into the Back Loop
After the foundation row, each slip stitch should be worked through the back loop only.
This is what produces the distinctive ribbed appearance.
If you accidentally work through both loops, that section of the fabric may look different.
3. Watch the Last Stitch Carefully
The final stitch often appears slightly hidden near the turning chain.
Skipping it is a common reason why ribbing becomes narrower with each row.
If you’re unsure, count the stitches before starting the next row.
4. Do Not Work Into the Turning Chain
The chain 1 at the beginning of each row provides turning height.
It does not count as a stitch.
Do not add an extra slip stitch into that chain.
5. Use Consistent Tension
Try to keep your slip stitches approximately the same size.
Uneven tension can produce ridges that differ in height and spacing.
A relaxed grip and a comfortable crochet hook can make a noticeable difference.
6. Choose Yarn With Good Recovery
Not all fibers stretch and recover equally.
For garment ribbing that needs to return to its original shape, fiber selection is especially important.
Always test a small swatch before committing to a large project.
Common Problems and How to Fix Them
Why Is My Elastic Crochet Stitch Too Tight?
The most likely cause is tight slip stitches.
Because slip stitches are short, pulling them firmly can create a dense, rigid fabric.
Try relaxing your yarn tension or using a slightly larger hook.
Make sure your foundation chain is not tighter than the rest of the fabric.
Why Is My Ribbing Getting Narrower?
You may be skipping the final stitch in one or more rows.
The last stitch can be difficult to identify, especially when the fabric is tightly crocheted.
Count your stitches at the end of each row.
For this sample, you should always have 14 stitches.
Why Is My Ribbing Getting Wider?
You may be accidentally crocheting into the turning chain.
Remember that chain 1 is not a stitch.
Work into the first actual slip stitch and stop after the final actual stitch.
Why Doesn’t My Ribbing Stretch Very Much?
Several factors can affect stretch.
The stitches may be too tight, the hook may be too small, or the yarn may have limited natural elasticity.
Try making a sample with a slightly larger hook.
Also consider using a yarn with better recovery, such as a suitable wool or wool-blend yarn.
Why Do My Ridges Look Uneven?
Uneven ridges can result from inconsistent tension or accidentally working into both loops.
Check that you’re inserting the hook under only the back loop of each stitch.
Try maintaining the same tension from one row to the next.
Why Is It Difficult to Insert My Hook?
Slip stitches can create small, tight loops.
If the hook does not enter easily, gently spread the top loops with your fingers.
Avoid forcing the hook, which can distort the stitches.
A smooth hook with a slightly larger head or a larger hook size may help.
Frequently Asked Questions
Is the Elastic Crochet Stitch Beginner-Friendly?
Yes.
This technique uses only chain stitches and slip stitches.
The main skill you’ll need to practice is identifying the back loop and keeping your slip stitches loose.
Once you understand the first few rows, the pattern becomes straightforward.
Is This Stitch the Same as Knitted Ribbing?
No, but it creates a similar appearance.
Knitted ribbing is made using knit and purl stitches, while this crochet technique uses back-loop slip stitches.
Both can create vertically ridged fabric, although their exact structure and elasticity differ.
Is Crochet Elastic Stitch Reversible?
The front and back have similar ribbed textures, making this stitch attractive from either side.
Minor differences may still be visible depending on your tension and how the ends are finished.
How Many Chains Do I Need for a Sweater Cuff?
There is no fixed number.
The foundation chain determines the depth of the cuff, not the circumference around the wrist.
Choose the number of chains based on how deep you want the cuff.
Then work enough rows to achieve the desired circumference.
Can I Use Cotton Yarn?
Yes.
Cotton yarn can produce clearly defined elastic-style ribbing.
However, many cotton yarns do not recover from stretching as effectively as wool.
Cotton may be better for projects where strong elasticity is not essential.
Can I Use This Stitch for a Crochet Baby Sweater?
Yes, provided you choose a suitable soft yarn and ensure the finished garment fits safely and comfortably.
The ribbing can be used around cuffs, necklines, and hems.
Make sure that it does not feel restrictive.
How Do I Attach the Ribbing to a Sweater?
You can attach the finished strip using a yarn needle or a row of crochet stitches.
Align the ribbing with the garment edge, use stitch markers to divide the sections evenly, and distribute the attachment stitches without pulling the fabric out of shape.
The ribbing’s row ends and the garment’s stitches usually have different gauges, so they may not match one-to-one.
Can I Make This Ribbing Wider?
Absolutely.
Begin with a longer foundation chain.
For example, chain 20 for a sample containing 19 slip stitches per row.
Continue working through the back loops until the strip reaches your desired length.
Does the Turning Chain Count as a Stitch?
No.
The chain 1 at the beginning of every row is used only for turning.
Do not include it in your stitch count.
Can I Use a Larger Crochet Hook?
Yes.
A larger hook can help make slip stitches more flexible and easier to work.
However, a hook that’s too large may create loose, uneven fabric.
Experiment with a small swatch until you find the balance you prefer.
Final Thoughts
Learning how to crochet the elastic stitch is a simple way to add beautiful, knitted-looking ribbing to your handmade projects.
With just a foundation chain and rows of back-loop slip stitches, you can create a textured fabric featuring neat raised ridges and useful flexibility.
The technique is especially practical for sweater cuffs, hat brims, necklines, waistbands, and other garment details.
The secret to successful crochet ribbing is maintaining relaxed tension, working consistently into the back loops, and paying attention to the first and last stitches of every row.
Once you’ve practiced the technique with a small 15-chain sample, you can easily adjust the size to suit your next project.
Grab your favorite yarn and crochet hook, and try this easy elastic crochet stitch for a beautiful textured finish on your handmade creations!