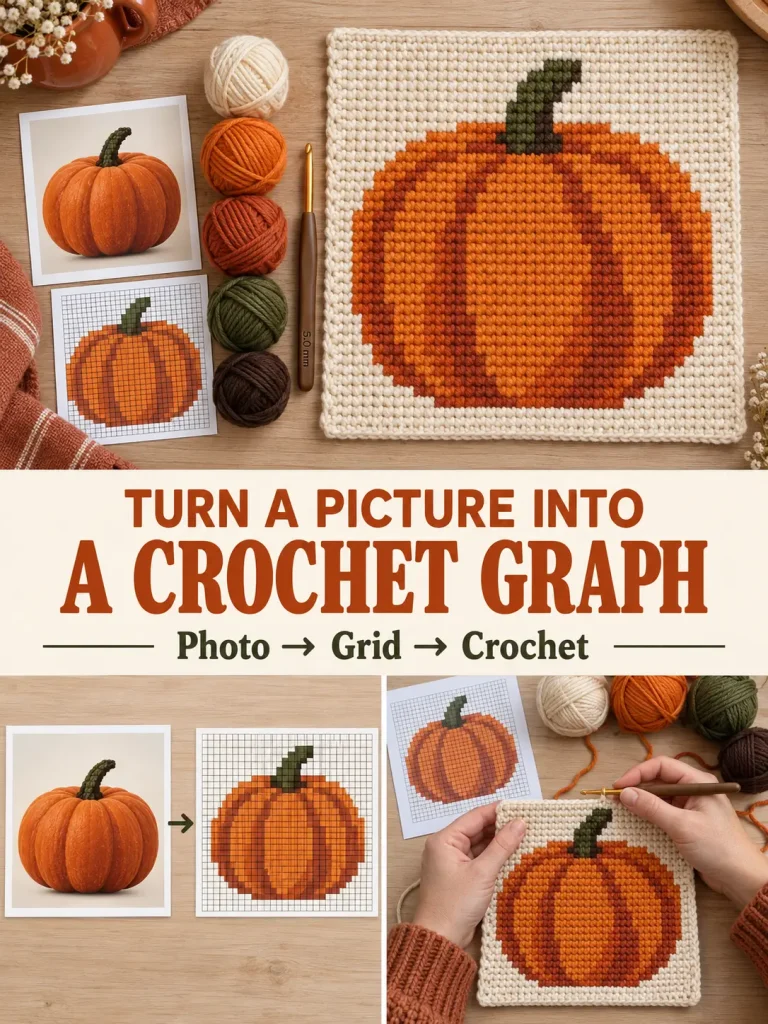
Turning a picture into crochet sounds complicated until you see what actually happens:
picture → simplified colors → square grid → crochet graph → finished project
I tested the idea with a simple fall pumpkin because it has exactly what works well for crochet colorwork: a recognizable shape, strong contrast, and only a few important colors.
The result is a graph you can use for tapestry crochet, a graphgan, C2C crochet, a pillow panel, tote bag, wall hanging, or even the front of a blanket.
You do not need to draw every square by hand, either. Crochet graph makers can convert an image into a grid first, then you clean up the parts that do not translate well into yarn.
What Is a Crochet Graph?
A crochet graph is a grid made from colored squares.
Each square represents part of your crochet design.
For regular single-crochet colorwork or tapestry crochet, one grid square will usually represent one stitch.
For corner-to-corner crochet, each grid square normally represents one C2C block rather than one individual stitch.
That distinction is important because the exact same 50 × 50 graph will make dramatically different-sized projects depending on the crochet technique you choose.
The Picture I Would Start With
For your first photo-to-crochet experiment, do not start with:
- a detailed family portrait
- a complicated landscape
- tiny lettering
- realistic fur
- dozens of colors
Start with something simple.
A pumpkin is ideal.
Imagine a photograph containing:
- one orange pumpkin
- dark green stem
- cream background
- strong outline
- very little background clutter
The simpler the image, the easier it is for a graph maker to decide which color belongs in each square.
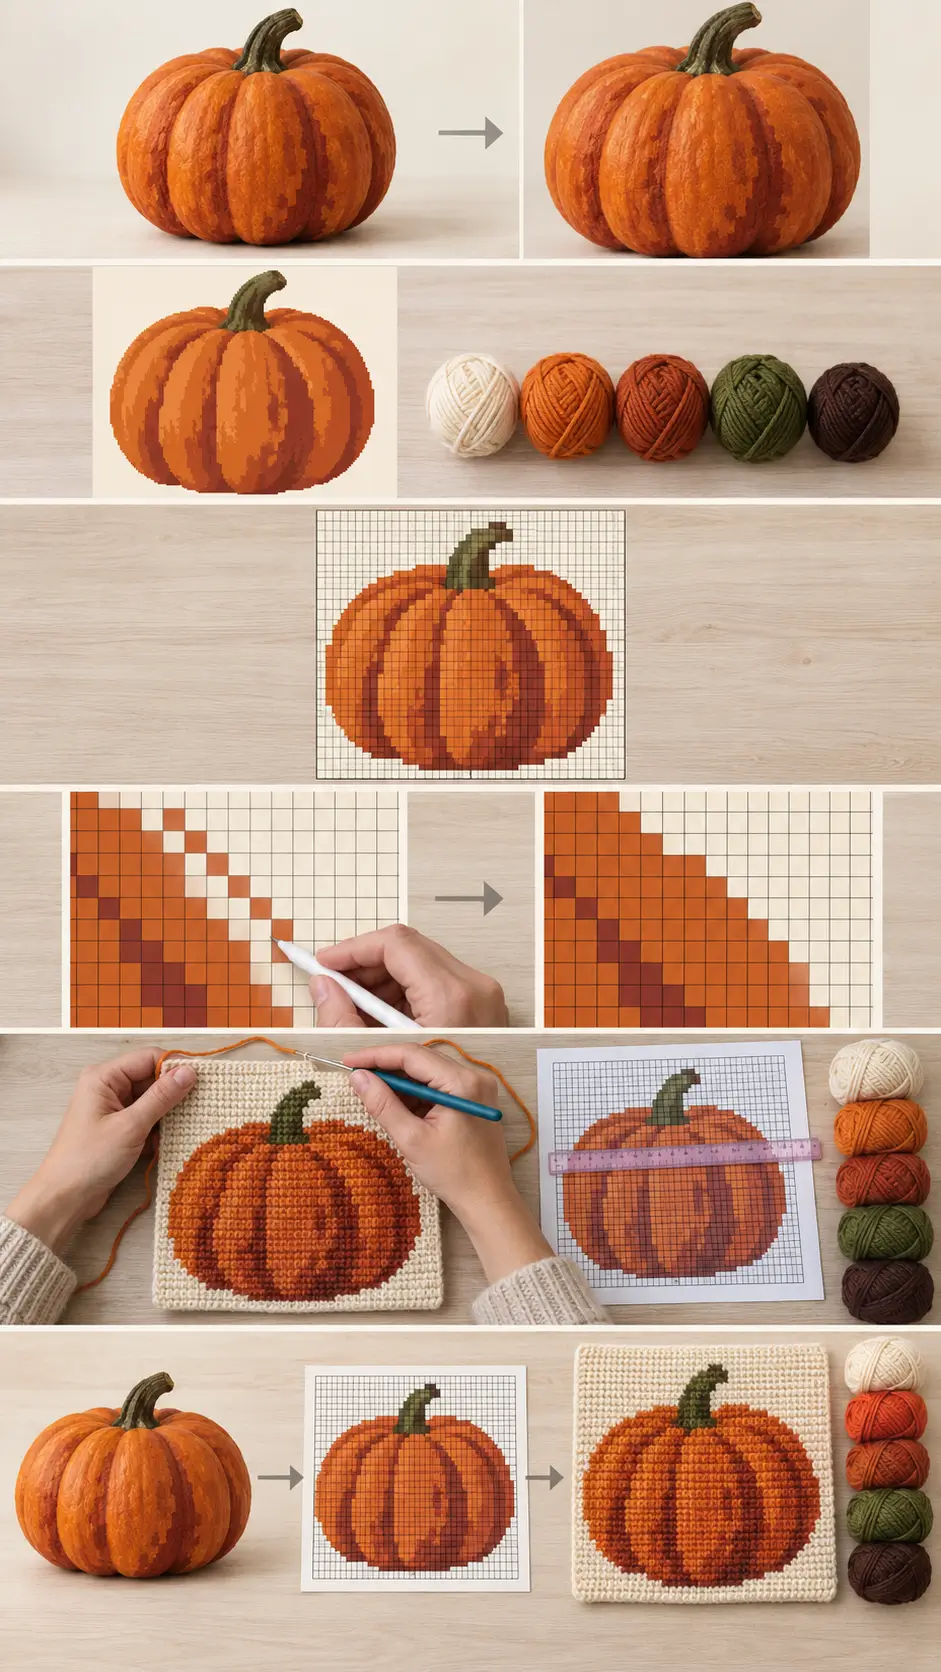
Step 1: Crop the Picture First
Before uploading the picture to a crochet graph maker, remove as much unnecessary background as possible.
If the pumpkin occupies only 20% of the photograph, most of your crochet graph will be wasted on empty background.
Crop closely around the object.
For a square pillow panel, I would crop the image approximately square.
For a tote-bag panel, a slightly taller rectangle can work better.
For a blanket, you have much more freedom.
Step 2: Increase the Contrast
Crochet cannot reproduce millions of tiny photographic color differences.
Yarn works better when the image has obvious color areas.
For our pumpkin example, I would simplify it into approximately:
- burnt orange
- dark orange
- olive or forest green
- cream
- optional dark brown
That gives us only four or five yarn colors instead of trying to reproduce every shadow in the photograph.
This is where many photo-to-crochet projects become much easier.
You are not trying to reproduce every pixel.
You are trying to preserve the shape people recognize first.
Step 3: Choose Your Crochet Graph Size
Now decide how detailed the graph needs to be.
A useful starting point for a small tapestry crochet panel is approximately:
30–50 stitches wide
For a larger pillow panel:
50–70 stitches wide
For a graphgan or larger wall hanging:
80–120+ stitches wide
More squares give you more detail, but they also mean more crochet.
That means making the grid twice as wide can turn a quick project into something much larger.
Why Bigger Is Not Always Better
Suppose your graph is:
40 squares wide
If you work one square as one single crochet stitch, the project can remain relatively compact.
But if you create:
120 squares across
you now have three times as many stitches in every row.
That extra detail may be worth it for a portrait.
It probably is not necessary for a simple pumpkin.
For bold graphic designs, fewer squares often produce a cleaner result.
Step 4: Upload the Picture to a Crochet Graph Maker
There are several types of crochet graph-making tools available now.
Some allow you to:
- start with a blank grid
- upload a photograph
- reduce the number of colors
- edit individual squares
- create C2C graphs
- create tapestry crochet graphs
- generate printable charts
- turn graphs into written row instructions
The important part is not finding a tool that does everything automatically.
The best workflow is usually:
let the software create the first graph → then manually clean it up
Crochet Graph Maker Option 1: Stitch Fiddle
Stitch Fiddle is one of the most flexible options because it supports multiple crochet chart types, including colorwork, C2C, filet crochet, Tunisian colorwork, and overlay mosaic crochet. Its picture-import feature can turn an uploaded image into a chart, and its tools allow the graph to be edited afterward. (Stitch Fiddle)
For this pumpkin project, I would choose a crochet colorwork chart rather than immediately selecting a complicated stitch-symbol chart.
That gives you a clean colored grid.
Good for:
- tapestry crochet
- graphgans
- C2C
- custom colorwork
- designing your own motifs
- editing individual grid cells
Stitch Fiddle can also convert pixel-style charts into written instructions, which can be useful if you would rather follow row-by-row color counts than stare at a large graph while crocheting. (Stitch Fiddle)
Crochet Graph Maker Option 2: Stitchboard Pattern Wizard
Stitchboard’s Pattern Wizard can take an uploaded image or drawing and convert it into a crochet chart.
It supports standard crochet and Tunisian crochet and can generate pattern output from uploaded images. (Stitchboard)
This type of converter is useful when you want to quickly see:
“Will this picture even work as crochet?”
before spending time manually drawing a graph.
Crochet Graph Maker Option 3: StitchingLab
StitchingLab offers a browser-based crochet graph maker that can start either from a picture or a blank grid.
Its current tool includes options for changing the graph size and color count, and it can produce a printable chart and row-by-row instructions. (StitchingLab)
For a simple design like our pumpkin, reducing the image to a small number of colors before crochet is exactly what I would want.
Crochet Graph Maker Option 4: Crochet Graph Maker
Crochet Graph Maker is another browser-based option for turning pictures into pixel-style crochet charts.
It allows you to import a photo, reduce the colors, edit cells manually, and export the result as a printable chart. (Crochet Graph Maker)
A simple tool like this can be especially useful when you already know the graph dimensions you want and mainly need:
photo → grid → cleanup → print
Which Crochet Graph Maker Would I Choose?
For a completely custom crochet project, I would start with:
Stitch Fiddle
if I wanted extensive editing and several crochet techniques in one tool.
I would try:
StitchingLab or Crochet Graph Maker
if I wanted a quick image-to-grid conversion with less setup.
And I would keep:
Stitchboard
as another useful photo-conversion option to test when the first graph does not interpret an image the way I want.
Different converters can simplify the same photograph differently, so there is nothing wrong with uploading your image to two tools and comparing the results.
Step 5: Reduce the Number of Yarn Colors
This may be the most important step in the entire process.
A photo converter might see:
- orange
- slightly darker orange
- slightly lighter orange
- reddish orange
- brown-orange
- yellow-orange
Your yarn stash does not need six nearly identical oranges.
For a simple pumpkin graph, I would reduce everything to:
Color A
Cream background
Color B
Main pumpkin orange
Color C
Dark orange shading
Color D
Green stem
Color E
Optional dark brown outline
Five colors are much easier to crochet than twenty.
Step 6: Clean Up the Pixel Edges
Automatic conversion rarely gives me a graph I would crochet without editing.
Zoom in.
Look at the pumpkin outline.
You may see isolated squares sticking out from the shape.
For example:
      OOO
    OOOOOOO
   OOOOOOOOO
  OOOOOOOOOOO
  OOOOOOOOOOO
   OOOOOOOOO
    OOOOOOO
      GG
      GG
The exact graph can be more detailed, but this shows what you are looking for:
a silhouette that is recognizable even before you crochet it.
Remove random single squares that do not contribute to the shape.
Fill accidental holes.
Smooth badly jagged edges.
The 3-Square Rule I Like for Simple Designs
When cleaning a graph, look closely at isolated pixels.
If one square appears completely alone and removing it does not change the recognizable design, I usually remove it.
Small isolated color changes can mean:
change yarn → make one stitch → change yarn again
That is a lot of work for almost no visual payoff.
Groups of several stitches are generally easier to manage and easier to see in the finished crochet.
Step 7: Decide How You Will Crochet the Graph
Now choose the technique.
The same graph can produce very different projects depending on how you crochet it.
Option 1: Tapestry Crochet
This is what I would use for a smaller pumpkin panel.
Work one grid square as:
1 single crochet
Carry or manage the unused colors as you work.
Tapestry crochet is excellent for:
- bags
- pillows
- wall hangings
- small decorative panels
- placemats
The finished fabric is relatively dense.
Option 2: Intarsia Crochet
Instead of carrying every yarn color across the row, use separate yarn sections for different areas.
This can be useful when the colors appear in large blocks.
For example, a large orange pumpkin centered on a cream background may be easier with separate cream yarn sources rather than carrying cream beneath the entire pumpkin.
Option 3: C2C Crochet
C2C turns every graph square into a small crochet block.
This makes the finished project much larger.
That makes it excellent for:
- graphgan blankets
- baby blankets
- wall hangings
- large picture panels
A 50 × 50 C2C graph can already become a substantial project depending on your yarn, hook, stitch, and tension.
Option 4: Tunisian Crochet Colorwork
A graph can also be used for Tunisian colorwork.
This creates a different fabric with strong stitch definition and can work beautifully for picture panels.
If you choose Tunisian crochet, make a swatch first because Tunisian stitches are not always perfectly square.
That can stretch the image vertically or horizontally.
Step 8: Make a Gauge Swatch Before Trusting the Graph
This is the step that prevents a round pumpkin from turning into an oval.
Crochet stitches are not automatically perfect squares.
Make a swatch using:
- your chosen yarn
- chosen hook
- chosen stitch
Measure:
10 stitches wide
and:
10 rows high
If 10 stitches measure 2 inches but 10 rows measure 2½ inches, your grid will not translate into a perfectly proportioned image.
Simple Graph Size Formula
Suppose:
20 stitches = 4 inches
Your stitch gauge is:
5 stitches per inch
If your graph is:
50 stitches wide
your approximate finished width will be:
50 ÷ 5 = 10 inches
That is perfect for something like a decorative pillow panel or small bag.
Another Example
Suppose you want a panel approximately:
16 inches wide
and your gauge is:
4 stitches per inch
Calculate:
16 × 4 = 64 stitches
Your graph should be approximately:
64 squares wide
if each square represents one single crochet stitch.
Step 9: Print or Save the Graph
Once your design looks right, save a clean version before you begin crocheting.
I like graphs that include:
- row numbers
- column numbers
- clear grid lines
- color key
- large enough squares to mark
- obvious center line
If your graph maker offers a row tracker, that can be useful for a larger design.
Otherwise, use a ruler, sticky note, or digital annotation to cover completed rows.
Step 10: Crochet a Small Test Section
Do not immediately begin a 60-inch blanket.
First crochet a small section of the design.
For our pumpkin, I would make:
a small tapestry panel
or even just the central pumpkin portion.
This tells you whether:
- the colors have enough contrast
- the image proportions look right
- your yarn changes are manageable
- the graph needs more cleanup
A digital graph can look perfect while the yarn colors blend together in real life.
How I Would Turn the Pumpkin Graph Into a Finished Project
Once the pumpkin graph works, there are several easy directions to take it.
Fall Pillow
Crochet the graph as the front panel.
Make a plain charcoal, cream, or orange back panel.
Join around three sides.
Insert pillow form.
Close the final edge.
Tapestry Crochet Tote
Use the graph in the center of a simple rectangular bag panel.
Keep approximately:
10–15 plain stitches
on each side of the picture.
Make a plain back panel.
Join the sides and bottom.
Add handles.
Small Wall Hanging
Crochet the graph.
Add a simple border.
Attach the upper edge to a wooden dowel.
Add a hanging cord.
This is one of the easiest ways to use a custom graph without worrying about garment sizing.
Graphgan Blanket
For a larger project, either:
- enlarge the graph for single crochet
- or use the graph as C2C blocks
You could also create several different fall graphs and combine them:
- pumpkin
- maple leaf
- mushroom
- acorn
- ghost
That could become a complete seasonal graphgan.
Pictures That Convert Well Into Crochet Graphs
Some images are much easier than others.
Good choices include:
- pumpkins
- hearts
- stars
- flowers
- mushrooms
- simple animals
- paw prints
- initials
- names
- simple houses
- Christmas trees
- snowflakes
- ghosts
- moons
- suns
- geometric designs
These have recognizable silhouettes.
Pictures That Are Harder to Convert
More difficult choices include:
- crowded family photos
- realistic faces
- long-haired pets
- cloudy landscapes
- photographs with shadows everywhere
- images with text over detailed backgrounds
- watercolor paintings containing dozens of blended shades
They are still possible.
They simply need larger graphs and more cleanup.
Turning a Pet Photo Into a Crochet Graph
Pet photographs are one of the most tempting projects.
The trick is to simplify aggressively.
Instead of reproducing every individual hair, focus on:
- head shape
- ears
- eyes
- nose
- main coat colors
- one or two distinctive markings
A recognizable silhouette plus the correct facial markings can often communicate the animal better than dozens of tiny color changes.
Turning Words Into a Crochet Graph
Words are actually easier than photographs in many cases.
Start with a blank grid.
Draw block-style letters.
Keep enough empty space between each letter.
Simple words work especially well:
- HOME
- LOVE
- BABY
- FALL
- JOY
- MERRY
Before crocheting, zoom out until the graph is small.
If you can still read the word, the letter design is probably clear enough.
Turning Children’s Drawings Into Crochet Graphs
This is another project where a graph maker can be incredibly useful.
Take a clear photograph or scan of the drawing.
Remove the paper background if possible.
Reduce it to a manageable number of colors.
Then convert it to a graph.
Simple children’s drawings often translate surprisingly well because they already contain:
- bold shapes
- limited colors
- strong outlines
The finished graph could become:
- a pillow
- wall hanging
- small blanket panel
- tote
- keepsake square
What Yarn Is Best for Crochet Graphs?
Smooth yarn is usually easier to read than highly textured yarn.
Good choices include:
- smooth acrylic
- cotton
- cotton/acrylic blends
- smooth wool blends
Avoid heavily fuzzy yarn when the picture contains small details.
The fuzzier the yarn, the softer the pixel edges become.
Choose Yarn Colors Before Finalizing the Graph
Your computer can display thousands of shades.
Your yarn collection cannot.
Before spending hours perfecting a graph with 14 shades, check whether those shades actually exist in yarn you can easily buy.
For many designs:
4–8 colors
is a very comfortable range.
For a simple graphic motif:
2–5 colors
can be even better.
Useful Supplies for Graph Crochet
Once you begin making your own designs, a few ordinary crochet supplies become especially useful:
- locking stitch markers
- yarn bobbins
- small yarn balls
- tapestry needles
- ergonomic crochet hook
- printed chart
- row counter
- yarn organizer
- blocking mats
For large intarsia projects, yarn bobbins can make a significant difference because they keep multiple colors from turning into one tangled pile.
Do I Need Special Crochet Software?
No.
You can make a crochet graph with ordinary graph paper.
But software becomes much more useful when you want to:
- convert a photograph
- change graph dimensions
- test different colors
- move a motif
- mirror a design
- create several versions
- print a clean chart
For one small heart, graph paper is enough.
For a 100 × 100 custom picture, a crochet graph maker can save a lot of time.
Can I Use Pixel Art for Crochet?
Yes.
Pixel art and crochet graphs are naturally compatible because both are based on grids.
Just make sure you have permission to use the artwork if you did not create it yourself.
Original drawings, your own photographs, public-domain images, and designs you create yourself are the safest choices for custom projects.
Why My First Converted Graph Looked Better After Simplifying It
The instinct is usually to add more detail.
Crochet often rewards the opposite approach.
A tiny dark square that looks like useful shading on a computer screen can disappear completely once it becomes yarn.
When I simplified the imaginary pumpkin into:
cream + orange + dark orange + green + brown
the shape became much easier to understand.
That is the real goal.
Not:
How accurately can I reproduce every pixel?
But:
Can someone immediately tell what this crochet picture is supposed to be?
A Good Beginner Workflow
For your first custom graph, try this:
1. Pick a simple picture.
2. Crop tightly around the subject.
3. Reduce it to 3–5 colors.
4. Convert it with a crochet graph maker.
5. Start around 30–50 squares wide.
6. Remove isolated pixels.
7. Check your crochet gauge.
8. Crochet a small test.
9. Adjust the graph if necessary.
10. Turn the successful graph into a finished project.
That is much less intimidating than trying to design an entire graphgan from scratch.
Frequently Asked Questions
What is the best crochet graph maker for beginners?
A tool that lets you upload a picture and then edit individual grid squares is usually the easiest place to start.
The automatic conversion gets you close.
The manual editing tools let you fix the result.
Can a crochet graph maker create the whole pattern for me?
Some tools can generate row-by-row instructions from a graph, but you still need to choose the correct crochet technique, gauge, yarn, hook, project dimensions, color-management method, and finishing.
Think of the graph maker as the design tool rather than a replacement for understanding the project.
How many colors should a beginner graph use?
For a first project, I would aim for:
3–5 colors.
Two colors are even easier.
Ten or more colors can create a beautiful picture, but yarn management becomes significantly more complicated.
How big should my first graph be?
Approximately:
30–50 squares wide
is a comfortable range for experimenting with a simple tapestry crochet image.
There is enough resolution to create recognizable shapes without turning the project into a huge commitment.
Can I make a crochet graph from any photograph?
Technically, many photographs can be converted into grids.
That does not mean every photograph will produce a good crochet design.
Strong contrast, simple backgrounds, clear silhouettes, and limited colors normally give you a much easier starting point.
Can I turn the graph into C2C crochet?
Yes.
Just remember that one graph square will normally become one C2C block, making the finished project significantly larger than single-crochet tapestry work.
Can I make my own design without a photograph?
Absolutely.
Start with a blank crochet grid and draw directly into the squares.
This is often the easiest method for:
- lettering
- geometric patterns
- hearts
- stars
- simple flowers
- seasonal motifs
Final Thoughts
The most surprising part of turning a picture into crochet is how little detail you actually need.
A photograph may contain thousands of colors.
A successful crochet version might need only five.
Once you reduce the picture to its important shapes, the process becomes much simpler:
picture → graph → yarn colors → stitches
And after you’ve made one successful graph, you are no longer limited to patterns someone else has already designed.
You can begin turning your own:
- photographs
- drawings
- seasonal ideas
- names
- simple artwork
into crochet projects that are completely personal.



