Introduction
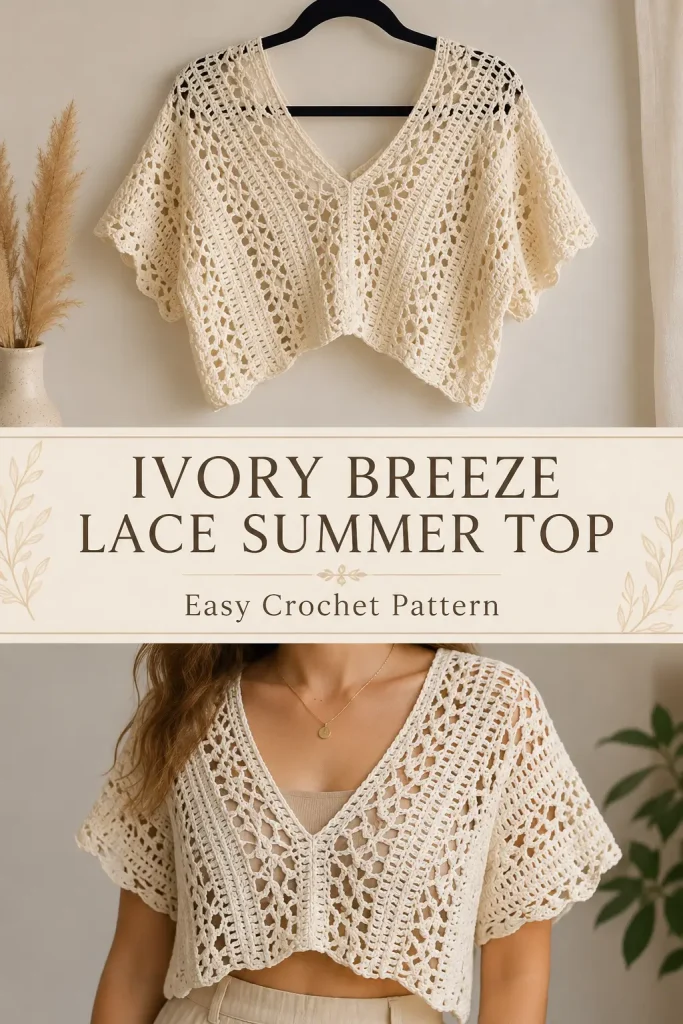
A crochet lace summer top is one of the prettiest handmade pieces you can make for warm weather. It feels light, breathable, feminine, and easy to layer over a camisole, bralette, swimsuit, or simple tank.
This Ivory Breeze Lace Summer Top is an original pattern inspired by the design idea in your screenshot: a cropped V-neck lace top with short loose sleeves, openwork texture, and a soft handmade drape. I did not fully change the visual style because the working idea is what makes the design attractive, but the construction, stitch counts, shaping, and finishing are written fresh so the pattern is unique and buildable.
The finished top has a relaxed cropped fit, V neckline, lace stitch body, short flutter-style sleeves, and clean edging around the neckline, hem, and sleeve openings.
Description
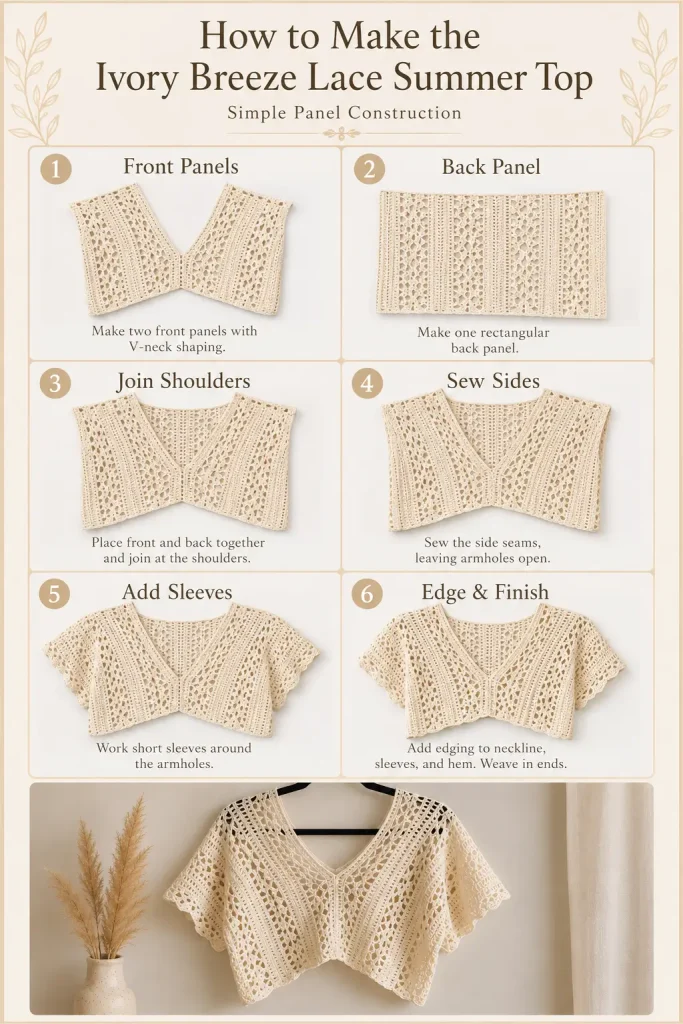
This crochet top is made in separate pieces: one back panel, two shaped front panels, and short sleeves worked around the armholes. The lace pattern uses simple double crochet, chain spaces, and shell-style stitch groups to create a pretty open texture similar to the reference design.
The front panels are shaped to form a soft V neckline. The shoulder seams and side seams create the main top shape, then the sleeves are worked directly around the armholes for a clean finish. The edges are finished with single crochet and a small scalloped trim.
The design is cropped and loose, so it works beautifully as a summer cover-up, festival top, beach top, or layered lace blouse.
Materials
- DK or light worsted cotton yarn in ivory or cream
- 4 mm crochet hook
- Yarn needle
- Scissors
- Stitch markers
- Measuring tape
- Blocking mat and pins, optional
Finished Fit
This pattern is designed as a relaxed cropped lace top.
Approximate finished measurements for size Medium:
- Bust: 38–40 inches
- Length from shoulder to hem: 15–16 inches
- Sleeve length: 5–6 inches
- Neckline: deep V front
- Fit: relaxed and slightly boxy
Size Notes
This written version is for a Medium.
To make it smaller, remove one lace repeat from the back panel and each front panel.
To make it larger, add one lace repeat to the back panel and each front panel.
The lace repeat uses 8 stitches.
Gauge
Approximate gauge after blocking:
- 16 dc stitches = 4 inches
- 8 rows = 4 inches
Because this is a wearable piece, check your gauge before starting.
Cotton yarn can stretch slightly after blocking, so do not make the top too loose.
Abbreviations
- ch: chain
- sc: single crochet
- hdc: half double crochet
- dc: double crochet
- sl st: slip stitch
- sk: skip
- st: stitch
- sts: stitches
- sp: space
- ch-sp: chain space
- FO: fasten off
Special Stitch
Lace Shell
Work dc, ch 1, dc, ch 1, dc all in the same stitch or space.
This creates one open lace shell.
Pattern Notes
This pattern is written in US crochet terms.
The top is made in panels and seamed.
The back panel is rectangular.
The two front panels are shaped at the inner neckline edge to create the V neck.
The sleeves are worked after shoulder and side seams are joined.
Ch 3 counts as 1 dc.
Ch 1 does not count as a stitch.
Block the panels before seaming for the cleanest lace shape.
Lace Stitch Pattern
The lace stitch is worked over a multiple of 8 plus 3 stitches.
Lace Row A
Ch 3.
Dc in next 2 sts.
Repeat across: ch 2, sk 2 sts, lace shell in next st, ch 2, sk 2 sts, dc in next 3 sts.
Turn.
Lace Row B
Ch 3.
Dc in next 2 dc.
Repeat across: ch 2, lace shell in the center dc of the lace shell below, ch 2, dc in next 3 dc group.
Turn.
Repeat Lace Row B for the pattern.
This creates vertical open lace columns with soft shell texture.
Step-by-Step Instructions
Back Panel
Use ivory yarn.
Foundation Chain
Ch 86.
This gives 83 working stitches.
Row 1
Dc in the 4th ch from hook.
Dc in each ch across. (83)
Turn.
Row 2
Work Lace Row A.
Turn.
Rows 3–28
Repeat Lace Row B.
The panel should measure about 14–15 inches from the foundation edge.
For a longer top, add more rows before fastening off.
FO.
Left Front Panel
The left front panel is worked from the hem upward. The neckline shaping happens on the inner edge.
Foundation Chain
Ch 46.
This gives 43 working stitches.
Row 1
Dc in the 4th ch from hook.
Dc in each ch across. (43)
Turn.
Row 2
Work Lace Row A across the panel.
Turn.
Rows 3–12
Repeat Lace Row B.
This creates the lower straight section before the neckline shaping begins.
Left Front Neck Shaping
The inner neckline edge is the edge closest to the center front.
For the left front, shape at the end of right-side rows.
Row 13
Work in lace pattern across, stopping 2 stitches before the end.
Turn.
Row 14
Work back across in pattern.
Turn.
Row 15
Work in lace pattern across, stopping 2 stitches before the end.
Turn.
Row 16
Work back across in pattern.
Turn.
Repeat Rows 15–16 until about 23 stitches remain for the shoulder.
Then continue working straight in pattern until the front panel is the same height as the back panel.
FO.
Right Front Panel
Make the right front panel the mirror image of the left front.
Foundation Chain
Ch 46.
This gives 43 working stitches.
Row 1
Dc in the 4th ch from hook.
Dc in each ch across. (43)
Turn.
Row 2
Work Lace Row A across the panel.
Turn.
Rows 3–12
Repeat Lace Row B.
Right Front Neck Shaping
For the right front, shape at the beginning of right-side rows.
Row 13
Sl st across the first 2 stitches.
Ch 3.
Continue working the lace pattern across the row.
Turn.
Row 14
Work back across in pattern.
Turn.
Row 15
Sl st across the first 2 stitches.
Ch 3.
Continue working the lace pattern across the row.
Turn.
Row 16
Work back across in pattern.
Turn.
Repeat Rows 15–16 until about 23 stitches remain for the shoulder.
Then continue working straight in pattern until the front panel is the same height as the back panel.
FO.
Blocking the Panels
Lay the back panel and both front panels flat.
Gently stretch the lace so the stitch pattern opens evenly.
Pin the edges straight.
Steam-block lightly if your yarn allows it.
Let the pieces dry completely before seaming.
Do not skip blocking if the lace looks uneven.
Shoulder Seams
Lay the back panel flat.
Place the two front panels on top of the back panel with right sides facing together.
Match the outer shoulder edges.
Sew the left front shoulder to the left back shoulder.
Sew the right front shoulder to the right back shoulder.
Leave the center front open to form the V neckline.
Side Seams
Lay the top flat.
Starting from the bottom hem, sew each side seam upward.
Stop about 7 inches below the shoulder seam to leave armholes.
Repeat on the other side.
Try the top on before fastening the yarn ends.
If the armholes feel too tight, open the side seam slightly lower.
If they feel too loose, sew a little higher.
Sleeves
The sleeves are worked directly into each armhole.
Join ivory yarn at the underarm.
Sleeve Round 1
Ch 1.
Sc evenly around the armhole.
Join with sl st to first sc.
Make sure you have an even number of stitches.
Sleeve Round 2
Ch 3.
Dc in next 2 sts.
Repeat around: ch 2, sk 2 sts, lace shell in next st, ch 2, sk 2 sts, dc in next 3 sts.
Join with sl st.
If your stitch count does not match perfectly, adjust near the underarm by skipping one fewer stitch.
Sleeve Round 3
Ch 3.
Dc in next 2 dc.
Repeat around: ch 2, lace shell in center dc of shell below, ch 2, dc in next 3 dc group.
Join with sl st.
Sleeve Rounds 4–6
Repeat Sleeve Round 3.
For a shorter sleeve, stop after Round 4.
For a longer sleeve, add more repeats.
Sleeve Edge
Sleeve Final Round
Ch 1.
Sc in first st.
Skip next st.
Work 5 dc in next st.
Skip next st.
Sc in next st.
Repeat around.
Join with sl st.
FO and weave in ends.
Repeat for the second sleeve.
Neckline Border
Join ivory yarn at the lower center of the V neckline.
Round 1
Ch 1.
Sc evenly up one side of the V neckline, around the back neck, and down the other side of the V.
Work 3 sc in the center point of the V.
Join with sl st.
Round 2
Ch 1.
Sc in each st around.
At the center V point, work sc, ch 1, sc in the center stitch.
Join with sl st.
FO and weave in ends.
This creates a clean neckline that helps the V shape sit flat.
Bottom Hem Border
Join yarn at one side seam along the bottom hem.
Round 1
Ch 1.
Sc evenly around the bottom edge.
Join with sl st.
Round 2
Ch 1.
Repeat around: sc in next st, ch 1, sk next st.
Join with sl st.
Round 3
Ch 1.
Sc in first st.
Skip next ch-1 sp.
Work 5 dc in next sc.
Skip next ch-1 sp.
Sc in next sc.
Repeat around.
Join with sl st.
FO and weave in ends.
This gives the hem a soft lace scallop like the summer style in the image.
Front Center Finishing
The lower front should meet neatly at the center below the V neckline.
If the center front opens too much, sew the two front panels together from the bottom hem upward for 2–3 inches.
If you want a more open beach cover-up style, leave the center front fully open below the V.
For the closest look to the screenshot, sew only the lowest 2 inches of the center front together so the V remains open and relaxed.
Optional Tie Closure
If you want the top more adjustable, add a small tie at the lower V point.
Join yarn at one side of the V point.
Ch 45.
FO.
Join yarn at the other side of the V point.
Ch 45.
FO.
Tie into a small bow.
This helps the front stay in place.
Fit Adjustments
To Make the Top Wider
Add 8 chains to the back panel and 8 chains to each front panel.
This adds one lace repeat.
To Make the Top Narrower
Remove 8 chains from the back panel and 8 chains from each front panel.
To Make the Top Longer
Add more lace rows to the back and front panels before shaping or finishing.
To Make the V Neck Higher
Start neckline shaping later, around Row 16 instead of Row 13.
To Make the V Neck Deeper
Start neckline shaping earlier, around Row 9 or 10.
To Make Sleeves Looser
Add more sc stitches evenly around the armhole before starting the sleeve lace.
To Make Sleeves Shorter
Work only 3–4 sleeve rounds before the scalloped edge.
Finishing
Weave in all ends carefully.
Try on the top.
Check the shoulder seams, side seams, V neckline, and sleeve openings.
Lightly block the finished top again.
Shape the V neckline while drying.
Smooth the sleeve edges and scalloped hem.
Let the garment dry fully before wearing.
Tips & Variations
Use cotton yarn for the best summer drape.
Use ivory or cream for the closest lace summer look.
Use soft beige for a natural boho style.
Use black for an evening festival version.
Use sage green for a trendy beachwear top.
Wear it over a fitted tank, bandeau, bralette, or swimsuit.
For more coverage, reduce the chain spaces in the lace stitch by using ch 1 instead of ch 2.
For a more open beach cover-up, use ch 3 spaces in the lace pattern.
Keep the sleeves loose so the top has the relaxed summer shape.
FAQ
Is this crochet lace summer top beginner-friendly?
It is best for confident beginners. The stitches are simple, but the neckline shaping, seaming, and sleeve placement require careful attention.
Is this the exact pattern from the image?
No. This is a new original pattern based on the visible design idea: a cropped ivory lace V-neck summer top with short sleeves. The construction, stitch counts, lace repeat, shaping, and finishing are original.
What yarn should I use?
Cotton or cotton-blend yarn is best because it is breathable, wearable, and holds the lace shape nicely.
Can I make the top longer?
Yes. Add more rows to the back and front panels before finishing. Make sure all panels stay the same length.
Can I make it less see-through?
Yes. Use fewer chain spaces in the lace stitch, work with a slightly smaller hook, or wear it over a fitted camisole.
Conclusion
The Ivory Breeze Lace Summer Top keeps the same attractive style from the inspiration image: cropped shape, soft lace texture, V neckline, and short relaxed sleeves. The pattern is written with fresh construction and clear steps so you can actually build the top from panels to finished garment.
It is light, pretty, wearable, and perfect for summer outfits, beach days, handmade fashion content, and crochet wardrobe projects.



