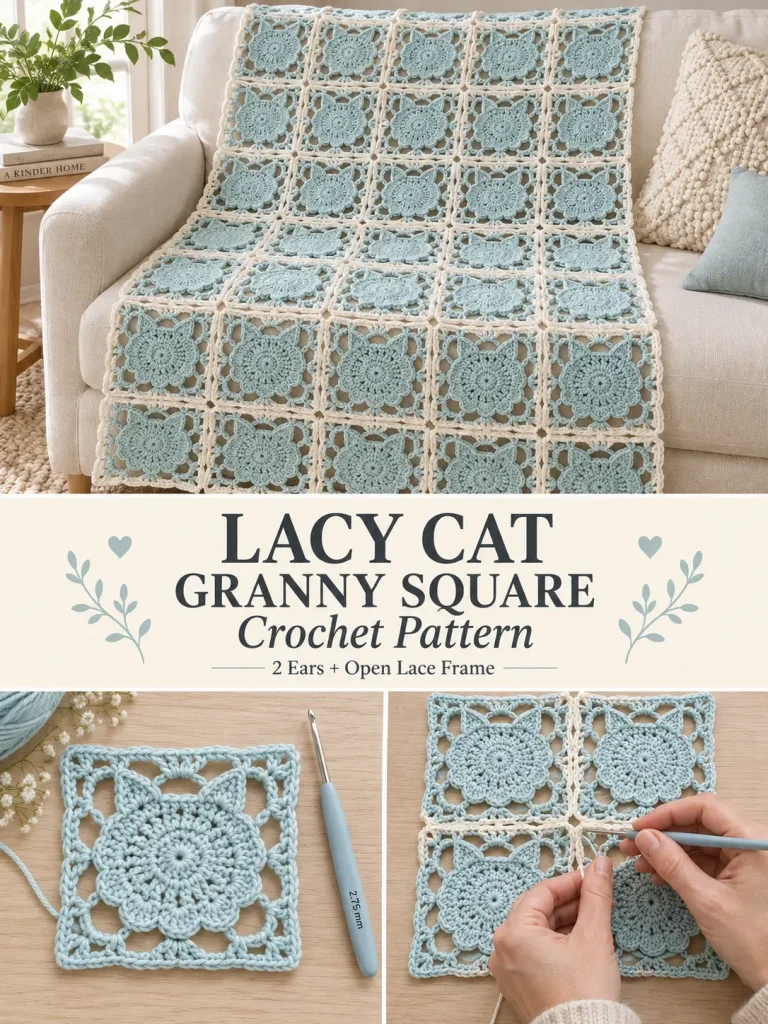
This airy crochet motif turns a simple circular center into a little cat-head lace tile with two pointed ears, then surrounds it with an open square frame so the motifs can be joined into scarves, shawls, blankets, bags, pillow covers, or decorative panels.
The finished fabric has two patterns happening at once: individual cat faces are easy to spot up close, while the open chain spaces between joined motifs create a larger geometric lace pattern.
This version uses an original construction with a 24-stitch center, two raised cat ears, six rounded face sections, and an open square joining frame.
Pattern at a Glance
Skill level: Intermediate
Terminology: US crochet terms
Construction: Individual lace squares joined together
Yarn: Fingering / Category 1 or light sport / Category 2
Hook: 2.75 mm
Finished motif: Approximately 4–4¼ inches square after blocking
Cat ears: 2 pointed ears
Inner arches: 8
Outer corners: 4
Joining: Join-as-you-go or sewn/slip-stitch join
Blocking: Recommended
Materials
You will need:
- fingering-weight cotton or smooth light sport yarn
- 2.75 mm crochet hook
- yarn needle
- scissors
- locking stitch markers
- blocking mats and rustproof pins
For a very delicate lace look, mercerized cotton works beautifully.
Suggested Colors
The lace is especially pretty in one solid color.
Try:
- pale aqua
- ice blue
- ivory
- soft gray
- dusty rose
- pale lavender
- sage
- cream
For a playful cat blanket, you can also make the cat centers in different colors and use one neutral color for the outer square frame.
Abbreviations
- ch = chain
- sc = single crochet
- hdc = half double crochet
- dc = double crochet
- tr = treble crochet
- sl st = slip stitch
- st = stitch
- sts = stitches
- sp = space
- rnd = round
- rep = repeat
- MR = magic ring
Gauge
One completed blocked motif should measure approximately:
4–4¼ inches square
Exact gauge is not critical for a motif project.
The important thing is that all motifs are the same size.
Important Motif Orientation
The two pointed ears are worked next to each other at the top of the motif.
When joining the squares, make sure every cat faces the same direction unless you intentionally want a rotated design.
After completing the first motif, place a stitch marker at the top edge between the ears. This makes orientation much easier during assembly.
CAT LACE GRANNY SQUARE
Make as many motifs as your project requires.
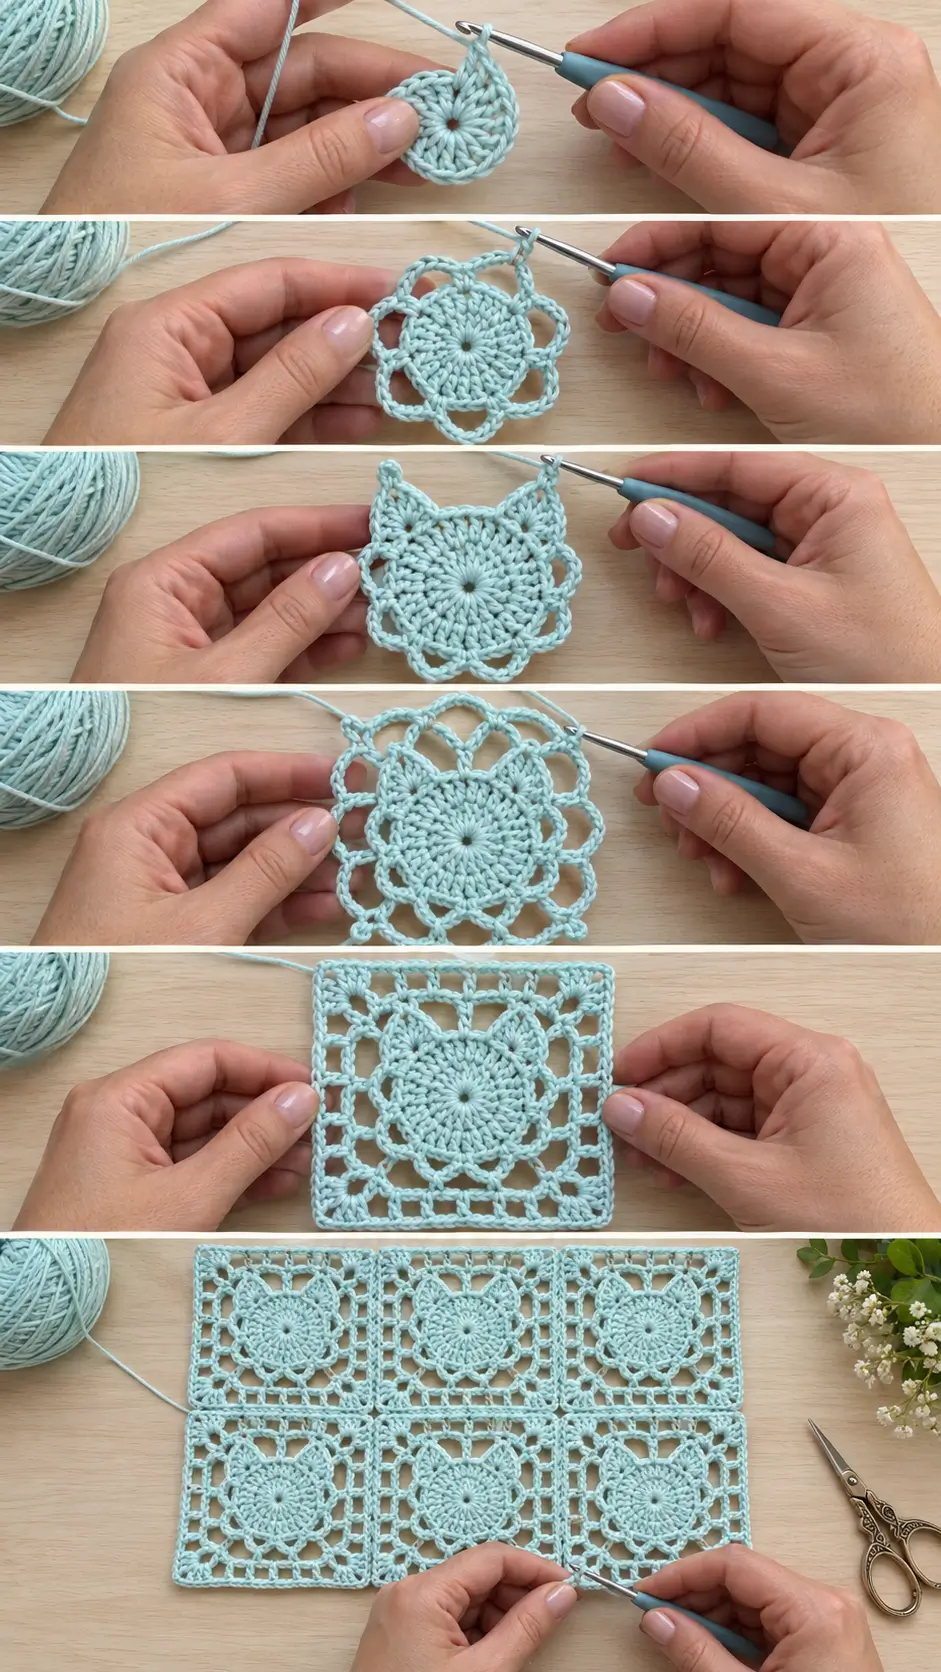
Round 1 — Cat Face Center
Make a magic ring.
Ch 3.
The ch-3 counts as the first dc.
Work:
11 dc into the ring
Pull the ring closed.
Join with sl st to the top of the beginning ch-3.
You should have:
12 dc
Round 2 — Expand the Face
Ch 3.
Dc in the same stitch.
Work:
2 dc in each stitch around
Join with sl st to the beginning ch-3.
You should have:
24 dc
Round 3 — Make 8 Foundation Arches
Ch 1.
Sc in the same stitch.
Now repeat:
ch 5, skip next 2 sts, sc in next st
7 times.
After the seventh repeat:
Ch 5.
Skip the final 2 stitches.
Join with sl st to the first sc.
You should have:
- 8 sc anchor stitches
- 8 ch-5 spaces
These eight spaces will create the ears and rounded parts of the cat head.
Round 4 — Cat Ears and Face
The first and last ch-5 spaces will form the two ears.
The six spaces between them form the sides and lower part of the face.
First Ear
Sl st into the first ch-5 space.
Work:
sc, hdc, dc, tr
Now:
ch 2
Sl st into the second chain from the hook to make a tiny pointed picot.
Continue in the same ch-5 space:
tr, dc, hdc, sc
The first ear is complete.
Rounded Face Sections
In each of the next:
6 ch-5 spaces
work:
sc, hdc, 3 dc, hdc, sc
These six rounded sections form:
- right temple
- right cheek
- lower-right face
- lower-left face
- left cheek
- left temple
Second Ear
In the final ch-5 space work:
sc, hdc, dc, tr, ch 2, sl st in second ch from hook, tr, dc, hdc, sc
Join with sl st to the beginning of the round.
Fasten off if you want to use a different color for the square frame.
Otherwise continue with the same yarn.
Check the Cat Shape
Lay the motif flat.
You should see:
- circular center
- two pointed ears at the top
- six rounded sections forming the face
- symmetrical left and right sides
The piece will still be somewhat round at this stage.
The next rounds turn it into a square.
Round 5 — Open Lattice Around the Cat
For this round, we will connect the outside points of the cat with alternating corner and side arches.
Identify these eight landmarks around the motif:
- tip of right ear
- center dc of upper-right rounded section
- center dc of next rounded section
- center dc of lower-right rounded section
- center dc of lower-left rounded section
- center dc of next rounded section
- center dc of upper-left rounded section
- tip of left ear
Join yarn with a sc into the tip of the right ear.
Now work:
Ch 5, sc in Landmark 2.
Ch 3, sc in Landmark 3.
Ch 5, sc in Landmark 4.
Ch 3, sc in Landmark 5.
Ch 5, sc in Landmark 6.
Ch 3, sc in Landmark 7.
Ch 5, sc in the tip of the left ear.
Finally:
Ch 3, join with sl st to the first sc at the right ear.
You now have:
- 4 ch-5 corner spaces
- 4 ch-3 side spaces
The motif should begin to look square.
Round 6 — Square Frame
Sl st into the first ch-5 corner space.
Ch 3.
The beginning ch-3 counts as one dc.
In the same corner space work:
1 dc, ch 3, 2 dc
Ch 3.
In the next ch-3 side space work:
3 dc
Ch 3.
In the next ch-5 corner work:
2 dc, ch 3, 2 dc
Continue around:
ch 3, 3 dc in side space, ch 3, (2 dc, ch 3, 2 dc) in corner
Repeat until all four sides and four corners are complete.
Join with sl st to the top of the beginning ch-3.
You should now have a clearly defined square.
Round 7 — Final Joining Edge
Sl st into the first corner ch-3 space.
Ch 1.
In the same corner work:
sc, ch 3, sc
Now work along the first side:
3 sc in next ch-3 space
sc in each of the next 3 dc
3 sc in next ch-3 space
At the next corner work:
sc, ch 3, sc
Repeat around all four sides.
Join with sl st to the first sc.
Fasten off.
Finished Motif
The finished square should contain:
- one central round cat face
- 2 pointed ears
- 6 rounded facial sections
- airy openings around the cat
- 4 open square corners
- a straight joining edge
Block the square to approximately:
4–4¼ inches
Blocking
Lightly wet the motif.
Place it on a blocking mat.
Pin the four corner ch-3 spaces first.
Then straighten the four side edges.
Adjust the ears so both points are the same height.
Shape the center so the cat face remains symmetrical.
Allow the motif to dry completely.
Make a Second Motif Before Starting a Large Project
Before making dozens of squares, crochet two complete motifs.
Block both.
Check that:
- they measure the same
- the ears line up
- the side stitch counts match
- the squares lie flat
Once those two motifs match, continue with the rest.
Joining Method 1 — Join as You Go
This method creates the light, open appearance that works especially well with this design.
Complete Rounds 1–5 normally.
On Round 6 of a new motif, crochet until you reach a ch-3 space that will touch an already completed motif.
Instead of:
ch 3
work:
ch 1, sl st into the corresponding ch-3 space of the neighboring motif, ch 1
Then continue the round.
Joining a Corner
At a corner that touches another motif, replace:
ch 3
with:
ch 1, sl st into corresponding corner space, ch 1
Continue normally.
Joining Four Motifs at One Intersection
When the fourth motif reaches a corner where three motifs already meet:
Ch 1.
Insert the hook through the existing joined corner space.
Sl st.
Ch 1.
Continue.
This creates one shared joining point instead of four separate bulky knots.
Joining Method 2 — Flat Slip-Stitch Join
If you prefer to make and block all motifs before assembly, use this method.
Place two squares:
wrong sides together
with right sides facing outward.
Align one side.
Join yarn through both corner spaces.
Sl st through corresponding stitches and chain spaces across the complete edge.
Keep your slip stitches relaxed.
Finish through the next corner spaces.
Fasten off.
Joining Method 3 — Whip Stitch
For the flattest seam:
Place two motifs right sides together.
Using matching yarn and a yarn needle, whip stitch through corresponding edge loops.
Open the motifs afterward.
This produces a softer seam than slip stitching.
Sample Baby Blanket
Make:
80 motifs
Arrange:
8 motifs across × 10 motifs down
At approximately 4¼ inches per motif, the joined center will measure roughly:
34 × 42½ inches
Add a narrow border for a finished blanket around:
36 × 45 inches
Because this is an open lace pattern, use it as a decorative or supervised-use baby blanket rather than loose bedding for unattended infant sleep.
Lap Blanket
Make:
99 motifs
Arrange:
9 across × 11 down
Approximate center measurement:
38 × 47 inches
Add the border for a comfortable lap throw.
Larger Throw
Make:
143 motifs
Arrange:
11 across × 13 down
Approximate center measurement:
47 × 55 inches
Add a 1½–2-inch border if desired.
Cat Lace Scarf
Make:
30 motifs
Arrange:
2 motifs across × 15 motifs long
Approximate finished size before border:
8½ inches × 64 inches
A fingering-weight cotton or wool blend gives this version excellent drape.
Wide Shawl or Wrap
Make:
72 motifs
Arrange:
6 motifs across × 12 motifs long
Approximate size:
25½ × 51 inches
For a longer wrap, add additional rows of six motifs.
Pillow Cover
For a pillow approximately 16–17 inches square:
Make:
4 motifs across × 4 motifs high
for:
16 motifs
Make one lace front.
For the back you can either:
- make another 16-motif panel
- crochet a solid back
- use a removable fabric pillow cover underneath
A contrasting fabric lining makes the cat shapes much easier to see.
Crochet Bag
For a small lace tote:
Make:
3 motifs across × 3 motifs high
for the front.
Make another:
3 × 3 panel
for the back.
You will need:
18 motifs total
Join the front and back with a solid crochet gusset.
Because this is open lace, add a fabric lining before using the bag for small items.
Optional Blanket Border
After joining all motifs, add a simple edge.
Border Round 1
Join yarn at any outer corner.
Ch 1.
Sc evenly around the complete project.
Work:
3 sc
at each outer corner.
Where two motifs meet, work the stitches closely enough to cover the joining point without adding unnecessary bulk.
Join with sl st.
Border Round 2
Ch 1.
Hdc in each stitch around.
At each corner work:
3 hdc
Join.
Border Round 3 — Picot Edge
Ch 1.
Sc in next 3 sts.
Make a picot:
ch 3, sl st into first chain
Repeat:
sc in next 3 sts, picot
around.
Adjust spacing slightly near corners if necessary.
Join and fasten off.
Optional Simple Scalloped Border
For a softer finish, replace the picot round with:
Skip 1 stitch.
Work:
5 dc in next stitch
Skip 1 stitch.
Sl st in next stitch.
Repeat around.
Make sure the edge remains flat.
How to Make the Cat Face More Obvious
Use a contrasting outer-frame color.
For example:
Cat
Pale aqua
Outer Frame
Soft ivory
or:
Cat
Charcoal
Outer Frame
Cream
You can also lightly block the two ears into sharper points.
Do not overstretch the center.
Two-Color Cat Square
For a more graphic motif:
Rounds 1–4
Cat color
Rounds 5–7
Background/frame color
Beautiful combinations include:
- gray + cream
- black + pale gray
- dusty rose + ivory
- aqua + white
- lavender + cream
- ginger orange + oatmeal
Scrap-Yarn Cat Blanket
This pattern also works well for scraps.
Make Rounds 1–4 in different cat colors.
Use the same neutral for Rounds 5–7 on every motif.
For example:
Cats
- ginger
- gray
- cream
- brown
- black
- dusty orange
Frames
Warm ivory
The consistent frame color helps all the different cats look coordinated.
Optional Face Details
The open lace version looks beautiful without facial features.
If you are making a decorative pillow or wall hanging, you can optionally add tiny embroidered details after blocking.
Use a contrasting yarn and add:
- 2 tiny straight stitches for eyes
- 1 small triangle-style stitch for the nose
- 2 short whisker lines on each side
Keep these details very small.
For blankets, scarves, or garments, the plain lace version is usually cleaner.
What If My Ears Are Different Sizes?
Both ears must contain exactly:
sc, hdc, dc, tr, picot, tr, dc, hdc, sc
Make sure your treble stitches are worked to the same height.
Blocking will correct minor differences.
What If the Cat Looks More Like a Flower?
Sharpen the ears during blocking.
Pin both ear picots upward.
Keep the six lower sections rounded.
The contrast between:
2 pointed upper sections + 6 rounded lower sections
is what creates the cat-head silhouette.
Using a slightly darker yarn can also make the outline easier to see.
What If My Motif Cups?
The outer chain spaces may be too tight.
Try:
- loosening the ch-5 spaces
- loosening the Round 5 chains
- increasing the hook to 3 mm
Block before deciding the motif is unusable.
Lace often looks uneven before blocking.
What If the Square Ruffles?
Check Round 6.
Do not add extra dc groups.
Each side should contain:
- one corner group
- one 3-dc side group
- one corner group
with ch-3 spaces separating the groups.
If your yarn is very thin and loose, reduce the hook size slightly.
What If My Joined Panel Pulls at the Corners?
Your join is probably too tight.
A join-as-you-go slip stitch should connect the motifs without shortening the chain space.
Keep the joining slip stitch relaxed.
Spread the panel flat after every few motifs to check tension.
Can I Use Worsted Yarn?
Yes.
Try a:
4–4.5 mm hook
Your motifs may measure approximately:
5½–6 inches square
This makes the design suitable for a faster blanket.
Make one complete motif first and measure it before calculating the final layout.
Can I Use Crochet Thread?
Yes.
Size 10 crochet cotton with approximately a:
1.5–1.75 mm hook
will create a very delicate lace motif suitable for:
- table runners
- curtains
- decorative doilies
- garment panels
Always swatch first.
Final Thoughts
The fun part of this motif is that the cat does not need complicated embroidery or dozens of shaping rows.
The recognizable shape comes from one simple contrast:
two pointed sections at the top and six rounded sections underneath.
After that, an open chain lattice turns the little cat head into a practical square tile.
One motif makes a decorative accent.
A few become a scarf or bag.
Dozens joined together create an airy field of repeating cats, with the spaces between the squares forming a second lace pattern of their own.



