Lightweight Sunset Lace Crochet Shawl With Fringe
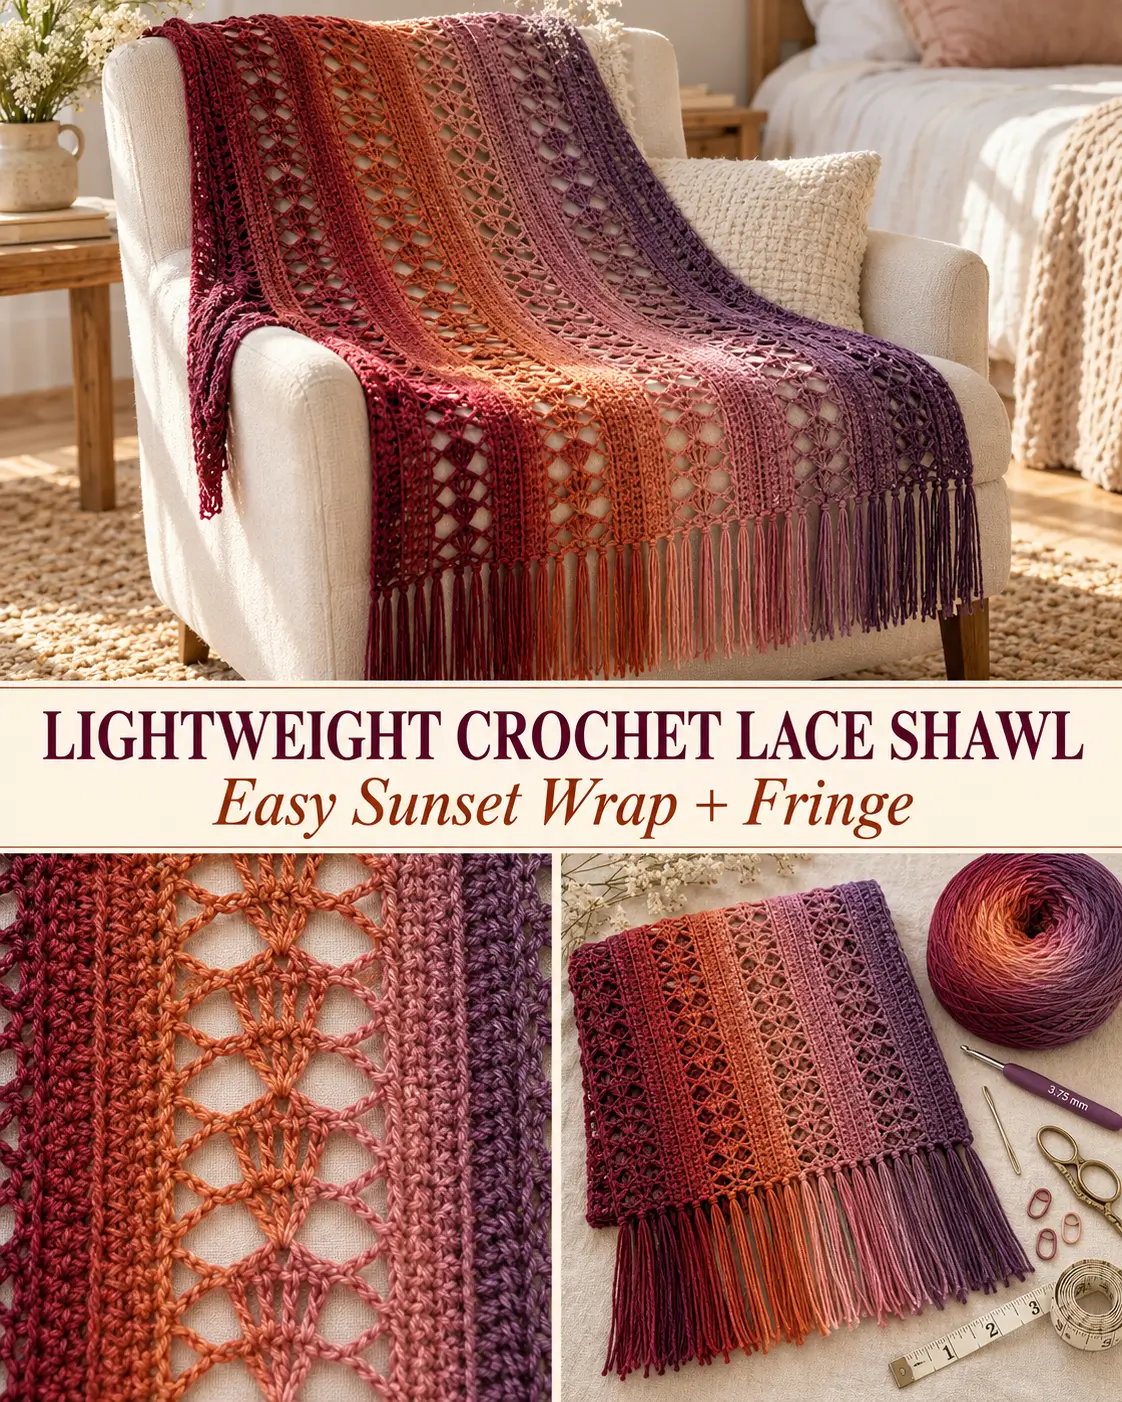
This lightweight crochet shawl combines open lace panels, solid double-crochet columns, soft fingering-weight yarn, and long fringe to create an airy wrap that works especially well for spring, summer evenings, and early fall.
The linked inspiration uses fingering-weight yarn, a 3.75 mm hook, dramatic open lace, and fringe, with the finished shawl measuring about 20 × 60 inches including fringe after blocking. Blocking is especially important because the lace opens significantly after washing and shaping.
The pattern below is an original construction designed to create the same lightweight rectangular-shawl look without reproducing the linked pattern line for line.
Finished Size
After blocking and adding fringe:
Approximately 19–20 inches / 48–51 cm wide
Approximately 60 inches / 152 cm long
The crocheted body should measure approximately:
49–50 inches / 124–127 cm long
before fringe.
The remaining length comes from the fringe at both ends.
Materials
- Fingering weight #1 yarn
- Approximately 750–800 yards / 685–730 m
- 3.75 mm / F crochet hook
- Yarn needle
- Scissors
- Measuring tape
- Blocking mats or thick towels
- Rustproof pins
- Additional matching fingering or lace-weight yarn for fringe
A soft single-ply or lightly twisted fingering yarn creates an especially fluid fabric. The linked design also uses fingering yarn and a 3.75 mm hook.
Suggested Color
For a strong visual effect, use a yarn that moves gradually through sunset shades such as:
- deep burgundy
- burnt orange
- copper
- dusty rose
- muted violet
- plum
A long-gradient yarn works beautifully because the rectangular construction allows the colors to travel naturally along the shawl.
A solid color also works well.
Skill Level
Confident beginner to intermediate
You should know:
- chain
- single crochet
- double crochet
- chain spaces
- skipping stitches
- working into chain spaces
- reading repeated lace sections
- basic blocking
There is no shaping, increasing, decreasing, or seaming.
Abbreviations
US crochet terminology:
ch — chain
sc — single crochet
dc — double crochet
st / sts — stitch / stitches
sp — space
sk — skip
rep — repeat
Pattern Structure
The shawl is one long rectangle.
Across each row you will see alternating:
solid double-crochet sections
and:
open expanding lace windows
Each lace window begins with a small three-dc center.
The following rows gradually spread the stitches farther apart with:
- ch-1 spaces
- ch-2 spaces
- ch-3 spaces
Then the pattern contracts back to the small central cluster and begins again.
This creates the repeating open diamond/fan effect.
Gauge
Gauge is not extremely strict, but it matters for finished width.
Make a swatch and block it before measuring.
A useful target is approximately:
one complete lace panel = 3–3¼ inches / 7.5–8 cm wide after blocking
The fabric should look somewhat compact before blocking.
Do not enlarge the hook just because the lace initially looks small.
The openings become considerably larger after wet blocking.
Starting Chain
For this version:
Ch 85
FOUNDATION ROW
Beginning in the second chain from the hook:
work:
1 sc in every chain across
You should have:
84 sc
Ch 3.
Turn.
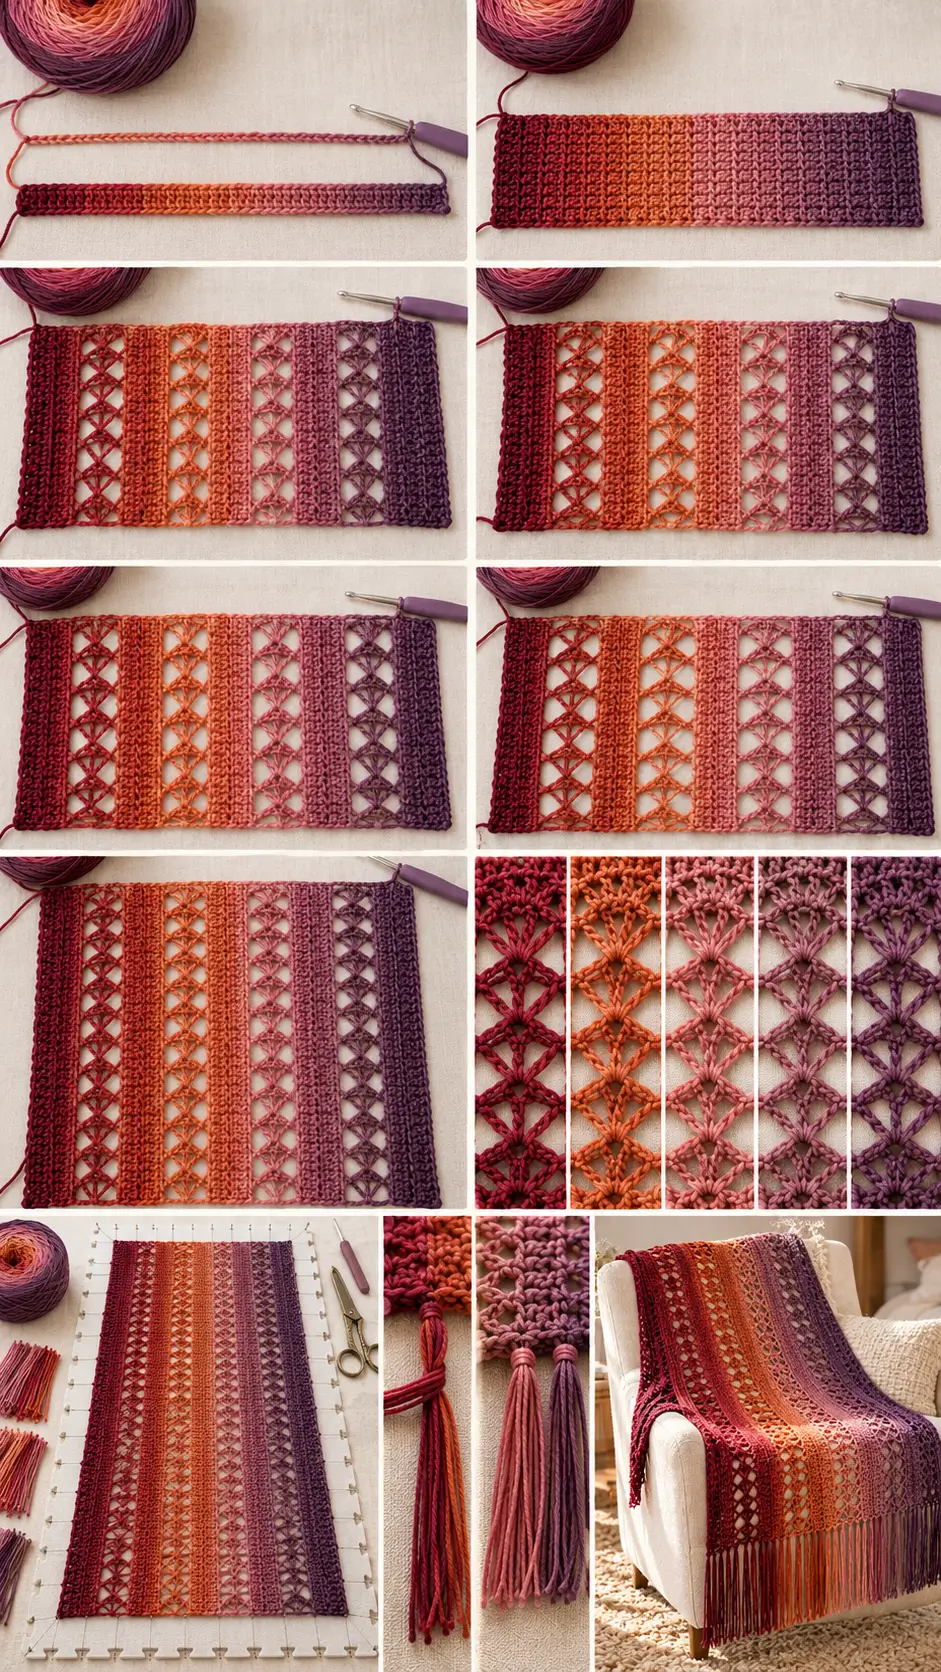
ROW 1 — SOLID FOUNDATION
The beginning ch-3 counts as the first dc.
Dc in every remaining stitch across.
You should have:
84 dc
Ch 3.
Turn.
ROW 2 — BEGIN THE LACE WINDOWS
The ch-3 counts as the first dc.
Dc in the next:
6 stitches
You now have:
7 dc at the beginning edge
Now repeat the following 4 times:
Ch 5
Skip:
5 stitches
In the next stitch work:
dc, ch 2, dc, ch 2, dc
Ch:
5
Skip:
5 stitches
Dc in the next:
7 stitches
At the end of the row you should have:
- five solid dc sections
- four lace centers
- two ch-5 spaces surrounding every lace center
Turn.
What Row 2 Should Look Like
Each lace section should read:
ch-5 space → 3-dc center with two ch-2 spaces → ch-5 space
The surrounding 7-dc sections remain solid.
These solid sections create the strong vertical columns running the length of the finished shawl.
ROW 3 — FIRST EXPANSION ROW
Ch 3.
Dc in the next:
6 dc
For each lace panel:
Ch:
4
Skip the first ch-5 space.
Dc in the first dc of the lace center.
Ch:
1
Dc in the first ch-2 space.
Ch:
1
Dc in the center dc.
Ch:
1
Dc in the second ch-2 space.
Ch:
1
Dc in the final dc of the lace center.
Ch:
4
Skip the next ch-5 space.
Dc in the next:
7 dc
Repeat across all four lace sections.
Turn.
ROW 4 — SECOND EXPANSION ROW
Ch 3.
Dc in the next:
6 dc
For each lace section:
Ch:
3
Skip the ch-4 space.
Dc in the first lace dc.
Now repeat four times:
ch 2, skip the next ch-1 space, dc in next dc
You should again have:
5 dc across the lace section
but they are now separated by larger:
ch-2 spaces
Ch:
3
Skip the next ch-4 space.
Dc in the next:
7 dc
Repeat across.
Turn.
ROW 5 — WIDEST LACE ROW
Ch 3.
Dc in next:
6 dc
For each lace section:
Ch:
2
Skip the ch-3 space.
Dc in the first lace dc.
Repeat four times:
ch 3, skip the next ch-2 space, dc in next dc
Ch:
2
Skip the final ch-3 space.
Dc in the next:
7 dc
Repeat across.
Turn.
The lace windows should now be at their widest and most open.
ROW 6 — CLOSE THE LACE BACK TO THE CENTER
Ch 3.
Dc in the next:
6 dc
For each lace section:
Ch:
5
Locate the middle dc of the five dc stitches in the lace section below.
Into that center dc work:
dc, ch 2, dc, ch 2, dc
Ch:
5
Skip the remainder of the lace section.
Dc in the next:
7 dc
Repeat across all four lace panels.
Turn.
You have now returned to the same structural arrangement created in Row 2.
MAIN REPEAT
Repeat:
Rows 3–6
for the remainder of the shawl.
Each complete repeat contains:
4 rows
and creates one full expanding-and-contracting lace section.
Continue until the body measures approximately:
49–50 inches / 124–127 cm
or until you reach your preferred length.
For the neatest finish:
end after a Row 5
before working the closing rows.
HOW THE LACE SHOULD LOOK
After several repeats you should see four long vertical lace columns.
Inside each column:
- a small center cluster opens outward
- five vertical dc points appear
- the chain spaces become progressively larger
- the motif reaches a wide open stage
- the next row pulls everything back toward the center
The solid dc strips between the motifs should remain straight from one end of the shawl to the other.
FINAL CLOSING ROW
You need to return the lace section to a solid row before finishing.
Ch 3.
Dc in next:
6 dc
For each lace section:
work dc evenly across all stitches and chain spaces.
A simple way is to place:
1 dc into each lace dc
and enough dc into each chain space to restore the same width occupied by that lace section.
Then work:
7 dc across the next solid section
Continue across.
At the end, you should again have approximately:
84 working stitches
Do not worry if you need to adjust by one stitch while filling the final lace spaces.
The important goal is a straight, flat edge.
FINAL EDGE ROW
Ch:
1
This does not count as a stitch.
Sc in every stitch across.
Fasten off.
Repeat a matching single-crochet row along the opposite starting edge if you want both fringe edges to have the same appearance.
BLOCK THE SHAWL BEFORE ADDING FRINGE
Blocking is essential for this pattern.
The lace may look narrow and slightly uneven directly off the hook.
After blocking, the motifs become significantly more open and the shawl gains width and length. The linked design likewise relies heavily on blocking to reveal the lace.
Wet Blocking
Check your yarn label first.
If suitable for wet blocking:
- Soak the shawl gently in cool or lukewarm water.
- Allow the fibers to become completely saturated.
- Lift the shawl carefully.
- Press out excess water without wringing.
- Roll it inside a clean towel.
- Press gently.
- Lay the shawl on blocking mats or dry towels.
- Stretch it evenly into a long rectangle.
- Open every lace panel with your fingers.
- Pin the long sides straight.
- Square both short ends.
Allow the shawl to dry completely.
Target Measurement After Blocking
Aim for approximately:
19–20 inches / 48–51 cm wide
The body should measure approximately:
49–50 inches / 124–127 cm long
before fringe.
Exact dimensions are flexible because this is a wrap rather than a fitted garment.
FRINGE
Fringe gives the lightweight shawl extra movement and adds length without requiring additional lace repeats.
The inspiration shawl also uses long fringe to complete its approximately 60-inch finished length.
Cut the Fringe
Cut strands approximately:
12 inches / 30.5 cm long
When folded in half, they create approximately:
6-inch fringe
before trimming.
For fingering yarn, begin with:
4–6 strands per fringe bundle
If using very fine lace-weight yarn:
6–8 strands
can create a fuller tassel.
Attach the Fringe
Take one group of strands.
Fold them in half.
Insert the crochet hook through a stitch along the short edge.
Pull the folded center through the stitch to create a loop.
Bring all loose ends through that loop.
Pull gently.
Repeat evenly across the entire short end.
Then add fringe to the opposite end.
Fringe Spacing
Attach one bundle approximately every:
2–3 stitches
You do not need fringe in every stitch.
Too much fringe can overpower the lightweight fabric.
Keep both ends symmetrical.
Trim the Fringe
Once all fringe is attached:
Lay the shawl flat.
Comb the strands gently with your fingers.
Trim to approximately:
5–5½ inches / 12.5–14 cm
finished length.
If the Lace Is Not Opening
Do not immediately change the pattern.
First block a sample.
The lace is intentionally designed to open considerably after blocking.
If it still looks too dense after blocking:
try a hook approximately:
0.25–0.5 mm larger
If the Lace Is Too Loose
Use a slightly smaller hook.
The solid dc columns should still look stable.
If the dc fabric is extremely open before blocking, the shawl may lose too much structure once stretched.
If the Shawl Is Getting Wider
Check the solid dc sections.
Each should always contain:
7 dc
Do not accidentally work extra stitches into the first or last chain spaces of the lace section.
If the Shawl Is Getting Narrower
Check that all five lace dc positions are present during Rows 3–5.
Each expanded lace section must retain:
5 dc points
while only the number of chains between them changes.
If the Lace Motifs Shift Sideways
The new center cluster in Row 6 must be worked into:
the middle dc of the five lace dc stitches
That center placement keeps every motif vertically aligned.
Mark the middle stitch if necessary.
If the Side Edges Look Uneven
Always count the solid edge sections.
Each solid section should remain:
7 dc
throughout.
Place a stitch marker in:
- the first dc
- the last dc
if you have trouble identifying the edge stitches.
Making the Shawl Longer
Simply continue repeating:
Rows 3–6
Each complete repeat adds another full lace motif vertically.
Remember to allow approximately:
10–11 inches / 25–28 cm
of total finished length for fringe at both ends.
Making It Shorter
Stop earlier after a completed Row 5.
Work the final closing row.
Block.
Then add fringe.
This is useful for a shorter scarf-style wrap.
Making a Wider Wrap
For a wider shawl, add another complete:
lace panel + solid dc section
across the foundation.
The easiest approach is to add:
18 stitches
for each additional panel in this original version:
- 11 stitch positions supporting the lace
- 7 dc forming the next solid section
Keep the same row instructions for every added panel.
Making a Narrow Scarf
Use:
2 lace panels
instead of four.
Keep one solid dc section:
- before the first motif
- between motifs
- after the final motif
Continue to your preferred scarf length.
Yarn Suggestions
This shawl works especially well with:
- fingering wool
- wool/nylon sock yarn
- merino blends
- cotton/bamboo blends
- lightweight acrylic
- single-ply gradient yarn
Choose a yarn that responds well to blocking.
The lace needs enough flexibility to open without becoming stiff.
Color Ideas
Sunset Gradient
Use:
burgundy → rust → coral → rose → purple
for the strongest sunset effect.
Ocean
Use:
navy → teal → turquoise → pale blue
Autumn
Use:
chocolate → copper → mustard → olive
Romantic Neutral
Use:
cream → beige → dusty rose
Solid Color
A single:
deep wine, teal, cream, charcoal, or forest green
allows the lace geometry to become the main focus.
Final Pattern at a Glance
Foundation
Ch 85
Sc across:
84 sc
Row 1
Dc across:
84 dc
Row 2
Maintain:
7-dc solid sections
Between them work:
ch 5, skip 5, (dc, ch 2, dc, ch 2, dc), ch 5, skip 5
Four lace sections total.
Row 3
Expand each lace section into:
5 dc separated by ch-1 spaces
with:
ch-4 outer spaces
Row 4
Keep the same five dc.
Separate them with:
ch-2 spaces
Use:
ch-3 outer spaces
Row 5
Keep the same five dc.
Separate them with:
ch-3 spaces
Use:
ch-2 outer spaces
Row 6
Collapse the lace back to the center:
ch 5
work:
dc, ch 2, dc, ch 2, dc
into the middle lace dc
then:
ch 5
Repeat
Repeat:
Rows 3–6
until the desired length.
Finish after:
Row 5
Then work:
- one solid closing row
- one sc edge row
Block thoroughly.
Add approximately:
5–5½ inch fringe
to both short ends.
The finished shawl should have four long columns of expanding open lace separated by narrow solid double-crochet bands, dramatic blocking, and soft fringe at both ends, creating the airy sunset-inspired look of the linked design while using a fresh, original construction.