Lightweight V-Neck Crochet Cardigan With Mesh Stripes and Button Front
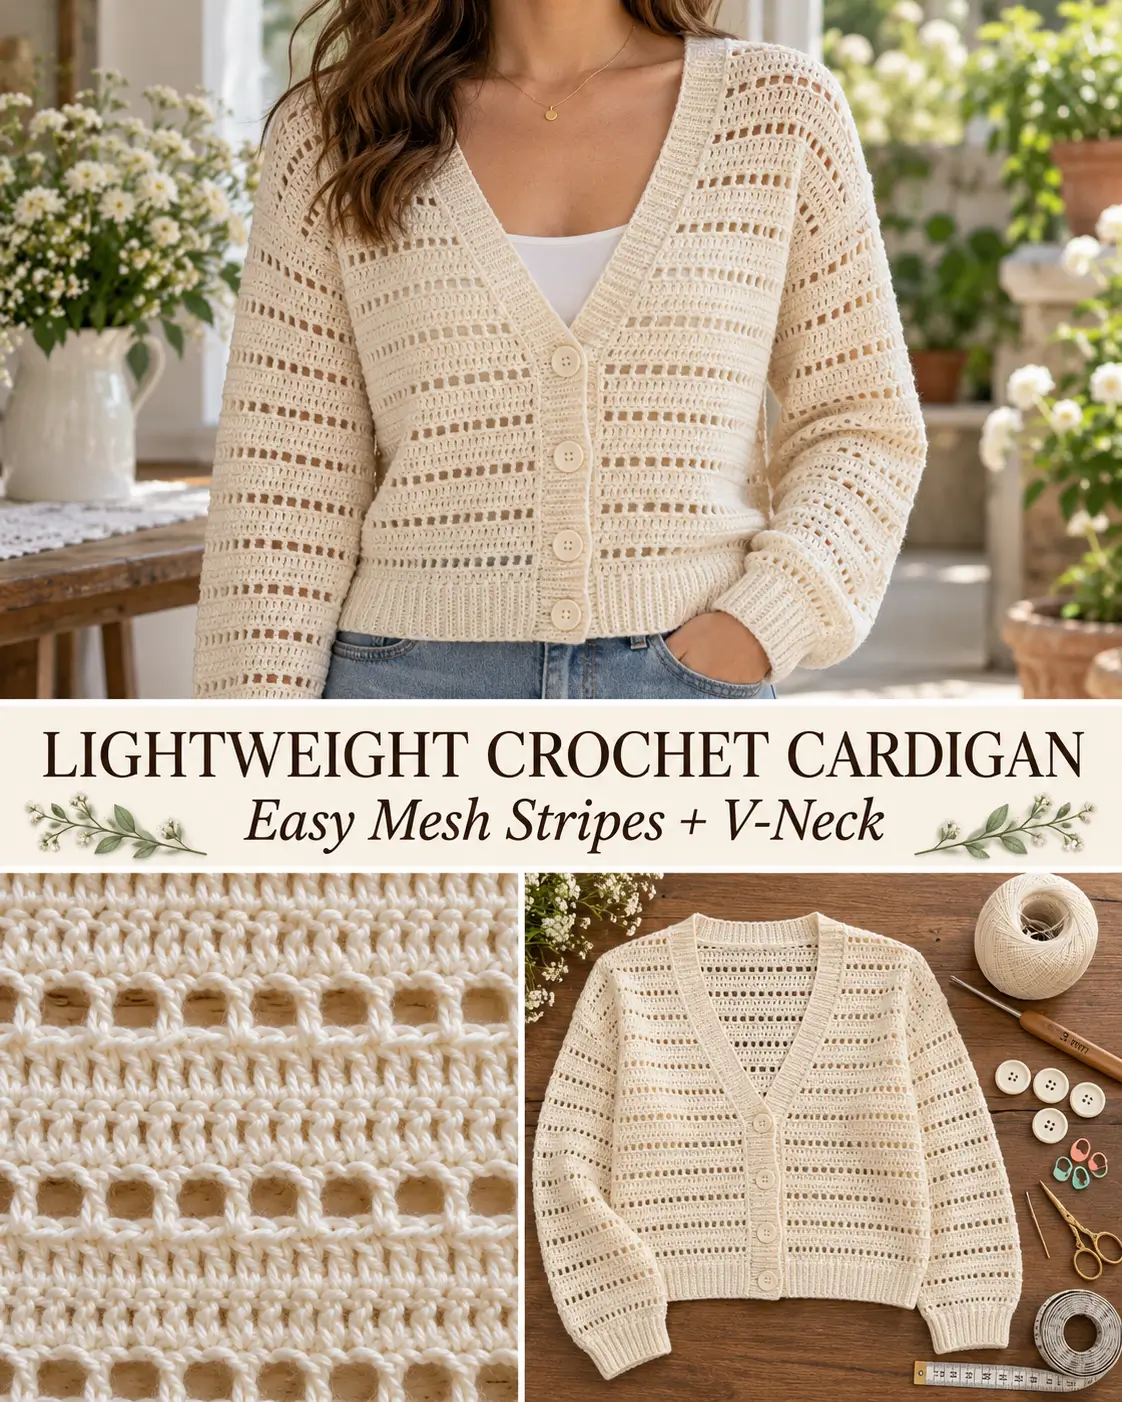
This lightweight crochet cardigan combines simple double crochet with regularly spaced open mesh rows to create the delicate horizontal stripe effect visible throughout the body and sleeves.
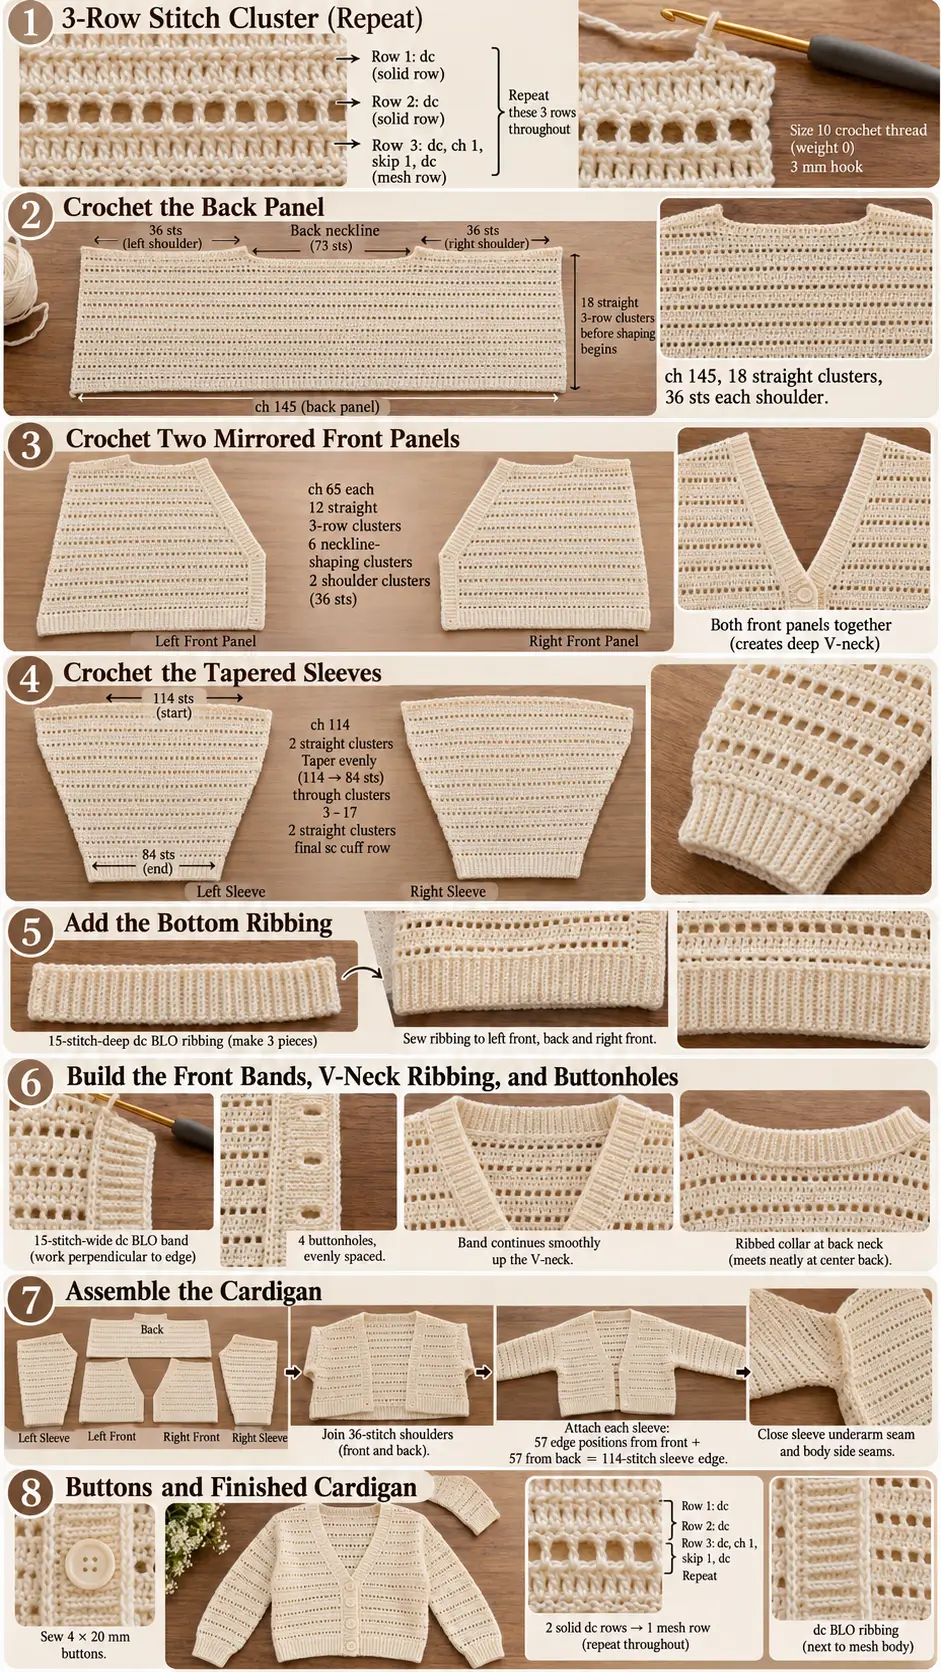
The cardigan is constructed from one back panel, two mirrored front panels, and two tapered sleeve panels. The deep V-neck is shaped directly into the fronts, while narrow back-loop ribbing finishes the hem, button bands, neckline, and back collar. Four buttons complete the front.
The original construction is designed around very fine size 10 / weight 0 crochet thread, a 3 mm hook, and generous positive ease so the fabric remains light and softly draped rather than stiff.
Finished Style
The cardigan has:
- relaxed lightweight fit
- deep V-neck
- four-button front
- horizontal mesh stripes
- slightly cropped body
- straight lower hem
- narrow ribbed hem
- wide comfortable sleeves
- gently tapered sleeve cuffs
- ribbed front bands
- shaped ribbed neckline
- no separate collar piece
- no bulky seams
The sample construction is intended for approximately a US S-M women’s fit, with instructions for resizing.
Materials
- Size 10 / weight 0 crochet cotton or cotton-acrylic thread
- Approximately 300 g for the sample size
- 3 mm crochet hook
- Stitch markers
- Measuring tape
- Yarn needle
- Scissors
- Four 20 mm buttons
- Sewing needle and matching sewing thread
Yarn quantity will increase for larger sizes or a longer cardigan.
Recommended Yarn
A smooth fine cotton or cotton-blend thread works best.
The original fabric is made with a 3-ply cotton-acrylic size-10 thread. Using significantly thicker yarn will change both the weight and the gauge, so make a new gauge swatch before changing yarn weight.
For the closest appearance to the cardigan shown, use:
soft cream / natural ivory
Skill Level
Intermediate
You should know:
- chain
- slip stitch
- single crochet
- half double crochet
- double crochet
- dc2tog
- dc3tog
- back-loop-only crochet
- working flat panels
- basic garment seaming
- attaching buttons
Abbreviations
This pattern uses US crochet terminology.
ch — chain
sl st — slip stitch
sc — single crochet
hdc — half double crochet
dc — double crochet
dc2tog — double crochet 2 together
dc3tog — double crochet 3 together
BLO — back loop only
dec — decrease
st / sts — stitch / stitches
RS — right side
WS — wrong side
Gauge
The source gauge is approximately:
15 dc stitches = 2 inches / 5 cm
and:
2 complete pattern clusters = 2 inches / 5 cm
One complete cluster contains:
2 solid double-crochet rows + 1 mesh row
So one cluster adds approximately:
1 inch / 2.5 cm
of length.
Always make a swatch before beginning.
The 3-Row Mesh Cluster
The entire cardigan is based on one repeating three-row unit.
Cluster Row 1 — Solid Double Crochet
Ch 2.
The ch-2 counts as the first dc.
Turn.
Dc in every remaining stitch across.
Cluster Row 2 — Solid Double Crochet
Ch 2.
Turn.
Dc across again.
Maintain the same stitch count.
Cluster Row 3 — Mesh Row
Ch 3.
The beginning chain functions as the first dc plus ch-1 space.
Turn.
Skip the next stitch.
Dc in the following stitch.
Repeat:
ch 1, skip 1 st, dc in next st
across.
For panels with an odd stitch count, this produces a clean row of evenly spaced mesh boxes. The back and front panels therefore use odd stitch counts.
Sizing
The design uses generous positive ease.
| Size | Bust | Suggested Finished Bust |
|---|---|---|
| XS | 32 in | 38 in |
| S | 34 in | 40 in |
| M | 36 in | 42 in |
| L | 40 in | 46 in |
| XL | 41 in | 49 in |
| 2XL | 43 in | 51 in |
| 3XL | 45 in | 53 in |
The source uses approximately 6 inches of positive ease through L and about 8 inches for XL-3XL.
How to Resize the Cardigan
The original sizing method works in gauge blocks.
For additional width, adjust panel widths by approximately:
15 stitches per 2 inches
For additional length, add:
1 cluster per approximately 1 inch
For a lower V-neck, begin the neckline shaping one or more clusters earlier.
Keep the front panels mirrored and keep the main front/back panel stitch counts odd.
When widening a panel by 15 stitches, the hem ribbing will need approximately 8 additional ribbing rows along that edge.
SAMPLE SIZE CONSTRUCTION
The counts below reproduce the S-M sample construction:
Back Panel
145 stitches
Front Panels
65 stitches each
Sleeves
114 stitches at upper edge
tapering to:
84 stitches at cuff
BACK PANEL
Foundation
Ch:
145
Cluster 1 — Row 1
At the end of the foundation chain:
Ch 2 and turn.
Dc into the 144th foundation chain and continue across.
You should finish with:
144 dc + beginning ch-2 = 145 stitches
Cluster 1 — Row 2
Ch 2.
Turn.
Dc across.
Maintain:
145 stitches
Cluster 1 — Row 3
Ch 3.
Turn.
Skip the next stitch.
Dc into the following stitch.
Repeat:
ch 1, skip 1, dc
across.
You should have:
72 mesh spaces
across the row.
Back Panel — Regular Body
Repeat the complete:
2 solid dc rows + 1 mesh row
cluster until you have:
18 complete clusters
or:
54 rows
before beginning the upper back-neck shaping.
The sample uses 20 clusters total, with the final 2 clusters used for shaping.
Back Neck and Shoulder Shaping
The upper back is shaped separately on each side.
You will first shape one shoulder, then mirror the same shaping on the opposite side.
The center stitches are left unworked to form the back neckline.
First Shoulder — Shaping Cluster 1
Begin from one outer edge.
Work only across the first section required for the shoulder.
Row 1
Ch 2.
Work dc until you have worked:
40 stitches including the beginning ch-2
Then work:
dc2tog over the next 2 stitches
You now have:
41 stitches
Turn.
Row 2
Work a decrease at the neckline edge so:
41 → 40 stitches
Then continue dc across the shoulder.
Row 3 — Mesh Row
Work the mesh pattern across until you have completed:
18 mesh spaces over the first 37 stitch positions
Ch 1.
Skip the next stitch.
Work a decrease over the final 2 stitches.
You should finish with:
39 stitches
Back Shoulder — Shaping Cluster 2
Row 1
Decrease at the neckline edge.
Continue dc across.
38 stitches
Row 2
Ch 2.
Dc until:
36 stitches have been worked including the beginning chain
Dc2tog over the final two stitches.
37 stitches
Row 3
Decrease at the neckline edge.
Continue across.
36 stitches
Fasten off.
Repeat the same shaping on the opposite outer edge, mirrored toward the center neckline.
Each finished shoulder should contain:
36 stitches.
FRONT PANELS — MAKE 2
Each front begins as a straight rectangular panel and then narrows gradually at the center-front edge to create the V-neck.
The two panels must be exact mirror images.
Front Panel Foundation
Ch:
65
Cluster 1 — Row 1
Ch 2 and turn.
Dc across the foundation.
Finish with:
64 dc + ch-2 = 65 stitches
Cluster 1 — Row 2
Ch 2.
Turn.
Dc across.
65 stitches
Cluster 1 — Row 3
Ch 3.
Turn.
Skip the next stitch.
Dc into the following stitch.
Repeat:
ch 1, skip 1, dc
across.
You should have:
32 mesh spaces
Front Panel — Straight Lower Section
Work:
12 complete clusters
with no shaping.
That equals:
36 rows
The neckline shaping begins with:
Cluster 13.
The full sample front is:
20 clusters
long:
- 12 straight clusters
- 6 neckline-decrease clusters
- 2 straight shoulder clusters.
V-Neck Shaping
All shaping occurs at the center-front edge.
The outer armhole edge stays straight.
For the second front panel, reverse every shaping instruction.
Use:
dc2tog when the table says dec.
Use:
dc3tog where specified.
Continue working each row in its normal solid-dc or mesh pattern while placing the decrease at the neckline edge.
Front Neckline Decrease Table
| Cluster | Row | Neckline Decrease | Stitches Remaining |
|---|---|---|---|
| 13 | 1 | dc3tog | 63 |
| 13 | 2 | dc3tog | 61 |
| 13 | 3 | dc3tog | 59 |
| 14 | 1 | dc3tog | 57 |
| 14 | 2 | dc3tog | 55 |
| 14 | 3 | dc3tog | 53 |
| 15 | 1 | dc3tog | 51 |
| 15 | 2 | dc2tog | 50 |
| 15 | 3 | dc3tog | 48 |
| 16 | 1 | dc2tog | 47 |
| 16 | 2 | dc3tog | 45 |
| 16 | 3 | dc2tog | 44 |
| 17 | 1 | dc3tog | 42 |
| 17 | 2 | dc2tog | 41 |
| 17 | 3 | dc2tog | 40 |
| 18 | 1 | dc2tog | 39 |
| 18 | 2 | dc2tog | 38 |
| 18 | 3 | dc3tog | 36 |
After Cluster 18 you should have:
36 stitches
remaining across the shoulder. The neckline diagram in the source shows this gradual reduction from 65 stitches to 36 over six clusters.
Front Shoulder
Work:
Clusters 19 and 20
without further decreasing.
Maintain:
36 stitches
The shoulder should now match the:
36-stitch back shoulder
exactly.
Fasten off.
Make the Second Front Panel
Repeat the complete front-panel pattern.
This time place every neckline decrease on the opposite edge.
Before continuing, lay the panels side by side.
They should form a symmetrical:
V
down the center.
SLEEVES — MAKE 2
The sleeves are worked as flat tapered panels.
The wide edge becomes the upper sleeve.
The narrow edge becomes the cuff.
The sample sleeve uses:
19 complete clusters
and decreases from:
114 stitches to 84 stitches.
Sleeve Foundation
Ch:
114
The sleeve count is even.
Sleeve Clusters 1-2
Work:
2 complete clusters
without decreasing.
Maintain:
114 stitches
Important Mesh-Row Rule for Even Stitch Counts
Because 114 is even, a mesh row will not begin and end exactly like the odd-numbered body panels.
If one mesh row begins with:
dc, ch 1, dc
and finishes with:
2 dc
then the next mesh row should begin with:
2 dc
and finish with:
dc, ch 1, dc
This keeps the mesh balanced along both sleeve edges.
Sleeve Taper — Clusters 3-17
At the first solid row of each cluster:
dc2tog over the first 2 stitches
and:
dc2tog over the final 2 stitches
This removes:
2 stitches per decrease cluster
Work Rows 2 and 3 of that cluster normally using the new stitch count.
Sleeve Stitch Count
| Cluster | Stitch Count |
|---|---|
| 1-2 | 114 |
| 3 | 112 |
| 4 | 110 |
| 5 | 108 |
| 6 | 106 |
| 7 | 104 |
| 8 | 102 |
| 9 | 100 |
| 10 | 98 |
| 11 | 96 |
| 12 | 94 |
| 13 | 92 |
| 14 | 90 |
| 15 | 88 |
| 16 | 86 |
| 17 | 84 |
| 18 | 84 |
| 19 | 84 |
Sleeve Clusters 18-19
Work the final:
2 clusters
straight with:
84 stitches
Sleeve Cuff
After Cluster 19:
Ch 1.
Work:
1 sc in every stitch across
This creates a simple firm cuff edge.
Fasten off.
The original pattern treats additional cuff ribbing as optional; the single-crochet finish is sufficient.
Seam Each Sleeve
Fold the sleeve in half lengthwise with:
wrong sides facing outward
Align the long edges.
Use sc to seam the edges together.
For the sample sleeve, the source estimates approximately:
115 sc seam stitches
along the sleeve length.
Fasten off.
Make the second sleeve exactly the same.
RIBBING
The cardigan uses narrow vertical ribbing made with:
double crochet through the back loop only
The ribbing is approximately:
15 stitches deep
throughout.
The ribbing is worked perpendicular to the garment edges.
FRONT BOTTOM RIBBING — MAKE 2
Each front panel contains:
65 stitches
along its bottom edge.
Because a dc row end contributes approximately two edge positions, the source uses:
32 ribbing rows
for each front hem.
Foundation
Ch:
15
Ribbing Row 1
Work a 15-stitch dc-BLO ribbing row.
Turn.
Rows 2-32
Continue:
dc BLO across
until you have:
32 rows
Fasten off.
Attach Front Bottom Ribbing
Position the ribbing sideways along the bottom edge of one front panel.
The ribbing rows should run vertically while the cardigan hem runs horizontally.
With wrong sides together, attach using sc evenly across.
Repeat for the second front panel.
Back Bottom Hem
The PDF explicitly describes the two front hem pieces but does not separately give instructions for a back hem band.
To create a continuous ribbed lower edge like the cardigan appearance, use the same 15-stitch dc-BLO ribbing along the back panel.
Using the source’s row-to-edge formula, a 145-stitch back panel requires approximately:
73 ribbing rows
to span the back hem.
Check against the actual back-panel width before fastening off.
LEFT FRONT BUTTON-BAND / NECKLINE RIBBING
The center ribbing is crocheted directly onto the front panel because it needs to follow the changing V-neck angle.
The finished band is:
15 stitches wide
and approximately:
68 ribbing rows
from the lower front edge to the shoulder.
Begin at the Lower Front Corner
Ch:
15
Attach the foundation to the completed bottom ribbing with slip stitches.
Work:
15 dc BLO
back across the ribbing foundation.
Work Up the Straight Center Front
Continue making 15-stitch dc-BLO rows while attaching each row to the cardigan edge with slip stitches.
By the time you reach the end of:
Cluster 12 / Row 36
you should have approximately:
43 ribbing rows
including the rows used around the lower corner.
Taper the Ribbing Along the V-Neck
The ribbing must change stitch height slightly so it lies flat against the diagonal neckline.
At the first V-neck decrease:
Slip stitch twice into the neckline edge.
Ch 1.
Across the 15-stitch band work:
7 sc
then:
1 hdc
then:
7 dc
Attach to the cardigan edge.
This produces a tapered ribbing row.
Next Ribbing Row
Work:
15 dc BLO
normally.
Attach to the next neckline edge position.
Following Ribbing Row
Repeat the tapered:
7 sc + 1 hdc + 7 dc
row.
Continue attaching ribbing upward.
After the initial neckline transition, continue regular 15-stitch dc-BLO ribbing while treating each sloping cardigan row as approximately two edge attachment positions.
Continue until the band reaches the shoulder.
Total:
approximately 68 ribbing rows
RIGHT FRONT BUTTON BAND
Work the second front band exactly as the first, mirrored from bottom to top.
This band contains the:
4 buttonholes.
Buttonhole Placement
The source constructs each buttonhole over:
4 ribbing rows
and spaces the units with:
7 regular dc-BLO rows
between them.
For the sample band, the four buttonhole units fall approximately at:
Rows 7-10
Rows 18-21
Rows 29-32
Rows 40-43
The fourth buttonhole finishes at approximately ribbing Row 43, just before the V-neck shaping begins.
Four-Row Buttonhole Unit
The buttonhole is centered in the 15-stitch band.
Buttonhole Row 1
Work dc BLO through the first section of the ribbing.
At the center stitch, work:
1 sc through both loops
rather than BLO.
Finish the row in dc BLO.
Buttonhole Row 2
Work:
6 dc BLO
Then work:
1 regular dc
Ch:
3
Skip the center opening.
Work:
1 regular dc
Then work:
6 dc BLO
Finish the row and attach it to the cardigan edge.
Buttonhole Row 3
Work:
5 dc BLO
Then:
1 regular dc
Slip stitch into the previous:
ch-3 space
to reinforce and open the buttonhole.
Work another regular dc on the opposite side.
Finish with dc BLO.
Buttonhole Row 4
Work to the buttonhole area.
Use a small sc around the preceding slip-stitch section to stabilize and lift the opening.
Complete the row in dc BLO.
Resume regular ribbing.
Repeat the entire four-row unit for all four buttonholes.
BACK NECK COLLAR RIBBING
The back-neck ribbing is worked from each shoulder toward the center back.
Make one half first and then mirror it from the opposite side.
Important Back-Collar Taper
The source diagram shows a 15-stitch tapered ribbing.
For a consistent 15-stitch interpretation, use:
7 sc BLO + 1 hdc BLO + 7 dc BLO
on one tapered row.
On the return row reverse it:
7 dc BLO + 1 hdc BLO + 7 sc BLO
This creates the wedge shape needed to travel around the back neckline.
First Back-Collar Half
Attach at the upper neckline edge near one shoulder.
Ch:
15
Tapered Row 1
Work:
7 sc BLO
1 hdc BLO
7 dc BLO
Attach to the next neckline position with a slip stitch.
Tapered Row 2
Move to the next attachment position.
Work:
7 dc BLO
1 hdc BLO
7 sc BLO
Rows 3-6
Repeat the alternating tapered rows while progressing down the first sloped neckline section.
You should have:
6 tapered rows
after covering the first six decrease-row edges.
Rows 7-12
Continue the same tapered method across the next:
12 horizontal dc attachment positions
until you have:
12 tapered ribbing rows total
Rows 13-22
Work:
10 regular dc-BLO rows
to reach the back center.
Do not fasten off until you check the fit.
Second Back-Collar Half
Repeat from the opposite shoulder, mirrored.
Work:
12 tapered rows
then approximately:
9 regular dc-BLO rows
The slightly different final straight-row count allows both halves to meet neatly at center back according to the original construction.
When the two collar ends meet:
Join them together with:
sc
and fasten off.
ASSEMBLY
Block the individual panels lightly before seaming if your thread benefits from blocking.
Do not overstretch the mesh.
Join the Shoulders
Place one front panel against the corresponding side of the back panel with wrong sides positioned for your chosen seam method.
Use sc to join the:
36-stitch front shoulder
to the:
36-stitch back shoulder
Continue neatly into the ribbing/collar connection.
Repeat on the second shoulder.
The source uses all 36 straight shoulder stitches and joins through the ribbing ends at the neckline.
Mark the Armholes
The upper edge of each sleeve contains:
114 stitches
Therefore, the cardigan body needs an armhole opening equivalent to:
114 stitches total
Split that equally:
57 edge positions on the front
and:
57 edge positions on the back
From each shoulder seam, measure down approximately:
28½ dc-row heights
on both front and back and place markers.
Repeat on the other side.
Attach the Sleeves
With the sleeve seam facing downward:
Center the widest 114-stitch sleeve edge over the shoulder seam.
Match:
57 sleeve stitches to the front armhole
and:
57 sleeve stitches to the back armhole
Use stitch markers to distribute the fabric evenly.
Sew or sc the sleeve into the armhole without gathering.
Repeat for the second sleeve.
Close the Side Seams
The PDF gives the shoulder and sleeve-to-armhole joining points but does not separately spell out the final body side seam.
To complete the panel construction, align each front-panel side edge with the corresponding back-panel side edge below the armhole.
Seam from:
underarm → hem
using the same neat sc seam or your preferred mattress-style seam.
If the sleeve underarm seam was left open during insertion, continue in one uninterrupted seam from:
cuff → underarm → body hem
This produces the cleanest finish.
Sew On the Buttons
Place the four:
20 mm buttons
on the button-free front band.
Align each button directly opposite one of the four buttonholes.
The source recommends centering each button around the middle rows of the corresponding buttonhole so the cardigan closes evenly.
Use regular sewing thread rather than crochet thread for a secure attachment.
Weave In the Ends
Use a fine yarn needle.
Weave every end through several stitches on the wrong side.
Change direction at least once.
Trim carefully.
Pay special attention to:
- shoulder seams
- sleeve attachment
- button bands
- collar join
- buttonhole edges
Blocking
The cardigan benefits from gentle blocking because the fine thread and mesh rows can look slightly uneven immediately after crocheting.
Follow your yarn’s care instructions.
Lay the cardigan flat.
Shape:
- shoulders
- V-neck
- front bands
- sleeve edges
- hem
- mesh rows
Keep the mesh openings rectangular.
Do not stretch the ribbing excessively.
Allow the cardigan to dry completely.
If the Mesh Rows Become Uneven
Count your stitches after every solid row.
For odd-count body panels, the mesh row should alternate:
dc / ch-1 space
evenly across.
Do not accidentally work a dc into a stitch that should have been skipped.
If the V-Neck Is Not Symmetrical
Lay both front panels beside each other after every shaping cluster.
The neckline edges should mirror one another exactly.
Check the target stitch counts:
63 → 61 → 59 → 57 → 55 → 53 → 51 → 50 → 48 → 47 → 45 → 44 → 42 → 41 → 40 → 39 → 38 → 36
If one panel has a different count, fix it before adding the front ribbing.
If the Front Band Ripples
The attached ribbing has too many rows for the edge.
Remove a row occasionally or attach across slightly more edge height.
The band should lie flat without pulling the V-neck open.
If the Front Band Pulls Tight
Add a ribbing row or attach more frequently.
Do not stretch the cardigan edge while sewing the ribbing.
If the Buttonholes Are Too Small
The sample uses:
20 mm buttons
Before finishing all four buttonholes, test the first one.
If necessary, use:
ch 4 instead of ch 3
for a larger button.
Keep all four buttonholes identical.
If the Sleeves Are Too Wide
Begin the decrease section earlier or continue decreasing for additional clusters.
Always remove stitches symmetrically:
one decrease at each edge
so the sleeve remains centered.
If the Sleeves Are Too Narrow
Work fewer decrease clusters.
Keep both sleeves identical.
Making the Cardigan Longer
Add complete:
3-row clusters
before the neckline shaping begins.
Each cluster adds approximately:
1 inch / 2.5 cm
at the source gauge.
Add the same number of clusters to:
- back
- both fronts
If desired, also add sleeve length independently.
Making a Deeper V-Neck
Begin the front neckline decreases earlier.
For example, starting one cluster earlier lowers the beginning of the V by approximately:
1 inch
at gauge.
Keep the same finishing shoulder count unless you intentionally redesign the shoulder width.
Making a Higher V-Neck
Work additional straight clusters before beginning the decrease sequence.
Shorten the shaping section only if you have recalculated it carefully.
The simplest adjustment is to move the entire existing shaping sequence upward.
Pattern Summary
Back
Ch 145
Work:
18 straight clusters
Then shape each back shoulder separately over:
2 clusters
Finish with:
36 stitches per shoulder
Fronts — Make 2
Ch 65
Work:
12 straight clusters
Then:
6 V-neck shaping clusters
reducing:
65 → 36 stitches
Finish with:
2 straight shoulder clusters
Mirror second panel.
Sleeves — Make 2
Ch 114
Work:
2 straight clusters
Then decrease both edges once during the first row of:
Clusters 3-17
Finish at:
84 stitches
Work:
Clusters 18-19 straight
Add one sc cuff row.
Seam sleeve.
Bottom Ribbing
Work 15-stitch-wide:
dc BLO ribbing
Front panels:
32 rows each
For a continuous back hem, approximately:
73 rows
fits the 145-stitch sample back using the source sizing relationship.
Front Bands
Work:
15-stitch dc-BLO ribbing
directly onto each center-front edge.
Left band:
approximately 68 rows
Right band:
same shape, with:
4 buttonholes
Back Collar
Work two mirrored collar halves.
Each begins with tapered:
7 sc BLO + 1 hdc BLO + 7 dc BLO
rows and transitions to straight dc-BLO ribbing.
Join at center back.
Assembly
- Join shoulders.
- Mark 57 edge positions down each front and back armhole.
- Attach each 114-stitch sleeve edge.
- Close sleeve and body side seams.
- Finish ribbing and collar joins.
- Sew four 20 mm buttons opposite the buttonholes.
- Weave in ends.
- Block gently.
The finished cardigan should have a soft cream V-neck, four-button front, narrow ribbed hem and bands, long relaxed sleeves, and repeating horizontal mesh stripes separated by two solid double-crochet rows, keeping the light, airy appearance of the reference design.