Introduction
A crochet crop top is one of those handmade pieces that feels perfect for summer, festivals, beach days, and layered outfits. It is light, feminine, adjustable, and easy to style with jeans, skirts, shorts, or over a swimsuit.
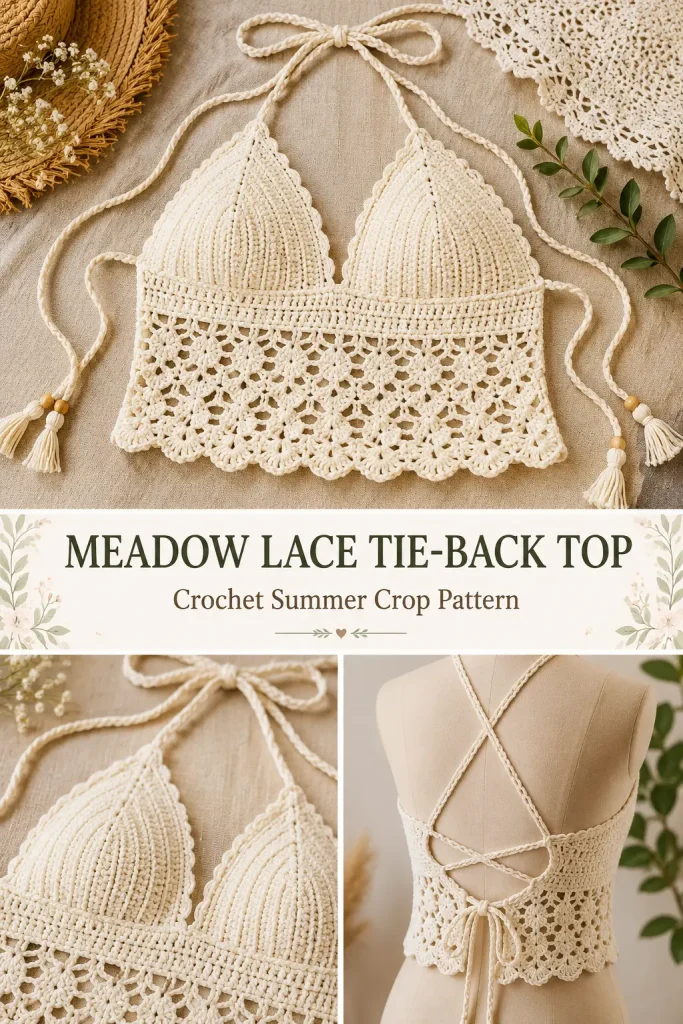
This Meadow Lace Tie-Back Crochet Crop Top is an original design inspired by the crochet crop top ideas in your image, but the construction, stitch counts, shaping, lace-up back, cups, straps, and edging are created fresh. The goal is a wearable top that looks cute, fits better, and is easier to adjust than many simple crop top patterns.
The design has two shaped crochet cups, a textured underbust band, a breathable lace body panel, scalloped lower edging, neck ties, and a crisscross back tie so the fit can be tightened or loosened.
Description
This crochet top has a soft bralette-style front with two lightly shaped cups and a decorative lace body underneath. The cups are made separately, joined at the center, then worked downward into a fitted underbust band and open lace panel.
The back is intentionally adjustable with long crochet ties. This makes the pattern more flexible for different body shapes and helps the top fit more comfortably. The lower edge has a soft scalloped finish, and the straps can be worn straight around the neck or crossed at the back.
This pattern is best for confident beginners or intermediate crocheters who know basic stitches, increases, working flat rows, and simple assembly.
Materials
- DK or worsted weight cotton yarn in cream, ivory, sage, blush, or any summer color
- 4 mm crochet hook
- Yarn needle
- Scissors
- Stitch markers
- Measuring tape
- Optional: removable bra cups or lining fabric
- Optional: sewing needle and thread for lining
Finished Style
This pattern creates an adjustable tie-back crochet crop top.
Suggested finished fit:
- Close-fitting bust cups
- Adjustable back
- Cropped length
- Light open lace body
- Scalloped hem
Cotton yarn is best because it holds shape better than soft acrylic.
Sizes
This pattern includes guidance for three sizes:
- Small: A/B cup, underbust width about 13–14 inches across front
- Medium: B/C cup, underbust width about 15–16 inches across front
- Large: C/D cup, underbust width about 17–18 inches across front
Because this top ties at the back, the fit is adjustable.
Gauge
Approximate gauge with 4 mm hook:
- 16 dc stitches = 4 inches
- 8 dc rows = 4 inches
Measure your cup as you go. The cup should cover comfortably from the lower bust to the top of the bust.
Abbreviations
- ch: chain
- sc: single crochet
- hdc: half double crochet
- dc: double crochet
- tr: treble crochet
- sl st: slip stitch
- st: stitch
- sts: stitches
- sp: space
- ch-sp: chain space
- FO: fasten off
Pattern Notes
Make two cups first.
Each cup is worked from the center bottom upward.
The cup size is controlled by the number of rows.
The cups are joined at the center front.
The body is worked downward from the bottom of the cups.
The back remains open and is closed with long ties.
Ch 3 at the beginning of cup rows counts as 1 dc.
Ch 1 does not count as a stitch.
Step-by-Step Instructions
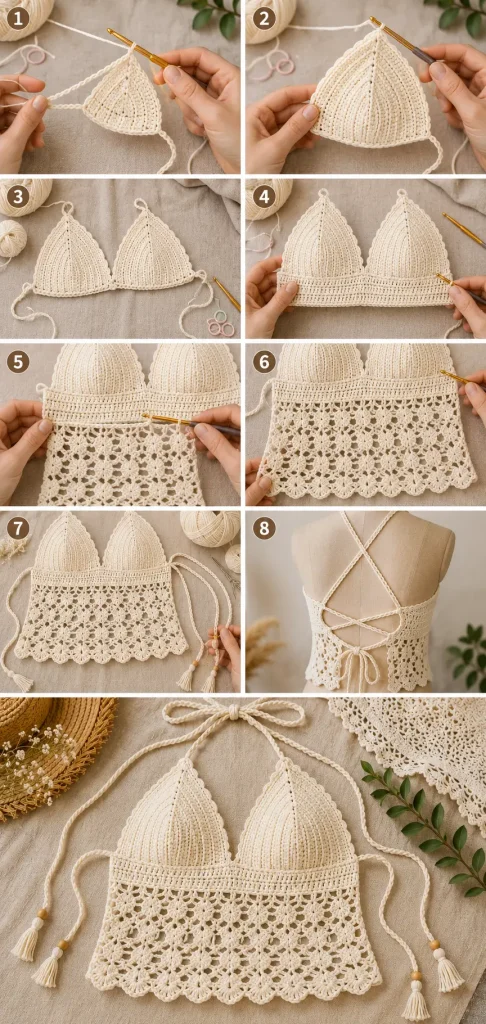
Cup Pattern
Make 2 cups.
Use your main yarn color.
Small Cup
Row 1
Ch 14.
Dc in 4th ch from hook.
Dc in each ch across until the last ch.
Work 5 dc in the last ch.
Now work along the opposite side of the chain.
Dc in each remaining loop across.
Ch 3, turn.
Row 2
Dc in each st up the first side.
Work 5 dc in the center stitch of the 5-dc group from the previous row.
Dc in each st down the opposite side.
Ch 3, turn.
Rows 3–6
Repeat Row 2.
Each row should grow around the top point of the cup.
At the center top point, always work 5 dc into the center stitch.
FO after Row 6.
Medium Cup
Work the same as Small Cup, but begin with:
Ch 16.
Work Rows 1–7.
FO after Row 7.
Large Cup
Work the same as Small Cup, but begin with:
Ch 18.
Work Rows 1–8.
FO after Row 8.
Cup Edging
Work this on both cups.
Join yarn at the lower outside corner of one cup.
Ch 1.
Sc evenly around the side edge, top point, and opposite side edge.
Work 3 sc in the top point.
Do not work across the bottom edge yet.
FO.
Repeat for second cup.
This gives the cup a clean edge before joining.
Joining the Cups
Lay both cups side by side with the bottom edges aligned.
The top points should angle outward slightly.
Overlap the inner bottom corners by about 0.5 inch.
Using a yarn needle and matching yarn, sew the inner corners together securely.
For a deeper center front, overlap less.
For more coverage, overlap slightly more.
Underbust Foundation Row
Join yarn at the lower outside edge of the left cup.
You will work across the bottom edge of both cups.
Row 1
Ch 1.
Sc evenly across the bottom of the first cup.
Sc across the joined center.
Sc evenly across the bottom of the second cup.
Ch 1, turn.
Suggested stitch counts:
- Small: about 42–46 sc
- Medium: about 48–54 sc
- Large: about 56–62 sc
The exact number can vary slightly, but keep it even if possible.
Underbust Band
Row 2
Hdc in each st across.
Ch 1, turn.
Row 3
Hdc in each st across.
Ch 1, turn.
Row 4
Repeat across: hdc in next 2 sts, ch 1, skip next st.
End with hdc in last 2 sts.
Ch 1, turn.
This creates small eyelets for structure and decorative detail.
Row 5
Hdc in each hdc and ch-1 sp across.
Ch 1, turn.
Row 6
Hdc in each st across.
Ch 1, turn.
Do not fasten off.
Lace Body Panel
The lace panel is worked downward from the underbust band.
Row 1
Ch 3.
Skip next st.
Dc in next st.
Repeat across: ch 1, skip next st, dc in next st.
Ch 3, turn.
Row 2
Dc in first ch-1 sp.
Repeat across: ch 1, dc in next ch-1 sp.
Dc in last st.
Ch 3, turn.
Row 3
Work 2 dc in first ch-1 sp.
Sc in next ch-1 sp.
Repeat across: 3 dc in next ch-1 sp, sc in next ch-1 sp.
Ch 3, turn.
This creates a soft shell-lace row.
Row 4
Dc in each st across.
Ch 3, turn.
Row 5
Repeat Row 1.
Row 6
Repeat Row 2.
Row 7
Repeat Row 3.
For a shorter top, stop here.
For a longer crop top, continue repeating Rows 4–7 until the body reaches your desired length.
Suggested lace body length:
- Small: 5–6 inches below cups
- Medium: 6–7 inches below cups
- Large: 7–8 inches below cups
Bottom Scalloped Edge
Work across the bottom edge of the lace panel.
Scallop Row
Ch 1.
Sc in first st.
Skip next st.
Work 5 dc in next st.
Skip next st.
Sc in next st.
Repeat across: skip next st, 5 dc in next st, skip next st, sc in next st.
FO and weave in end.
If the repeat does not end perfectly, adjust by skipping one fewer stitch near the edge.
Side Edging
Join yarn at one upper side of the top.
Sc evenly down the side edge of the cup, underbust band, and lace body.
FO.
Repeat on the other side.
This strengthens the side edges where the back ties will attach.
Neck Straps
Make 2.
Join yarn to the top point of one cup.
Ch 90 for a neck tie.
Sl st in 2nd ch from hook and in each ch back to the cup.
Sl st into the cup top to secure.
FO and weave in ends.
Repeat for the second cup.
For thicker straps, make hdc straps instead:
Ch 90, hdc in 2nd ch from hook and across, then secure to cup.
Back Side Ties
Make 2 lower back ties.
Join yarn to the upper side edge of the underbust band on one side.
Ch 110.
Sl st in 2nd ch from hook and in each ch back.
Secure with sl st to the side edge.
FO.
Repeat on the opposite side.
These ties wrap around the back and tie securely.
Crisscross Back Lace Option
For a more stylish and adjustable back, add side loops.
Side Loops
On each side edge, mark 4 spots:
- One at the cup side
- One at the underbust band
- One at the upper lace body
- One near the lower lace body
Join yarn at each marked spot and ch 6.
Sl st back into the same spot to form a loop.
FO and weave in ends.
Make matching loops on both sides.
Back Lace Cord
Ch 170.
Sl st in 2nd ch from hook and in each ch across.
FO.
Thread the cord through the side loops like a corset lace.
Tie at the lower back.
This gives the top a more adjustable trendy fit.
Optional Front Center Tie Detail
For a cute upgraded style, add a short center tie between the cups.
Join yarn at the center front where the cups meet.
Ch 40.
FO.
Join yarn again at the same center point.
Ch 40.
FO.
Tie into a small bow.
This is decorative only.
Optional Lining
For more coverage, add a simple lining behind the cups.
Place the crochet top over lining fabric or removable bra cups.
Trace the cup shape.
Cut slightly smaller than the crochet cup.
Hand sew the lining carefully to the inside edge of each cup.
Do not pull the crochet fabric too tight.
Fit Check
Try the top on before weaving in the final ends.
Check:
- Cups cover comfortably
- Neck straps are not too tight
- Underbust band sits flat
- Lace body does not pull upward
- Back ties hold the top securely
- Side edges do not gap
- Scalloped hem sits evenly
Adjust straps or tie lengths if needed.
Finishing
Weave in all ends securely.
Steam-block lightly if your yarn allows it.
Shape the cups gently with your hands.
Flatten the scalloped edge.
Check all ties and loops.
Trim any loose yarn ends.
Size Adjustments
Smaller Cup
Use fewer foundation chains and fewer cup rows.
Try Ch 12 and work 5 cup rows.
Larger Cup
Use a longer starting chain and add more cup rows.
Try Ch 20 and work 9–10 cup rows.
Wider Body
Add more stitches evenly across the underbust foundation row.
Longer Top
Repeat the lace body rows until the top reaches your preferred length.
More Coverage
Add one extra sc or hdc edging round around each cup before joining.
Tighter Fit
Use shorter back ties or add side loops for corset-style tightening.
Tips & Variations
Use cotton yarn for the best structure.
Use cream for a clean beachy look.
Use sage green for a soft boho style.
Use variegated yarn for a festival-style top.
Use black for a dramatic evening version.
Add beads only to the ends of ties, not near the cups.
Make the body longer if you want a tank-style crop.
Use removable cups or lining if wearing it as a top without layering.
For a more modest version, work extra rows on each cup and make the lace panel less open by using hdc rows instead of chain spaces.
FAQ
Is this crochet crop top beginner-friendly?
This pattern is best for confident beginners. The stitches are basic, but the cup shaping, joining, side ties, and fitting need careful attention.
Is this the exact pattern from the image?
No. This is a new original crochet crop top pattern inspired by the general style of crochet summer tops. The construction, stitch counts, cup shaping, lace panel, ties, and finishing are original.
What yarn works best?
Cotton or cotton-blend yarn works best because it holds shape, feels breathable, and stretches less than acrylic.
Can I make this top larger?
Yes. Increase the cup chain length, add more cup rows, and work more stitches across the underbust foundation row.
Do I need to line the top?
Lining is optional, but it adds coverage and comfort. You can sew fabric lining inside the cups or use removable bra cups.
Conclusion
The Meadow Lace Tie-Back Crochet Crop Top is cute, adjustable, and made for summer styling. The shaped cups, lace body, scalloped hem, neck straps, and crisscross tie-back make it more wearable and customizable than a simple crochet bralette.
Make it in cream, sage, blush, black, or a colorful variegated yarn for a handmade top that feels trendy, flattering, and fun to wear.



