Mini Crochet Handbag Keychain Pattern With Tiny Handles
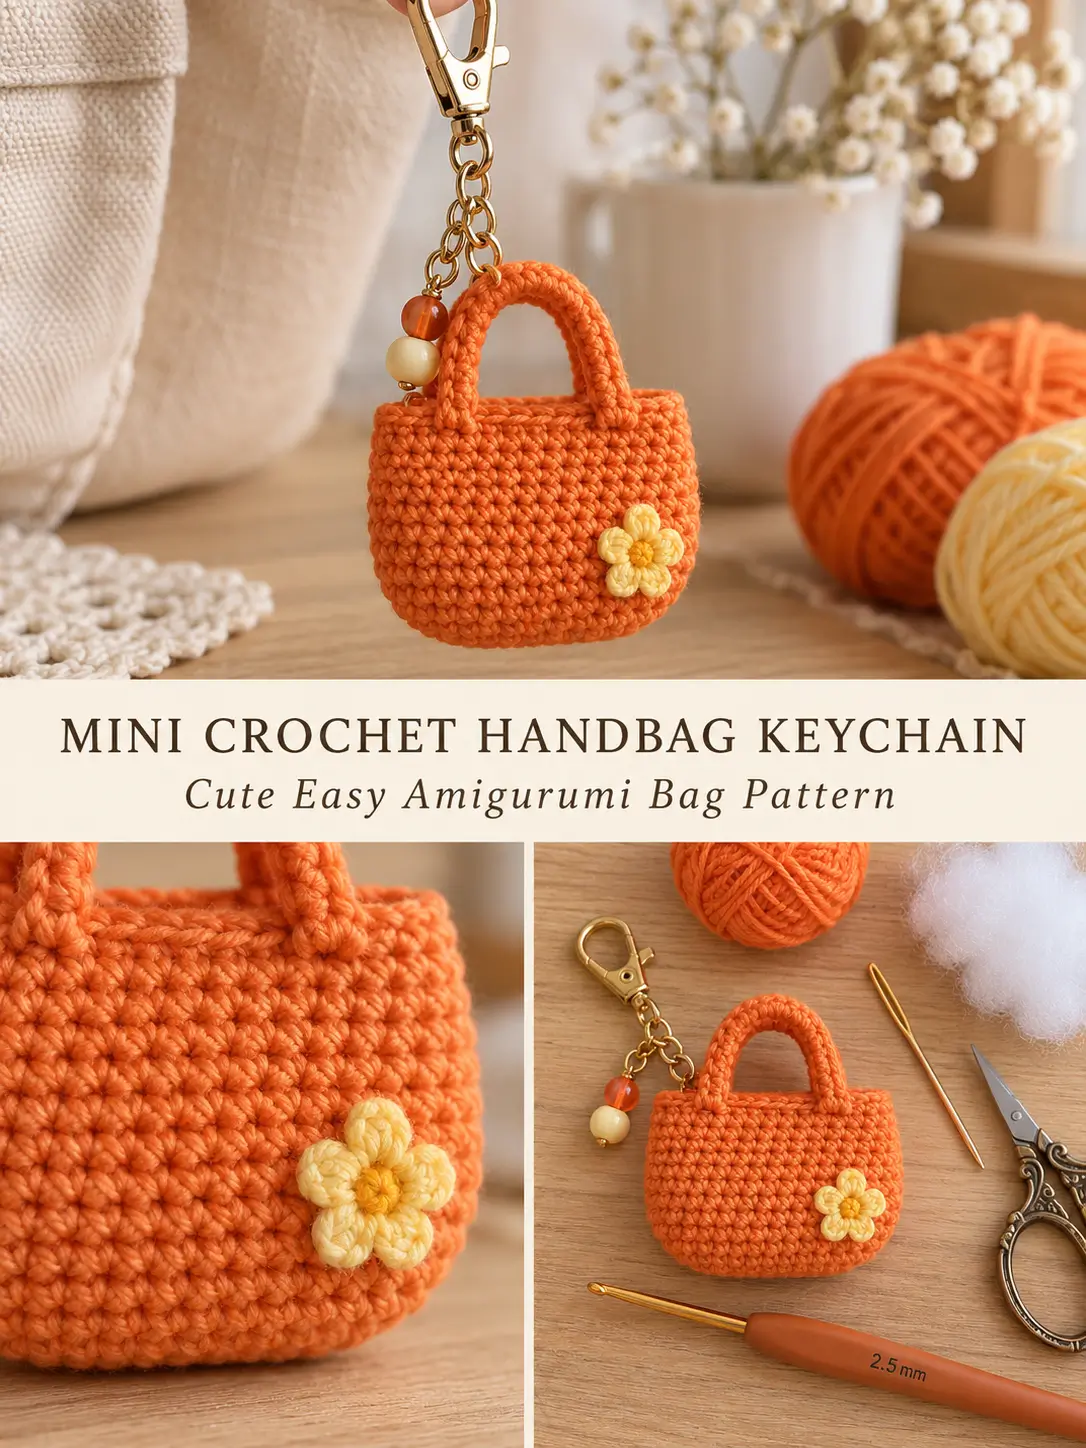
This tiny crochet handbag is one of those projects that looks surprisingly detailed even though the construction is simple.
The little bag is worked from the bottom upward in continuous rounds, shaped with a few easy increases, and finished with two crocheted handles built directly into the top edge. A small flower, charm, beads, or keychain clasp can be added at the end.
You can make it in two ways:
- Stuffed decorative keychain for bags, backpacks, keys, or gifts
- Functional miniature pouch by leaving out the stuffing and adding a small snap closure
The original project uses 2 mm mercerized cotton yarn and a 2.5 mm crochet hook.
Finished Size
Using 2 mm cotton yarn and a 2.5 mm hook, expect a miniature handbag approximately:
2½–3 inches / 6–7.5 cm wide
and approximately:
2–2½ inches / 5–6.5 cm tall, excluding the keychain hardware.
Exact measurements will depend on your yarn, tension, and how firmly you stuff the decorative version.
Materials
- 2 mm cotton or amigurumi yarn
- 2.5 mm crochet hook
- Yarn needle
- Scissors
- Stitch marker
- Small amount of polyester fiberfill for the decorative version
- Keychain clasp and short chain
- Small flower, button, charm, or other decoration, optional
- Small sew-on snap if making the pouch functional
The original tutorial specifically allows cotton or another suitable yarn and treats the flower decoration as optional.
Skill Level
Easy / confident beginner
You should know how to make:
- magic ring
- chain
- single crochet
- single crochet increase
- slip stitch
- working in continuous rounds
Abbreviations
This pattern uses US crochet terminology.
MR — magic ring
ch — chain
sc — single crochet
inc — 2 sc in the same stitch
sl st — slip stitch
st / sts — stitch / stitches
rnd — round
Important Construction Notes
The bag body is worked in a continuous spiral.
Do not join the body rounds with a slip stitch.
Place a stitch marker in the first stitch of every round and move it upward as you work.
The body begins with:
8 sc
and increases to:
32 stitches
The stitch count then stays at 32 while the sides grow upward.
The two handles are formed directly from chain loops at the top of the bag.
Optional X-Shaped Single Crochet
The original project uses an amigurumi-style single crochet that produces a small X-shaped stitch.
You can use ordinary single crochet if you prefer.
For the X-shaped version:
Insert the hook into the stitch.
Instead of yarning over in the usual direction, place the yarn over the hook from top to bottom.
Pull up a loop.
Yarn over normally and pull through both loops.
Continue using the same method throughout the bag body.
The original instructions use this X-style single crochet beginning inside the magic ring.
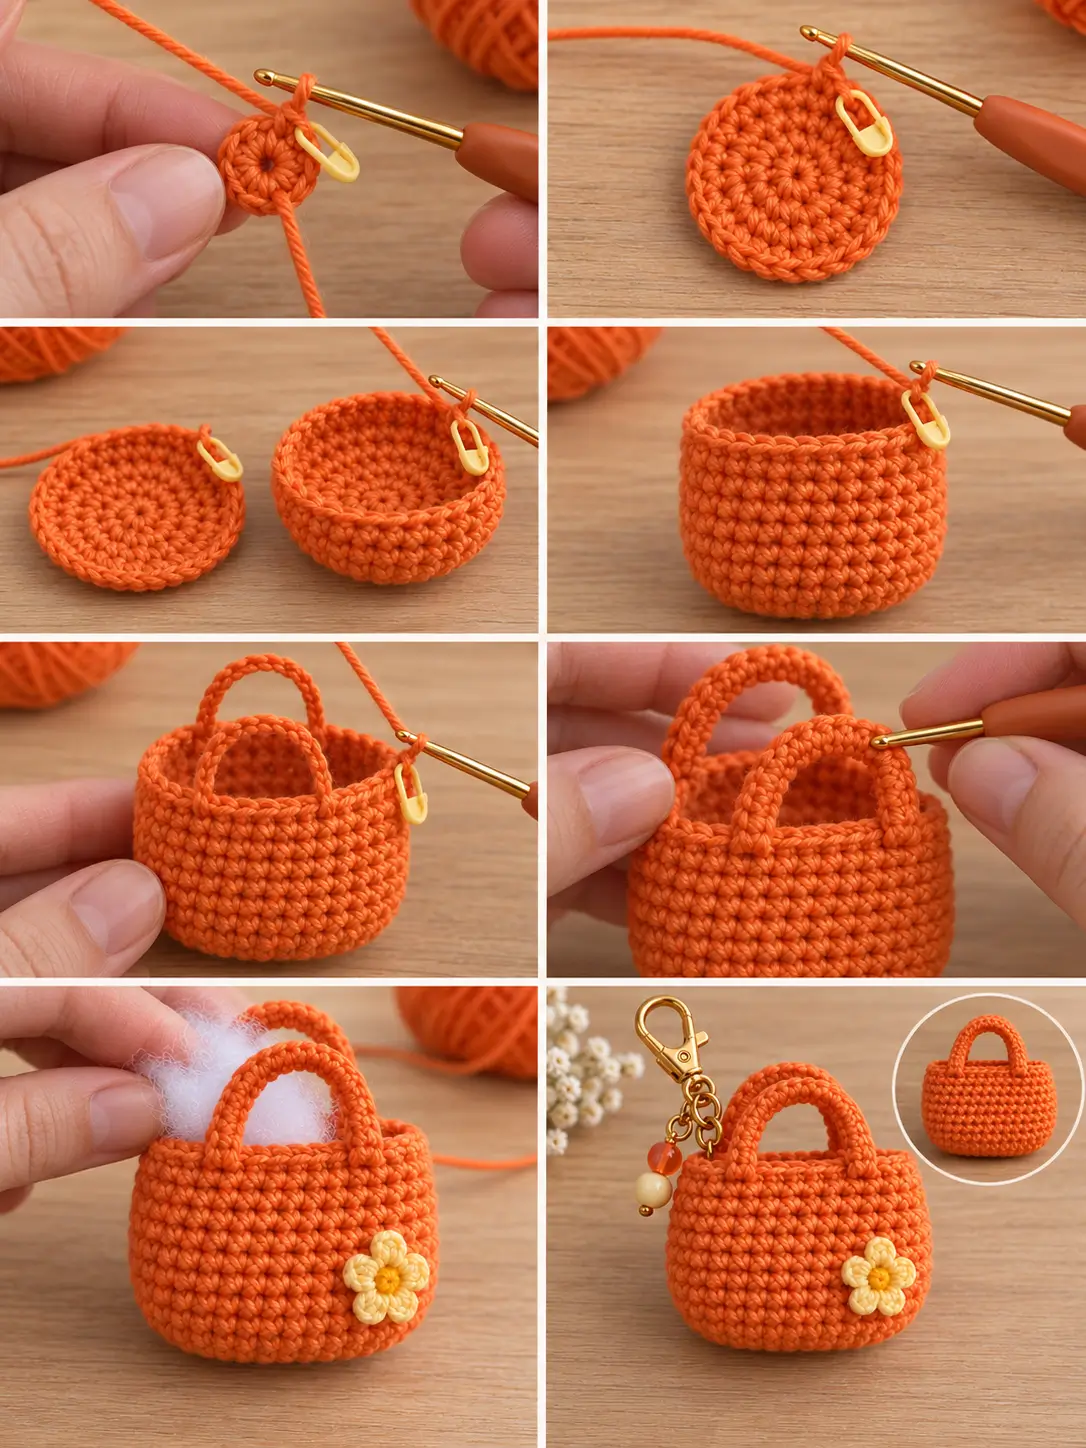
Round 1
Make a magic ring.
Ch 1.
Work:
8 sc into the MR
Pull the ring closed.
Do not join.
Place a stitch marker in the first sc.
8 sts
Round 2
Work:
inc in every stitch around
That means:
2 sc in each of the 8 stitches
At the end of the round you should have:
16 sts
The original pattern increases from 8 to 16 stitches in this round.
Round 3
Work:
(1 sc, inc) × 8
At the end:
24 sts
Round 4
Work:
1 sc in every stitch around
24 sts
Do not increase.
This round begins forming the side of the little handbag.
Round 5
Work:
(2 sc, inc) × 8
At the end:
32 sts
Rounds 6–12
Work:
1 sc in every stitch around
for all seven rounds.
Each round contains:
32 sc
At the end of Round 12, the little bag body should look like a short rounded cup.
The source specifies seven straight rounds from Round 6 through Round 12, all with 32 stitches.
Check the Shape
At this stage you should have:
- a rounded closed bottom
- a slightly wider body created by the increase rounds
- straight sides
- 32 stitches around the upper edge
Do not stuff yet.
The handles need to be made first.
Round 13 — Create the Two Handles
This round forms both handles while keeping them positioned opposite one another.
Work:
5 sc
Then:
ch 12
Skip the next:
6 stitches
Work:
10 sc
Then:
ch 12
Skip the next:
6 stitches
Work:
5 sc
You should now be back at the beginning of the round.
The arrangement around the bag is therefore:
5 sc + handle + 10 sc + handle + 5 sc
Each handle is made from:
12 chains
and spans:
6 skipped stitches
The tutorial establishes the handles with 12-chain loops and six skipped stitches on each side.
Do not make the chains extremely tight.
Both handles should be the same size.
Check the Handle Placement
Lay the tiny handbag flat.
One handle should sit on the front half of the opening.
The other should sit directly behind it.
The 10 sc between the two handle openings form the two side sections of the bag when it is folded flat.
If one handle looks noticeably off-center, correct Round 13 before continuing.
Final Top-Edge Round
The last round gives the upper edge a small decorative texture while strengthening both handles.
Work around the existing sc sections using:
sl st in the next stitch, ch 1
Repeat the slip-stitch-and-chain sequence across the stitches leading to the first handle.
When you reach the first ch-12 handle loop, do not continue the slip-stitch texture across individual chains.
Instead, work:
12 sc around the entire ch-12 loop
Crochet around the chain rather than trying to force each stitch into a tiny chain loop.
This covers and strengthens the handle.
Between the Handles
After completing the 12 sc around the first handle:
Sl st into the next body stitch.
Ch 1.
Continue:
sl st in next st, ch 1
across the stitches between the two handles.
When you reach the second ch-12 loop, work:
12 sc around the second handle loop
The original finishing sequence works the decorative slip-stitch/chain texture across the top sections and 12 single crochets over each handle chain.
Finish the Last Section
After the second handle:
Continue the same:
sl st, ch 1
sequence across the remaining upper-edge stitches.
After the last slip stitch:
Ch 1.
Cut the yarn.
Pull the tail completely through the final loop.
The source finishes this decorative top edge and then cuts the yarn for finishing.
Neaten the Final Join
Thread the yarn tail onto a yarn needle.
Bring the needle from the back of the crochet toward the front at the first finishing stitch.
Pass the needle through the nearby stitch so the final edge resembles the rest of the top.
Pull gently.
Do not tighten so much that the top edge puckers.
Weave the tail through several stitches on the inside of the bag.
Trim the excess yarn.
Option 1 — Make a Stuffed Handbag Keychain
For a decorative keychain like the pictured version, add a small amount of polyester stuffing.
Do not pack the bag firmly.
Use only enough stuffing to make the body look softly rounded.
Keep the stuffing below the top edge so fibers do not poke through the opening.
The original version uses only enough stuffing to shape the piece while still allowing the top to close easily.
Closing the Decorative Version
Flatten the top of the handbag so the front and back edges meet naturally.
Locate corresponding stitches near the center of the front and back.
The original construction uses matching points approximately three stitch positions in from each side to hold the opening together.
Thread a short strand of matching yarn onto the yarn needle.
Pass through the chosen front stitch.
Pass through the corresponding back stitch.
Pull the two sides together.
Tie securely.
Make a second knot.
Trim or weave in the ends.
Push the tied section toward the inside so the knot is hidden.
Do not sew the entire upper edge closed.
The two handles should remain clearly separated and visible.
Option 2 — Make a Functional Mini Pouch
If you want to place tiny objects inside the bag, do not add stuffing and do not tie the opening permanently closed.
Instead, sew a very small snap inside the opening.
Position one half of the snap on the inside front.
Position the matching half directly opposite it on the inside back.
Sew both pieces securely with matching thread or yarn.
The source specifically recommends adding a small snap or click-style closure when the miniature bag is intended to hold something rather than serve only as decoration.
Add the Flower Decoration
Position a small flower or button near one lower corner of the front of the bag.
For the strongest finish, sew the decoration securely through the crochet fabric.
Pass through the decoration and bag several times.
Tie the yarn on the inside.
Weave in the ends.
You can also leave the handbag undecorated.
Add the Keychain Hardware
Use a lobster clasp, swivel clasp, or split key ring.
Attach a short metal chain to the keychain clasp.
Open the final chain link with jewelry pliers if necessary.
Pass it securely through one of the reinforced crochet handles.
Close the link completely.
Make sure the metal connection passes through several strands of crochet rather than pulling against one tiny yarn strand.
Optional Beaded Name Charm
A short strand of alphabet beads can be attached beside the crochet handbag.
Use:
- small alphabet beads
- heart or decorative spacer beads
- strong jewelry cord or beading wire
Spell a short name or word.
Attach the beaded strand to the keychain hardware rather than directly to a delicate crochet stitch whenever possible.
This keeps the weight off the yarn.
Complete Round-by-Round Pattern
Round 1
8 sc in MR.
8 sts
Round 2
Inc around.
16 sts
Round 3
(1 sc, inc) × 8.
24 sts
Round 4
Sc around.
24 sts
Round 5
(2 sc, inc) × 8.
32 sts
Rounds 6–12
Sc around.
32 sts each round
Round 13 — Handles
5 sc, ch 12, skip 6, 10 sc, ch 12, skip 6, 5 sc.
Final Edge
Work sl st + ch 1 across the body sections.
Work 12 sc around each ch-12 handle loop.
Continue the decorative edge around the entire opening.
Fasten off.
If Your Bag Is Too Wide
The most likely cause is loose tension or yarn that is thicker than approximately 2 mm.
The intended construction reaches only:
32 stitches around
Do not remove stitches randomly from the pattern.
Instead, try:
- slightly thinner yarn
- a smaller hook
- firmer amigurumi tension
If Your Bag Is Too Tall
Check Rounds 6–12.
There should be exactly:
7 rounds of 32 sc
before you begin the handles.
Adding extra straight rounds will make the handbag noticeably taller and change its compact proportions.
If the Bottom Looks Pointed
Make sure the magic ring contains:
8 evenly spaced sc
and that Round 2 contains:
8 increases
The increases should be distributed evenly around the circle.
Do not pull the magic ring so hard that the center becomes distorted.
If the Sides Have Holes
Use firm, even amigurumi tension.
A 2.5 mm hook with approximately 2 mm cotton yarn should produce a dense fabric.
This is especially important if you plan to add stuffing.
The stuffing should not be visible through the stitches.
If the Handles Are Different Sizes
Both handles must be:
ch 12
Both must also span:
6 skipped stitches
When covering them on the final round, each handle receives:
12 sc
Keep the tension as similar as possible on both handles.
If the Handles Curl
A little curve is normal.
After covering each chain loop with 12 sc, use your fingers to straighten the handle gently.
Do not steam or aggressively block the tiny handbag.
The reinforced handles should retain a soft rounded arch.
Making the Orange Version
Use orange cotton yarn for the entire handbag.
Make all body rounds and handles in the same orange.
Finish with a small yellow flower or another warm-colored decoration.
Add gold-tone keychain hardware for a bright finished look.
Making the Pastel Yellow Version
Use pale yellow cotton yarn.
Work the same 32-stitch body and 12-chain handles.
A yellow or cream flower works well as the front decoration.
The stitch counts and construction do not change.
Making It Without a Flower
The handbag does not require a decoration.
For a cleaner minimalist version:
- leave the front plain
- use a contrasting keychain clasp
- add a small initial charm
- attach a short bead strand
The crochet handbag itself remains exactly the same.
Making Several Consistent Mini Bags
If you are making several as gifts or for a craft table, consistency matters more than crocheting quickly.
For every bag, keep:
2 mm yarn
2.5 mm hook
8-stitch magic ring
32-stitch finished body circumference
7 straight rounds after Round 5
12-chain handles
6 skipped stitches under each handle
Making every piece with the same numbers will keep the finished handbags close to the same size and shape.
Final Check
Before attaching your keychain hardware, make sure the miniature handbag has:
- 8 stitches in Round 1
- 16 stitches in Round 2
- 24 stitches in Round 3
- 24 stitches in Round 4
- 32 stitches in Round 5
- seven rounds of 32 stitches from Rounds 6–12
- two matching 12-chain handles
- 6 skipped stitches beneath each handle
- reinforced handles with 12 sc each
- securely woven yarn ends
- evenly shaped body
- securely attached decoration
- hidden stuffing if making the decorative version
- a snap instead of stuffing if making the functional pouch version
The result is a tiny structured crochet handbag that works beautifully as a keychain, backpack charm, small gift, or miniature decorative accessory.